Yada BT532767 User manual

User Manual
Important, retain for future reference:
Read carefully
BT532767
360 2KROADCAM
APP-Controlled with GPS

2
QUICK INSTALLATION GUIDE
1. Mount the Roadcam
Before you begin... Gather these items.
1 2 3 4
1
2
4

3
2. Connect to Power
3
3

4
PRODUCT SPECIFICATIONS
Lens:
360 degrees
Video Resolution: 2160 x 2160, 1632 x 1632
Circular Video: Seamless loop recording
Memory Card: MicroSD (maximum support 128GB)
Microphone: Supported
Built-in Audio: Supported
Operating Temperature: 14°F~140°F (-10°C~60°C)
Operating Voltage: Cigarette Charger - DC 12/24V / DC 5V (USB-C)
Battery: Built-in Super Capacitor
Please read all of the installation instructions carefully before installing
the product. Improper installation will void manufacturer’s warranty. The
installation instructions do not apply to all types of vehicles, and are
written as guidelines to assist in installing the system.
Consult an experienced technician if you are not comfortable installing
the product. You can also contact YADA at 1.866.294.9244 to speak
to one of our installation specialists if you have any specific questions
regarding the 360 2K Roadcam APP-Controlled with GPS.
BEFORE using the 360 2K Roadcam APP-Controlled with GPS,
please read the safety information provided in this user manual.
ALWAYS use the product as outlined in this user manual.
Please make sure to read and understand all local laws and regulations
regarding cameras and their use in a vehicle. Laws vary by state.
INTRODUCTION

5
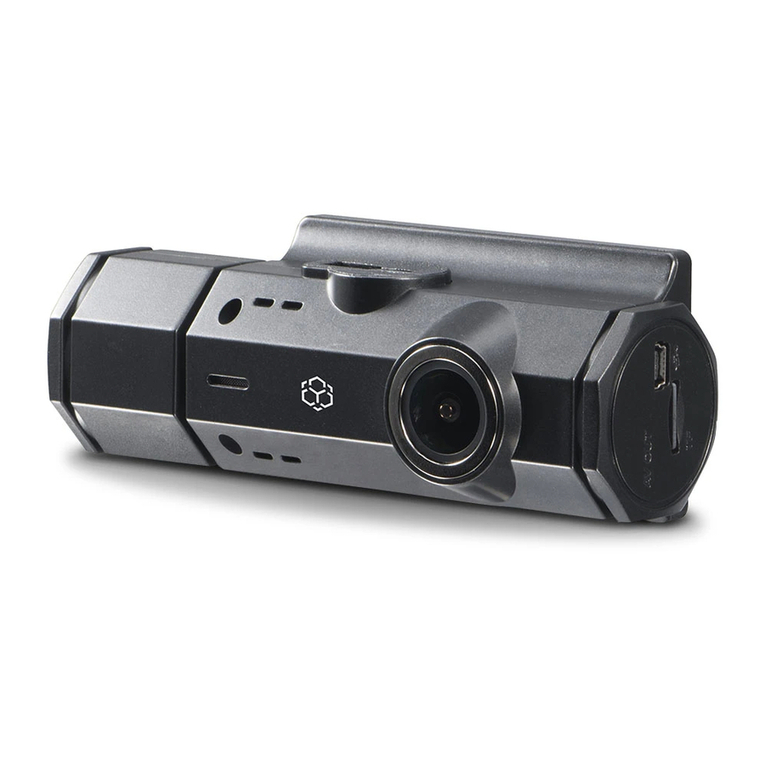
1. 1 x 360 2K Roadcam
2. 1 x Windshield Mount with 3M VHB™ Double-Sided Tape
3. 1 x 12V/24V Power Adapter
4. 1 x 16GB MicroSD Card
PACKAGE CONTENTS
21
3 4

6
PRODUCT OVERVIEW
1. MicroSD Card Slot
2. 3M VHB™ Windshield Mount
3. Camera Lens
4. USB-C Power Port
9
1
3
2
4
5
6
8
7
10
11
5. Speaker
6. Microphone
7. Record/Pause Button
8. Microphone On/Off Button
9. Lock Video Button
10. GPS Indicator Light
11. Recording Indicator Light

7
CAMERA DIMENSIONS
1.
2.
INSTALLATION
Insert the windshield
mount to the back of the
Roadcam.
Insert the MicroSD card.
9. Lock Video Button
10. GPS Indicator Light
11. Recording Indicator Light
4.4” / 112mm 1.25” / 32mm
1.96” /
50mm

8
4.
INSTALLATION
Plug the USB-C
power cable into the
DC input port.
Note: Power on and test camera before mounting.
Check the live screen on Yada Drive APP and determine the most suitable
mounting position. (See page 11 on setting up the APP.).
Warning: Do not install the product in a location where it can obstruct
driver’s field of vision.
5.
3. Peel off the 3M VHB™
adhesive tape backer from
the windshield mount.
Recommended mounting position

9
INSTALLATION
Press the adhesive windshield mount onto the
windshield to secure the Roadcam in place.
6.
Route and hide the power cable in the headliner and pillars in your vehicle.
Plug the cigarette charger cable into your vehicle’s 12/24V DC outlet, you
are all set!
CONFIGURATION & MENU SETTINGS
Initial Setup
Set the date & time before installing and using the Roadcam. This date &
time is the time stamp for all recorded media files.

10
DOWNLOADING THE APP
The 360 2K Roadcam auto sync
function enables you to control
and play back recorded media files
using your smartphone with the
YADA Drive APP. Scan the QR code
on the right or search "YADA Drive"
in the APP Store or Google Play.
Download and install the APP.
YADA Drive
Compatible with phones
with Android™ 5.0 or
higher.
Compatible with iPhone
4s and higher, iPad3,
iPad Mini, iPad Air and
higher, and iPod touch
5th Generation and
higher. Requires iOS 9.0
or higher.
• This is the default recording setting. The Roadcam will start recording
automatically once it is turned on.
• Stop loop video: press the button once to pause or resume recording.
• Press the button during recording to turn the microphone on or off.
• Lock video: press the button during recording to lock that recorded
file.
G-Sensor Setting: The Roadcam’s integrated G-Sensor will
automatically save and lock the recorded file if activated by an impact
event or accident. Select to turn the G-Sensor on or off. The default
setting is low.

11
4. The APP will search for Roadcam's
SSID
"YADA_DVR05_2K_XXXXXX "
and
connects to Roadcam automatically.
5. You should see the live view of
the Roadcam if the connection is
successful.
1. Turn on the power of the
Roadcam, it will enter WiFi
pairing mode automatically.
2. Launch the YADA Drive
APP and tap on the Dash
Cam category.
3. Select 360 2K Roadcam
from the list of Dash Cams.
Tap on Set Up Device.
Android device
Auto-sync the Roadcam
with your smart device
3
2
APP SETUP
4
5
YADA_DVR05_2K_XXXXXX
YADA_DVR05_2K

12
4. Tap Join on the main interface when it
prompts you to join the Roadcam’s SSID.
5. If there is any problem with auto pairing,
tap the icon and go to the WiFi settings
page. On the WiFi settings page choose
SSID “YADA_DVR05_2K_XXXXXX” and
enter the password. (The default password
is 12345678.)
6. Tap on the YADA Drive icon to
return to the APP.
7. You should see the live view of the
Roadcam.
NOTE: Tap on the icon for more
on-screen instructions.
4
7
APP SETUP
iOS device (Follow steps 1-3 from previous
page’s instructions) 6
5
5YADA_
DVR05_2K_XXXXXX
Yada Drive
YADA_DVR05_2K_XXXXXX

13
Select from 6 different viewing modes.
Display Mode
*Normal 180˚ 360˚ VR
*Rotate the Camera
Lens into front facing
when switching to
Normal 180˚ viewing
mode.
Normal 360˚
Fish Eye 2 in 1 4 in 1
Main Interface
Main Menu On-screen Instructions
WiFi Setting (iOS only) Microphone On / O
Display Mode
GPS Signal Record
Video Mode / Camera Mode
Home Screen Gallery

14
Tap the MOBILE tap to access the
downloaded files in your smartphone.
You can manage files even if your phone
is not auto sync with the Roadcam. Tap
the icon to share the selected file, or
tap the icon to delete the file.
MOBILE Tap GPS Information
You can tap to play the
footage or tap to show GPS
location while the footage is playing
back.
Tap the icon on the main interface
to enter the media gallery. Tap the SD
CARD tap to access the media files
stored in the MicroSD card. Scroll down
the list to select the file arranging from
newest to oldest.
Gallery
Tap the icon to download the
selected file into your smartphone, or tap
the icon to delete the file from the
MicroSD card.
SD CARD tap

15
GPS Signal Status 1 GPS Signal Status 2
This status indicates GPS receiver
is waiting for GPS signal when the
footage is recorded. GPS trip data will
resume once it picks up the signal. If
this status appeared repeatedly please
call our technical support to assist in
troubleshooting.
This status indicates map tracking is not
working. Mobile data must be turned on
for map tracking to process.

16
ADDITIONAL FEATURES
Automatic ON / OFF
When the Roadcam is connected to the vehicle’s power, it will power on
and start recording when the vehicle engine starts. When the engine is
off, the Roadcam will stop recording and turn off automatically.
Gravity Induction Recording Protection System
In a vehicle collision, the Roadcam will lock the video of the accident and
save it as a special image. At the same time, the icon of the lock will be
displayed in the middle of the display screen. The locked image will not
be overwritten by looped recordings.
Note: The G-Sensor supports sensitivity adjustment and it can be done
in the video and camera settings page according to actual needs.
Note: The Roadcam is designed to be powered on while the vehicle is
running. The built-in capacitor is only designed for storing documents
when the vehicle’s engine is off. The capacity of the built-in capacitor
is limited. Please connect the Roadcam to the vehicle’s on-board power
supply for daily use.

17
Help / FAQs
1) Problem: The Roadcam is unable to take pictures and record videos.
Solution: Check if the MicroSD card has enough space and lock it.
2) Problem: The Roadcam stopsautomatically when it is recording a
video.
Solution: Because HD video data takes a lot of space, please use a
high-speed MicroSD card compatible with SDHC, high-speed
MicroSD cards will have a U1 logo.
3) Problem: The image looks foggy.
Solution: Please check whether there is dirt or fingerprintson the lens.
Clean the lens using lens cleaner or lens wiper before using.
5) Problem: The image looks too dark.
Solution: If the Roadcam captures an image that is too dark, adjust the
exposure level to your desired brightness.

18
IMPORTANT SAFETY INSTRUCTIONS
1. SAVE THESE INSTRUCTIONS – This manual contains important
safety and operating instructions of the 12V/24V cigarette lighter
adapter for Model BT532767.
2. Before using the product, read all instructions and cautionary markings.
3. Do not expose cigarette lighter adapter to rain, moisture, or snow.
4. Use of an attachment not recommended or sold by the product
manufacturer may result in a risk of fire, electric shock, or injury to
persons.
5. To reduce risk of damage to cigarette lighter connector and cord,
pull by cigarette lighter connector rather than cord when disconnecting
cigarette lighter adapter.
6. Make sure cord is carefully secured so that it will not be stepped on,
tripped over, or otherwise subjected to damage or stress.
7. Do not operate cigarette lighter adapter with damaged cord or
cigarette lighter connector – replace it immediately.
8. Do not operate cigarette lighter adapter if it has received a sharp
blow, been dropped, or otherwise damaged in any way; take it to a
qualified serviceperson.
9. Do not disassemble cigarette lighter adapter; take it to a qualified
serviceperson when service or repair is required. Incorrect reassembly
may result in a risk of electric shock or fire.
10. To reduce risk of electric shock, unplug cigarette lighter adapter
before attempting any maintenance or cleaning. Turning off controls
will not reduce this risk.
SAFETY INFORMATION

19
WARNING: A failure to read and follow these warnings and instructions
may result in a serious accident, including damaged property or a serious
injury, including loss of life.
• Adhere to all applicable traffic laws and motor vehicle regulations
applicable to the device.
• Consult local laws and regulations for any restrictions on installation or use.
• Never allow children to play with the device. Small parts may be a
choking hazard.
• If the temperature changes rapidly, the system may not operate normally.
• When strong light directly enters a camera, objects may not be displayed
clearly.
• The colors of objects on the 360 2K Roadcam APP-Controlled with GPS
may differ from those of the actual object.
• Do not use alcohol or thinner to clean the camera. This will cause
discoloration. To clean the camera, wipe with a clean cloth dampened with
mild cleaner diluted with water and then wipe with a dry cloth.

20
MAINTENANCE & WARRANTY
Cleaning
• If dirt, rain water droplets, snow or mud adhere to the camera
lens, rinse with water and wipe with a dry cloth.
• Do not use alcohol or thinner to clean the camera. This will cause
discoloration. To clean the camera, wipe with a clean cloth dampened
with mild cleaner diluted with water and then wipe with a dry cloth.
Warranty
YADA LIMITED WARRANTY
YADA warrants, to the original purchaser, that its products are free from
defects in material and workmanship for 1 year from the date of original
purchase. Where permitted by law, YADA’s liability shall be limited to that set
forth in this limited express warranty. This limited express warranty shall be
the exclusive remedy of the purchaser and YADA makes no other warranty
of any kind aside from the limited express warranty stated above.
Note: Warranty only applies for North American customers of purchases
made in North America.
Table of contents
Other Yada Dashcam manuals