manuals.online logo
Brands
  1. Home
  2. •
  3. Brands
  4. •
  5. Yaesu
  6. •
  7. Transceiver
  8. •
  9. Yaesu FTM-3200DR Installation guide

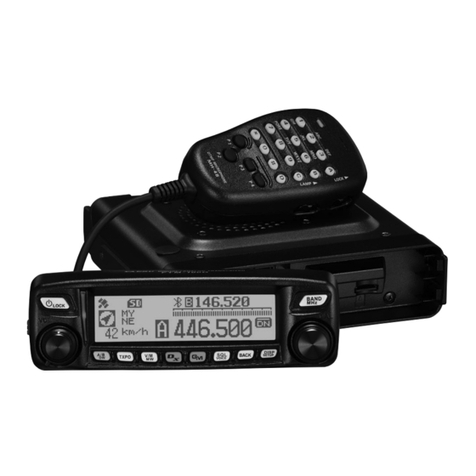
Yaesu FTM-3200DR Installation guide

Quick Manual
1 VOL knob
2 LCD display
3 DIAL knob
4 Power/LOCK key
5 V/M MW key ( )
6 MHz SETUP key ( )
7 D/A GM key ( )
8 REV DW key ( )
9 SQL TXPO key ( )
10 External MIC jack
Inputting/changing the call sign
Inputting the call sign
When turning the transceiver on for the first time after
purchase, or after resetting the transceiver, a screen
requesting input of your call sign appears.
Press , then rotate the DIAL to input the call sign.
You can move the cursor to the right by pressing .
Press for over one second to register the input call
sign.
Supplement By rotating the DIAL, you can switch the
characters in the following order:
“space”
à“ - ” à“ / ” à0 to 9 àA to Z
Note that “space”, “ - ”, and “ / ” are not
selectable for the first character.
Changing the call sign
The call sign can be changed from the Setup menu.
Press and hold for over one second, then rotate
the DIAL to select “MY CALL 53” and then press .
Rotate the DIAL to select the desired character. You
can move the cursor to the right by pressing . After
inputting the call sign, press and hold for over one
second.
Returning to the operating screen
Press and hold for over one second to return to the
operating screen from the Setup menu.
Supplements • Press to return to the previous
screen.
• Press and hold for over one sec-
ond to return to the operating screen.
Restoring defaults (All Reset)
All transceiver settings and memory content may be
restored to the default settings.
Turn the power OFF.
While pressing , , and , turn the power
ON.
When “ALL RESET PUSH V/M KEY” appears, release
the keys.
Press to reset.
Adjusting the volume
Rotate the volume clockwise/counterclockwise to adjust
the volume level.
Tuning in to the frequency
Press to switch to VFO mode, then rotate the DIAL.
Press to make the first three digits of the frequency
display blink, then rotate the DIAL to set the frequency
by one MHz increments.
Selecting communication mode
For normal use, operate the transceiver in AMS mode
(The “ ” icon blinks). The operating mode automati-
cally switches to match the received signal.
Press to manually change the communication
mode.
“ANALOG (No icon appears)” à“AMS (The “ ” icon
blinks)” à“DN (The “ ” icon lights)”
DN: Calls are less prone to interruptions due to
detection and correction of voice signals
during digital voice signal transmission.
ANALOG: Analog communication using FM mode. Ef-
fective when the signal is weak and audio is
susceptible to interruption in digital mode.
Changing the transmit power level
Press and hold for over one second, then rotate
DIAL to select the transmit power level.
“HIGH” à“LOW” à“MID”
Press to set the transmit power level.
FTM-3200DR
C4FM/FM
EH052N550
VOL
DIAL
SQL
TXPO DW MW
SETUP
REV D/A V/MMHz
10 9 8
3
5 47 6
2
1
Using the memory channels
Frequently used frequencies can be registered to the
memory channels. You can also assign a name to each
memory channel.
Registering frequencies
Switch to VFO mode, then rotate the DIAL to tune in
to the frequency you want to register to the memory
channel. Press and hold for over one second, then
rotate the DIAL to select the desired memory channel
and press .
Assigning a name to the memory channel
Press to switch to memory mode. Rotate the DIAL
to select the memory channel that is to be assigned a
name. Press and hold for over one second, then
rotate the DIAL to select “MEM NAME 25”.
Press , then rotate the DIAL to input the name.
You can move the cursor to the right by pressing .
Press and hold for over one second to save the
input name.
Scanning
The FTM-3200DR is equipped with a scanning function
to search for memory channels and frequencies with
active signals.
VFO scan
Press to switch to VFO mode.
Press and hold
[
UP
]
or
[
DWN
]
on the microphone for
over one second.
Pressing
[
UP
]
scans in the higher frequency direction.
Pressing
[
DWN
]
scans in the lower frequency direction.
Press
[
UP
]
,
[
DWN
]
or
[PTT]
on the microphone to cancel
scanning (this does not put the transceiver into transmit
mode).
Memory scan
Frequencies registered to the memory channels can be
scanned in the memory channel number order.
Press to switch to memory mode.
Press and hold
[
UP
]
or
[
DWN
]
on the microphone for
over one second.
Pressing
[
UP
]
scans the memory channels in an upward
direction.
Pressing
[
DWN
]
scans the memory channels in a down-
ward direction.
Press
[
UP
]
,
[
DWN
]
or
[
PTT
]
on the microphone to cancel
scanning (this does not put the transceiver into transmit
mode).
Using the GM function
While in GM mode, if the transceiver receives a signal
from a group member within communication range, the
call sign will appear on the LCD display and the “R” icon
will light up.
*During the GM operation, press and hold for over
one second to quit the GM operation and return to the
VFO or memory mode operation screen.
Activating GM mode
Tune in to the frequency, then in AMS mode (The “ ”
icon blinks) or digital mode (The “ ” icon lights), press
and hold for over one second. The transceiver will
be in GM mode and the “ ” icon will light up.
Locking the keys and DIAL
Press Power/LOCK to lock the keys and knobs.
Press Power/LOCK again to unlock.
Communicating
Using this transceiver permits digital communications
with Yaesu C4FM digital amateur transceivers and also
communication with FM analog transceivers.
When using AMS (The “ ” icon blinks), the operating
mode recognizes C4FM digital or analog FM signals, and
automatically switches to match the received signal.
When operating in digital modes, be especially aware
of the analog stations using the frequency, and do not
transmit when there is a risk of interference.
*Select the mode in accordance with circumstances.
Transmitting
While pressing [PTT]on the microphone, speak into the mi-
crophone keeping it approximately 5 cm from your mouth.
In analog mode, the upper and lower portions of the
indicator light are red. In digital audio mode, the upper
portion lights red and lower portion lights blue.
Receiving
Release
[PTT]
on the microphone to return to receive
mode. Upon receiving a C4FM digital signal, the station
name or call sign of the received station appears.
*You can change the time duration the received station
information is displayed. Press and hold for over
one second to display the Setup menu, then change the
setting from “DI POPUP 12”.

Other manuals for FTM-3200DR

5

Other Yaesu Transceiver manuals

Yaesu FT-912R User manual

Yaesu

Yaesu FT-912R User manual

Yaesu FT-690R User manual

Yaesu

Yaesu FT-690R User manual

Yaesu FT-991 User manual

Yaesu

Yaesu FT-991 User manual

Yaesu FTDX 9000 Series User manual

Yaesu

Yaesu FTDX 9000 Series User manual

Yaesu FT-7800R User manual

Yaesu

Yaesu FT-7800R User manual

Yaesu FT-710 User manual

Yaesu

Yaesu FT-710 User manual

Yaesu FT-891 User manual

Yaesu

Yaesu FT-891 User manual

Yaesu FT-902DM User manual

Yaesu

Yaesu FT-902DM User manual

Yaesu FT-1500M User manual

Yaesu

Yaesu FT-1500M User manual

Yaesu FTM-6000R User manual

Yaesu

Yaesu FTM-6000R User manual

Yaesu FT-891 Manual

Yaesu

Yaesu FT-891 Manual

Yaesu Mark-V FT-1000MP User manual

Yaesu

Yaesu Mark-V FT-1000MP User manual

Yaesu FR5DR User manual

Yaesu

Yaesu FR5DR User manual

Yaesu FT-840 User manual

Yaesu

Yaesu FT-840 User manual

Yaesu FT-23R MKII User manual

Yaesu

Yaesu FT-23R MKII User manual

Yaesu FT-707 User manual

Yaesu

Yaesu FT-707 User manual

Yaesu VX-60R User manual

Yaesu

Yaesu VX-60R User manual

Yaesu FT-65R Installation guide

Yaesu

Yaesu FT-65R Installation guide

Yaesu Mark-V FT-1000MP Installation guide

Yaesu

Yaesu Mark-V FT-1000MP Installation guide

Yaesu FT-101 User manual

Yaesu

Yaesu FT-101 User manual

Yaesu FT-991A User manual

Yaesu

Yaesu FT-991A User manual

Yaesu FTM-3200DR User manual

Yaesu

Yaesu FTM-3200DR User manual

Yaesu FT-7B User manual

Yaesu

Yaesu FT-7B User manual

Yaesu FT-900 User manual

Yaesu

Yaesu FT-900 User manual

Popular Transceiver manuals by other brands

Schweitzer Engineering Laboratories SEL-3031 instruction manual

Schweitzer Engineering Laboratories

Schweitzer Engineering Laboratories SEL-3031 instruction manual

Infinova N3574XA-1-M/R user manual

Infinova

Infinova N3574XA-1-M/R user manual

ADI AR-147 user manual

ADI

ADI AR-147 user manual

Dynascan V-600 instruction manual

Dynascan

Dynascan V-600 instruction manual

Codan 8525B Series Technical & service manual

Codan

Codan 8525B Series Technical & service manual

Badger Meter Impeller ModHopper R9120-5 user manual

Badger Meter

Badger Meter Impeller ModHopper R9120-5 user manual

City Theatrical The SHoW DMX 5691 user manual

City Theatrical

City Theatrical The SHoW DMX 5691 user manual

Ritron SPX-200 owner's manual

Ritron

Ritron SPX-200 owner's manual

Vertex Standard VX-160U Service manual

Vertex Standard

Vertex Standard VX-160U Service manual

Alinco DJ-SR1 manual

Alinco

Alinco DJ-SR1 manual

uAvionix Ping1090i quick start guide

uAvionix

uAvionix Ping1090i quick start guide

THine THCS252 instruction manual

THine

THine THCS252 instruction manual

Keysight Technologies S9101A Startup guide

Keysight Technologies

Keysight Technologies S9101A Startup guide

FlexRadio Systems FLEX-6000 Signature Series user guide

FlexRadio Systems

FlexRadio Systems FLEX-6000 Signature Series user guide

alphatronics AlphaCom XL Service manual

alphatronics

alphatronics AlphaCom XL Service manual

Team TS-TwoWay Series Operating	 instruction

Team

Team TS-TwoWay Series Operating instruction

XIEGU X108 user manual

XIEGU

XIEGU X108 user manual

Ten-Tec ARGONAUT VI 539 quick start guide

Ten-Tec

Ten-Tec ARGONAUT VI 539 quick start guide

manuals.online logo
manuals.online logoBrands
  • About & Mission
  • Contact us
  • Privacy Policy
  • Terms and Conditions

Copyright 2025 Manuals.Online. All Rights Reserved.