manuals.online logo
Brands
  1. Home
  2. •
  3. Brands
  4. •
  5. Yaesu
  6. •
  7. Transceiver
  8. •
  9. Yaesu FTM-400XDE Reference guide

Yaesu FTM-400XDE Reference guide

This manual suits for next models

1

Other Yaesu Transceiver manuals

Yaesu FT-80C - SERVICE User manual

Yaesu

Yaesu FT-80C - SERVICE User manual

Yaesu FT-480R User manual

Yaesu

Yaesu FT-480R User manual

Yaesu FT-980 Manual

Yaesu

Yaesu FT-980 Manual

Yaesu FT-817 - User manual

Yaesu

Yaesu FT-817 - User manual

Yaesu FTM-400XDR User manual

Yaesu

Yaesu FTM-400XDR User manual

Yaesu FT-730R User manual

Yaesu

Yaesu FT-730R User manual

Yaesu FT-767GX User manual

Yaesu

Yaesu FT-767GX User manual

Yaesu FT-7800R Manual

Yaesu

Yaesu FT-7800R Manual

Yaesu FT-60R User manual

Yaesu

Yaesu FT-60R User manual

Yaesu FT-60 HT User manual

Yaesu

Yaesu FT-60 HT User manual

Yaesu FT-990 User manual

Yaesu

Yaesu FT-990 User manual

Yaesu FT-912R User manual

Yaesu

Yaesu FT-912R User manual

Yaesu VX-150 User manual

Yaesu

Yaesu VX-150 User manual

Yaesu FT-817ND User manual

Yaesu

Yaesu FT-817ND User manual

Yaesu FTM-100DR User manual

Yaesu

Yaesu FTM-100DR User manual

Yaesu Mark-V FT-1000MP Manual

Yaesu

Yaesu Mark-V FT-1000MP Manual

Yaesu FT-818ND User manual

Yaesu

Yaesu FT-818ND User manual

Yaesu FT-817ND User manual

Yaesu

Yaesu FT-817ND User manual

Yaesu VX-1000 Series User manual

Yaesu

Yaesu VX-1000 Series User manual

Yaesu FT-23R MKII Manual

Yaesu

Yaesu FT-23R MKII Manual

Yaesu FT-710 User manual

Yaesu

Yaesu FT-710 User manual

Yaesu FT-8100R User manual

Yaesu

Yaesu FT-8100R User manual

Yaesu FT-212RH User manual

Yaesu

Yaesu FT-212RH User manual

Yaesu FT-747GX User manual

Yaesu

Yaesu FT-747GX User manual

Popular Transceiver manuals by other brands

Kenwood ProTalk TK-3201 instruction manual

Kenwood

Kenwood ProTalk TK-3201 instruction manual

City Theatrical SHoW DMX SHoW Baby user manual

City Theatrical

City Theatrical SHoW DMX SHoW Baby user manual

Standart Horizont HX407 owner's manual

Standart Horizont

Standart Horizont HX407 owner's manual

B&G V90S quick start guide

B&G

B&G V90S quick start guide

VictelGlobal ALK300 series Operation manual

VictelGlobal

VictelGlobal ALK300 series Operation manual

Cactus Wireless Flash Transceiver V6 user manual

Cactus

Cactus Wireless Flash Transceiver V6 user manual

Skanti TRP 5000 instruction manual

Skanti

Skanti TRP 5000 instruction manual

ELECRAFT KX3 Installation and operation guide

ELECRAFT

ELECRAFT KX3 Installation and operation guide

American Lighting DMX512 quick start guide

American Lighting

American Lighting DMX512 quick start guide

Furuno FM-77 Operator's handbook

Furuno

Furuno FM-77 Operator's handbook

Mizuho MX-2 Operating & assembly instruction

Mizuho

Mizuho MX-2 Operating & assembly instruction

Kenwood TK-3180 Manuale di istruzioni

Kenwood

Kenwood TK-3180 Manuale di istruzioni

Blitz MJ-398U instruction manual

Blitz

Blitz MJ-398U instruction manual

Utilicom LongRanger 2050 Operator's manual

Utilicom

Utilicom LongRanger 2050 Operator's manual

Standart HX290UKA Service manual

Standart

Standart HX290UKA Service manual

Altronix Pace1PTM installation guide

Altronix

Altronix Pace1PTM installation guide

Kirisun PT2208 instruction manual

Kirisun

Kirisun PT2208 instruction manual

ELECRAFT KX2 manual

ELECRAFT

ELECRAFT KX2 manual

manuals.online logo
manuals.online logoBrands
  • About & Mission
  • Contact us
  • Privacy Policy
  • Terms and Conditions

Copyright 2025 Manuals.Online. All Rights Reserved.

Information for Customers Operating VHF/UHF Transceivers in the UK
Thank you very much for purchasing the YAESU transceiver.
The transceivers listed in this notice are congured at the factory with the ARS (Automatic Repeater Shift) Frequency
Range, and the Repeater shifts, as shown in the below chart “ARS Conguration B2”.
When any of the listed transceivers is operated in a location where the frequency range and repeater shifts in use are
as shown in the chart “ARS Conguration C2”; follow the respective procedure to change the Automatic Repeater
Shift conguration, before using the transceiver for the rst time.
ARS Conguration “B2”
Factory Default Setting
ARS Conguration “C2”
Selectable Setting
ARS Frequency Range: 438.20 MHz - less than 439.45 MHz (- shift)
Repeater Shifts: 7.6 MHz
ARS Frequency Range: 433.00 MHz - less than 433.40 MHz (+ shift)
434.60 MHz - less than 435.00 MHz (- shift)
Repeater Shifts: 1.6 MHz
FTM-400XDE
1. Turn the transceiver OFF.
2. Connect the supplied microphone MH-48A6JA to the
transceiver.
3. Press and hold the [F(MW)] and [GM] keys while turn-
ing the transceiver ON.
4. Press the [Power] key briey, then “LOCK” will appear
on the display for one sec.
5. Press
[8]à[3]à[7]à[8]à[3]à[7]keys on the
MH-48A6JA microphone.
6. Press the [Power] key briey, then “UNLOCK” will ap-
pear on the display for one sec.
7. Press and hold the [DISP(SETUP)] key.
8. Touch the [RESET/CLONE]on the display.
BACK
BACK
TX/RX
SETUP MENU
RESET/
CLONE
CONFIGW  RES
SCAN
DISPLAY
SIGNALING
APRS OPTION
SD CARD
MEMORY
DATA
CALLSIGN
9. The ARS Configuration name “B2” will appear in the
top right of the display.
BACK
BACK
RESET/CLONE




FACTORY RESET
PRESET
RECALL PRESET
MEM CH RESET
〉
〉
〉
〉
VERSION
MAIN :x.xxx 0EXP B2
PANEL:x.xx
10.Press [F(MW)] key, then the message <Confirming
FROM “B2” TO “C2”> will appear on the display.
11.Touch [OK?]. The radio will re-start automatically.
Setting of the ARS feature to “Configuration C2” is
successfully completed.
BACK
BACK
RESET/CLONE




FACTORY RESET
PRESET
RECALL PRESET
MEM CH RESET
〉
〉
〉
〉
VERSION
MAIN :x.xxx 0EXP B2
PANEL:x.xx
OK?
FROM “B2” TO “C2”
Confirming
Cance
To restore the ARS feature setting to the factory default
(B2), perform the same procedures above.
FTM-100DE
1. Turn the transceiver OFF.
2. Connect the supplied microphone MH-48A6JA to the
transceiver.
3. Press and hold the [A/B(DW)] and [GM] keys while
turning the transceiver ON.
4. Press the [Power] key briey, then “LOCK” will appear
on the display for one sec.
5. Press
[8]à[3]à[7]à[8]à[3]à[7]keys on the
MH-48A6JA microphone.
6. Press the [Power] key briey, then “UNLOCK” will ap-
pear on the display for one sec.
7. Press and hold the [DISP(SETUP)] key.
8. Rotate the DIAL to select [13 RST/CLONE], then
press the [DISP(SETUP)] key.
9. Rotate the DIAL to select [8 SOFTWARE VERSION],
then press the [DISP(SETUP)] key.
10. The ARS Conguration name “Region “EXP” Type “B2”
will appear in the bottom on the display.
11.Press [BAND(MHz)] key, then the message <FROM
“B2” TO “C2”> appears on the display.
12. Rotate the DIAL to select [OK?], and then press the
[DISP(SETUP)] key. The radio will re-start automati-
cally. Setting of the ARS feature to “Conguration C2”
is successfully completed.
To restore the ARS feature setting to the factory default
(B2), perform the same procedures above.
FT2DE
1. Turn the transceiver ON.
2. Press and hold in the [DISP] key, then touch the [DIS-
PLAY].
3. Rotate the DIAL knob to select “8OPENING MES-
SAGE” and then press the [DISP]key.
4. Rotate the DIAL knob to select “MESSAGE” and then
press the [DISP]key.
5. Enter “AH060M”.
1) Touch the [abc] four times to select “A”, then touch
the [Æ].
2) Touch the [ghi] ve times to select “H”, then touch
the [Æ].
3) Touch the [123]key to display the numeric keypad
input screen.
4) Touch the [0]à[6]à[0]à[Æ].
5) Touch the [ABC] to display the alphabet input
screen.
6) Touch the [mno] four times to select “M”.
6. Press the [PTT] switch, the screen that was shown
when the transceiver was turned ON will reappear on
the display.
7. Turn the transceiver OFF.
8. Press and hold the [X]and [GM] keys while turning the
transceiver ON.
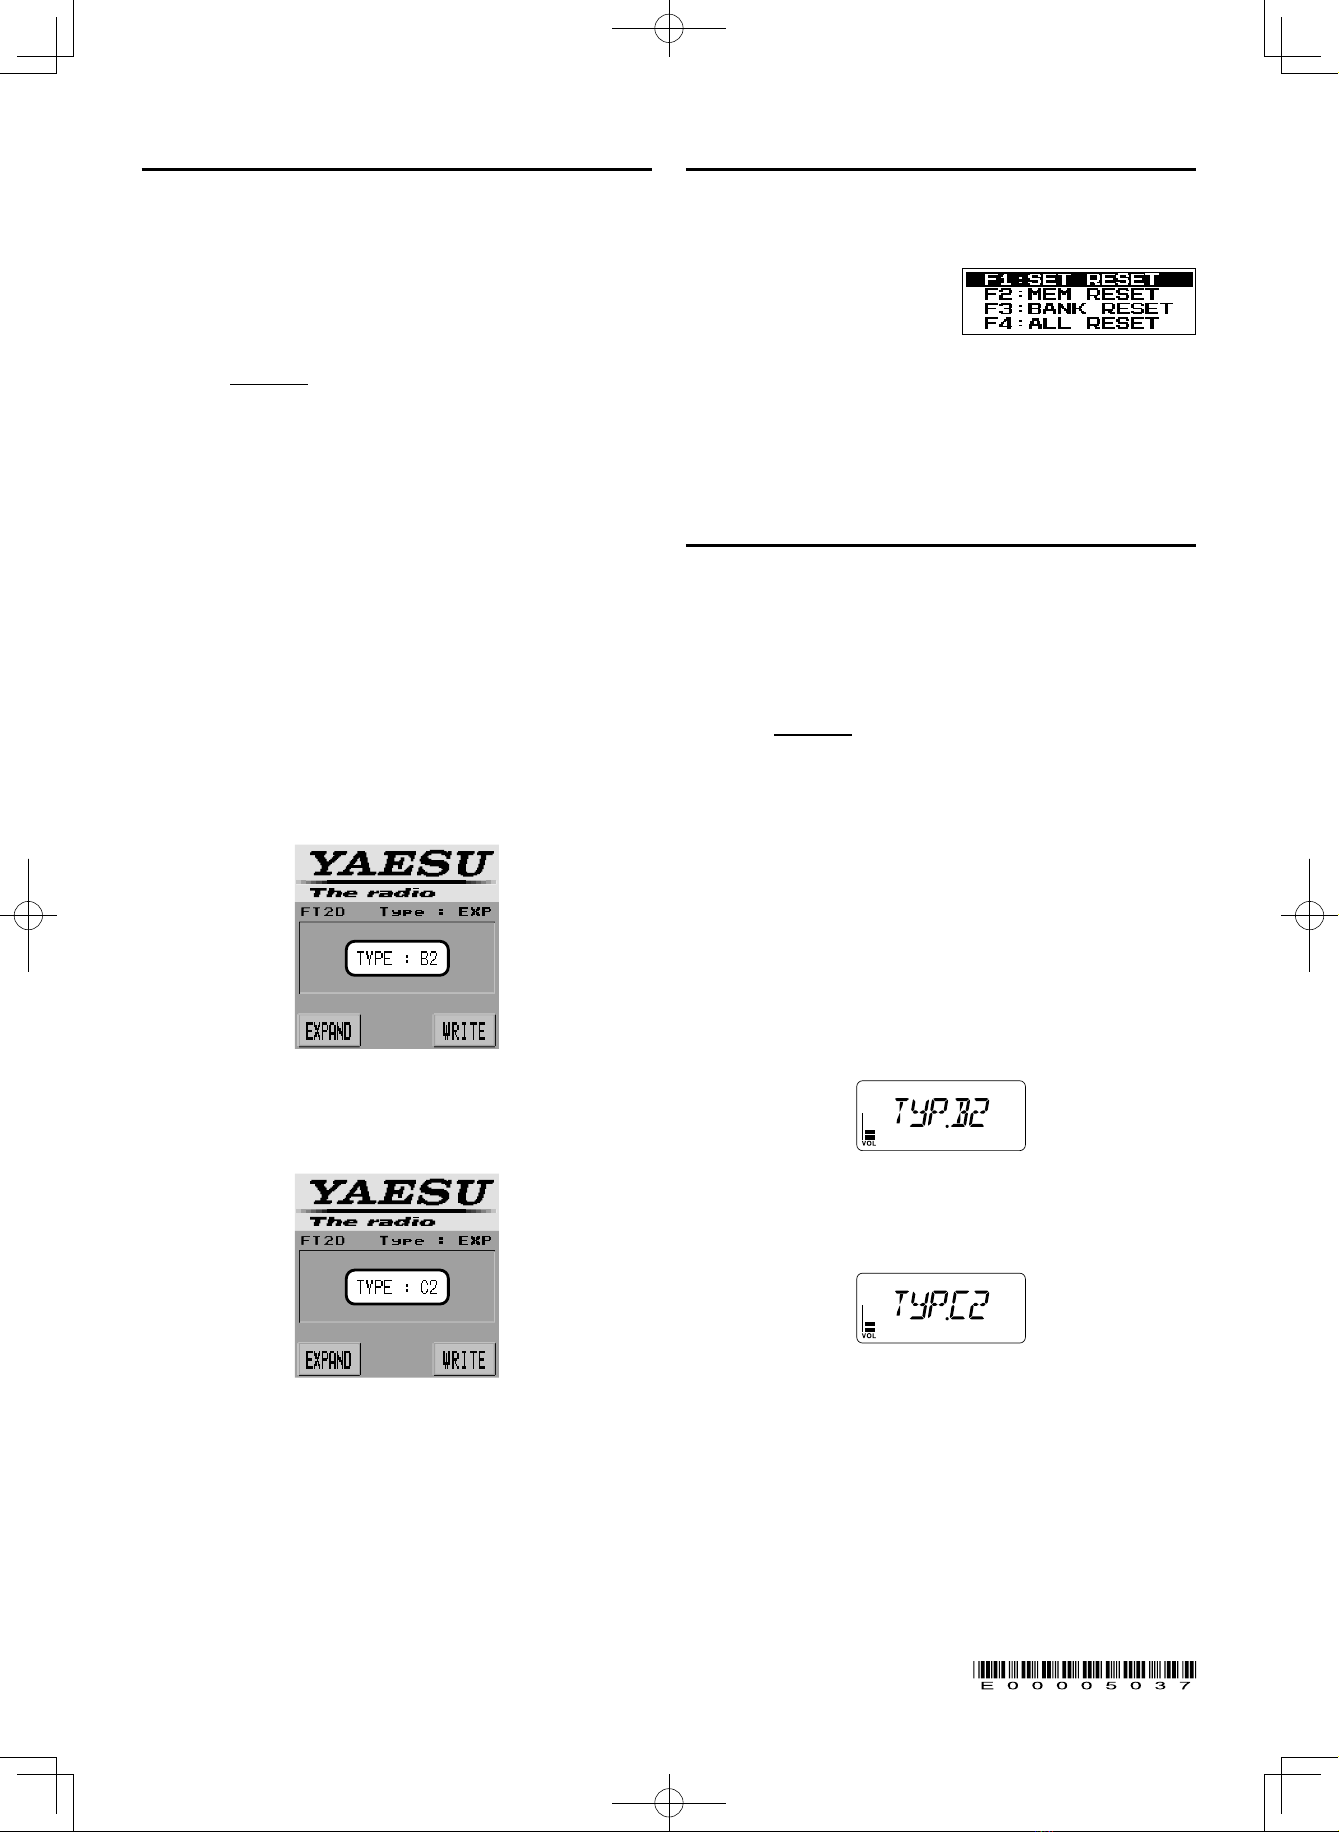
9. <TYPE : B2> appears in the display.
10. Rotate the DIAL knob to select <C2> and touch the
[WRITE] key. The radio will re-start automatically.
Setting of the ARS feature to “Configuration C2” is
successfully completed.
To restore the ARS feature setting to the factory default
(B2), perform the same procedures above.
FT-65E
1. Turn the transceiver OFF.
2.
Press and hold the MONI/T.CALL key and the PTT
switch simultaneously, while turning the transceiver ON.
3. When the LCD backlight
comes on, release the
MONI/T.CALL key and
PTT switch.
4. Press the [0]à[2]à[2]keys.
The radio will re-start automatically. Setting of the ARS
feature to “Conguration C2” is successfully completed.
To restore the ARS feature setting to the factory default
(B2), perform the same procedures above.
FT-70DE
1. Turn the transceiver ON.
2. Press and hold in the [F]key.
3. Rotate the DIAL knob to select “36 OPN.MSG” and
then press the [F]key.
4. Rotate the DIAL knob to select “MSG” and then press
the [V/M]key.
5. Enter “AH051M”.
1) Press the [2] to select “A”.
2) Press the [4] two times to select “H”.
3) Press the [0] to select “0”.
4) Press the [5] four times to select “5”.
5) Press the [1] to select “1”.
6) Press the [6] to select “M”.
6. Press the [PTT] switch, the screen that was shown
when the transceiver was turned ON will reappear on
the display.
7. Turn the transceiver OFF.
8. Press and hold the [HM/RV]and [GM] keys while turn-
ing the transceiver ON.
9. <TYP.B2> appears in the display.
10. Rotate the DIAL knob to select <TYP.C2> and touch
the [F] key. The radio will re-start automatically. Setting
of the ARS feature to “Conguration C2” is successful-
ly completed.
To restore the ARS feature setting to the factory default
(B2), perform the same procedures above.
Caution:
NOTE: By changing the ARS designated bands and repeater shifts according to the procedures above, all saved data,
such as Menu and Memory settings, will be deleted. If you need to change the ARS feature setting after using
the radio, make sure to back up your registered data or make a written note, before applying the setting change.
NOTE: The ARS feature setting is NOT changed, even when executing the “Factory Reset” to restore the transceiver
to the factory defaults, as described in the Operating Manuals (FTM-400XDE: Page 61) (FTM-100DE: Page 49)
(FT2DE: Page 51) (FT-65E: Page 24) (FT-70DE: Page 34).