Yedoo OOPS YOOTOO User manual

OOPS
YOOTOO
TOOTOO
onetoo
onetoo without
brake
tootoo emoji
FIRERESCUE
AMBULANCE
POLICE
User manual

EN 7
CZ 13
DE 19
RU 25
SK 31
FR 37
ES 43
IT 49
HU 55
SV 61
ET 67
PL 73
SL 79
HR 85
Contents
Visit our website www.yedoo.eu
for more language versions. 2
Yedoo
YooToo
Product Number: 13108
TooToo
Product Number: 13109
OneToo
Product Number: 13204
OneToo without brake
Product Number: 13203
TooToo Emoji
Product Number: 13306
Ambulance
(Special edition 112)
Product Number: 13305
Fire Rescue
(Special edition 112)
Product Number: 13304
Police (Special edition 112)
Product Number: 13303
Wheels: 12“/12“
Age: 1,5+
Maximum load: 50 kg/110 lb
i

3
Yedoo YooToo
5 mm 6 mm
14 mm
+

Yedoo TooToo / 112 / Emoji
5 mm 6 mm
14 mm
+
4

5
Yedoo OneToo
5 mm
14 mm
+

Yedoo OneToo (without brake)
666
5 mm
14 mm
+

EN
7
Introduction
We recommend that you entrust the installation, adjustment
and regular maintenance to a specialist bicycle shop. Improper
intervention can lead to damage of the balance bike or to an
accident with serious health consequences.
If you are technically capable, do not worry; this manual
contains all the information you need to help you assemble your
new balance bike.
Send your questions, comments and suggestions for
improvement of our products by e-mail to: info@yedoo.eu.
Yedoo frames are protected by
a Registered Community Design
(RCD), the commercial names
are protected by registered
trade marks.
More information from the
world of scooters and the list
of distributors can be found at
www.yedoo.eu.

8
EN
1.
YooToo, TooToo, 112
Before assembly, remove the plastic
covers from the front and rear wheel
axis.
Handlebar installation
Place the handlebar into the main frame
tube (
1
) of the balance bike, adjust the
desired height and tighten the screw on
the stem (
2
).
1
2
10 Nm
Assembly Instructions
1.b
1.e
1.c
1.a
1.d
OneToo
Before assembly, remove the plastic
covers from both front and rear wheel
axis.
Handlebar and front fork installation
Remove the sleeve cover, the sleeve
itself and upper the headset ring
from the front fork. At installation,
theheadset composition must be
as on the picture.
Put the sleeve cover (
1
) on the handlebar
tube and place it into the fork tube (
2
).
Adjust the heigh as desired (donot
exceed the maximum mark) and tighten
the screw on the sleeve (
3
).
In the end, place the protective cover
over the sleeve.
Insert the front fork into the main frame
tube (
1
) so that the bending of the fork
faces forward. Place the upper headset
ring (
2
) and the sleeve (
3
) back on the
front fork.
Place the sleeve screw exactly
onthecut-out of the fork tube
as onthepicture.
1
1
2
2
3 10 Nm
3

9
EN
2.
4. 5.a
3.a 3.b
Place the wheel into the front fork so
that is well-centered and tighten the
nuts (
1, 2
). (For easier installation you
can turn the balance bike upside down).
If the tire has anarrow-shaped tread
pattern, the arrows should be pointing
to the front.
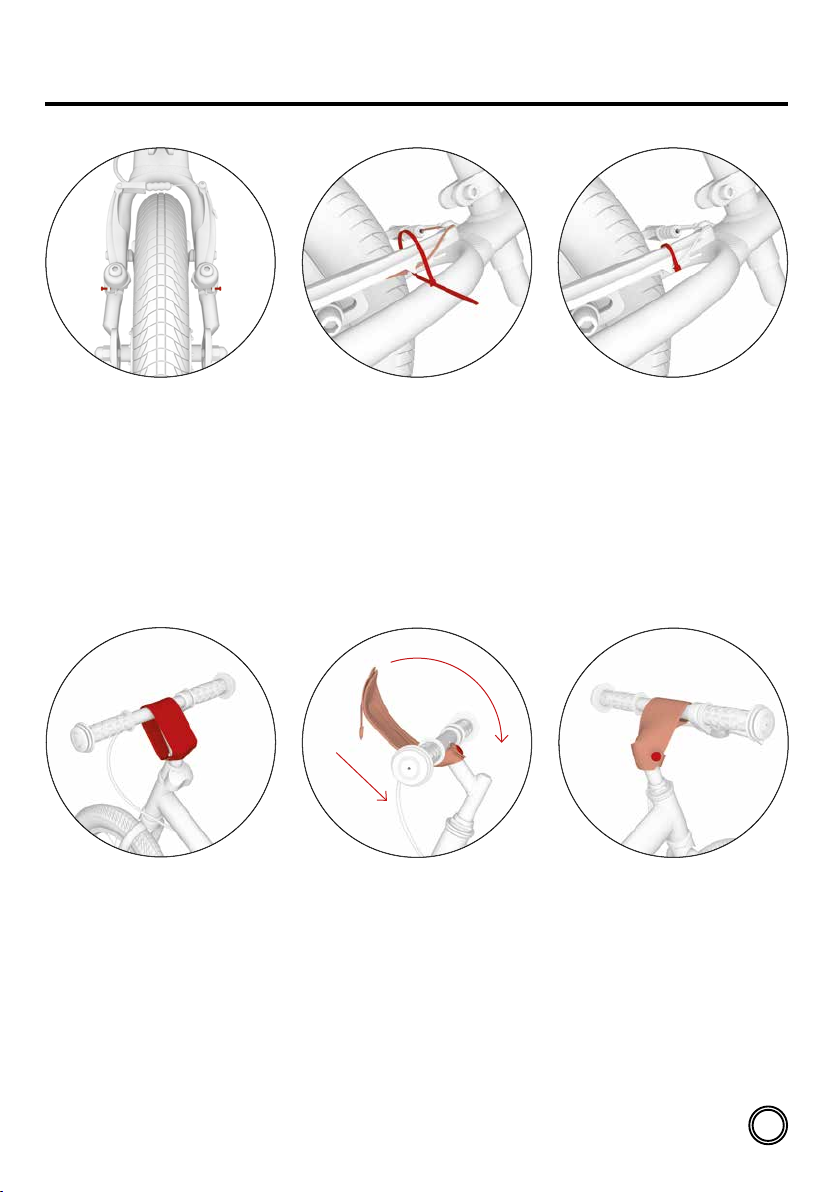
Adjustment of brake levers
(does not apply for OneToo without
brake)
Incline the brake levers correctly by
loosening the screw on the sleeve (
1
).
The right inclination:
Let the child sit on the balance bike, hold
the handles and stretch out your fingers
in away that his/her arm and the fingers
form asingle straight line. This should
be the position of the brake lever.
Adjustment of brake
(does not apply for OneToo without
brake)
Before adjusting the brakes, inflate the
tires according to the values on their side
(ideally between 1,3 and 1,8 bars). Check
that the brake pads fit tightly on the rim
sides. Their position can be adjusted via
the screws (
1
). The pads shall not touch
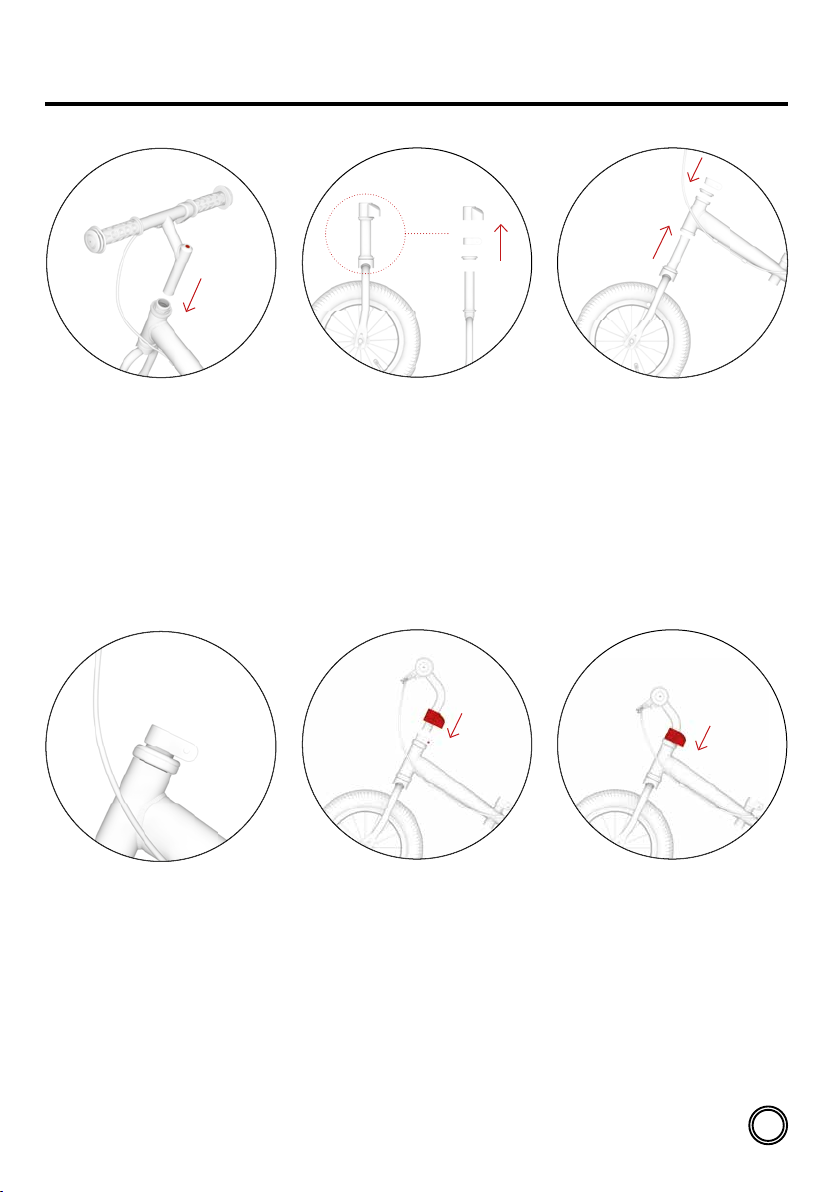
the tires.
Seat installation
Put the seat tube into the frame (
1
) of
the balance bike, adjust the desired
height (donot exceed the maximum
mark) and tighten the sleeve screw (
2
).
YooToo, TooToo, 112
Front wheel installation
Make sure the front fork of the balance
bike is well positioned (the bending of
the fork faces forward).
5.b
Check that the pads make enough
space (1–2 mm) after releasing the brake
levers. The distance can be adjusted by
tightening or loosening the brake cable
at the anchor screw (
2
).
1
10 Nm
1 1
1
1
5 Nm
2
10 Nm
2
1
2
6 Nm
2
Max

10
6.
Protective pad installation
(One Too)
Place the soft protective pad from
washable nylon over the handlebar
stem.
5.c
6.a
5.d
6.b
In case the brake pad is touching
the wheel when turning, symmetrically
adjust the distance of brake arms by
the tightening screws (
3
).
Protective pad installation
(YooToo, TooToo, 112)
Turn the neoprene cover bottom side
up, slip it below the handlebar (
1
) and
fasten the press stud around the neck
of the stem (
2
).
Turn the cover over the handlebar (
3
).
Turn the side slip around the column
of the stem and fasten the press stud.
Fasten the end of the brake cable in
the lock and secure with the cable tie,
then trim the tie.
3 3
1
2
3
EN
Assembly Instructions

11
7.a 7.b
YooToo
Yedoo YooToo is equipped with double
dropout at the rear fork, which enables
abigger range of seat height. The upper
dropout is meant for lower seat position.
The lower dropout, on the contrary,
enables the seat to be positioned higher
than usual.
Warning:
after each position
change, readjust the brakes.
YooToo
YooToo
EN

Safety measures
The balance bike in its basic equipment is designed for riding
during daylight in areas meant for sport and recreation. For
roads with car traic or for riding in the dark, you need to
provide your balance bike with safety features (lights, reflectors,
etc.) in accordance with the regulations valid in your country.
Make sure the children obey general safety regulations or
traic rules and that they use use protective accessories
(helmets, knee and elbow pads, good shoes, etc.)
Before each ride, always check good function of the brakes
and the overall technical condition of the balance bike. Donot
exceed the maximum loading capacity of the balance bike
(as specified on the front side). The balance bike is designed
for one rider only! Donot overload the balance bike, it is not
intended for jumping or acrobatic riding.
Balance bikes (YooToo, TooToo) have headsets with integrated
backstops, which prevent the handlebars from turning around.
Therefore, donot turn the handlebars by force to avoid damage
to the backstops. Always have the backstops repaired in
aspecialized cycle repair centre.
All the speed-limiting mechanisms (brake pads or discs, rims,
and tires etc.) can become warm when used. For this reason,
itis not recommendable to touch them before cooling o!
Riding instructions
Children can use the balance bike only under the supervision
of an adult. It is important that the child always grips the
handles with both hands at when riding. While seated and
balancing, the child pushes o alternating the feet as when
running or walking fast.
Warning:
Children can develop
aconsiderable speed, so they should be properly instructed
about the possible dangers and braking methods by the parent
or the responsible adult. For braking, the child should squeeze
the brake lever on the handlebar or should use soles of his/her
shoes to slow down by puting them to the ground.
Warning:
sudden violent braking may cause injury.
Maintenance
Correct and regular maintenance increases safety and
lengthens the life span of the balance bike. Regularly inspect
screw connections, quick releases, pressure in tires and
lubricate the moveable parts (wheels, bearings, handlebars
bearings, cables, brake parts etc.).
Make sure that no lubricant gets on the rims or brake pads.
Grease reduces their eect! If this situation occurs, it is
necessary to remove the grease from all the parts, using
asolvent and/or degreaser. Inspect the tires for cuts, nicks
and deformities. Replace tires that show excessive wear and
damage with an equivalent tire.
Inspect the self-locking nuts. If they get loose freely, exchange
them with new ones.
Check the spokes for defects. Irregular strain or looseness
in spokes can cause their cracking or can make the wheel
wobble.
Keep the balance bike clean, use soft cloth moistened with
water. It should be stored inside, on adry and shaded place.
Donot expose the balance bike to high humidity or extreme
temperatures over along period of time. Before the winter,
prepare it against corrosion. The producer does not cover
damage caused solely by neglected maintenance, non-
adequate adaptation, or inappropriate treatment and storage.
The product complies with the corresponding EU standards
(ČSN EN 71-1, ČSN EN 71-3) and received quality and safely
certifications from aleading Czech testing lab – Engineering
Test Institute (Strojírenský zkušební ústav, s.p.).
Producer: INTREA – PIKO, s. r. o., Sasanková 2657/2, 10600
Prague 10, Czech Republic, www.yedoo.eu.
Warranty list
General regulations
The content, extend and duration of the warranty conforms to
the valid legal code in the respective country of the purchase
of the balance bike.
Warranty period
The buyer of the new Yedoo balance bike (product) can
apply the warranty during the period of 36 months from the
purchase. The warranty commences on the day of the sale to
the end user and is automatically extended when the product
is taken into repair during warranty period.
Warranty application
The warranty must be filled out with the retailer, where
theproduct was purchased (see bellow). When applying
the warranty, we recommend presenting the filled out sheet
bellow, the receipt and acomplete and cleaned product. The
seller will give awritten confirmation to the buyer regarding
the acceptance of the product into the warranty process.
Warranty conditions
The product must be assembled following the instructions of
the manual. The products shall only be used for the purposes,
which it was designed for. The product must be stored and
maintained in the ways in accordance with the Instruction
manual. The warranty does not cover damage caused by
common wear and tear is not covered by this warranty.
The producer does not cover damage caused by incorrect
assembly or by use in contradiction with the Instruction
manual.
Product model:
Serial number of the frame:
Date of purchase:
Retailer:
Signature and stamp:
EN
12

13
Úvod
Montáž, seřízení a pravidelnou údržbu doporučujeme svěřit
odbornému cykloservisu. Neodborné zásahy mohou vést
k poškození odrážedla či nehodě s vážnými zdravotními následky.
Pokud jste ale technicky zdatní, ničeho se nebojte a s chutí
sedomontáže pusťte s námi.
Dotazy, připomínky a náměty na zlepšení našich výrobků
námprosím posílejte na e-mail: info@yedoo.eu.
CZ
13
Rámy koloběžek Yedoo
jsou chráněny zapsanými
průmyslovými vzory
Společenství, obchodní názvy
jsou chráněny zapsanými
ochrannými známkami.
Více informací ze světa
koloběžek a seznam distributorů
najdete na www.yedoo.eu

14
1.
1
2
10 Nm
1.b
1.e
1.c
1.a
1.d
1
1
2
2
3 10 Nm
3
Montážní návod
CZ
OneToo
Před montáží odstraňte plastové kryty
zosy předního azadního kola.
Instalace řídítek a přední vidlice
Zvidlice předního kola sundejte kryt
objímky, objímku samotnou ahorní
kroužek hlavového složení. Při instalaci
musí být dodržena skladba hlavového
složení viz obrázek.
Nařídítkovou tyč navlečte kryt objímky
(
1
) azasuňte ji dovidlicové trubky (
2
).
Nastavte požadovanou výšku řídítek
(max. povyznačenou rysku) adotáhněte
šroub naobjímce (
3
).
Nakonec naobjímku nasaďte
ochranný kryt.
Zasuňte přední vidlici dohlavové trubky
rámu (
1
) tak, aby mírné prohnutí vidlice
směřovalo dopředu. Navidlici navlečte
zpátky horní kroužek hlavového složení
(
2
) aobjímku (
3
).
Šroub objímky umístěte navýřez
vidlicové trubky přesně podle obrázku.
YooToo, TooToo, 112
Před montáží odstraňte ochranné
plastové kryty zosy kol apřední
vidlice.
Instalace řídítek
Zasuňte řídítkovou tyč dohlavové
trubky rámu odrážedla (
1
), nastavte
požadovanou výšku adotáhněte šroub
nařídítkové tyči (
2
).

15
2.
4. 5.a
3.a 3.b
5.b
1
10 Nm
1 1
1
1
5 Nm
2
10 Nm
2
1
2
6 Nm
2
Max
CZ
Poté dovidlice vsaďte kolo tak, aby bylo
přesně uprostřed adotáhněte matice
(
1, 2
). (Pro usnadnění montáže můžete
odrážedlo překlopit dopolohy vzhůru
nohama).
Pokud má pneumatika vzorek vetvaru
šípů, měly by šípy směřovat dopředu
posměru jízdy.
Seřízení brzdových páček
(neplatí pro OneToo bez brzdy)
Nastavte správný sklon brzdových páček po-
mocí upevňovacího šroubu naobjímce (
1
).
Správný sklon brzdových páček:
nechte dítě sednout naodrážedlo, ruce
nechť položí nařídítka anatáhne prsty
tak, aby prodlužovaly přímku jeho ruky.
Dotéto polohy nastavte brzdovou páčku.
Seřízení brzdy
(neplatí pro OneToo bez brzdy)
Před seřízením brzd nahustěte
pneumatiky dle hodnot naboku pláště
(ideálně mezi 1,3–1,8 bary). Zkontrolujte,
zda brzdové špalíky při zabrzdění
dosedají celou svou plochou nabok
ráfku. Jejich polohu můžete upravit
pomocí šroubků (
1
). Špalíky se nesmí
dotýkat pláště.
Instalace sedla
Zasuňte sedlovou trubku dorámu
odrážedla (
1
), nastavte požadovanou
výšku sedla (max. povyznačenou rysku)
adotáhněte šroub naobjímce (
2
).
YooToo, TooToo, 112
Montáž předního kola
Zkontrolujte, zda je přední vidlice
odrážedla natočená vesprávném směru
(mírné prohnutí směřuje dopředu).
Zkontrolujte, zda se špalíky při uvolnění
brzdové páčky dostatečně oddálí
odráfku (1–2 mm). Vzdálenost špalíků
lze upravit přitažením či povolením
brzdového lanka vkotevním šroubu (
2
).

16
5.c 5.d
Postranní pásku otočte kolem sloupku
představce a zapněte druk.
3 3
Montážní návod
CZ
Instalace chrániče
(One Too)
Napředstavec řídítek připněte měkký
ochranný kryt zomyvatelného nylonu.
Pokud kolo při otáčení vněkterém
místě škrtá obrzdový špalík, symetricky
upravte vzdálenost brzdových ramen
napínacími šroubky (
3
).
Konec brzdového lanka zafixujte do
zámku a zabezpečte stahovací páskou,
pásku poté zastřihněte.
Instalace ochranného krytu
(YooToo, TooToo, 112)
Neoprenový kryt obraťte spodní stranou
nahoru, podsuňte ho pod řídítky (
1
)
a zapněte druk kolem krku představce
(
2
). Přetočte kryt přes řídítka (
3
).
6. 6.a 6.b
1
2
3

17
CZ
7.a 7.b
YooToo
YooToo
YooToo
Yedoo YooToo je vybaveno dvojitou
zadní vidlicí, která umožňuje zvětšit
rozsah nastavení výšky sedla. Horní
úchyt je určen pro sníženou výšku
sedla.
Spodní úchyt naopak umožní
nastavit sedlo výše než je běžné.
Pozor:
pokaždé změně polohy
zadního kolečka znovu seřiďte brzdy.

Bezpečnostní doporučení
Varování:
Odrážedlo je v základní výbavě určeno pro jízdu za
denního světla v prostorách určených pro sport a rekreaci.
Pro jízdu na pozemních komunikacích a pro jízdu za tmy ho
musíte vybavit bezpečnostními prvky (světla, odrazky atd.)
v souladu s platnými předpisy ve vaší zemi. Dbejte, aby děti
dodržovaly zásady bezpečné jízdy či pravidla silničního
provozu a používaly ochranné pomůcky (přilbu, chrániče
kolen a loktů, pevné boty apod.).
Odrážedlo používejte s opatrností, neboť k jízdě na
odrážedle jsou zapotřebí dovednosti, které předejdou
pádům a kolizím, jež by mohly způsobit zranění dítěte
(uživatele) nebo jiných osob
.
Před každou jízdou zkontrolujte funkčnost brzd acelkový technický
stav odrážedla. Dbejte, aby nebylo překračováno jeho maximální
zatížení (nosnost odrážedla je uvedena naúvodní straně).
Odrážedlo je určeno pro jednoho jezdce a není vhodné pro skoky
a akrobatickou jízdu.
Odrážedla (YooToo, TooToo) mají vhlavovém složení
integrované bezpečnostní dorazy proti přetočení řídítek. Řídítka
proto nikdy nepřetáčejte silou, mohli byste poškodit jejich
funkci. Opravu dorazů nechte vždy naodborném cykloservisu.
Všechny mechanismy snižující rychlost (brzdové špalíky, ráfky,
pneumatiky apod.) se při používání zahřívají, nedotýkejte se
jich, dokud nevychladnou!
Jízdní pokyny
Děti mohou používat odrážedlo jen zadozoru dospělé osoby.
Je důležité, aby dítě mělo při jízdě vždy obě ruce nařídítkách.
Zatímco sedí audržuje rovnováhu, odráží se střídavě oběma
nohama jako při běhu či rychlé chůzi.
Pozor:
dítě může
naodrážedle vyvinout značnou rychlost, proto by ho rodiče,
případně jiná odpovědná osoba, měli před první jízdou řádně
poučit omožných nebezpečích aozpůsobu brzdění.
Pro zabrzdění nechť dítě stiskne brzdovou páčku nařídítkách
nebo zpomaluje třením podrážky bot ozem/brzdí nohama.
Pozor:
prudké zabrzdění může způsobit pád.
Údržba
Řádná údržba zvýší bezpečnost aprodlouží životnost
zakoupeného odrážedla. Proto pravidelně dotahujte šroubové
spoje, kontrolujte tlak vpneumatikách apromazávejte
pohyblivé části (ložiska kol ařídítek, čepy brzdových páček,
čelisti brzd, brzdová lanka, atd.).
Dejte však pozor, aby se mazivo nedostalo naráfky či brzdové
destičky. Mastnota snižuje jejich účinek! Pokud se tak stane,
odmastěte znečištěné části např. technickým benzínem.
Pravidelně kontrolujte výšku vzorku napláštích kol, vpřípadě
potřeby vyměňte pláště zanové se shodnými parametry.
Kontrolujte stav samojistných matic (pokud se zajízdy
samovolně uvolňují, vyměňte je zanové).
Pravidelně kontrolujte výplet kol, nestejnoměrné napnutí
drátů vevýpletu může způsobit jejich praskání nebo
rozcentrování kol.
Odrážedlo udržujte včistotě, zašpinění otřete vlhkým hadrem.
Skladujte ho uvnitř nasuchém astinném místě, dlouhodobě
ho nevystavujte zvýšené vlhkosti ani extrémním teplotám.
Před zazimováním ošetřete antikorozním přípravkem. Výrobce
neodpovídá zaškody vzniklé výlučně zanedbanou údržbou,
neodborným zásahem, vlastními úpravami či špatným
zacházením.
Výrobek splňuje náležité normy EU (ČSN EN 71-1, ČSN EN 71-3)
azískal certifikáty kvality abezpečnosti odpředního českého
zkušebního ústavu (Strojírenský zkušební ústav, s. p.).
Výrobce a dovozce do EU INTREA – PIKO, s.r.o.,
Sasanková 2657/2, 106 00 Praha 10, Česká republika,
www.yedoo.cz.
Uplatnění práv
z vadného plnění
Obecná ustanovení
Obsah, rozsah a trvání práv kupujícího z vadného plnění
zboží se řídí platnými právními předpisy České republiky,
a to především příslušnými ustanoveními občanského
zákoníku (z.č. 89/2012 Sb.) a zákona o ochraně spotřebitele
(z. č. 634/1992 Sb.). Práva kupujícího ve smyslu těchto
předpisů nejsou tímto dokladem ani v něm uvedenými
informacemi nijak dotčena.
Doba pro uplatnění práv z vadného plnění
Právo z vady u nově zakoupeného odrážedla Yedoo (dále
jen zboží) může kupující uplatnit v době 36 měsíců od jejího
převzetí. Vytkne-li kupující vadu zboží oprávněně, lhůta pro
uplatnění práv z vadného plnění neběží po dobu, po kterou
kupující nemůže zboží užívat.
Způsob uplatnění práv z vadného plnění
Práva z vadného plnění se uplatňují u prodejce, u kterého
kupující zboží zakoupil (viz údaje níže). Při uplatnění vad
zboží doporučujeme předložit tento doklad, doklad o koupi
akompletní, nečistot zbavené odrážedlo. O uplatnění práv
z vadného plnění, případně o provedení opravy vystaví
prodejce kupujícímu písemné potvrzení.
Podmínky trvání práv z vadného plnění
Při montáži odrážedla musí být dodrženy pokyny uvedené
vmontážním návodu. Odrážedlo musí být používáno výhradně
k účelu, k jakému byla vyrobena. Odrážedlo musí být
skladováno a udržováno podle výrobcem uvedených pokynů.
Na vady způsobené výlučně nesprávnou montáží či používáním
odrážedla v rozporu s uživatelskou příručkou se odpovědnost
výrobce nevztahuje.
Model odrážedla:
Výrobní číslo rámu:
Datum prodeje:
Prodejce:
Razítko a podpis:
CZ
18

19
Einleitung
Grundsätzlich empfehlen wir die Montage, Einstellung und
regelmäßige Wartung einem spezialisierten Fahrradservice zu
überlassen. Zudem beachten Sie bitte, dass Veränderungen am
Laufrad sowie unsachgemäßer Gebrauch, Materialschäden und
schwere Unfälle zur Folge haben können.
Falls Sie über technische Kenntnisse verfügen und von
diesen Gebrauch machen möchten werden Sie bemerken,
dass die Montage einfach ist. Folgen Sie den beschriebenen
Schritten der Montageanleitung und beachten Sie sämtliche
Warnhinweise.
Fragen, Bemerkungen und Verbesserungsvorschläge zu unseren
Produkten schicken Sie bitte an folgende E-Mail Adresse:
info@yedoo.eu.
DE
19
Die Rahmen der Tretroller Yedoo
sind geschützt durch ein ein-
getragenes Gemeinschaftsge-
schmacksmuster, die kommerzi-
ellen Bezeichnungen sind durch
eingetragene Marken geschützt.
Weitere Informationen aus der
Welt der Tretroller und eine
Liste unserer Vertriebspartner
finden Sie unter www.yedoo.eu.

20
1.
1
2
10 Nm
1.b
1.e
1.c
1.a
1.d
1
1
2
2
3 10 Nm
3
DE
Montageanleitung
YooToo, TooToo, 112
Entfernen Sie vor dem Zusammenbau
die Plastikabdeckungen von den
Vorder- sowie Hinterradachsen.
Lenkermontage
Schieben Sie die Lenkerstange in das
Hauptrohr des Laufradrahmens (
1
) und
stellen Sie die gewünschte Höhe des
Lenkers ein (bis max. in Höhe des gekenn-
zeichneten Striches). Überprüfen Sie, ob
der Lenker gerade ist und ziehen Sie die
Inbusschraube der Lenkerstange fest (
2
).
OneToo
Entfernen Sie vor dem Zusammenbau
die Plastikabdeckungen von den
Vorder- sowie Hinterradachsen.
Lenker- und Vordergabelmontage:
Entfernen Sie die Plastikabdeckung der
Klemmschelle, Klemmschelle selbst
sowie den oberen Lagerungsring.
Beim Zusammenbau müssen die Teile
wie abgebildet über das Gabelrohr
geschoben werden.
Schieben Sie die Plastikabdeckung der
Klemmschelle (
1
) auf das Lenkerrohr
und stecken dieses in das Gabelrohr
(
2
). Stellen Sie die gewünschte Höhe
des Lenkers ein (bis max. in Höhe des
gekennzeichneten Striches). Überprüfen
Sie, ob der Lenker gerade ist und ziehen
Sie die Fixierschraube der Klemmschelle
fest (
3
).
Zuletzt schieben Sie die
Plastikabdeckung über die
Klemmschelle.
Schieben Sie die Lenkerstange in das
Hauptrohr des Laufradrahmens (
1
)
so dass die die Biegung der Gabel
nach vorne zeigt. Schieben Sie nun
abschließend den oberen Lagerring
(
2
) und die Klemmschelle (
3
) über das
Vordergabelrohr.
Platzieren Sie die Klemmschellenschrau-
be exakt über dem Ausschnitt des Ga-
belrohres wie auf der Abbildung gezeigt.
Other manuals for OOPS YOOTOO
1
This manual suits for next models
7
Table of contents
Languages:
Other Yedoo Bicycle manuals