manuals.online logo
Brands
  1. Home
  2. •
  3. Brands
  4. •
  5. YOODA
  6. •
  7. Remote Control
  8. •
  9. YOODA MAGNETIC Deluxe Series User manual

YOODA MAGNETIC Deluxe Series User manual

This manual suits for next models

2

Other YOODA Remote Control manuals

YOODA LINEO Series User manual

YOODA

YOODA LINEO Series User manual

YOODA MAGNETIC PRO 1RT YSH User manual

YOODA

YOODA MAGNETIC PRO 1RT YSH User manual

YOODA VITO Series User manual

YOODA

YOODA VITO Series User manual

YOODA NUXO Series User manual

YOODA

YOODA NUXO Series User manual

YOODA MELODY Series User manual

YOODA

YOODA MELODY Series User manual

YOODA UNO Series User manual

YOODA

YOODA UNO Series User manual

YOODA ARTISTIC 1R User manual

YOODA

YOODA ARTISTIC 1R User manual

YOODA 28LEQ Series User manual

YOODA

YOODA 28LEQ Series User manual

YOODA 1711190 User manual

YOODA

YOODA 1711190 User manual

YOODA ARTISTIC-1R User manual

YOODA

YOODA ARTISTIC-1R User manual

YOODA SMART TOUCH 2 User manual

YOODA

YOODA SMART TOUCH 2 User manual

YOODA MELODY 1R User manual

YOODA

YOODA MELODY 1R User manual

YOODA SVERO Series User manual

YOODA

YOODA SVERO Series User manual

YOODA ARTISTIC 5R User manual

YOODA

YOODA ARTISTIC 5R User manual

YOODA VETRO 5RT User manual

YOODA

YOODA VETRO 5RT User manual

Popular Remote Control manuals by other brands

Bircher Reglomat RC Duo 2 user guide

Bircher Reglomat

Bircher Reglomat RC Duo 2 user guide

Emerson RCBT100 owner's manual

Emerson

Emerson RCBT100 owner's manual

BILDA Element-6 user manual

BILDA

BILDA Element-6 user manual

Absima CR7P manual

Absima

Absima CR7P manual

Mitsubishi Electric PAR-32MAAG Instruction book

Mitsubishi Electric

Mitsubishi Electric PAR-32MAAG Instruction book

RCA RCRTBL08BE1 quick start guide

RCA

RCA RCRTBL08BE1 quick start guide

US Electronics NOVARI user guide

US Electronics

US Electronics NOVARI user guide

Panasonic EUR7622KB0 Operation guide

Panasonic

Panasonic EUR7622KB0 Operation guide

Bang & Olufsen Beo4 user manual

Bang & Olufsen

Bang & Olufsen Beo4 user manual

Marantz RC101 user guide

Marantz

Marantz RC101 user guide

FUTABA 9ZAP - PART2 manual

FUTABA

FUTABA 9ZAP - PART2 manual

HR Matic HR MULTI 3 quick start guide

HR Matic

HR Matic HR MULTI 3 quick start guide

Anritsu MP1777A Operation manual

Anritsu

Anritsu MP1777A Operation manual

Niles WVC100 Installation & operating guide

Niles

Niles WVC100 Installation & operating guide

Bang & Olufsen BEO6 Getting started

Bang & Olufsen

Bang & Olufsen BEO6 Getting started

GE 94901 instruction manual

GE

GE 94901 instruction manual

FUTABA R7108SB Full manual

FUTABA

FUTABA R7108SB Full manual

Invacare G91S user manual

Invacare

Invacare G91S user manual

manuals.online logo
manuals.online logoBrands
  • About & Mission
  • Contact us
  • Privacy Policy
  • Terms and Conditions

Copyright 2025 Manuals.Online. All Rights Reserved.

1. Control:
can control single motor, or a group
of up to 20 motors on each channel
2. Range:
200 meters outdoor,
35 meters indoor
3. Battery:
CR2430
4. Power supply:
3 V
5. Dimensions:
86 x 86 x 14 mm
6. Transmitting power:
10 mW
7. Operating temperature:
0°C + 50°C
8. Protection degree:
IP 30
Radio receiver range is a variable value and can differ from declared values depending on conditions in which device
operates. Possible sources of changes in range are building construction, interference caused by other radio transmitters
etc.
In order to fully explore available functions of MAGNETIC Deluxe series please take a moment and read this manual before using the device.
MAGNETIC Deluxe transmitters are compatible with all YOODA brand devices.
MAGNETIC Deluxe_15Rw
www.sukcesgroup.pl
1. General information
2. Detailed description
1
Illustrations (from the top):
Fig. 1. 15-channel MAGNETIC Deluxe remote control black (MAGNETIC Deluxe_15Rw_B)
Fig. 2.15-channel MAGNETIC Deluxe remote control, white (MAGNETIC Deluxe_15Rw)
15-channel transmitter
(front)
15-channel transmitter
(back)
UP button
STOP button
battery
DÓŁ button
CHANNEL + buttonCHANNEL - button
ZERO button
1. Pushing simultaneously ZERO and CHANNEL+ - has the function of P2 programming button
2. When you press the ZERO button, the digit 0 will appear, which indicate the group channel. On this channel, all the
devices programmed for each channel of the transmitter are active. On the group channel we do not perform any
programming procedures
3. Estimated battery lifespan is 3 year if the device runs 4 commends a day in average.
4. Batteries should be changed when no channel number is displayed after pressing any button or receiving device stops
reacting to commands.
5. Przy wymianie baterii należy zwrócić uwagę na jej prawidłową polaryzację. Baterie mogą zawierać składniki powodu-
jące uszczerbek na zdrowiu lub poważną degradację środowiska. Zużyte baterie należy wyrzucać do specjalnie
oznaczonych pojemników.
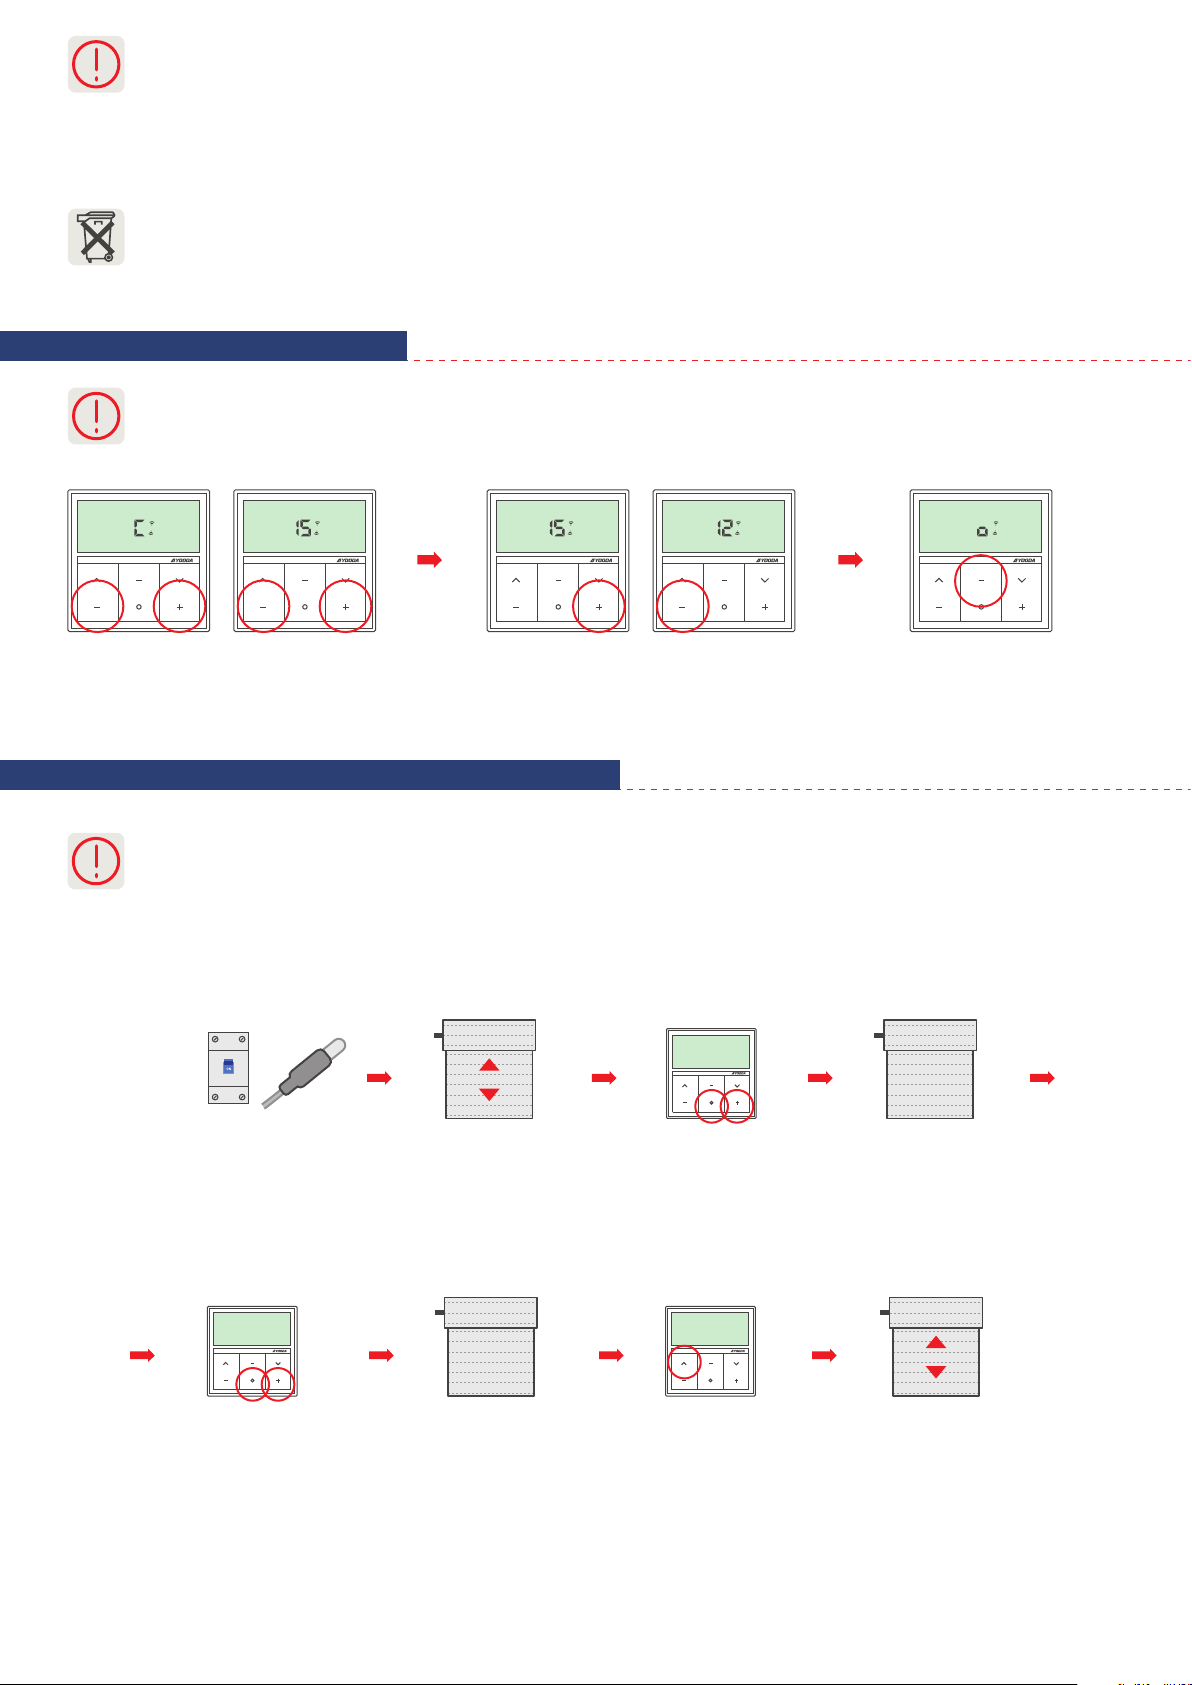
Pressing UP or DOWN button exits active channel selection mode.
Repeat the following procedure to set the number of active channels.
3. Active channel selection
2
1. Programowanie nadajnika zależne jest od rodzaju odbiornika. Przy programowaniu należy kierować się instrukcją obsługi
urządzenia, którym nadajnik ma sterować.
2. Dłuższa niż 5 sekund przerwa, między kolejnymi wciśnięciami przycisku, spowoduje automatyczne wyjście
z trybu programowania bez wprowadzonych zmian.
3. Dodawanie nadajnika tą metodą spowoduje wykasowanie pamięci odbiornika.
Turn on power supply
or press microswitch
(for 2 sec.) when
power is on.
Motor will make a sound.
Roller shutter will make
an up/down move.
Motor will make a sound.Press simultaneously
ZERO and CHANNEL+
buttons.
or
Roller shutter
will make an
up/down move
and the motor
will make a few
short sounds.
Motor will make a sound.Press simultaneously ZERO +
and CHANNEL+ buttons.
Press UP button.
4. Programming first transmitter to R-type motors
Press simultaneously and hold down the CHANNEL +
and CHANNEL- buttons. "C" symbol appears on the display
and than after 4 seconds it changes to number 15 with up
and down arrows.
Use the CHANNEL + or CHANNEL - buttons
to set the number of displayed channels.
Press the STOP key to conrm your choice.
The symbol "o" should appear.