manuals.online logo
Brands
  1. Home
  2. •
  3. Brands
  4. •
  5. YOODA
  6. •
  7. Transmitter
  8. •
  9. YOODA BESH 1RT User manual

YOODA BESH 1RT User manual

Fifteen-channel BESH remote control
with display and timer, white (BESH_15RT)
In order to fully explore available functions of BESH series please take a moment and read this manual before using the device.
BESH transmitters are compatible with all YOODA brand devices.
BESH_1RT | BESH_5RT | BESH_15RT
www.sukcesgroup.pl
1. General Information
2. Detailed description
1
1. Control:
can control single motor, or a group
of up to 20 motors on each channel
2. Range:
200 meters outdoor,
35 meters indoor
3. Battery:
1 x CR2430
4. Power supply:
3 V
5. Dimensions:
120 x 40 x 10 mm
6. Transmitting power:
10 mW
7. Operating temperature:
from 0°C to 50°C
8. Protection degree:
IP 30
Radio receiver range is a variable value and can differ from declared values depending on conditions in which device
operates. Possible sources of changes in range are building construction, interference caused by other radio transmitters
etc.
Single-channel or 5-channel or 15-channel transmitter
with timer (front)
Single-channel or 5-channel or 15-channel transmitter
with timer (back)
LCD display
UP button
STOP button
DOWN button
CHANNEL - button CHANNEL + button
SETUP
MODE SET
TIME SET
P2
programming button
battery
TIME CHANGE
button
WORK MODE
button
4. Changing work mode
3. Activating channels in automatic mode
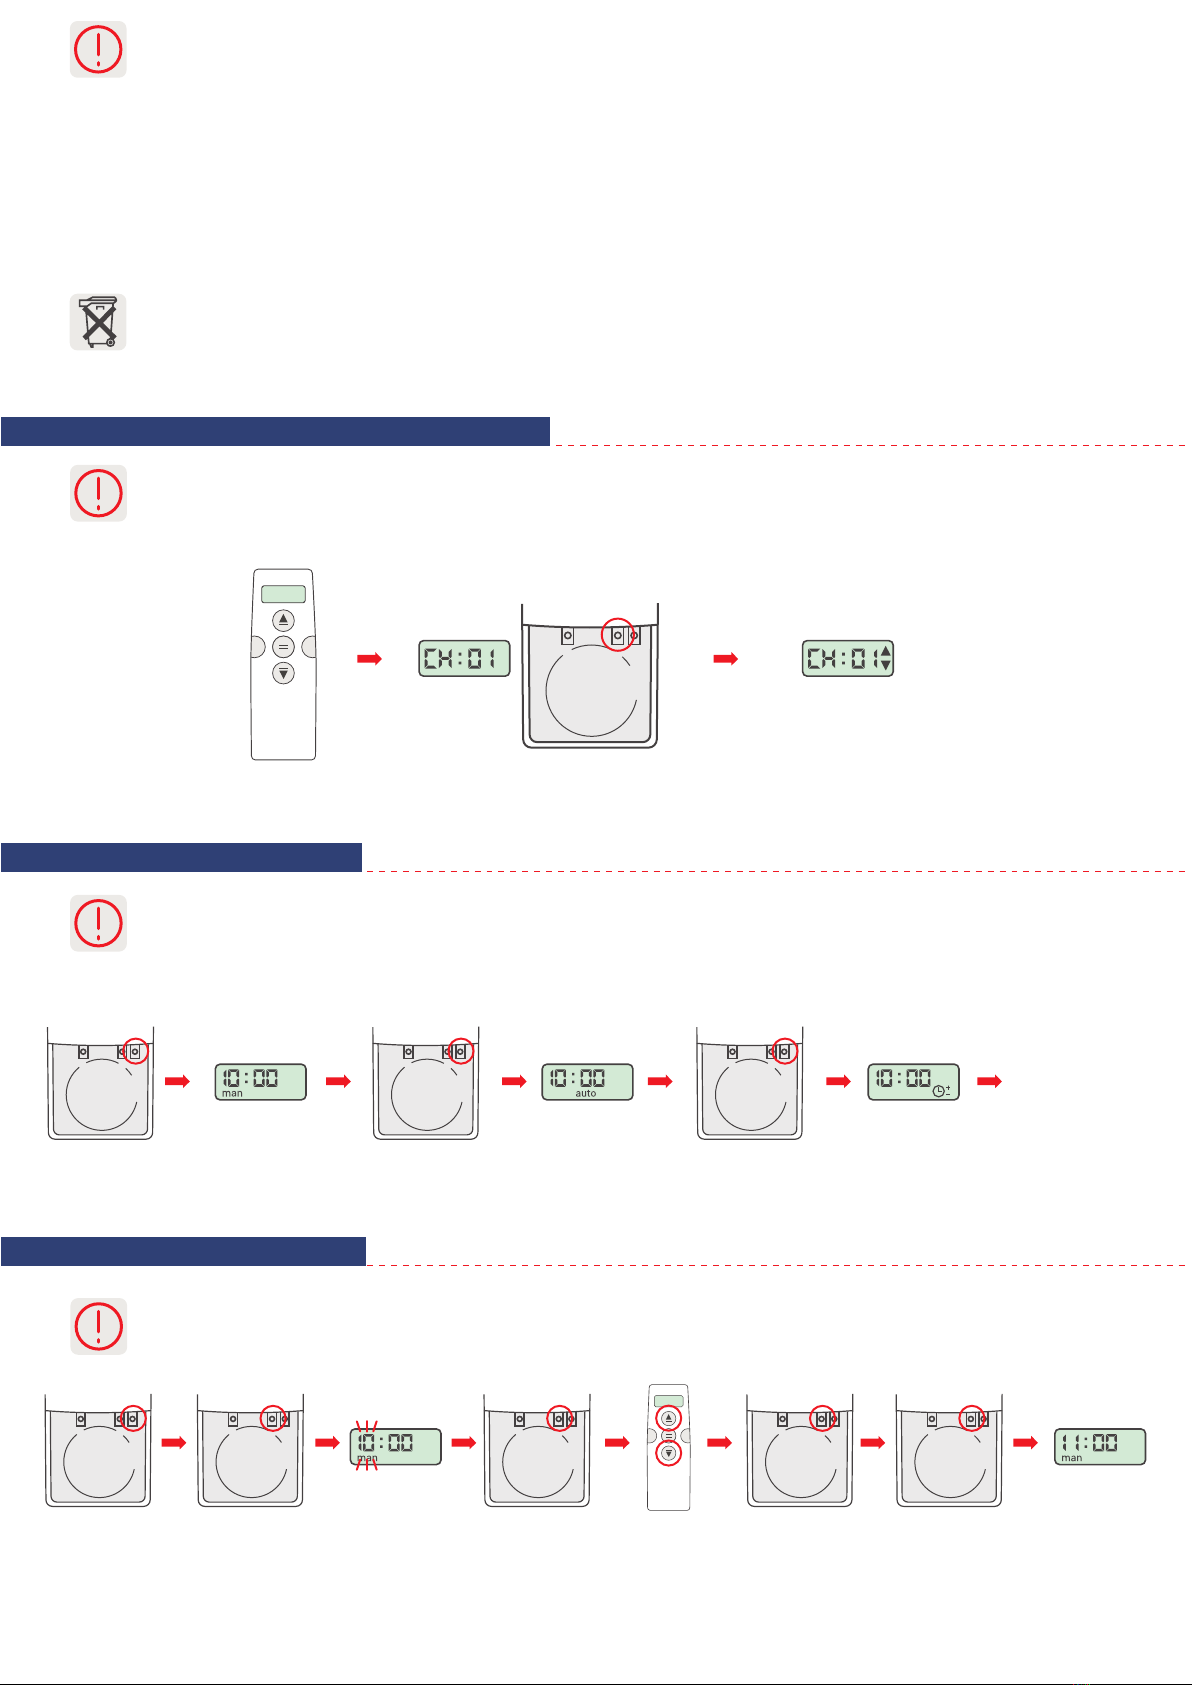
5. Setting current time
2
1.Difference between automatic time of roller shutter opening and closing cannot be shorter than 32 minutes. In case of
smaller than minimal time difference fault message will appear and none of the changes will be saved.
2. Pressing UP or DOWN button in automatic or random mode will show currently set opening/closing time and symbol of
current process.
3. Choosing ‘00’ group channel means remote controls all programmed devices on all channels at the same time. No
programming functions can be performed on group channel. All devices programmed to any other channel can be controlled
on group channel without additional programming.
4. For all the programmed devices on every channel to work automatically group channel ‘00’ should be chosen in automatic
mode.
5. Estimated battery lifespan is 1 year if the device runs 4 commends a day in average.
6. Batteries should be changed when device stops reacting to commands.
7. When placing the battery ensure that polarity is correct.
Batteries contain substances that may be hazardous to health and may pollute the environment. Used batteries should be
disposed of properly.
1. Manual working mode: normal working mode, without timer function.
2. Automatic working mode: normal working mode with timer function.
3. Random working mode: time controlled work with random opening/closing time (up to 15 minutes difference to preset
opening/closing time).
4. Working mode is changed for all channels.
1. Each channel can be activated or deactivated in the automatic mode.
2. If the channel is inactive, the transmitter will not control the receiver in this mode on progremmed time.
3. By default, all channels are active in automatic mode.
Press
WORK MODE button
to set the manual
working mode.
Using the CHANNEL + or
CHANNEL- buttons select
the channel.
Press the CHANGE TIME button, when the channel
number is visible on the display.
When arrows are visible next to the channel number,
the channel is active in automatic mode. When arrows
are not visible in the display next to the channel number,
the transmitter will not control the receiver
in automatic mode.
Manual work mode. Automatic work mode. Random work mode.Press
WORK MODE button
to set the automatic
working mode.
Press
WORK MODE button
to set the random working
mode.
Every working mode
change results in
switching between
the modes.
1.Time can be set only when device is in manual working mode.
2. Longer than 10 seconds pause between series of button clicks during programming will cause device to switch off
from programming mode without saving any changes.
Using
UP and DOWN
buttons set
current time.
Press
WORK MODE button
to set the manual
working mode.
Press and hold
TIME CHANGE button
for about 5 seconds.
Press TIME CHANGE button
to switch between
setting hour, minutes
or days of week.
Press
TIME CHANGE
button to start
the clock .
Pressing and holding the
TIME CHANGE button
for 5 seconds we
confirm the changes
(the time on the display
will stop flashing).
Current time flashes
on the screen.
Current time
was successfully
changed.
SETUP
MODE SET
TIME SET
SETUP
MODE SET
TIME SET
SETUP
MODE SET
TIME SET
SETUP
MODE SET
TIME SET
SETUP
MODE SET
TIME SET
SETUP
MODE SET
TIME SET
SETUP
MODE SET
TIME SET
SETUP
MODE SET
TIME SET
SETUP
MODE SET
TIME SET
6. Setting automatic time of closing and opening
7. Programming first transmitter to R-type motors
3
1. Time can be set only when device is in automatic or random working mode.
2. Longer than 10 seconds pause between series of button clicks during programming will cause device to switch off
from programming mode without saving any changes.
3. The time of automatic opening and closing is set separately on each channel.
Use the
UP or DOWN
buttons to set the
automiatic opening
time.
Press and hold
TIME CHANGE button
for about 5 seconds.
Press
WORK MODE button
to set the automatic or
random working mode.
Press the CHANGE TIME
button to select the
change option hours
or minutes.
Automatic opening time
flashes on the screen.
Press
WORK MODE button
once to switch to
closing time setup.
Using
UP and DOWN
buttons set
closing time.
Press TIME CHANGE
button to switch between
setting hour or minutes.
To save settings
press and hold CHANGE
TIME button
for about 5 seconds
(elements on display
will stop flashing).
Automatic closing
time was successfully
changed. Display shows
current time.
Automatic closing time
flashes on the screen.
1. Way of programming first transmitter depends on type of radio receiver. When programming first transmitter please
follow instruction of the device that is going to be controlled by the transmitter.
2. Longer than 5 seconds pause between series of button clicks during programming will cause device to switch off from
programming mode without saving any changes.
3. Programming first transmitters will result in deleting all previously programmed transmitter.
Turn on power supply
or press microswitch
(for 2 sec.) when power is on.
Motor will make a sound.
Roller shutter will make
an up/down move.
Motor will
make a sound.
Press
programming button
(P2) on the remote.
or
Roller shutter
will make
an up/down move
and the motor will
make a few short
sounds.
Motor will
make a sound.
Press
programming button
(P2) on the remote.
Press
UP button
on the remote.
SETUP
MODE SET
TIME SET
SETUP
MODE SET
TIME SET
SETUP
MODE SET
TIME SET
SETUP
MODE SET
TIME SET
SETUP
MODE SET
TIME SET
SETUP
MODE SET
TIME SET
SETUP
MODE SET
TIME SET
SETUP
MODE SET
TIME SET

This manual suits for next models

2

Other YOODA Transmitter manuals

YOODA MAGNETIC-PRO-15Rw YSH User manual

YOODA

YOODA MAGNETIC-PRO-15Rw YSH User manual

YOODA CAMELEO_1RwT Configuration guide

YOODA

YOODA CAMELEO_1RwT Configuration guide

YOODA MAGNETIC DELUXE YSH Series User manual

YOODA

YOODA MAGNETIC DELUXE YSH Series User manual

YOODA MAGNETIC Deluxe 1Rw User manual

YOODA

YOODA MAGNETIC Deluxe 1Rw User manual

YOODA MAGNETIC Deluxe-15Rw User manual

YOODA

YOODA MAGNETIC Deluxe-15Rw User manual

YOODA MAGNETIC PRO YSH User manual

YOODA

YOODA MAGNETIC PRO YSH User manual

YOODA MAGNETIC Series User manual

YOODA

YOODA MAGNETIC Series User manual

YOODA MAGNETIC PRO YSH User manual

YOODA

YOODA MAGNETIC PRO YSH User manual

Popular Transmitter manuals by other brands

FISCHER DE28 instruction manual

FISCHER

FISCHER DE28 instruction manual

Emerson Rosemount 848T quick start guide

Emerson

Emerson Rosemount 848T quick start guide

Eltek GS42AVE User instructions

Eltek

Eltek GS42AVE User instructions

Comnet FVT11MAC Installation and operation manual

Comnet

Comnet FVT11MAC Installation and operation manual

Prevail-Catv WT-1550-EM20 Series operating manual

Prevail-Catv

Prevail-Catv WT-1550-EM20 Series operating manual

Shure AD2/B87A manual

Shure

Shure AD2/B87A manual

BEA ANALOG user guide

BEA

BEA ANALOG user guide

ETRONIX EX6G quick start guide

ETRONIX

ETRONIX EX6G quick start guide

GRAUPNER mc-32 HoTT manual

GRAUPNER

GRAUPNER mc-32 HoTT manual

JRC NTG-420 installation manual

JRC

JRC NTG-420 installation manual

Extron electronics XTP FT HD 4K user guide

Extron electronics

Extron electronics XTP FT HD 4K user guide

Emerson Rosemount 2090P quick start guide

Emerson

Emerson Rosemount 2090P quick start guide

Emerson Rosemount 8782 quick start guide

Emerson

Emerson Rosemount 8782 quick start guide

BBC Bircher XRF-T.2 Supplementary sheet to the original operating instructions

BBC Bircher

BBC Bircher XRF-T.2 Supplementary sheet to the original operating instructions

Moore Industries IPH user manual

Moore Industries

Moore Industries IPH user manual

Signet 8550-1 manual

Signet

Signet 8550-1 manual

Aplisens APCE-2000 user manual

Aplisens

Aplisens APCE-2000 user manual

AKG FLEXX GUITARBUG GB 40 User instructions

AKG

AKG FLEXX GUITARBUG GB 40 User instructions

manuals.online logo
manuals.online logoBrands
  • About & Mission
  • Contact us
  • Privacy Policy
  • Terms and Conditions

Copyright 2025 Manuals.Online. All Rights Reserved.