manuals.online logo
Brands
  1. Home
  2. •
  3. Brands
  4. •
  5. YOODA
  6. •
  7. Transmitter
  8. •
  9. YOODA MAGNETIC PRO YSH User manual

YOODA MAGNETIC PRO YSH User manual

Other YOODA Transmitter manuals

YOODA MAGNETIC DELUXE YSH Series User manual

YOODA

YOODA MAGNETIC DELUXE YSH Series User manual

YOODA MAGNETIC Deluxe-15Rw User manual

YOODA

YOODA MAGNETIC Deluxe-15Rw User manual

YOODA MAGNETIC Series User manual

YOODA

YOODA MAGNETIC Series User manual

YOODA CAMELEO_1RwT Configuration guide

YOODA

YOODA CAMELEO_1RwT Configuration guide

YOODA MAGNETIC Deluxe 1Rw User manual

YOODA

YOODA MAGNETIC Deluxe 1Rw User manual

YOODA MAGNETIC PRO YSH User manual

YOODA

YOODA MAGNETIC PRO YSH User manual

YOODA MAGNETIC-PRO-15Rw YSH User manual

YOODA

YOODA MAGNETIC-PRO-15Rw YSH User manual

YOODA BESH 1RT User manual

YOODA

YOODA BESH 1RT User manual

Popular Transmitter manuals by other brands

Seneca K120RTD installation manual

Seneca

Seneca K120RTD installation manual

Nautel GV40 installation manual

Nautel

Nautel GV40 installation manual

HumanTechnik cm-light operating instructions

HumanTechnik

HumanTechnik cm-light operating instructions

INOR APAQ C130 TC User instructions

INOR

INOR APAQ C130 TC User instructions

Linear DXS-64 operating instructions

Linear

Linear DXS-64 operating instructions

FeinTech ABT00102 instruction manual

FeinTech

FeinTech ABT00102 instruction manual

Geo Web Pack quick start guide

Geo

Geo Web Pack quick start guide

Inovonics EchoStream EN1210W installation instructions

Inovonics

Inovonics EchoStream EN1210W installation instructions

IKONNIK KA-6 quick start guide

IKONNIK

IKONNIK KA-6 quick start guide

Rohde & Schwarz SR8000 Series System manual

Rohde & Schwarz

Rohde & Schwarz SR8000 Series System manual

Audio Technica UniPak ATW-T93 Installation and operation

Audio Technica

Audio Technica UniPak ATW-T93 Installation and operation

NIVELCO EasyTREK SCA-300 Series Programming manual

NIVELCO

NIVELCO EasyTREK SCA-300 Series Programming manual

Honeywell 5816WMBR installation instructions

Honeywell

Honeywell 5816WMBR installation instructions

Kamstrup READy MTU Installation and operation guide

Kamstrup

Kamstrup READy MTU Installation and operation guide

Omega ZW Series user guide

Omega

Omega ZW Series user guide

ABB Field 264H Instructions for installation

ABB

ABB Field 264H Instructions for installation

Dejero EnGo 3x manual

Dejero

Dejero EnGo 3x manual

Rosemount 4600 Reference manual

Rosemount

Rosemount 4600 Reference manual

manuals.online logo
manuals.online logoBrands
  • About & Mission
  • Contact us
  • Privacy Policy
  • Terms and Conditions

Copyright 2025 Manuals.Online. All Rights Reserved.

UP button
STOP button
DOWN button
P2 programming
button
MAGNETIC PRO YSH single channel remote control without a display, white
(MAGNETIC PRO_1Rw YSH)
1. Control:
possibility to control 1 motor
or a group of up to 20 motors
2. Range:
up to 200 meters in open area,
up to 35 meters indoors
3. Battery:
CR2430
4. Power supply:
3 V
5. Dimensions:
80 x 80 x 15 mm
6. Signal power:
10 mW
7. Operation temperature:
from 0°C to 50°C
8. Safety degree:
IP 30
The range given by the manufacturer is a variable value, depending on the conditions in the environment in which the device
works. Factors such as building structure, signal interference from other devices, etc. affect range.
1
2. Description of the device
Single channel transmitter
(front)
Single channel transmitter
(back)
1. Open the battery case to obtain access to the battery.
2. Lifespan of the battery is ca. 1 year while executing approximately 4 commands per day.
3. The batteries need replacing when the integrated LED diode does not turn on, or when the receiver stops reacting while
you press the buttons.
4. Pay attention to polarisation of the battery while replacing it.
Batteries contain substances that may present risk to health or serious environment degradation. Used batteries must be
disposed of in specially marked containers.
To use the technical capability of MAGNETIC PRO YSH transmitters optimally, read the following instructions carefully. MAGNETIC PRO YSH transmitters
are compatible with all devices of YOODA SMART HOME system.
MAGNETIC PRO YSH transmitters is control dedicated to bidirectional communication.
MAGNETIC_PRO_1Rw YSH
1. Technical data
O
P
E
N
-
C
L
O
S
E
M
P2P2
LED diode
battery
2
1. Programming of a transmitter depends on the type of receiver. While programming you should abide by the manual of the
device, that the transmitter is supposed to control.
2. A break between succesive button presses longer than 6 seconds, will automatically cause the exit from programming
mode without saving the changes.
3. If limit positions have not been set, programming of the first transmitter will delete transmitters that were programmed
earlier.
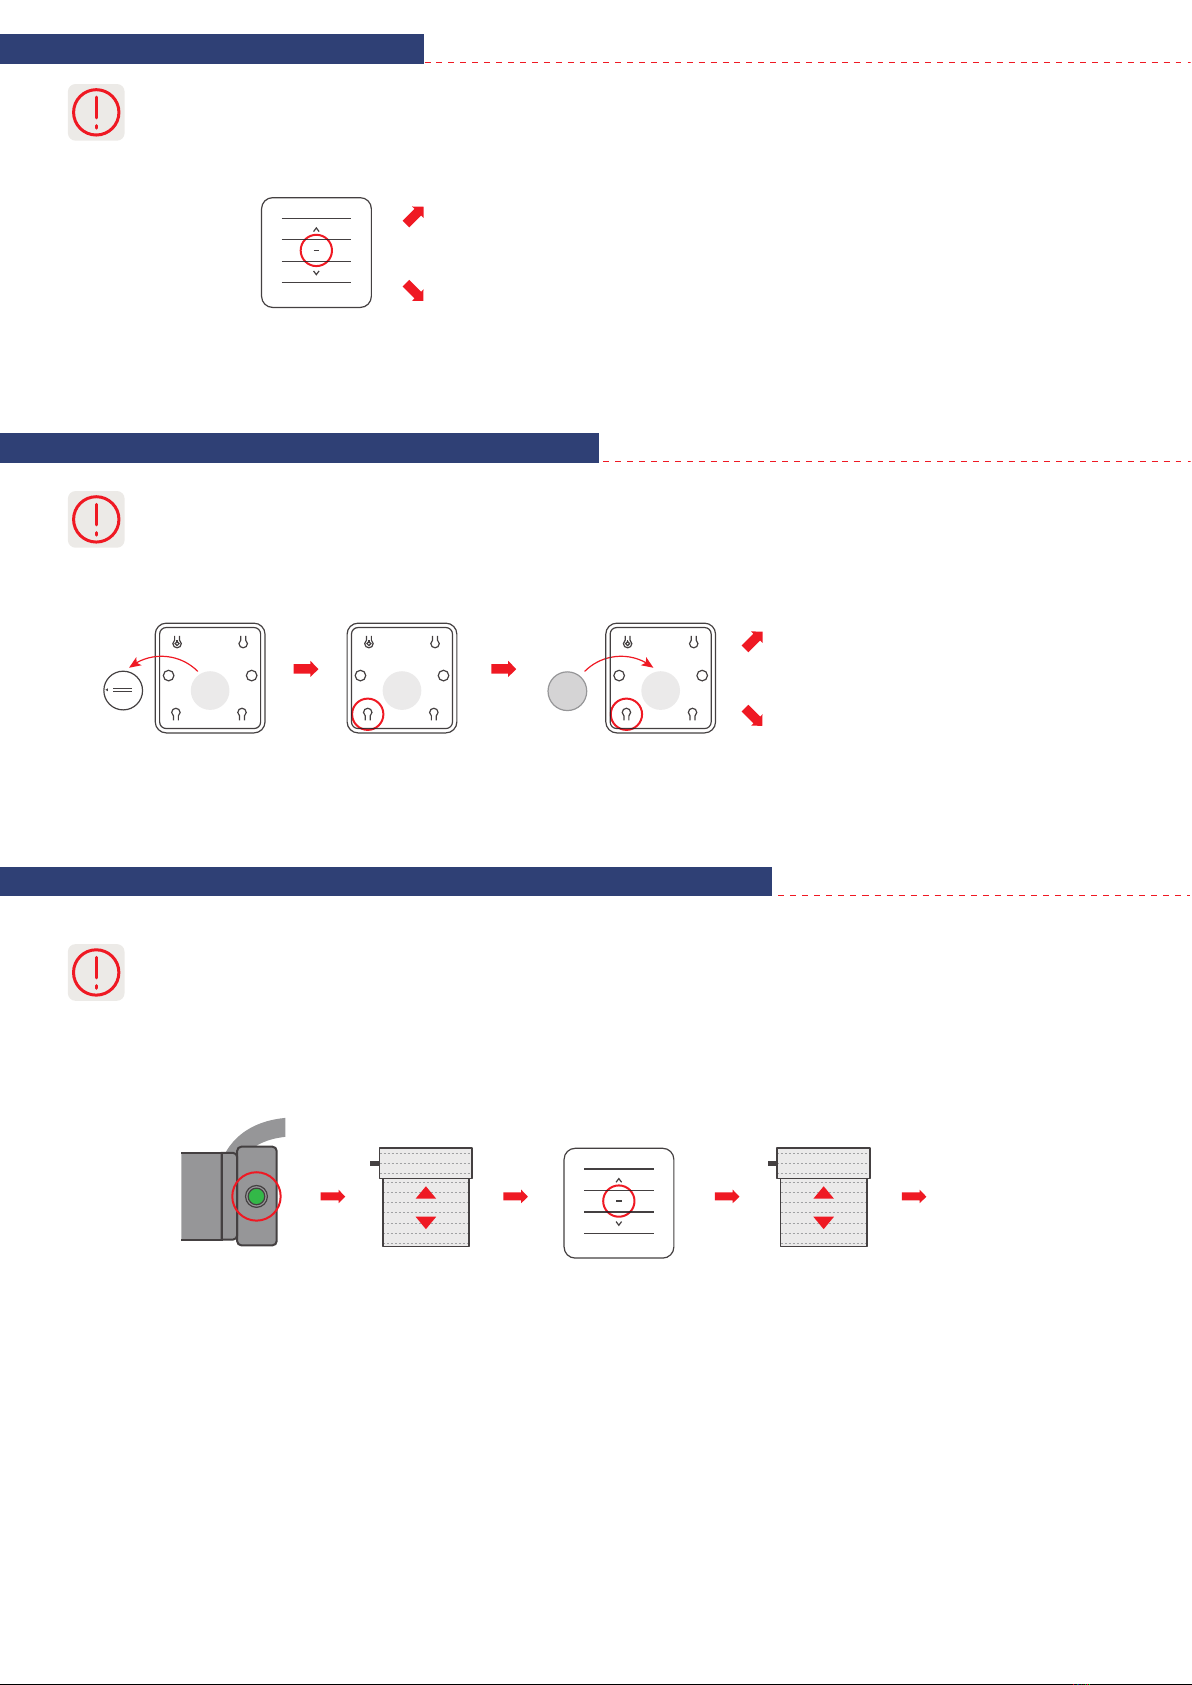
5. Programming the first transmitter for motors of EV/S type
Turn on power supply or
press the programming
button on the cylinder head
(for 2 sec.) if the power
supply is on.
Motor will make a sound.
Blind will make short
up/down moves.
Press and hold STOP
button on the remote
control for 2 seconds.
Blind will make two short
up/down moves. Motor will
make a few short sound
signals.
1. Blockage of function keys prevents accidental pressing of two buttons used while programming motors or radio receivers.
2. This function is disabled due to factory settings. To turn it on/off you need to perform the following procedure.
1. Transmitter can operate in one of two modes:
a) bidirectional
b) unidirectional
2. The transmitter operates in bidirectional mode due to factory settings.
3. Blockage of function keys
4. Choosing the mode of transmitter operation
Take the battery out
of the transmitter.
Press P2
programming button.
If the LED diode lights up for 4 seconds,
the blockage function is on.
If the LED diode flashes a few times,
the blockage function is off.
If the LED diode flashes once and lights up steadily,
the transmitter operates in unidirectional mode.
If the LED diode flashes twice and lights up
steadily, the transmitter operates
in bidirectional mode.
Transmitter has been
programmed.
Put the battery in
while holding P2
programming button.
Press and hold
STOP button for 15 seconds.
O
P
E
N
-
C
L
O
S
E
M
P2P2
O
P
E
N
-
C
L
O
S
E
M
P2P2
O
P
E
N
-
C
L
O
S
E
M
P2P2