manuals.online logo
Brands
  1. Home
  2. •
  3. Brands
  4. •
  5. Yuwell
  6. •
  7. Medical Equipment
  8. •
  9. Yuwell 405A User manual

Yuwell 405A User manual

Other manuals for 405A

1

This manual suits for next models

1

Other Yuwell Medical Equipment manuals

Yuwell BreathCare PAP User manual

Yuwell

Yuwell BreathCare PAP User manual

Yuwell 7F-5A User manual

Yuwell

Yuwell 7F-5A User manual

Yuwell 7B-1 User manual

Yuwell

Yuwell 7B-1 User manual

Yuwell 7F-3 User manual

Yuwell

Yuwell 7F-3 User manual

Yuwell 8F-3A User manual

Yuwell

Yuwell 8F-3A User manual

Yuwell YX102 User manual

Yuwell

Yuwell YX102 User manual

Yuwell 7E-B5 User manual

Yuwell

Yuwell 7E-B5 User manual

Yuwell YH-550 User manual

Yuwell

Yuwell YH-550 User manual

Yuwell 7E-A User manual

Yuwell

Yuwell 7E-A User manual

Yuwell 7E-B5 User manual

Yuwell

Yuwell 7E-B5 User manual

Yuwell YX3 Series User manual

Yuwell

Yuwell YX3 Series User manual

Yuwell YX310 User manual

Yuwell

Yuwell YX310 User manual

Yuwell YU100 Parts list manual

Yuwell

Yuwell YU100 Parts list manual

Yuwell BreathCare PAP User manual

Yuwell

Yuwell BreathCare PAP User manual

Popular Medical Equipment manuals by other brands

Itamar Medical WatchPAT Operation manual

Itamar Medical

Itamar Medical WatchPAT Operation manual

PROTEOR 1P650 KNEE Assembling and adjustment instructions

PROTEOR

PROTEOR 1P650 KNEE Assembling and adjustment instructions

Liberate Medical VentFree user manual

Liberate Medical

Liberate Medical VentFree user manual

Dicarre DA20 user guide

Dicarre

Dicarre DA20 user guide

Stryker Medical M Series Operation manual

Stryker Medical

Stryker Medical M Series Operation manual

Invacare ScanBed 750 user manual

Invacare

Invacare ScanBed 750 user manual

Getinge Arjohuntleigh Nimbus 3 Professional Instructions for use

Getinge

Getinge Arjohuntleigh Nimbus 3 Professional Instructions for use

Mettler Electronics Sonicator 730 Maintenance manual

Mettler Electronics

Mettler Electronics Sonicator 730 Maintenance manual

Pressalit Care R1100 Mounting instruction

Pressalit Care

Pressalit Care R1100 Mounting instruction

Denas MS DENAS-T operating manual

Denas MS

Denas MS DENAS-T operating manual

bort medical ActiveColor quick guide

bort medical

bort medical ActiveColor quick guide

AccuVein AV400 user manual

AccuVein

AccuVein AV400 user manual

agiliti NP Trio user manual

agiliti

agiliti NP Trio user manual

Rocket Medical Rocket Digital Oocyte Aspiration Pump Service manual

Rocket Medical

Rocket Medical Rocket Digital Oocyte Aspiration Pump Service manual

Monteris Medical Neuroblate Instructions for use

Monteris Medical

Monteris Medical Neuroblate Instructions for use

Otto Block 8E33 7 manual

Otto Block

Otto Block 8E33 7 manual

ADVANCED HOME CARE Helios Guide

ADVANCED HOME CARE

ADVANCED HOME CARE Helios Guide

NeuLog NUL-208 Guide

NeuLog

NeuLog NUL-208 Guide

manuals.online logo
manuals.online logoBrands
  • About & Mission
  • Contact us
  • Privacy Policy
  • Terms and Conditions

Copyright 2025 Manuals.Online. All Rights Reserved.

User's manual
405A/B
Air-compressing Nebulizer
Please read the user's manual closely!
JIANGSU YUYUE MEDICAL EQUIPMENT & SUPPLY CO., LTD.
Sales Center Address: Huanyuan East Road No.1, Xuzhuang Software
Park, Nanjing, Jiangsu Province, P.R. China, 210000
Manufacturing Address: YunYang Industrial Park, DanYang, Jiangsu
Province, P.R. China, 212300
http://www.yuwell.com
I. Features
The 405A/B Compressor Nebulizer is intended to aerosolize
medications for inhalation by the patient for respiratory disorders.
It is a new generation of compressor nebulizer manufactured by
the company based on innovation and improvement of similar
products at home and abroad.
I. Summary
II. Product performance and index
I. Features
II. Use and Maintenance-------------------------------------03
III. Sale and others-------------------------------------------19
------------------------------------------------------01
Contents
1. Power:
Input: AC100-240V~ 350mA, 50/60Hz
Output: DC12V, 1000mA
2. Maximum nebulization rate: ≥0.2mL/min
3. MMD: 3.9μm
Percentage of nebulized particles with diameter less than 5μm >
65% ※
4. Maximum pressure of compression pump: ≥0.1MPa
5. Free flow of compression pump: ≥3.5L/min
6. Noise: ≤55dB(A)
7. Net weight:
405A about 260g (unit only)
405B about 240g(unit only)
8. Size:
405A Approx. 13cm (l) × 6.5cm (w) ×6.8cm (h)
405B Approx. 14.5cm (l) ×8cm (w) ×5.6cm (h)
9. Taboo: None
10. Electrical safety requirements: Class II equipment, Type B
applied part
01
100-240V Adapter Compression pump
M
DC
12V
AC
11. Working system: intermittent operation – working for 20
minutes with an interval of 40 minutes
12. Normal working conditions:
Environmental temperature: 10℃~40℃R e l a t i v e h u m i d i t y :
30%~75%
Air pressure: 86KPa~106KPa
13. Restrictions on transportation and storage:
Environmental temperature: -40℃~+55℃
Relative humidity: 10%~93%
Air pressure: 70KPa~106KPa
※Test conditions: The environmental temperature is 20℃ and
the humidity is 53%. The test distance from the nebulizing
aerosol nozzle is 10cm.
Test solution: 0.9% saline
(Change with test conditions and test solution)
Caution:
If the storage temperature is below 5 ℃, apply the device only
when the temperature meets normal operating conditions.
Store this product in a well-ventilated room, and avoid violent
vibration in transportation.
02 03
1.The pressure source is DC compression pump.
2.Innovative designs, simple operation, compacted size, easy
storage and portable.
3.Schematic diagram of working principles
The compressed air generated with the pump inside the main
unit, when pumping out from the nozzle, can suck up the
medication with the negative pressure between the nozzle and
the air tube. The pumped-up medication when impacting on the
To ensure proper use of this product, please read this instruction
manual carefully and operate strictly in accordance with the
requirements of the manual. Please contact the supplier or
manufacturer if there is any doubt.
III. Structural Features and Working Principles
IV. Electrical Schematic
top of the septum can turn into very fine aerosol before ejecting
to the outside.
Figure 2: Electrical schematic
Electrical maintenance should be operated by professionals.
II. Use and Maintenance
Compressed air
Baffle
Aerosol Aerosol
Nozzle Straw
Medication Medication
Figure 1
04 05
Users, before installing and commissioning, shall first check
whether the appearance of the product is good, and whether the
variety and number of attachments is in line with the list of
accessories attached to the specifications. If there is any defect,
please contact the supplier or manufacturer timely.
I. Open-package Checking
II. Schematic of each components and names of the whole machine
Medication
cup
Medication
cup
Power Switch
Power Switch
Air tube
Air tube
Power plug
Power plug
Filter cover
Main unit
Main unit
Holder
Holder
Air Outlet
Air Outlet
Figure 3: Schematic diagram of components (405A)
Figure 4: Schematic diagram of components (405B)
Figure 5: Schematic diagram of the nebulizer kit and accessories
Cap
Baffle
Mask Medication cup
Mouthpiece
Air tube
06 07
AC adapter
Power cable
Connector plug
Figure 6: Schematic diagram of the AC adapter
1. Open the cap.
Caution:
Consult with physicians when nebulizing medication.
Pour the correct amount of medication into the medication cup
and do not exceed the maximum mark.
The scale on the medication cup is a reference. Please use the
scale on your syringe or vial for accurate measurement of
2. Add the correct amount of
prescribed medication to the
medication cup.
III. Preparing the Nebulizer for Use
medication.
After the medication is added to the medication cup, please
properly place the cup and avoid the dumping of the cup and the
medication flowing outside.
3.Cover the cap and connect the mouthpiece or mask.
4. Turn the power switch to the off ("○") position.
5. Plug the AC adapter with
the main unit.
6. Plug the adapter into a
power outlet.
or
405A 405B
08 09
Caution:
Make sure the AC adapter plug must be fully inserted into the
power outlet when in use.
Do not plug or unplug the AC adapter into the electrical outlet
with wet hands.
※ Use on holder
Please use the holder when temporarily placing medication cup.
1. Turn the power switch to the on ( _ ) position
2. As the main unit starts, connect the air tube to the connector of
the main unit and the medication cup respectively.
1) Connect one end to the main unit connector.
2) Connect the other end to the medication cup connector.
So far, preparation is ready
The included masks are premiums for the test machine. In official
use, please purchase nebulization masks with medical
registration certificate. The nebulizer kit are attachments. In
addition to the accessories and other sold products, please do
not use other components.
405A
405A
405B
405B
IV. Steps
405A 405B
1
2
2
1
2
10 11
Caution:
Make sure the air tube is firmly connected to the main unit and
the medication cup.
Caution:
Do not pull the power cord strongly when unplugging it. Please
hold the adapter and pull it out.
Caution:
In nebulization, keep the mouthpiece in mouth and close your
mouth.
Do not tilt the nebulizer kit so the angle of the kit is greater than
45 degrees. Medication may flow into the mouth and the spraying
may be ineffective.
If there is anything unusual in using, please stop using it
immediately.
In nebulization, check whether there is visible aerosol discharging
from the medication cup. In the event of irregular spray, please
immediately stop the treatment.
Be sure to wipe the face after using
nebulizer mask, and do not let the
medication left in the face.
※ Rotating the cap can properly
adjust aerosol quantity.
3. Hold the nebulizer kit for treatment.
1. Cleaning
Following cleaning instructions after each use will prevent any
remaining medication in the bottle from drying resulting in the
device nebulizing effectively and will help prevent infections.
First, remove the baffle and accessories, discharge remaining
medication in medication cup, and do related cleaning or
disinfection.
1) Baffle, mask and mouthpiece
Rinse with clean water or immerse in warm water for 15 minutes
4. After treatment, turn the power switch to the off (○) position.
5. Disconnect the nebulizer kit from the air tube.
6. Check the air tube. No condensation or moisture should
remain in the air tube.
7. Disconnect the air tube.
8. Unplug the adapter from
the power outlet.
Inhaling with the mouthpiece or mask
405A 405B
V.Cleaning after Each Use
12 13
to ensure hygienic cleaning. Add appropriate amount of vinegar
in the water, and then dry naturally in a clean place.
2) Main unit and air tube
Please wipe with moisturized cloth and then dry naturally.
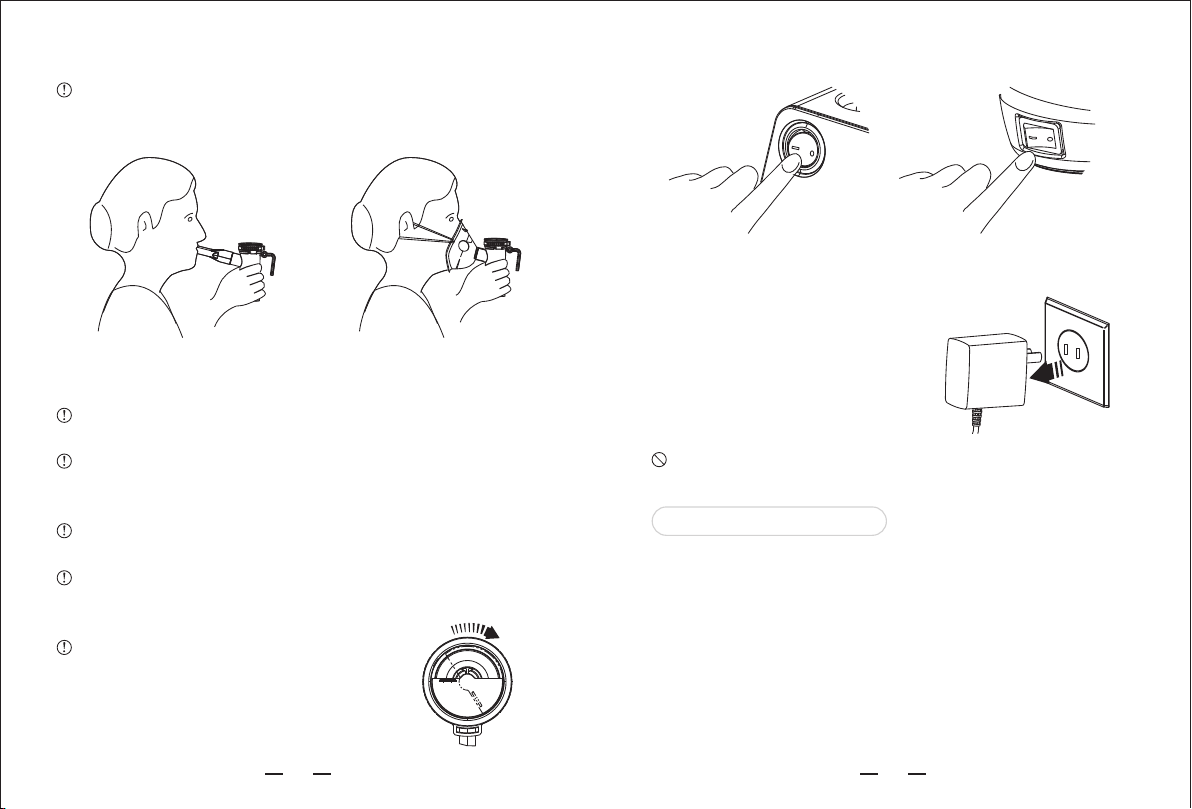
Methods for removing water inside the air tube:
1) Make sure the air tube is connected to the main unit.
2) Remove the air tube from the accessories of medication cup.
After the main unit power is turned on, use fingers open and
close the air tube ports repeatedly to exhaust water droplets.
Caution:
Always dispose of any remaining medication in the medication
cup after each use. Use fresh medication each time you use the
device.
After cleaning, all attachments must be dried and then stored in a
clean place.
Do not store the air tube when there is moisture or medication
residue inside.
Disinfection
Make sure the parts after each use are disinfected. If pollution is
serious, please replace parts with new ones timely. There are two
disinfection methods:
1) Use a commercially available disinfectant. Please follow
the instructions provided by the disinfectant manufacturer.
a) Disinfectant soaking should be in accordance with the time
required in the instruction manual of disinfectant.
Rinse with clean warm water and allow to air dry in a clean
environment.
Caution:
After the nebulizer kit are removed from the disinfectant,
according to instructions on disinfectant, sufficiently wash the
units with clean water, and take care to avoid residual disinfectant
for disinfectant inhalation may cause worsening of symptoms.
If colored disinfectants (such as chlorhexidine) are used, after a
long time using, there may be different color changes of units.
This is not a problem on the physical properties. When color
change is serious, please purchase separately sold items to
replace.
2) Add enough water in the container, put parts that can be
sterilized by boiling, heat up to boiling for 15 to 20 minutes. After
boiling, carefully take out the units, shake off excess water and
allow to dry in a clean environment.
Caution:
Do not cook the air tube, mask, filter, filter cover and accessories
in boiling water or use boiling water to wash to prevent heat
deformation.
In the disinfection process, please ensure the medication cup is
empty.
When sterilized by boiling, be careful not to burn without water.
14 15
Part name Material
Please select the disinfection method listed in the following table:
Sterilization
by boiling
Ingredient: alcohol
Main disinfectant:
disinfection with
ethanol
Mouthpiece
Mask
Nebulizer
kit
Air tube
Filter
PP
PVC
PP
PVC
PET
○ ○
○
○ ○
×
× ×
× ×
VI. Replacement of filter
VII. Maintenance
Typically, a filter sheet shall be replaced every three months. If
the air filter has changed color, replace it with a new one. If
medication has spilled on the air filter, replace with a new air filter
immediately.
1. Pull the air filter cover to remove from the back side of the
compressor.
2. Replace the filter.
Remove the old filter sheet with a toothpick or other tools and
then install a new one.
3. Install the cover of filter sheet.
Caution:
Before use, make sure the filter sheet is properly installed.
Please use the original filter sheet only and do not use the device
if the filter sheet is not installed.
Do not attempt to wash or clean the filter sheet. Damp air filters
may cause blockages. If water or medication has spilled on the
filter, replace with a new air filter immediately.
Filter sheet has no positive or negative side.
Please confirm whether the filter sheet is clean and whether
there is any stained dust before installing.
To prevent clogs, regularly clean the filter cover sheet with water
(non-boiling) or other methods, dry naturally and install properly.
405A 405B
405A 405B
16
Caution:
Do not use or store when the air tube is bending.
Do not let the main unit, nebulizer kit, AC adapter drop or
subjected to strong shocks.
Do not apply force to the air tube and the nebulizer kit to deform.
Do not poke the nebulizer kit with needles or sharp objects.
Continuous use is prevented.
Do not dissemble the main unit or AC adapter or attempt to repair
them.
Do not use or store in bathrooms and other damp places.
Do not put the main unit or other parts in extreme heat, cold or
direct sunlight.
Do not use benzine, thinner, etc. to clean the air tube.
Please store product away from children, because for it contains
small parts that may be swallowed.
Before maintenance, please unplug the AC adapter.
OFF(power)
Fragile items
ON(power)
Caution! Refer to
attached files Afraid of rain
Up
VIII. Safety Symbols and Meanings in Operating the Device
IX. Common Failure Analysis and Troubleshooting
Symbol Meaning
Type II device
Symbol Meaning
Type B
application
No. Symptom Analysis
1
The device is
abnormally
loud.
The air filter cover
is incorrectly
attached
Power is not on.
The nebulizer kit
has been deformed
in disinfection.
The medication is
excess or the air
tube is not dried
after cleaning.
Medication runs out.
2
3
4
If there are any other questions, please contact the supplier or
manufacturer, or please turn to professionals for maintenance.
The nebulizer kit or
air tube has been
blocked or deformed.
In nebulization,
there is
condensation inside
the air tube.
No
nebulization
when the
main unit is
operating.
There are
water
droplets in air
tube.
The main unit
is not
operating.
Solution
Attach the air filter cover
correctly.
Plug the adapter securely
into an electrical outlet.
Turn the device on.
Replace the nebulizer kit
or air tube.
After the air tube is
connected to the main
unit, repeatedly open and
close the outlet of the air
tube with a finger to get
rid of water.
Add the correct amount
of prescribed medication
to the medication cup.
17