Yuwell YH-550 User manual

BreathCare PAP
Positive Airway Pressure Units
User manual
Name of manufacturer :Suzhou Yuyue Medical Technology Co., Ltd.
Add of manufacturer:No.9 Jinfeng Road, Suzhou Science &
Technology Town, 215163 Suzhou, Jiangsu, PRC
TEL:(+86)0512-67373001
Web address: www.yuyue.com.cn
Shanghai International Holding Corp.GmbH(Europe)
Eiffestrasse 80,20537 Hamburg, Germany
IFU-V-09 version:01
Prepared date:2019-10 1030400-0A
Paper

1. Indications for use ........................................................... 01
2. Contraindications ............................................................ 01
3. Warnings ........................................................................ 01
4. Precautions .................................................................... 03
5. Adverse reactions ........................................................... 04
6. Package table ................................................................. 05
7. Picture and explanation for product ................................. 05
8. Explanation of button ...................................................... 07
9. Installation ...................................................................... 07
10. Therapy ........................................................................ 09
11. Function ....................................................................... 10
12. Caring for your device ................................................... 15
13. Therapy data ................................................................ 19
14. Traveling ...................................................................... 20
15. Trouble shooting ........................................................... 20
16. Specified of technology ................................................. 23
17. Symbols ........................................................................ 27
18. Limited warranty ........................................................... 28
19. Repairing ...................................................................... 29
20. List of cables ................................................................. 29
21. Technical description .................................................... 29
22. Warranty card .............................................................. 34
Content
Welcome
The YH-550 is YUWELL's auto-adjusting pressure device. The YH-350 is
YUWELL's continuous positive airway pressure (CPAP) device.
Warning
Read this entire guide before using the device.
Caution
In the US, federal law restricts this device to sale by or on the order of a
physician.

01 02
1. Indications for use
The YH-550 self-adjusting device and YH-350 are indicated for the treatment of Obstructive Sleep
Apnea (OSA) in patients weighing more than 66 lb (30 kg). They are intended for home use only.
YH-550 and YH-350 consist of main device, water tank and power adapter. Mask and air tube are
purchased. Mask and air tube are type BF applied part. The patient is an intended operator.
2. Contraindications
Positive airway pressure therapy may be contraindicated in some patients with the following pre-
existing conditions:
Severe bullous lung disease, pneumothorax, pathologically low blood pressure, dehydration,
cerebrospinal fluid leak, recent cranial surgery, or trauma
3. Warnings
yDo not maintain the device while it is in use, otherwise it may lead to unacceptable risk.
yDo not modify this equipment without authorization of the manufacturer or open this device by
yourself, contact YUWELL when the device need to be repaired.
yThis device cannot be used for life support. It may be shut down by turning off the electricity, but
no unacceptable risk will happen.
yThe device can't be used in the environment where the air is mixed with flammable anesthetic
gases or nitrous oxide gases. (Non-AP and Non-APG series PAP)
yThe sources of oxygen must be located more than 1 m from the BreathCare PAP to avoid the risk
of fire and burns.
ySupplemental oxygen must not be used while smoking or in the presence of an open flame.
yAlways make sure that the device is turned on and airflow generated before the oxygen supply
is turned on. Always turn the oxygen supply off before the device is turned off, so that unused
oxygen will not accumulate within the device enclosure or create a risk of fire.
yMake sure that you arrange the cables and air tube so that they will not twist around the head or
neck. Otherwise it may result in strangulation.
yIf you notice any unexplained change in the performance of the device, if it is making unusual
sounds, if the device or the power supply are dropped or mishandled, or if the enclosure is broken,
discontinue use and power off the equipment, then contact your provider or YUWELL Service
Center.
yDo not place the device where it can be bumped or where someone is likely to trip over the power
cord.
yDo not block the air tube and/or air inlet of the device while in operation otherwise it could cause
overheating of the device.
yKeep the area around the device dry, clean and clear of anything (e.g. clothes, bedding, lint,
dust or direct sunlight) that could block the air inlet, cover the power supply unit, affect patients’
breathing or reduce the life of device.
yPlace the device on the stable table. Placing device on the soft, out of flatness surface is forbidden.
yKeep device far away from water.
yMake sure the power cord and plug are in good condition and the equipment is not damaged.
yKeep the power cord away from hot surfaces.
yBeware of electrocution. Do not immerse the device, power supply or power cord in water. If liquids
are spilled into or onto the device. Unplug the device and let the parts dry naturally and contact
YUWELL Service Center.
yAlways unplug the device before cleaning and make sure that all parts are dry before plugging it
back in.
yThis device cannot be used for multiple patients.
yUse of this equipment adjacent to or stacked with other equipment should be avoided because
it could result in improper operation. If such use is necessary, this equipment and the other
equipment should be observed to verify that they are operating normally.
yUse of accessories, transducers and cables other than those specified or provided by the
manufacturer of this equipment could result in increased electromagnetic emissions or decreased
electromagnetic immunity of this equipment and result in improper operation.
yPortable RF communications equipment (including peripherals such as antenna cables and

03 04
external antennas) should be used no closer than 30 cm (12 inches) to any part of the BreathCare
PAP, including cables specified by the manufacturer. Otherwise, degradation of the performance
of this equipment could result.
yInterconnection of this equipment to other equipment which is not the supply one is forbidden.
yNebulisation or humidification can increase the resistance of breathing system filters and the
operator must monitor the breathing system filter frequently for increased resistance and blockage
to ensure the delivery of the therapeutic pressure.
yFailure to use a mask or accessory that minimizes rebreathing of carbon dioxide or permits
spontaneous breathing can cause asphyxiation.
yKeep device far away from the following environments, e.g. magnetic fields, electromagnetic
fields, external electrical influences, electrostatic discharge, pressure or variations in pressure,
acceleration, thermal ignition sources and so on.
yDo not block the several holes in your mask, otherwise it will result strangulation.
yHumidity performance of the device can be compromised when used outside the specified ambient
temperature range or humidity range.
yThe performance of the device can be compromised when exposed to environment, for example,
electrocautery, electrosurgery, defibrillation, X-ray(gamma radiation), infrared radiation, conducted
transient magnetic fields, magnetic resonance imaging (MRI), and radiofrequency interference.
yWhen the device is used near the children or disabled persons, the device must be supervised. Do
not let the children or disabled persons inhale or swallow small parts. Otherwise , it may result in
choking.
yKeep the area around the device dry, clean and clear of anything (eg, pets, pests or children) that
could affect the device hygiene, drop the device, and so on.
yThe device is intended for single patient use only. Do not let others use it.
4. Precautions
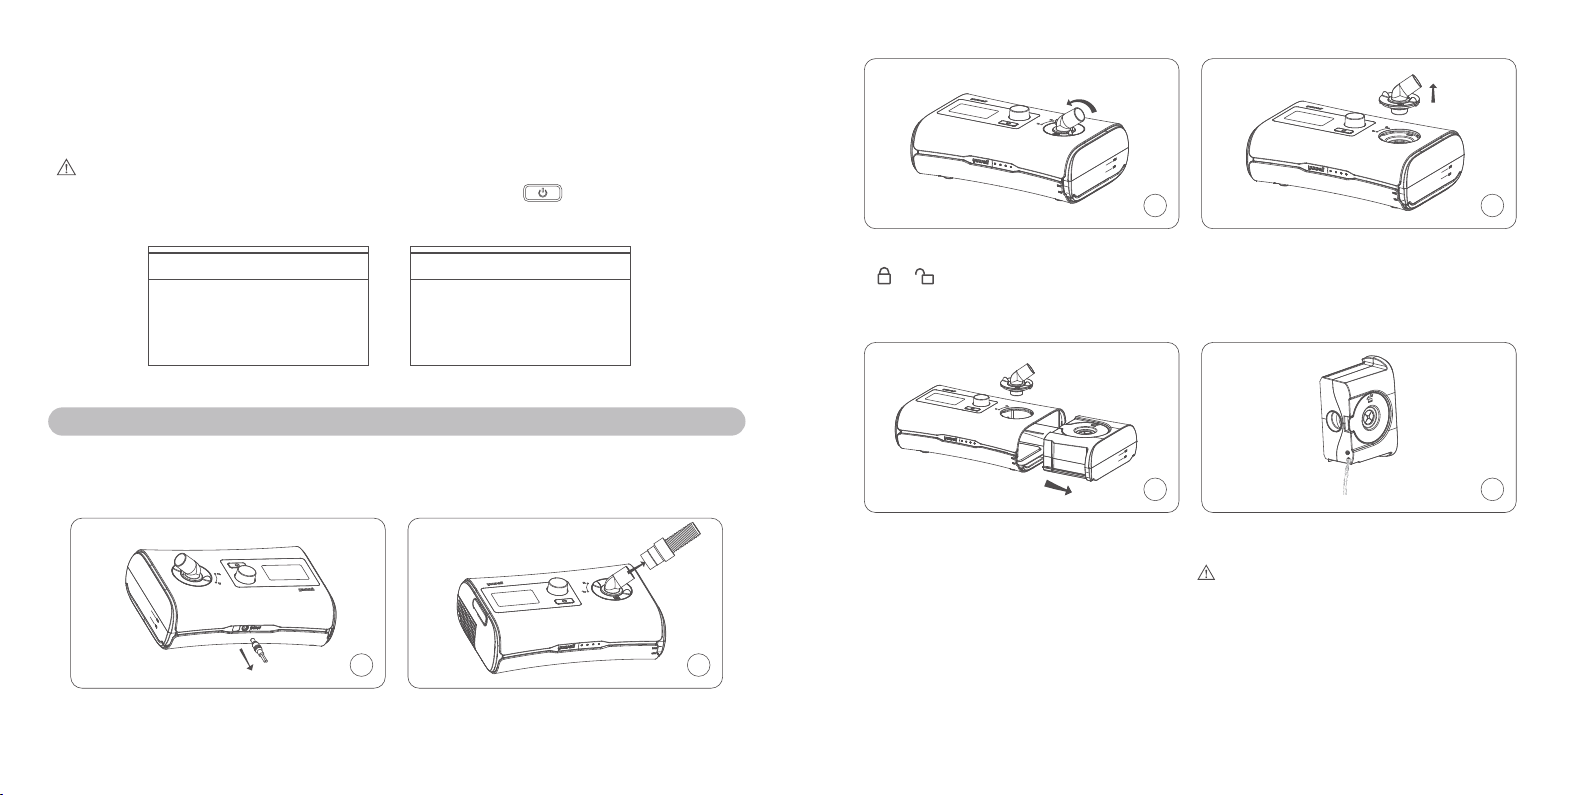
yUsing only YUWELL part and accessories with device. Non-YUWELL parts may reduce
effectiveness of the treatment and/or damage the device.
yUse only vented masks recommended by YUWELL or by your doctor with this device. Fitting the
mask without the device blowing air can result in rebreathing of exhaled air. Make sure that the
mask vent holes are kept clear and unblocked to maintain the flow of the fresh air into the mask.
yDo not use bleach, chlorine, aromatic-based solutions, moisturizing or antibacterial soaps or
scented oil to clean the device, water tank or air tube. Otherwise it may cause damage and reduce
the life of these products.
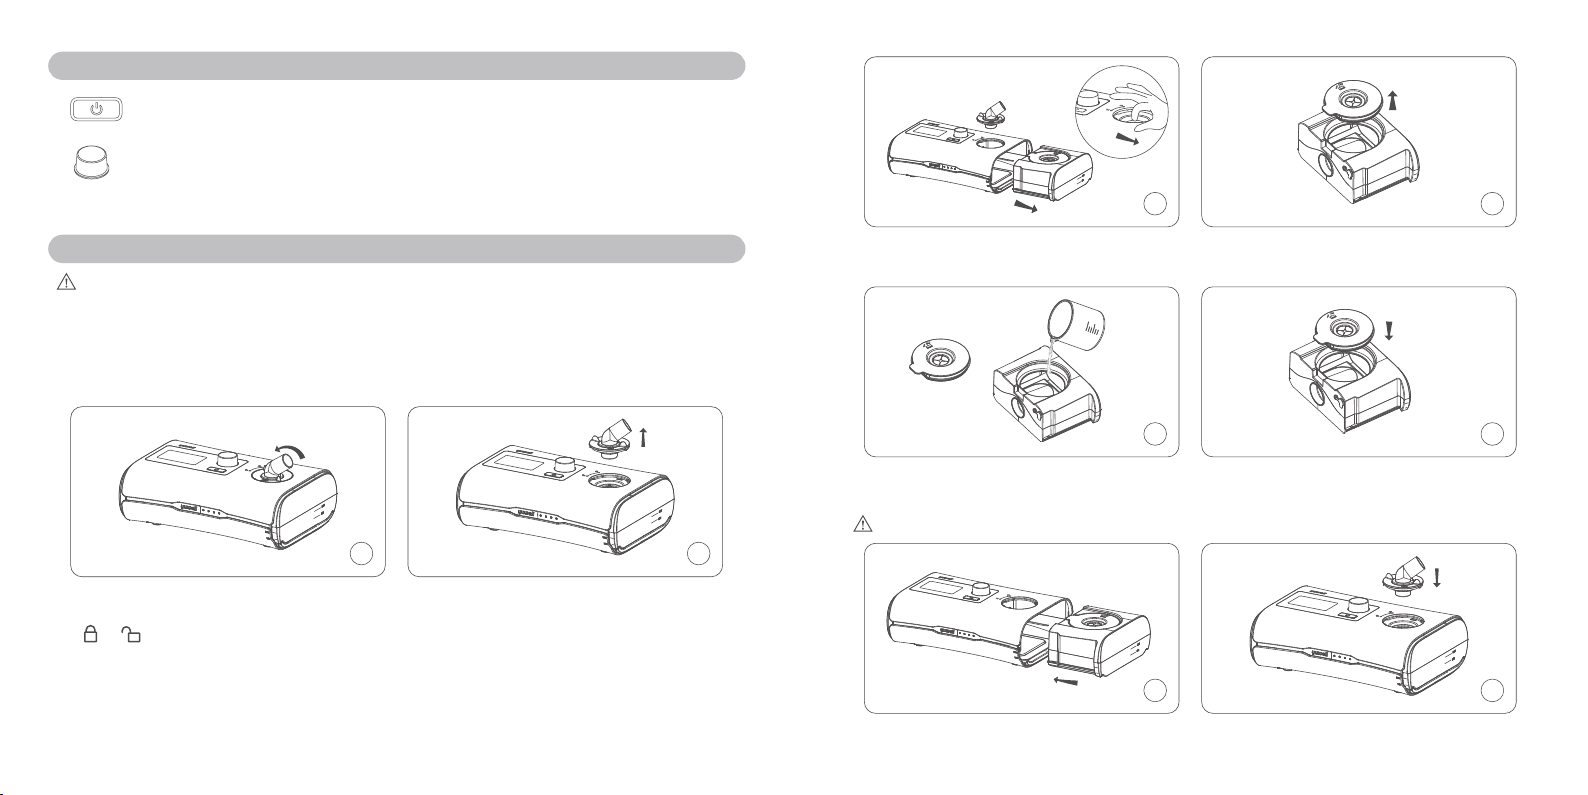
yIf you use the humidifier, always place the device on a level surface lower than your head to
prevent the mask and air tube from filling with water.
yLeave the water tank to cool for ten minutes before handling to allow the water to cool and to make
sure that the water tank is not too hot to touch.
yMake sure that the water tank is empty before transporting the device.
yThis equipment might not offer adequate protection to radio-frequency communication services.
The user might need to take mitigation measures, such as relocating or re-orienting the
equipment.
yThe proper placement and positioning of the mask on the face is critical to the consistent operation
of this equipment.
yNot intended for use with patient whose upper airways have been bypassed.
yThe time required for the device to warm from the minimum storage temperature between uses
until the device is ready for its intended use when the ambient temperature is 20 ℃ is about 2
hours.
yThe time required for the device to cool from the maximum storage temperature between uses until
the device is ready for its intended use when the ambient temperature is 20℃ is about 2 hours.
yThis device is not intended for children, and patients who are physically or mentally deficient can’t
use the device without assistance or supervision.
5. Adverse reactions
You should report unusual chest pain, severe headache, or increased breathlessness to
your prescribing physician. An acute upper respiratory tract infection may require temporary
discontinuation of treatment.

05 06
The following adverse reactions may arise during the course of therapy with the device:
ydrying of the nose, mouth, or throat
ynosebleed
ybloating
year or sinus discomfort
yeye irritation
yskin rashes.
6. Package table
Name Quantity Name Quantity
Main device 1 Mask (with mask accessories) 1
Water tank 1 Air filter 2
Air tube 1 SD card 1
Power adapter and Cable(as part
of the main device) 1 User manual 1
Bag 1
7. Picture and explanation for product
Air outlet
Dial
START/STOP button
Interface silicone cover
Air filter
Indicator light
(the colour is blue, and it
will light with the backlight
of LCD lighting)
Screen
Movable cover component
Knob cover component
Air outlet of main device
to water tank
Heater plate
Silica gel stopper
Air inlet of water tank
Air outlet of water tank
Water tank
Power interface

07 08
8. Explanation of button
START/ STOP button: Press to start /stop therapy.
Dial: Turn to navigate the menu and press to select an option. Turn to adjust the
options and press to save your choice.
9. Installation
Caution:
Do not overfill the water tank in case the water may enter the air tube and the device.
Appliance coupler or mains plug is used as the isolation means from mains supply, not to position the
equipment so that it is difficult to operate the disconnection device.
The following section will help you install your device by yourself.
1 2
1. Place the device on a stable level surface;
Rotate the knob cover component from the
to .
2. Pull the knob cover component out.
3 4
3. Press the water tank gently and pull it away
from the device.
4. Open the movable cover component.
5 6
5. Fill the distilled water into the water tank, please
notice that do not place the hot water into it.
6. Close the movable cover component.
Caution: Please change the distilled water in the water tank every day.
7 8
7.Insert it into the side of the device. 8. Close the knob cover component

09 10
910
9. Rotate the knob cover component from the
to .
10.Connect the air tube firmly to the air outlet
located on the top of the device.
11 12
11.Connect the free end of the air tube firmly
onto the mask; See the mask user guide
for detailed information.
12.Plug the power connector into the rear of
the device.
10. Therapy
f10.1 Start therapy
① Fit your mask;
② Press or breathe normally if Smart Start/Stop is enabled, therapy will start. During the
therapy, the real-time average pressure, the set pressure, the ramp time (min), and the humidity
level will all be displayed on the screen;
③ During the ramp time, the pressure increases gradually until the setting pressure has been
reached;
④ The screen backlight will turn off automatically after two minutes of no action. You can press any
button to turn it back on.
Caution:
When the level of the humidity is 1-6 and the device is delivering gas pressure,the heating plate
is heating ( including the situations that the screen shows "Large Leakage" and the backlight of the
screen is off ) . When the level of the humidity is 0, the heat plate is not heating. Also if the device is
not delivering gas pressure, the heat plate will not heat either.
Ramp: 15
Humidity: 6
APAP
6.0-15.0
6.0
Pressure
Picture 1: therapy
f10.2 Stop therapy
① Remove your mask first;
② Press the or if Smart Start/Stop is enabled, therapy will stop automatically after about one
minute;
③ To power off your device, please separate your plug from the electricity.
11. Function
f11.1 Function that patient can safely use
① Information:
You can read summary of sleep report on information page. Following parameters will be displayed
yAHI: indicates the number of apneas and hypopneas per hour.
yUsed Time: the number of hours of the device working last session(h).
yTreatment Time: the number of hours of therapy patient received last session(h).
yAverage Pressure: the average pressure of the last therapy (cmH2O/hPa).

11 12
yAverage Leak volume: average air leak volume per minute of the last therapy (L/min).
yTotal Time: the number of hours of the device working.
yP90: the pressure for the 90 percent of the last therapy (cmH2O/hPa).
yVersion: the version of software used for the device.
ySN: the serial number of device.
AHI 0.0
Used Time 0.4
Treatment Time 0.4
Average Pressure 20.0
Average Pressure 0.0
Average Leak Volume 0.0
Total Time 37.9
P90 20.0
P90 20.0
Version V1.00_AIC
SN YH550A*940100001
Back<<
Picture2-1:Info Picture 2-2:Info Picture 2-3:Info
② Ramp:
Ramp time is designed to make you more comfortable at the beginning of the therapy; you can adjust
the ramp time from 0 to 45 minute with an increment of 5min.
To adjust the Ramp:
yHighlight the "Ramp" and press dial to see your current setting;
yPress dial and rotate it to adjust your setting;
yPress dial to save your change.
Info
Humidity
Setup
Ramp Ramp
0
Picture 3-1: Home Picture 3-2: Ramp
③ Humidity level:
Humidifier is designed to moisten the air and is designed to make therapy more comfortable. If you
are getting a dry nose or mouth, turn up the humidity. If you are getting any moisture in your mask,
turn down the humidity. You can set Humidity level between 0 to 6, where 0 means this function is
disabled, 1 is the lowest humidity setting and 6 is the highest humidity setting.
The temperature of each level on the heater plate is as following (accuracy is ±4℃ )
0=OFF 1=33℃ 2=35℃ 3=40℃ 4=45℃ 5=50℃ 6=55℃
This temperature has been tested with empty water tank, with 10 minutes preheating time.
To adjust the humidity level:
yHighlight the "Humidity", press dial to enter the humidity page;
yPress the dial and rotate it to choose humidity level, then press dial again to save your change and
back to home page;
yYou can change humidity level at any time during therapy.
Info
Humidity
Setup
Ramp Humidity
6
Picture4-1: Home Picture4-2: Humidty
④ Setting:
ySound Reminder: When this function is enabled, the device will give a reminder, if abnormal air
leakage occurs.
ySmart Start/Stop: When this function is enabled, therapy starts automatically when you breathe
into your mask. After you remove your mask, it will stop automatically in one minute.
yFPS Level: When this function is enabled, you may feel easier to breathe out; It helps you get used
to the therapy. It has 4 levels of FPS, 0 means this function is disabled, 1 is the lowest level of FPS,

13 14
and 3 is the highest level of FPS. The higher FPS level means more comfortable expiration you will
get.
yDate: Adjust the date (year, month, day) displayed on the device.
yTime: Adjust the time (hour, minute) displayed on the device.
yLanguage: You can choose English or Chinese.
yFilter Cotton Reminder: When this function is enabled, this can remind you to check and change
the filter.
yReset: When this function is enabled, parameters of the device will be reset to the factory defaults
and data will be erased.
Info
Humidity
Setup
Ramp
Sound Reminder
Smart Start/Stop OFF
FPS Level 0
Date 2019-5-4
OFF
Picture 5-1: Home Picture 5-2: Setup
Date 2019-5-4
Time 9:27
Language EN
OFF
Filter Cotton Reminder
Language EN
Filter Cotton Reminder OFF
Reset
Back<<
>>
Picture5-3: Setup Picture 5-4: Setup
f11.2 Function that patient must use under the direction of doctor (Clinical menu)
The patient should use the device by the direction of physician.
① Set Mode (CPAP or APAP)
yAt home page, press and dial at the same time, the clinical menu will be shown on screen.
yRotate the dial, highlight the "Mode" , and then select CPAP or APAP.
yAfter mode setting, press dial to save your change.
yHighlight the "Back", press dial to back to home page.
② Set Pressure
yAt clinical page, choose "CPAP" mode, Highlight "Initial Pressure" or "Therapy Pressure" , press
and rotate dial to set suitable value.
yYou can rotate the dial to the right or to the left to rise or decrease therapy pressure (each step is 0.5
cmH2O / hPa).
yAfter setting therapy pressure, press dial to save your change.
yHighlight the "Back", press dial to back to home page.
yYou can set "Max Pressure" , "Min Pressure" , "Initial Pressure" and "Therapy Pressure" of APAP
mode according to above method.
Notice:
When you try to make the max pressure lower than min pressure,initial pressure or therapy pressure,
these pressures will be equal to the max pressure.
③ Set Pressure Unit
yAt clinical page, highlight "Unit".
yRotate the dial to the right or left, set your pressure unit (cmH2O or hPa).
yAfter setting pressure unit, highlight the "Back" , press dial to back to home page.
④ Set FPS Level
yAt clinical page, Highlight "FPS Level".
yRotate the dial to the right or left, set your level of FPS (0-3 level).
yAfter setting level of FPS, highlight the "Back", press dial to back to home page.
⑤ Set Ramp
yAt clinical page, Highlight "Ramp".
yRotate the dial to the right or left, set your ramp time (0-45minutes, step value is 5 minutes).
yAfter setting Ramp, highlight the "Back", press dial to back to home page.

15 16
⑥ Set Humidity Level
yAt clinical page, Highlight "Humidity Level".
yRotate the dial to the right or left, set your humidity level (0-6level, step value is 1 level).
yAfter setting humidity level, highlight the "Back", press dial to back to home page.
Caution:
During your therapy, you can go to clinical menu by pressing dial and at the same time. Section
11.2 clinical menu tells the method about how change all the parameters.
Mode CPAP
Inital Pressure 4.0
Therapy Pressure 20.0
Unit cmH20
Mode APAP
Max Pressure 15.0
Min Pressure 4.0
4.0Initial Pressure
Picture 6-1:Clinical menu (CPAP) Picture 6-2:Clinical menu (APAP)
12. Caring for your device
It is important that you regularly clean your device to make sure you receive optimal therapy. The
following sections will help you with disassembling, cleaning, checking, reassembling your device.
f12.1 Disassembling
1 2
1. Pull the power connector out of device. 2. Hold the cuff of the air tubing and gently pull
it away from device.
3 4
3. Rotate the knob cover component from the
to .
4. Pull the knob cover component out.
5 6
5. Press the water tank gently and pull it away
from the device.
6. Open the silica gel stopper and discard the
remaining water.
Notice:Close the silica gel stopper after the
water has been poured out.

17 18
78
7. Open the movable cover component. 8. Hold both the cuff of the air tubing and the
swivel of the mask, then gently pull apart.
Notice:Don't pull the threaded portion of the
air tubing.
f12.2 Cleaning
Please clean your device under the service environment of this device. It may be influenced by dust,
thus please following several steps to clean your device, and you should clean your device at least
once a week. Refer to the mask and air tube user guides for detailed instructions on cleaning your
mask and air tube.
yIf there is dust on your device, please wipe it with the dry compress;
yWash the air tube and water tank in warm water using mild detergent. The temperature of the
warm water should not be over 41℃ .
Caution:
Do not use bleach, chlorine, aromatic solution, moisturizing factor, antibacterial soaps, and sesame
oil to clean the device.
Do not wash in a dishwasher or washing machine.
Please wash the water tank every day.
yRinse the water tank and air tube thoroughly and allow to dry out of direct sunlight and/or heat.
(Temperature should not exceed 40℃ ).
Warning:
It is generally not necessary to sterilize your water tank if you are following the cleaning method.
When the water tank is contaminated, it can be disinfected by immersing the water tank in a water
which temperature is 75℃ ±2℃ for 30 minutes.
f12.3 Checking:
You should check power adapter and cable, water tank, air tube and air filter regularly in case of any
damage.
a. Check the power adapter and cable
yWipe the power adapter and cable with the dry compress if it is dirty.
yReplace the power adapter and cable if it is broken.
b. Check the water tank
yReplace the water tank if it is broken or cracked.
yReplace the water tank if the seal is torn or cracked.
c. Check the air tube
yReplace the air tube if there are any holes, tears or cracks.
d. Check the air filter
yPlease check the air filter every week and replace the air filter at least every four weeks.
yIf you find some particle blocked in the air filter, replace it more often.
To replace the air filter
1 2
1. Open the air filter cover; 2. Remove the dirty air filter;

19 20
3 4
3. Place a new air filter onto the air filter cover; 4. Close the air filter cover.
Caution:
Make sure the air filter is fitted at all times to prevent water and dust from entering the device.
f12.4 Reassembling:
After finishing all the cleaning steps, reassemble all these parts together. When the water tank and air
tube are dry, you can reassemble the parts.
yOpen the movable cover component and fill the distilled water into the water tank.
yClose the movable cover component, and insert it into the side of the device.
yClose the knob cover component and rotate it from to .
yConnect the air tube firmly to the air outlet located on the top of the device.
yConnect the free end of the air tube firmly onto the assembled mask.
13. Therapy data
BreathCare PAP records your therapy data for you and your care provider so they can view and
make changes to your therapy if required. The data is recorded and then transferred to your care
provider via a SD card.
1. Open the silica gel stopper at the left side of the device;
2. Push the SD card into the SD card connector;
3. Remove the SD card from the device after it wrote successfully.
Caution:
Don't use the interface of the mini USB, since it is reserved for the manufacture.
14. Traveling
You can take your device with you wherever you go. Just keep the following in mind.
yUse the travel bag provided to prevent damage to the device.
yEmpty the water tank.
15. Trouble shooting
When your device has trouble, look for the following table to find solution. Contact your physician or
your provider if you cannot solve your problem. Do not try to open the device.

21 22
f15.1 General troubleshooting:
Trouble Cause Solution
Air is leaking from
around my mask. Mask may be fitted incorrectly.
Ensure your mask is fitted correctly.
See your mask user guide to check
your mask fit and seal.
I am getting a dry or
blocked nose. Humidity level may set too low. Adjust the humidity level.
I am getting droplets of
water on my nose, in
the mask and air tube.
Humidity level may be set too
high. Adjust the humidity level.
My mouth is very dry
and uncomfortable.
Air may be escape from your
mouth.
Increase the humidity level.
You may need a chin strap to keep your
mouth closed or a full face mask.
Air pressure in my
mask seems too
high (it feels like I am
getting too much air).
Ramp may be turned off. Enable your ramp option.
Air pressure in my
mask seems too low
(it feels like I am not
getting enough air).
Ramp may be in progress. Start your therapy after the setting
pressure reached or turn ramp time off.
My screen is black.
After therapy start, the screen
backlight went off;
In other case, the power do not
connect firmly.
Press dial to turn on the screen light;
Check the connection of power, ensure
it connect with device firmly.
My water tank is
leaking.
Water tank assemble
incorrectly or it is broken.
Check the water assemble correctly;
Contact your provider if your water tank
is broken.
f15.2 Other trouble:
Message in LCD Meaning of error Solution
ERROR 1 There is a mistake of pressure
sensor
Please contact your provider
ERROR 2 There is a mistake of flow sensor Please contact your provider
ERROR 3 There is a mistake of temperature
sensor
Please contact your provider
ERROR 5 There is a parameter exceed in
parameter range
Please restart the device or contact
your provider
ERROR 6 The pressure is exceed in pressure
range
Please restart the device or contact
your provider
ERROR 7 It is failed to supply power to the
humidifier
Please contact your provider
ERROR 8 There is a mistake of blower Please restart the device or contact
your provider
ERROR 9 There is a mistake of RTC(loss
power)
Please adjust the time of the device
or contact your provider

23 24
16. Specied of technology
Items Specifies
Power Powered by adapter (Model: BJE1M-0060-N600/DA-60I24)
Input: 100~240VAC, 50~60Hz, 2A max
Output: 24V DC, 2.5A
Environment
conditions
Temperature Operate: +5℃~35℃(+41℉~95℉),Non-condensing
Transport: -20℃ ~70℃(-4℉~158 ℉)
Storage: -20℃ ~70℃(-4 ℉~158 ℉)
Humidity Operate: relative humidity 15%~90%, Non-
condensing
Transport: relative humidity 15%~90%
Storage: relative humidity 15%~90%
Atmospheric pressure
range
700hPa~1060hPa
Altitude ≤ 3000m
Protection class IP 21, Class Ⅱ
Mode of operation Continuous operation
Maximum single fault
steady pressure
Device will shut down in the presence of a single fault if the steady state
pressure exceeds: 40 cmH2O
Sound Sound pressure level Sound pressure level measured according to ISO
80601-2-70:2015 (CPAP mode)
BreathCare PAP ≤ 32dB(A)
Sound power level Sound power level measured according to ISO
80601-2-70:2015 (CPAP mode)
BreathCare PAP ≤ 40dB(A)
Physical properties Dimensions
(length*width*height)
272.5mm * 181mm * 93mm or 10.73'' * 7.13'' * 3.7''
Weight About 1419 g
Air tube Plastic hose,about 1.8m
Maximum volume of
water tank
260±10 mL
Materials of water tank PC, Injection molded plastic, stainless steel and
silicone seal
Air outlet 22 mm (complies with ISO 5356-1:2015)
Temperature Maximum temperature
of heater plate
55℃ (131 ℉)(±4℃ )
Cut-out 110℃(if it is damaged, return to manufacturer)
Maximum gas
temperature
≤ 41℃
Air filter Material: Polyester non-woven fiber
Average arrestance: ≥ 85%for~2.5 micron dust
Therapy pressure 4~20 hPa (adjustable, step is 0.5hPa) or 4~20 cmH2O
Initial pressure 4~20 hPa (adjustable, step is 0.5hPa) or 4~20 cmH2O

25 26
Maximum pressure 4~20 hPa (adjustable, step is 0.5hPa) or 4~20 cmH2O
Minimum pressure 4~20 hPa (adjustable, step is 0.5hPa) or 4~20 cmH2O
Ramp 0~45min (adjustable, step is 5minutes)
Maximum flowrate The BreathCare PAP performance at set pressure is shown below:
Test pressures
Measured pressure at the
PATIENT-CONNECTION
PORT(hPa)
4 8 12 16 20
2.97 7.06 11.25 15.29 19.34
Average flow at the PATIENT-
CONNECTION PORT (L/min) 98.8 107.8 107.1 111.1 114
Pneumatic flow path:
Atmosphere Filter Blower Air tube
Pressure
sensor Leak
Mask
Humidifier
performance
Humidification system output: ≥ 12mg/L
Relative humidity: ≥ 50%
Humidification system Pressure drop
(ISO 5367:2014)
Flowrate (L/min) Pressure drop (cmH2O)
30 0.18
60 0.6
90 1.2
Gas leakage at the
maximum operating
pressure
(ISO 5367:2014)
< 2 L/min
Displayed values Value Range Display resolution
Pressure measurement:
Mask pressure 4~20 cmH2O 0.1 cmH2O
Value Accuracy
Pressure measurement:
Mask pressure ±[2% of the full scale+4% of the set value]
Pressure accuracy Maximum static pressure variation at 10 cmH2O according to ISO80601-2-
70:2015
±[2% of the full scale+4% of the set value]
Maximum dynamic pressure variation according to ISO80601-2-70:2015
Pressure(cmH2O) 10bpm 15bpm 20bpm
4 0.6 0.9 1.1
8 1.0 1.2 1.4
12 1.2 1.4 1.6
16 1.4 1.6 1.8
20 1.6 2.0 2.3

27 28
Maximum limited
pressure
The maximum limited pressure
20 cmH2O in normal condition
40 cmH2O under single fault Condition
The Uncertainty of
measurement
For measures of pressure:±0.25 hPa
For measures of flow:±2.5 L/min
Expected service
life
Device(excluding
accessories)
5 years
Water tank 90 days
17. Symbols
f17.1 The following symbols may appear on the product or packaging:
Symbol Meaning Symbol Meaning
Follow instructions for use Press to start /stop therapy
Caution Temperature limitation for storage and
transport
Manufacturer Type BF applied part
Date of manufacture Class II equipment
Serial number Maximum water level
Rx Only Prescription only Minimum water level
Warning: hot surface European Authorized Representative
Environmental information (EU directive 2012/19/EE Waste Electrical and Electronic
Equipment (WEEE))
Protected against finger sized objects and against dripping water on the surface of the
device
f17.2 Disposal statement:
Warning:
Please contact local authorities, your provider, or YUWELL to determine the proper method of
disposal of this device.
18. Limited warranty
YUWELL warrants that your device shall be free from defects in material and workmanship from date
of purchase for the period specified below:
Product Warranty period
Water tank 90 days
Power adapter 1 year
Device 2 years
The quality warranty is only available to the initial customer. It is not transferable. Warranty is void on
product sold, or resold, outside the original purchase, repaired by the company without accredited,
and pollution caused by smoking.
YUWELL has the interpretation about the device's warranty.

29 30
19. Repairing
1. If your device is in trouble, please contact YUWELL or provider. This device only can be repaired
by the provider who has been authorized.
2. The user should follow the instruction of cleaning and safety to guarantee that the device can be
used for a long time.
3. If you have troubles in setting up, using or maintaining the equipment or meet some unexpected
operation or events, please contact YUWELL as well. If you want to know more information about
your device, you can visit the website of YUWELL: www.yuyue.com.cn
20. List of cables
Name Lengths(m)
Cable(AC) 1.5
Cable(DC) 1.2
21. Technical description
f21.1 Compliance information for Emission test
Emission test Compliance
RF emissions CISPR 11 Group 1
RF emissions CISPR 11 Class B
Harmonic emissions IEC 61000-3-2 Class A
Voltage fluctuations/flicker emissions IEC61000-3-3 Complies
f21.2 Compliance information for Immunity test
Immunity test Compliance level
Electrostatic discharge(ESD) IEC61000-4-2 ±8kV contact
±15kV air
Electrical fast transient/burst IEC61000-4-4 ±2kV for power supply lines
Surge IEC61000-4-5 ±1kV differential mode
Voltage dips, short interruptions and voltage variations on
power supply input lines
IEC61000-4-11
0 % UT; 0, 5 cycle
At 0°, 45°, 90°, 135°, 180°, 225°,
270° and 315°
0 % UT; 1 cycle
and
70 % UT; 25/30 cycles
Single phase: at 0°
0 % UT; 250/300 cycle
Power frequency(50Hz) magnetic field
IEC61000-4-8
30A/m
Radiated RF EM fields 10V/m
80 MHz-2,7 GHz
80 % AM at 1 kHz
Conducted disturbances induced by RF fields 3V
0, 15 MHz-80 MHz
6V in ISM and amateur radio bands
between 0, 15 MHz and 80 MHz
80% AM at 1 kHz
NOTE UT is the a.c mains voltage prior to application of the test level.

31 32
Test specifications for ENCLOSURE PORT IMMUNITY to RF wireless communications equipment
Test
frequency
(MHz)
Band a)
(MHz) Service a) Modulation b)
Maximum
power
(W)
Distance
(m)
IMMUNITY
TESTL EVEL
(V/m)
385 380-390 TETRA 400
Pulse
modulation b)
18Hz
1,8 0,3 27
450 430-470 GMRS 460
FRS 460
FM c) ±5kHz
deviation 1 kHz
sine
2 0,3 28
710
704-787 LTE Band 13,17
Pulse
modulation b)
217Hz
0,2 0,3 9745
780
810
800-960
GSM 800/900,TETRA
800, iDEN 820, CDMA
850, LTE Band 5
Pulse
modulation b)
18Hz
2 0,3 28870
930
1 720
1 700-1 990
GSM 1800; CDMA
1900; GSM 1900;
DECT; LTE Band
1,3,4,25;UMTS
Pulse
modulation b)
217Hz
2 0,3 281 845
1 970
2 450 2 400-2 570
Bluetooth, WLAN,
802.11 b/g/n, RFID
2450, LTE Band 7
Pulse
modulation b)
217Hz
2 0,3 28
5 240
5 100-5 800 WLAN 802.11 a/n
Pulse
modulation b)
217Hz
0,2 0,3 95 500
5 785
NOTE
If it's necessary to achieve the IMMUNITY TEST LEVEL, the distance between the transmitting antenna and
the ME EQUIPMENT or ME SYSTEM may be reduced to 1 m. The 1 m test distance is permitted by IEC
61000-4-3.
a) For some services, only the uplink frequencies are included.
b) The carrier shall be modulated using a 50 % duty cycle square wave signal.
c) As an alternative to FM modulation, 50 % pulse modulation at 18 Hz may be used because while it does
not represent actual modulation, it would be worst case.
f21.3 Precautions
According to IEC60601-1-2:2014, BreathCare PAP(Auto CPAP)complies with all applicable
electromagnetic compatibility requirements (EMC) .It may have harmful interference with other
devices if you do not follow the instructions. However, there is not certain it has not interference with
other devices if you follow the instructions. If it does have interference with other device, you can
amend interference by the following methods.
yEnlarge the distance between this device and other device.
yConnect the two devices with different power socket.
yAsk YUWELL engineer for help.
Essential performance and basic safety testing should be done every two years. If your device needs
to be done, please contact your provider or YUWELL. This device only can be tested by the provider
who has been authorized.

33 34
This limited warranty does not cover:
Any damage caused as a result of improper use, abuse, modification or alteration of the product.
Repairs carried out by any service organizations that have not been expressly authorized by
Yuwell to perform such repairs.
Any damage caused as accident, act of god or human factor.
Product which is not involved in quality warranty sheet.
User sign
Date
Contact Department User
Add.
Diagnose Tel.
BreathCare PAP Warranty Card
Model SN
Invoice number Purchasing date
Dealer
Feedback Couplet
22. Warranty card

Contact Department User
Add.
Diagnose Tel.
BreathCare PAP Warranty Card
Model SN
Invoice number Purchasing date
Dealer
This limited warranty does not cover:
Any damage caused as a result of improper use, abuse, modification or alteration of the product.
Repairs carried out by any service organizations that have not been expressly authorized by
Yuwell to perform such repairs.
Any damage caused as accident, act of god or human factor.
Product which is not involved in quality warranty sheet.
User sign
Date
Customer Couplet
This manual suits for next models
1
Table of contents
Other Yuwell Medical Equipment manuals

Yuwell
Yuwell 7B-1 User manual

Yuwell
Yuwell BreathCare PAP User manual

Yuwell
Yuwell 7E-A User manual

Yuwell
Yuwell 7E-B5 User manual

Yuwell
Yuwell YX3 Series User manual

Yuwell
Yuwell YU100 Parts list manual

Yuwell
Yuwell 7F-3 User manual

Yuwell
Yuwell BreathCare PAP User manual

Yuwell
Yuwell 7F-5A User manual

Yuwell
Yuwell 8F-3A User manual
Popular Medical Equipment manuals by other brands

Dräger Medical
Dräger Medical CF 800 Technical documentation

TZ Medical
TZ Medical TRIDENT NANO PATIENT QUICK START GUIDE

ResMed
ResMed AirFit F30 quick start guide

Lloyd
Lloyd GALAXY ULTIMATE Operation manual

Barco
Barco Nio Color 5MP user guide

Datex-Ohmeda
Datex-Ohmeda S/5 Compact Anesthesia Monitor Technical reference manual