1
Contents
1 About this service manual . . . . . . . . . . . . . . . . . . . . . . . . . . . . . . . . . . . . . . . . . . . . . . . . . . . . . .2
1.1 ZELL hotline
. . . . . . . . . . . . . . . . . . . . . . . . . . . . . . . . . . . . . . . . . . . . . . . . . . . . ... . . . . . . . . . . 2
2 Safety warnings . . . . . . . . . . . . . . . . . . . . . . . . . . . ........ . . . . . . . . . . . . . . . . . . . . . . . . . . . .3
3 Electronic diagrams. . . . . . . . . . . . . . . . . . . . . . . . . . . . . . . . . .. . . . . . . . . . . . . . . . . . . . . . . . . .4
3.1 Main power diagram
. . . . . . . . . . . . . . . . . . . . . . . . . . . ........ . . . . . . . . . . . . . . . . . . . . . . . ..4
3.2 Main control board diagram
. . . . . . . . . .. . . . . . . . . . . . . . . . . . .. . . . . . . . . . . . . . . . . . . . . . . . .. 4
4 Flow chart. . . . . . . . . . . . . . . . . . . . . . . . . . . ........ . . . . . . . . . . . . . . . . . . . . . . . . . . . . . . . . . 5
4.1 Overall layout
. . . . . . . . . . . . . . . . . . . . . . . . . . . . . . . . .. . . . . . . . . . . . . . . . . . . . . . . . . . . .. . . 5
4.2 eneral flow chart
. . . . . . . . . . . .. . . . . . . . . . . . . . . . . . . . . . .. . . . . . . . . . . . . ... . . . . . . . . . . . 6
4.3 Recovery
. . . . . . . . . . . . . . . . . . . . . . . . . . . . . . . . . ................................ . . . 6
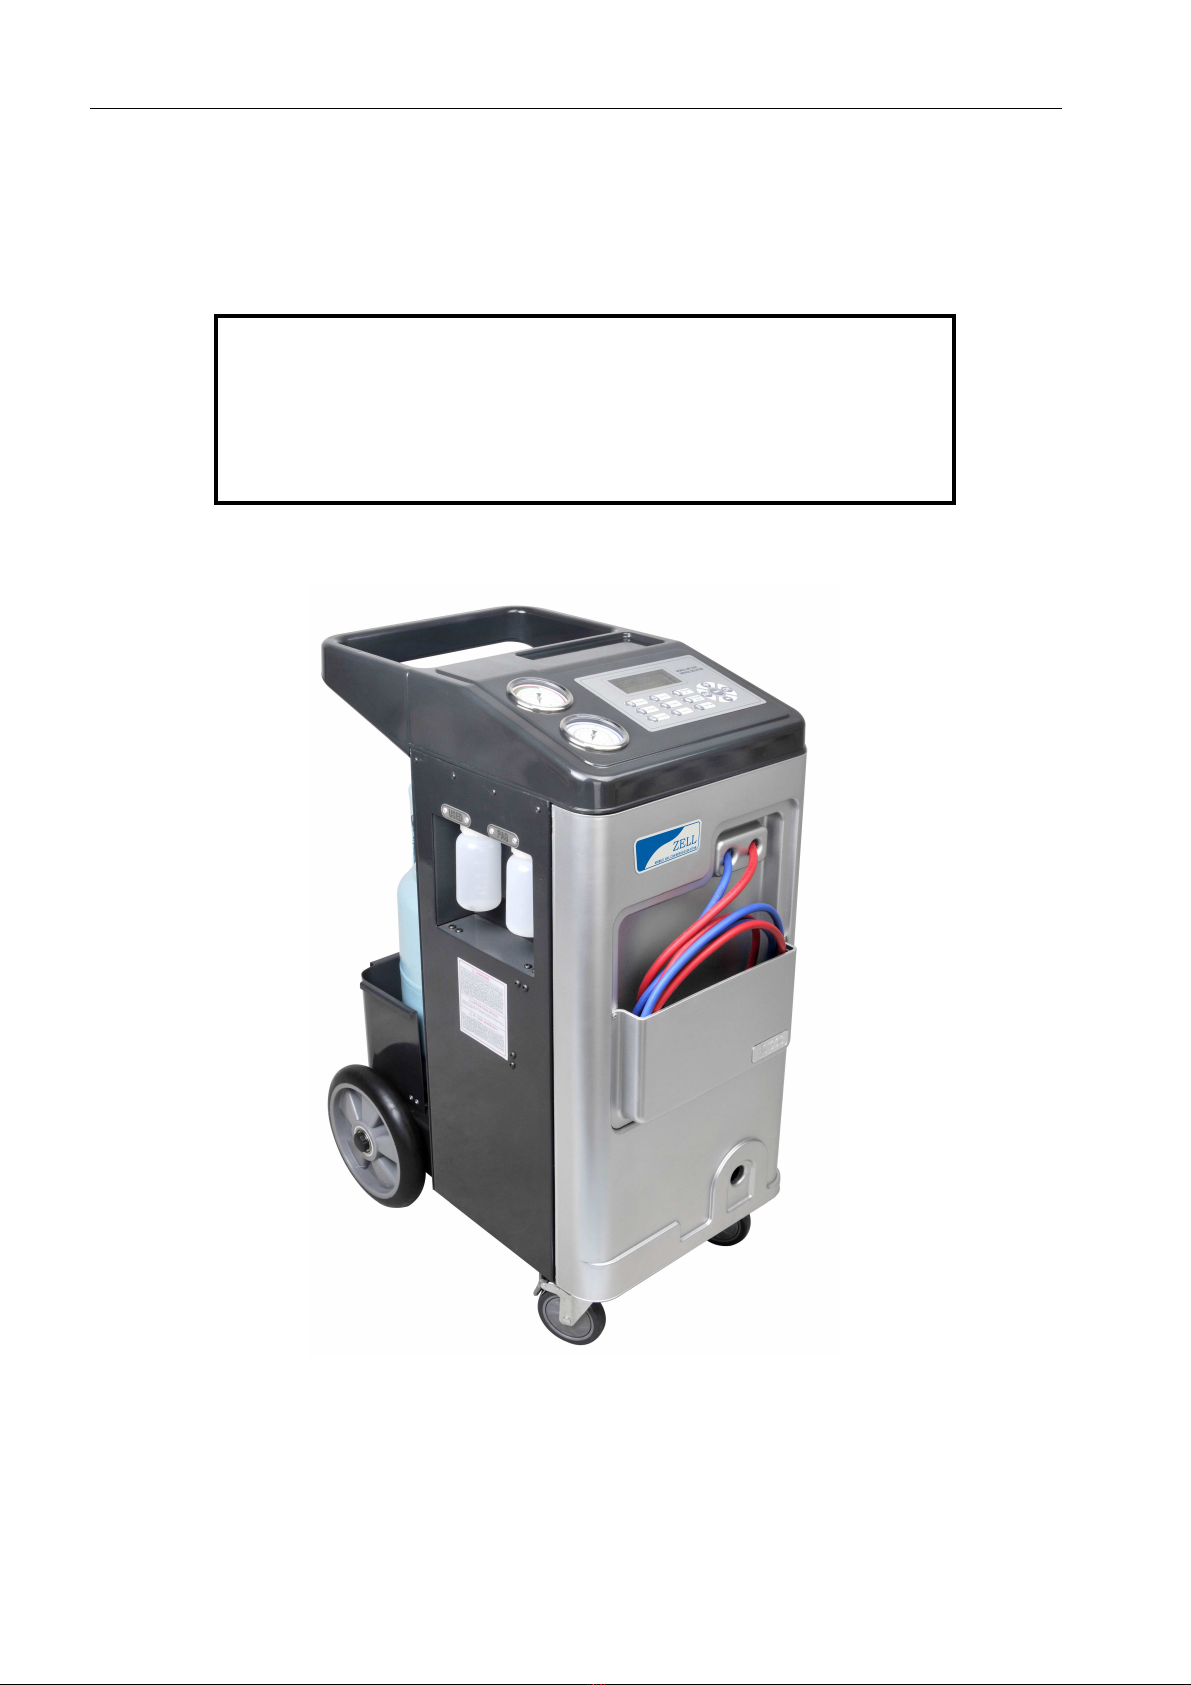
4.4 Purge and drain oil
. . . . . . . . . . . . . . . . . . . . . . . . . . . . . . . . . .. . . . . . . . . . . . . . . . . . . . . . . . . . .
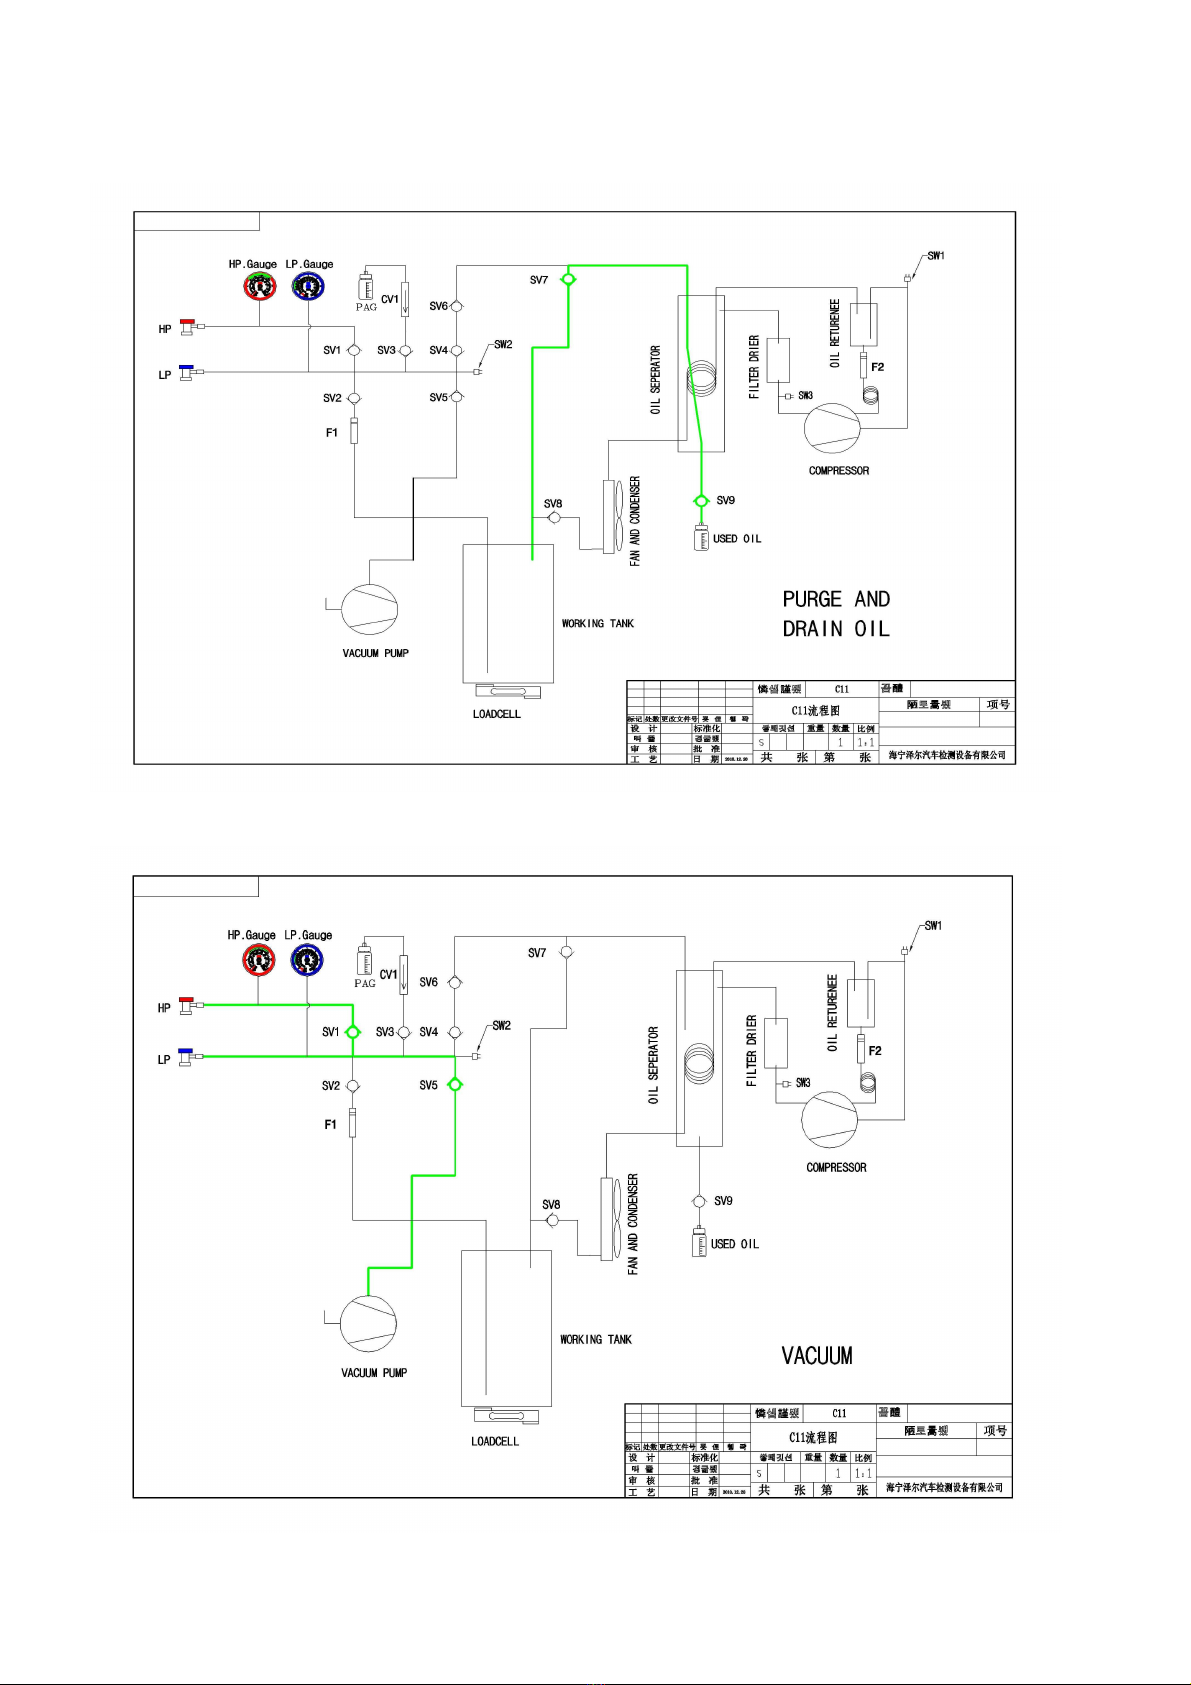
4.5 Vacuum
. . . . . . . . . . . . . . . . . . . . . . . . . . . . . . . . . .. . . . . . .. . . . . . . . . . .. . . . . . . . .. . ... . . . .
4.6 PA oil injection
. . . . . . . . . . . . . . . . . . . . . . . . . . . ........................... . . . . . . . . . .8
4.7 Recharge
. . . . . . . . . . . . . . . . . . . . . . . . . . . . . . . . . .. . . . . . . . . . . . . . . . . . . . . . . . . .. . .. . . . . .8
4.8 Pressure Up
. . . . . . . . . . . . . . . . . . . . . . . . . . . . . . . . . ... . . . . . . . . . . . . .. . . . . . . . . .. . . . . . . .9
4.9 Pressure Down
. . . . . . . . . . . . . . . . . . . . . . . . . . . ..... . .. .. . . . . . . . . . . . . . . . . . . . . . . . . . . . .9
5 Function check . . . . . . . . . . . . . . . . . . . . . . . . . . . . . . . . . .. .. . .. . . .. . . . . . .. . .. . . .. . . . . .10
5.1 Recovery
.....................................................................10
5.2 Vacuum
........................................ . . . ..........................10
5.3 Recharge
................................................. ...................11
5.4 Output check table
. . . . . . . . . . . . . . . . . . . . . . . . . . . . . . . . . .. . . . . . . . . . . . . . . . . . . . . . . . . . . . .11
6 Load cell check . . . . . . . . . . . . . . . . . . . . . . . . . . . . . . . . . .. . . . . . . . . . . . . . . . .. . . . . .. . . . . . . 12
Compressor Suction and Discharge Pressure Test . . . . . . . . . . . . . . . . . .. . .. . . .. . . . . . . . 13
8 Trouble shooting. . . . . . . . . . . . . . . . . . . . . . . . . . . . . . . . . . . .. . . . . . . . . . . . . . . . . . . . . . . . . . .14
8.1 No display
. . . . . . . . . . . . . . . . . . . . . . . . . . . . . . . . . . . . . . . . . .. . . . . . . . . . . . . . . . . . . . . . . . . . 14
8.2 Recovery not start
. . . . . . . . . . . . . . . . . . . . . . . . . .. . . . . . . . .. . . . . . . . . . . . . . . . . . . . . . . . . . 14
8.3 Recovery endless
. . . . . . . . . . . . . . . . . . . . . . . . . .. . . . . . . . .. . . . . . . . . . . . . . . . . . . . . . . . . . 14
8.4 Will Not Evacuate
. . . . . . . . . . . . . . . . . . . . . . . . . .. . . . . . . . .. . . . . . . . . . . . . . . . . . . . . . . . . . 14
8.5 Will not charge
. . . . . . . . . . . ... . . . . ... . . . ... . . . . .. . . . . . . . .. . . . . . . . . . . . . . . . . . . . . . . . . . 14
8.6 Recharge low efficiency
............................................................14
9. Disposal. . . . . . . . . . . . . . . . . . . . . . . . . . . . . . . .. . . . . . .. . . . . . . . . . . . . . . . . . . . . . . . . . . . . . . .15
9.1 Disposing of used fluids
. . . . . . . . . . . . . . . . . . . . . . . . . . . . . . . . . . . . . . . . . . . . . . . . . . . . . . . . 15
9.2 Disposing of packaging material
...................................................15
9.3 Scrapping old unit
..............................................................15
10. Spare part list.................................................................16