Zibro SRE 229 TC User manual

B
F
S
S
J
I
P
H
A
S
W
O
D
SRE 229 TC
!"#
3
2
6
5
4
>
u
1
:
=
MANUEL D'UTILISATION
GEBRAUCHSANWEISUNG
BRUGSANVISNING
INSTRUCCIONES DE USO
KÄYTTÖOHJE
OPERATING MANUAL
ISTRUZIONI D’USO
BRUKSANVISNING
GEBRUIKSAANWIJZING
INSTRUKCJA OBSŁUGI
BRUKSANVISNING
2
12
22
32
42
52
62
72
82
92
102

B
F
S
S
J
I
P
H
A
S
W
O
D
!!!!!!!!!!!!!!!!!!!!!
3PAGE PLIANTE
2FALTBLATT
6FOLDEUDSIDE
5HOJA DESPLEGABLE
5AUKI TAITETTU SIVU
4FOLD-OUT PAGE
>PIEGHEVOLE
uUTBRETTSIDE
1UITVOUWBLAD
:INSTRUKCJE˛ ROZŁOŻYC
=UTVIKNINGSSIDA
- EMC - LV
!"#

Dear Sir, Madam,
Congratulations with your purchase of a portable domestic heater. You have
purchased a quality product, which will serve you for many years to come. This,
of course, provided you use the heater correctly. Please read these Directions
for Use first, to ensure maximum lifetime for your heater.
Your heater comes with a 48-month manufacturer’s warranty on all defects in
materials or workmanship.
We wish you a warm and comfortable time with your heater.
Yours sincerely,
PVG Holding b.v.
Customer Service Department
1 READ THE DIRECTIONS FOR USE FIRST.
2 IN CASE OF ANY DOUBT, CONTACT YOUR DEALER.
3 BEFORE YOU START READING, FOLD OUT THE LAST PAGE. !!!!!!!!!!
4
52
p052_061_SRE229TC_uk.qxd:p052_061_SRE229TC_uk.qxd 14-06-12 09:45 Page 52

GENERAL DIRECTIONS FOR USE
Below you will find the main steps to be taken for
using your heater. For more details, please refer to
the MANUAL (pages 55 ff.).
• As a fire precaution, the tank must be filled either
when the heater has been switched off or in
another room than the room where the heater is
installed.
• Always ensure that the tank is closed properly
after filling it at a safe distance from all sources of
heat and open flames (see chapter B).
• The first time the heater is ignited it will smell like
“new” for a short time.
• Store all fuel containers with their original caps
and seals in a cool and dark place.
• Fuel ages. Use new fuel at the start of every
heating season.
• The use of Zibro Extra, Zibro Kristal or Zibro Bio as
a heating fuel assures you that you have a good
quality fuel.
• Before changing brands and/or types of fuel make
sure that the mobile heater first completely
empties all of the remaining fuel inside the
heater.
MAIN COMPONENTS
Front plate
Grid
Base plate
Lid for removable
tank
Operation panel
Removable tank
Fuel gauge
removable tank
Vent filter
Thermostat
Plug + cord
Information display
key
Childproof lock
Adjustment keys
(time and
temperature)
Timer
SAVE key
!
"
#
$
%
&
'
(
)
*
+
,
-
.
/
0
!!!!!!!!!!!!!!!!!!!!!!!
Remove all packaging materials
(refer to Section A, Fig. A).
Fill the removable tank 1
(refer to Section B, Fig. C).
Insert the plug into the wall-socket.
Ignite the heater using the key ,
(refer to Section D).
If required, change the temperature using the adjustment keys
(refer to Section E).
Switch off the heater by pressing the key ,.
1
2
3
4
5
6
4
53
p052_061_SRE229TC_uk.qxd:p052_061_SRE229TC_uk.qxd 14-06-12 09:45 Page 53

This transportation cap
is packed separately in
the box. Only this cap
ensures trouble-free
transportation of the
heater after use.
Store it well!
WHAT YOU NEED TO KNOW IN ADVANCE
VENTILATE SUFFICIENTLY
Read this user manual carefully before using the appliance and keep it for future
reference. Install this device only when it complies with local/national legislation,
ordinances and standards. This product is intended to be used as a heater in
residential houses and is only suitable for use in dry locations, in normal household
conditions, indoors in living room, kitchen and garage.
Regardless of the model, you must always make sure that the heater is used in a
room large enough to enable the heater to be used safely without extra
ventilation. If the room is smaller than required, you must always open a door or
window slightly (ensuring an opening of approx. 2.5 cm). It is important that every
room where the heater is used has sufficient air intake and efficient air outflow
(both openings must have a minimum cross section of 50 cm2). No modifications
to the safety system are allowed, as that will invalidate the guarantee that the air
probe will work properly. Consult your dealer in case of doubt.
Especially for France: Your heater was designed to operate exclusively on fuel for
liquid fuel-operated mobile heaters in accordance with the Decrees of 08-01-1998
and 18-07-2002. The use of other fuels is forbidden.
Ask your dealer or check our website for the addresses of our retailers.
The liquid fuel-operated mobile heater is intended as an extra heater, and not as a
continuous source of heat.
Especially for United Kingdom: Only use Class C1 paraffin fuel in accordance with
BS2869; Part 2, or equivalent.
The user must comply with the following instructions for proper use:
DO NOT
- use the liquid fuel-operated mobile heater in caravans, boats, and vehicle cabins;
- use the liquid fuel-operated mobile heater in insufficiently ventilated rooms
(consult the table of properties for the minimum dimensions of the room to be
heated), underground rooms and / or at a height of over 1500 metres;
- modify the heater safety features.
The use of this type of heating in public rooms is subject to prior regulatory
permission. Obtain proper information on this in advance.
THE RIGHT FUEL
Your heater has been designed for use with high-quality water-free pure paraffin
oil, such as Zibro Extra, Zibro Kristal or Zibro Bio. Only fuels of this kind will ensure
clean and proper burning. Lower quality fuel may result in:
!increased possibility of malfunctioning
!incomplete combustion
!reduced heater lifetime
!smoke and/or fumes
!deposits on the grid or mantle
Using the right fuel is therefore essential for safe, efficient, and comfortable use
of your heater.
Damage and/or malfunctions of the heater due to the use of other than high-
quality water-free pure parafine oil is not covered by the warranty.
Always refer to your local dealer for the right fuel for your heater.
Only the use of the
correct fuel will ensure
safe, efficient, and
comfortable use of your
heater.
4
54
! ! !!

MANUAL
AINSTALLING THE HEATER
Carefully remove your heater from the box and check the contents.
In addition to the heater you also need to have:
!a manual fuel pump
!a transportation cap
!these directions for use
Keep the box and the packaging materials (Fig. A) for storage and/or
transportation.
Open the lid of the removable tank and remove the piece of cardboard.
Fill the removable tank as indicated in
Section B.
The floor should be firm and completely level. Reposition the heater, when it
is not level. Do not try to correct the situation by placing books or other
goods under the heater.
Insert the plug !into the wall-socket (230 Volts - AC / 50 Hz) and set the
correct time using the adjustment keys "
(refer to Section C).
Your heater is now ready for use.
BFILLING FUEL
Fill the removable tank in a suitable place since there can always be some spillage.
Follow the procedure below:
Make sure that the heater is switched off.
Open the upper lid and lift the removable tank out of the heater (Fig. B).
Note: Some drops may leak from the tank. Put down the removable tank
(cap pointing upwards, handle on floor (Fig. C) and screw off the fuel cap.
Fill the removable tank using a fuel pump (refer to fuel pump operation
instructions.) Make sure that it is in a higher position than the removable tank
(Fig. C). Insert the ribbed hose into the opening of the removable tank.
Check the removable tank fuel gauge while filling the tank (Fig. D). Stop
filling once the gauge indicates that the tank is full. Never overfill the tank,
especially not when the fuel is very cold (fuel expands when it heats up).
Let the remaining fuel in the pump flow back into the jerrycan and carefully
remove the pump. Carefully screw the fuel cap back on the tank. Clean off
any spilled fuel.
5
4
3
2
4
3
2
1
5
6
1
4
55
!!!!!!
C
B
D
empty full
A
! ! !!!

Check whether the fuel cap is straight and tightened properly. Reinstall the
removable tank in the heater (cap down). Close the lid.
CSETTING THE CLOCK
It is only possible to set the correct time, when the heater is connected to the
mains and not burning. Use the adjustment keys !to set the time. First press
either of the two keys to switch on the function (the 4-digit "will start blinking).
Next, set the hours using the key on the left (!hour) and the minutes using the
key on the right ("min.). Press once to increase the value by one step. When you
hold down the key, the value will continue going up, until you release the key
again. After approximately 10 seconds the 4-digit will stop blinking and the
setting will be locked. 5 minutes after switching off the heater, the information on
the display will disappear and the heater will automatically switch into the stand-
by position.
When the heater has been unplugged (or after a power failure), the time needs
to be set again.
DIGNITING THE HEATER
When used for the first time, a new heater may give out a smell for a short while.
You should therefore provide extra ventilation.
Always ignite the heater with the
button #
. Never use matches or a cigarette
lighter.
Just press the button #to ignite the heater. The POWER lamp will start
blinking, indicating that the ignition procedure has started. This will take a short
while. Once the heater is burning, the POWER lamp will remain lit (red). The
information display "will show two numbers. The light next to them indicates
that these numbers refer to the temperatures (Fig. F). The actual room temperature
is indicated below ROOM, while the temperature setting is indicated below SET.
The latter can be changed with the adjustment keys
(refer to Section E).
Prior to igniting the heater, always check for sufficient fuel in the removable tank.
ESETTING THE REQUIRED TEMPERATURE
The temperature setting can only be adjusted, when the heater is burning. Use the
adjustment keys !to adjust the temperature. First press either of the two keys to
switch on the function (the °C mark "will start blinking). Next, adjust the
temperature using the key on the right ("min.) to set the temperature to a higher
setting and the key on the left (!hour) to lower the temperature. Press once to
increase the value one step. After approximately 10 seconds the °C mark will stop
blinking and the setting will be locked (Fig. F).
The available temperature settings range from 6°C minimum to 28°C maximum.
When the heater has been unplugged (or after a power failure), the temperature
will reset to the factory setting of 20°C.
6
4
56
F: The required
temperature on the left,
the measured
temperature on the
right.
E: When the 4-digit stops
blinking, the setting has
been locked to the
indicated value.
☞
! ! !!

FUSING THE TIMER
The timer allows you to switch on the heater automatically at a preset time.
In order to switch on the timer, the correct time must have been set
(refer to
Section C)
and the heater should be off. Follow the procedure below:
Press the button !and then the TIMER key "immediately after that.
The TIMER lamp and the 4-digit #will start blinking.
Use the adjustment keys $to set the time at which the heater must ignite.
Use the key on the left (!hour) to set the hours and the key on the right
("min.) to set the minutes (interval of 5 minutes)
.
After approximately 10 seconds the 4-digit will show CLOCK again and the
TIMER lamp will light up, indicating that the timer function has been
activated (Fig. G).
The timer will ensure that the room will have been heated to approximately
the required temperature at the set time.
When you want to switch off the heater and ignite it again with the timer, all
you have to do is press the TIMER key
(refer to Section G).
Press the button !once to clear the timer setting.
GSWITCHING OFF THE HEATER
There are two ways to switch off the heater.
Press the button !. The information display will show the CLOCK
signal. Within approximately one minute the flame will have extinguished.
Press the TIMER key ", when you want to switch off the heater and ignite it
again with the timer the next time. This not only switches off the heater, but
it also activates the timer function. You can change the required time with
the adjustment keys $
(refer to Section F).
HTHE INFORMATION DISPLAY
The information display #not only serves as an indicator of the (set) time and
temperature (
sections C, E, and F
), it also indicates any malfunctioning of the
heater. The code on the information display tells you what is the matter:
CODE INFORMATION WHAT TO DO
e - 0 Temperature within the heater too high. Cool-down and re-ignite.
f - 0 Power interrupted. Re-ignite the heater.
e - 1 Faulty thermostat. Contact your dealer.
f - 1 Faulty burner thermistor. Contact your dealer.
e - 2 Starting problems. Contact your dealer.
1
2
3
4
1
2
4
57
G: The TIMER indicator
light indicates that the
timer function has been
switched on.
☞
In case of any
malfunctioning the
information display will
tell you what is the
matter.
! ! !!

e - 5 Tipping-over protection. Re-ignite the heater.
e - 6 Poor burning. Contact your dealer.
e - 7 Room temperature If necessary,
above 32°C. re-ignite the heater.
e - 8 Defective booster. Contact your dealer.
e - 9 Air filter dirty; or Clean filter.
Fuel pump dirty. Contact your dealer.
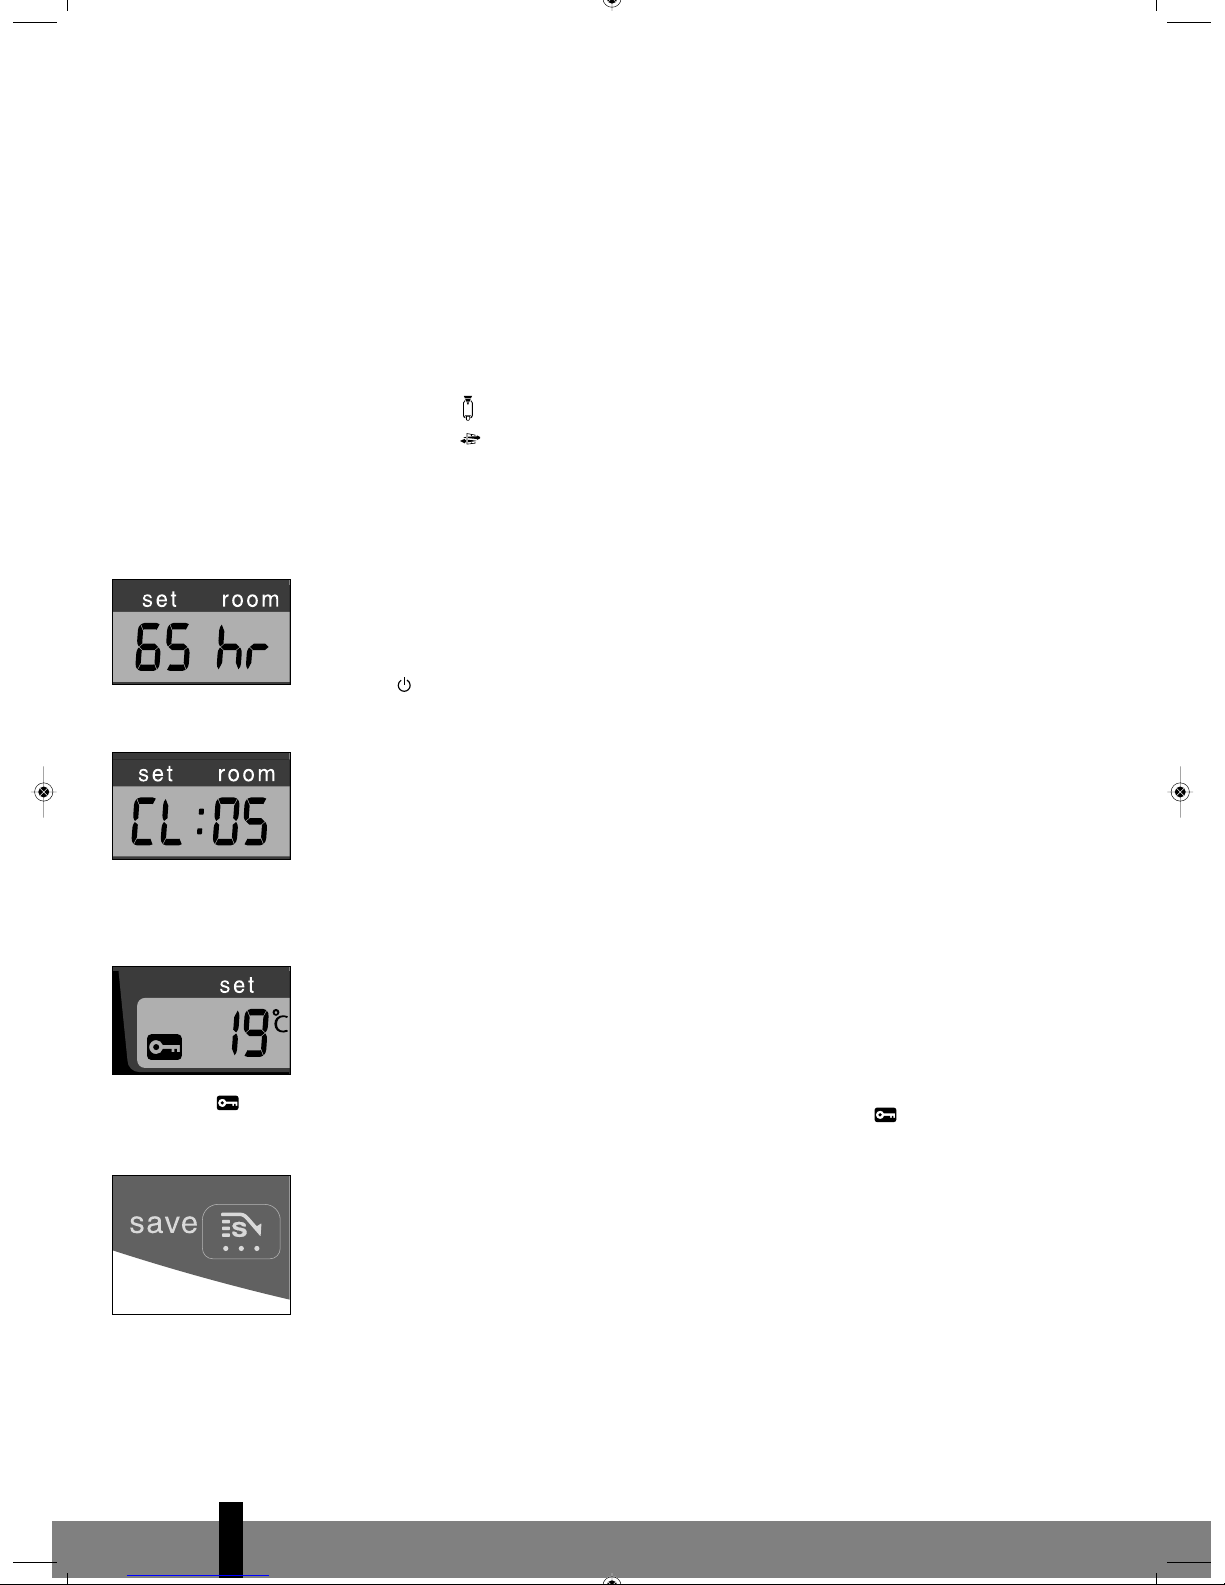
65
H
rThe heater has been in operation
continuously for a period of 65 hours
and has turned itself off automatically. Switch the heater back on.
-- : --
+
Out of fuel. Refill removable tank.
-- : --
+
Too little ventilation. Ventilate better.
Always contact your dealer for any malfunctioning not listed above and/or when
the error keeps occuring after taking the corrective measure as described above.
AUTOMATIC DEACTIVATION
This heater is fitted with a safety system that ensures that it switches off
automatically after 65 hours continuous operation. The following will then appear
in the display: 65
H
r. If desired, you can switch the heater on again by pressing the
button
!
(
see section D
).
AUTOMATIC CLEANING MODE
When the heater has been burning continuously for two hours at its highest
setting, the burner will automatically start an autoclean procedure. The display
will show the autocleaningcode cl:05 running back to cl:01. The procedure takes 5
minutes, during which the heater will burn at its lowest setting, while the burner
autocleans. When the burner is clean again, the heater will automatically switch
back to the highest setting again.
ICHILDPROOF LOCK
The childproof lock can be used to prevent children accidentally changing the
heater settings. When the heater is burning and the childproof lock is on, the heater
can only be switched off. Other functions are blocked then. If the heater has already
been switched off, the childproof lock also prevents accidental ignition of the
heater.
Activate the childproof lock by pressing the appropriate key "and holding it
down for more than 3 seconds. The KEY-LOCK indicator will appear on the
information display (Fig. H), indicating that the childproof lock has been activated.
Switch off the childproof lock by pressing the key "and holding it down for more
than 3 seconds once again.
JTHE CORRECT USE OF 'SAVE'
The 'SAVE' function allows you to limit the temperature. When this function is
activated, the heater will automatically switch off, when the room temperature exceeds
the set temperature by 3°C. Subsequently, when the room temperature has dropped
again to the set temperature, the heater will automatically switch on again.
Activate
the 'SAVE' setting by pressing the appropriate #key. The SAVE indicator light will
light up (Fig. I). Switch off the function by pressing the SAVE key once again.
4
58
H: When the mark
appears, the childproof
lock has been activated.
I: When the SAVE light
lights up, the heater will
automatically switch on
or off in order to remain
within a specified
temperature range.
p052_061_SRE229TC_uk.qxd:p052_061_SRE229TC_uk.qxd 14-06-12 09:45 Page 58

☞
☞
Without the 'SAVE' setting your heater will maintain the set temperature by
approximation as well, by adjusting its heating capacity. 'SAVE' is an economy
setting, which you can use when, for instance, you are not present in the room
or to keep it frost-free.
KTHE 'FUEL' INDICATOR
When the FUEL indicator appears, there is enough fuel left for another 10 minutes
of heater use. The count-down of the remaining heating time can be seen in the
information display !(Fig. J). Every two minutes an alarm signal is sounded,
warning you to refill the removable tank. If you do not react, the heater will
extinguish by itself. The heater will also sound a warning signal, when it switches
off. The FUEL indicator will blink, while four lines are blinking in the information
display. You can stop this by pressing the button "once.
Once the heater has used up all its fuel and is extinguished it will take some time,
after the refill, before the heater is completely ready for use again.
LTHE 'VENT' INDICATOR
When the VENT indicator starts blinking, this is a sign that the room is not vented
sufficiently (Fig. K). The heater will switch off automatically. If the indicator continues
blinking after extra ventilation, please contact your dealer.
MMAINTENANCE
Switch off the heater and let it cool down, before you start any maintenance
work. Also disconnect the plug from the mains. Your heater needs hardly any
maintenance. It is, however, important that you clean the vent filter #with a
vacuum cleaner and the grid with a damp cloth, both on a weekly basis.
Regularly inspect the fuel filter as well:
Remove the removable tank $from the heater and remove the fuel filter
(Fig. L). Some drops may leak from the filter; keep a cloth at hand.
Remove the dirt by tapping the fuel filter upside-down against a hard surface.
(Never clean it with water!)
Reinstall the fuel filter into the heater.
We recommend that you remove dust and stains from time to time with a damp
cloth, because otherwise these may cause stains that are hard to remove.
Do not remove any heater components yourself. Always contact your dealer for
repairs. When the power cord is damaged, it may only be replaced by an
authorised fitter. Use a new cord of the type H05 VV-F.
3
2
1
4
59
L
Fuel filter
J: When the FUEL
indicator has appeard,
the information display
will show the number of
minutes of fuel left in
the tank.
K: A blinking VENT
indicator is a sign that
you need extra
ventilation.
! ! !!

NSTORAGE (END OF THE HEATING SEASON)
At the end of the heating season, you must store the heater in a dust-free place, if
possible in its original packaging. Unused fuel cannot be used in the next heating
season. We therefore recommend that you burn up all fuel. If there is still some
fuel left, do not throw it away, but dispose of it in accordance with the local
regulations for the disposal of domestic chemical waste.
Always start the new heating season with fresh fuel. When you start re-using the
heater follow the instructions again
(starting from section A and as specified)
.
OTRANSPORTATION
Take the following measures to avoid fuel leakage during the transportation of
the heater:
Let the heater cool down.
Remove the removable tank !from the heater and remove the fuel filter
(refer to Section M, Fig. L).
Some drops may leak from the filter; keep a cloth
at hand. Store the fuel filter and the removable tank outside the heater.
Place the transportation cap into the position of the fuel filter (Fig. M).
Press it tight. The transportation cap will, as much as possible, prevent oil
leakage from the heater during transport.
Always move the heater in an upright position.
Make the fixed tank empty with a fuel pump before transportation or in case
of wrong or dirty fuel. First remove the fuel filter and then insert the fuel
pump into the empty fixed tank. Follow the same procedure if the fuel tank
contains water.
PSPECIFICATIONS
Ignition electrical Dimensions (mm) width 376
Fuel paraffin including base plate: depth 296
Capacity (kW) max. 3.20 height 428
Capacity (kW) min. 0.80 Accessories: - manual fuel pump
Suitable space (m3)** 50-120 - transportation cap
Fuel consumption (l/hr)*0.333 Mains 230 V
-- AC / 50 Hz
Fuel consumption (g/hr)*267
Electrical consumption
:
Burning time per tank (hr)*16.2
-
igniter 320 W
Capacity removable tank (litres) 5.4 - continuous 13 W
Weight (kg) 8.0 Fuse rating 250V, 5A
* At maximum setting ** Specified values are indicative
1
5
2
4
3
4
60
Transportation
cap
M
! ! !

QWARRANTY PROVISIONS
Your heater comes with a 48-month warranty starting on the date of purchase.
Within this period all defects in material or workmanship will be repaired without
any charge. The following provisions shall apply regarding this warranty:
We expressly dismiss all other claims for damages, including consequential
damages.
Any repairs or replacements of components within the term of warranty will
not result in an extension of the term of warranty.
The warranty shall no longer apply, when the heater has been modified,
non-original parts have been used, or when it is repaired by third parties.
The warranty shall not apply to parts that are subject to normal wear, such as
the burner mat and the manual fuel pump.
The warranty shall only apply, when you present the original, dated proof of
purchase, provided no changes have been made to it.
The warranty shall not apply to damages caused by actions not in compliance
with the Directions for Use, neglect, and the use of an incorrect type of fuel,
or fuel past its use-by date. The use of incorrect fuel can even be dangerous*.
Transportation costs and the risks involved during the transportation of the
heater or heater components shall always be at the expense of the purchaser.
In order to avoid unnecessary costs, we recommend that you always read the
’Directions for Use’ carefully first. In case they offer no solution, please take the
heater to your dealer for repair.
* Highly inflammable substances may induce uncontrollable burning, causing flames to break out. Should this
happen, never try to move the heater, but always switch off the heater immediately. In case of emergency you
may use a fire extinguisher, but only a type B extinguisher: a carbon dioxide or powder extinguisher.
11 TIPS FOR SAFE USE
1Children should be supervised to ensure that they do not play with the
appliance.
2Do not move the heater when it is burning or still hot. Do not refill nor
service the heater when it is burning or still hot.
3Position the front of the heater at a distance of minimum 1.5 metres
from walls, curtains, and furniture.
4Do not use the heater in dusty rooms. You will not have optimum
burning in such rooms. Do not use the heater in the immediate
surrounding of a bath, a shower or a swimmingpool.
5Switch off the heater, before you leave or go sleeping. Unplug the
heater as well, when you go away for a longer period of time
(e.g. holidays).
6Store and move fuel only in suitable tanks and jerrycans.
7Make sure that the fuel is not exposed to heat or extreme temperature
changes. Always store the fuel in a cool, dry and dark place (sunlight
will affect the quality).
8Never use the heater in places where harmful gasses or fumes may be
present (e.g. exhaust gasses or paint fumes).
9Beware that the grid of the heater becomes hot. If the appliance is
covered there is a risk of fire.
10 Always make sure that there is sufficient ventilation.
11 This appliance is not intended for use by persons (including children)
with reduced physical, sensory or mental capabilities, or lack of expe-
rience and knowledge, unless they have been given supervision or
instruction concerning use of the appliance by a person responsible for
their safety.
Defective electrical devices and batteries must be kept separate from household
waste. Ensure that there is effective recycling where possible. Ask you local council
or dealer for expert advice on recycling.
3
2
1
4
5
6
7
4
61
! ! !

!
"
#
$
%
&
'
()
*
+
,
!!!!!!!! ! !!!!!!!!!!!!!!!!
-
.
/0
co_SRE229TC_4.1.qxd:co_SRE229TC_4.1.qxd 14-06-12 09:39 Page 6

D
Benötigen Sie weitere Informationen oder treten Probleme auf, besuchen Sie bitte unsere Website www.zibro.com, oder setzen Sie sich mit
unserem Kundendienst in Verbindung (Telefonnummer auf www.zibro.com).
For alle yderligere oplysninger eller ved eventuelle problemer med apparatet henvises til www.zibro.com eller det lokale Kundecenter (telefon-
numre findes i www.zibro.com).
Si necesita información o si tiene algún problema, visite nuestra página Web www.zibro.com, o póngase en contacto con el servicio cliente
(hallará el número de teléfono en www.zibro.com).
F
Si vous souhaitez obtenir des informations supplémentaires ou si vous rencontrez un problème, rendez-vous sur notre site Web (www.zibro.
com) ou contactez notre service client (vous trouverez l’adresse et numéro de téléphone sur www.zibro.com).
Jos haluat huoltoapua, lisätietoja tai laitteen kanssa tulee ongelmia, tutustu verkkosivustoon osoitteessa www.zibro.com tai kysy neuvoa PVG
kuluttajapalvelukeskuksesta (www.zibro.com).
If you need information or if you have a problem, please visit the our website (www.zibro.com) or contact our sales support (you find its phone
number on www.zibro.com)
I
Per informazioni e in caso di problemi, visitate il sito Web www.zibro.com oppure contattate il Centro Assistenza Clienti (per conoscere il numero
di telefono, consultate www.zibro.com).
N
Hvis du trenger informasjon, eller hvis du har et problem med produktet, kan du gå til nettsidene www.zibro.com. Alternativt kan du kontakte
med PVG’ forbrukertjeneste (telefonnummeret i www.zibro.com).
Als u informatie nodig hebt of als u een probleem hebt, bezoek dan de onze website (www.zibro.com) of neem contact op met de afdeling
sales support (adres en telefoon op www.zibro.com).
P
Se necessitar de informações ou se tiver problemas, visite o Web site www.zibro.com ou contacte o Centro de Assistência (número de telefone
o www.zibro.com)
W przypadku problemów i w celu uzyskania szczegółowych informacji odwiedźstronęinternetowąZibro dostępnąpod adresem www.zibro.
com lub skontaktuj sięz Centrum kontaktów Zibro (www.zibro.com)
S
Om du behöver service eller information eller har problem med apparaten kan du besöka www.zibro.com eller kontakta Zibro kundtjänst (du
hittar telefonnumret på www.zibro.com).
Če želite dodatne informacije, obiščite spletno mesto podjetja na naslovu www.zibro.com ali pokličite na telefonsko (www.zibro.com).
Daha fazla bilgiye ihtiyaç duyarsanız veya bir sorunla karşılaşırsanız, www.zibro.com adresindeki Zibro Internet sitesini ziyaret edin veya ülkenizde
bulunan Zibro müşteri merkeziyle iletişim kurun (telefon numarasını: www.zibro.com).
--- --- -- ----
-- -- --- -----
-- -- --- -----
-- ---- -- ----
-- -- --- -----
-- -- --- -----
--- --- -- ----
-- ---- -- ----
www.zibro.com
Distributed in Europe by PVG Holding B.V.
Zibro® is registered trademark of TOYOTOMI Co., Ltd. for paraffin heaters.
ZIBRO brand paraffin heaters are made in Japan and imported by PVG Holding B.V.
PVG Traffic avg©120614 man_SRE229TC
Rev. 06/12 Printed in Japan
8162001921

B
F
S
S
J
I
P
H
A
S
W
O
D
SRE 229 TC
!"#
3
2
6
5
4
>
u
1
:
=
MANUEL D'UTILISATION
GEBRAUCHSANWEISUNG
BRUGSANVISNING
INSTRUCCIONES DE USO
KÄYTTÖOHJE
OPERATING MANUAL
ISTRUZIONI D’USO
BRUKSANVISNING
GEBRUIKSAANWIJZING
INSTRUKCJA OBSŁUGI
BRUKSANVISNING
2
12
22
32
42
52
62
72
82
92
102

B
F
S
S
J
I
P
H
A
S
W
O
D
!!!!!!!!!!!!!!!!!!!!!
3PAGE PLIANTE
2FALTBLATT
6FOLDEUDSIDE
5HOJA DESPLEGABLE
5AUKI TAITETTU SIVU
4FOLD-OUT PAGE
>PIEGHEVOLE
uUTBRETTSIDE
1UITVOUWBLAD
:INSTRUKCJE˛ ROZŁOŻYC
=UTVIKNINGSSIDA
- EMC - LV
!"#

Sehr geehrte Kundin, sehr geehrter Kunde,
herzlichen Glückwunsch! Sie sind jetzt der stolze Besitzer eines transportablen
Kaminofens. Sie haben sich für ein Qualitätsprodukt entschieden, an dem Sie
noch viele Jahre Ihre Freude haben werden, vorausgesetzt, Sie benutzen den
Kaminofen verantwortungsvoll.
Lesen Sie deswegen zuerst diese Gebrauchsanweisung aufmerksam durch,
um so eine optimale Lebensdauer Ihres Kaminofens zu garantieren.
Im Namen des Herstellers bieten wir Ihnen 48 Monate Garantie auf alle
eventuell auftretende Material- und Herstellungsfehler.
Wir wünschen Ihnen viel Wärme und Komfort mit Ihrem Kaminofen.
Mit freundlichen Grüßen
PVG Holding b.v.
Abteilung Kundendienst
1 LESEN SIE ZUERST DIE GEBRAUCHSANWEISUNG.
2 WENDEN SIE SICH IM ZWEIFELSFALL AN IHREN HÄNDLER.
3 VOR DEM LESEN DER GEBRAUCHSANWEISUNG BITTE DAS LETZTE BLATT AUFFALTEN. !!!!
2
12
p012_021_SRE229TC_de.qxd:p012_021_SRE229TC_de.qxd 14-06-12 09:48 Page 12

BENUTZUNG
KURZ ZUSAMMENGEFASST
Nachfolgend sind in groben Zügen die Schritte
angegeben, die zur Inbetriebnahme Ihres Kamin-
ofens ausgeführt werden müssen. Detaillierte
Beschreibung der Handlungen entnehmen Sie bitte
der GEBRAUCHSANWEISUNG (Seite 15 ff).
•Zur Vorbeugung von Feuer muss entweder der
Heizofen vor dem Füllen des
Brennstoffbehälters ausgeschaltet werden oder
der Behälter muss in einem anderen Raum als
dem, in dem sich der Heizofen befindet, gefüllt
werden.
•Sorgen Sie immer dafür, dass der
Brennstoffbehälter nach dem Füllen gut
verschlossen ist. Achten Sie beim Füllen darauf,
dass sich der Behälter in einer sicheren
Entfernung von Wärmequellen und offenen
Flammen befindet (siehe Kapitel B).
•Das erste Mal wird Ihr Kaminofen während des
Brennens noch kurz ‘neu’ riechen.
•Lagern Sie alle Brennstoffbehälter mit
Originaldeckel und Versiegelung kühl und
dunkel.
•Brennstoff altert. Beginnen Sie jede Heizsaison
mit neuem Brennstoff.
•Wenn Sie Zibro Extra, Zibro Kristal oder Zibro
Bio benutzen, können Sie sich auf die Qualität
des Brennstoffs verlassen.
•Wenn Sie zwischen den einzelnen Sorten /
Marken wechseln, müssen Sie den Kaminofen
erst vollständig leer brennen lassen.
WICHTIGE EINZELTEILE
Frontplatte
Gitter
Bodenplatte
Deckel
Brennstofftank
Bedienungsfeld
Brennstofftank
Brennstoffanzeige
Brennstofftank
Ventilatorfilter
Thermostat
Stecker + Kabel
Informations-
Display
-Taste
Kindersicherung
Einstelltasten (Zeit
und Temperatur)
Zeitschaltuhr
SAVE-Taste
!
"
#
$
%
&
'
(
)
*
+
,
-
.
/
0
!!!!!!!!!!!!!!!!!!!!!!!
Entfernen Sie das gesamte Verpackungsmaterial
(
siehe Kapitel A, Abb. A).
Befüllen Sie den Brennstofftank 1
(siehe Kapitel B, Abb. C)
.
Stecken Sie den Stecker in die Steckdose.
Starten Sie den Kaminofen über die -Taste ,
(siehe Kapitel D).
Verändern Sie wenn nötig die gewünschte Temperatur
über die Einstelltasten
(siehe Kapitel E).
Schalten Sie den Kaminofen über die -Taste ,aus.
1
2
3
4
5
6
2
13
p012_021_SRE229TC_de.qxd:p012_021_SRE229TC_de.qxd 14-06-12 09:48 Page 13

Diesen Transport-
verschluß finden Sie im
Verpackungskarton. Nur
hiermit kann der
Kaminofen nach
Benutzung problemlos
transportiert werden.
Bewahren Sie den
Verschluß also gut auf!
WICHTIG ZU WISSEN
JEDERZEIT AUSREICHEND VENTILIEREN
Lesen Sie bitte vor der Anwendung des Geräts sorgfältig die Bedienungsanleitung
und bewahren Sie sie für eine zukünftige Einsichtnahme auf. Das Gerät nur dann
installieren, wenn die örtlich geltenden bzw. nationalen Vorschriften,
Verordnungen und Normen erfüllt sind. Dieses Produkt ist für den Gebrauch als
Heizofen in Wohngebäuden bestimmt, und darf nur in trockener Umgebung,
unter normalen Haushaltsverhältnissen, in Wohnräumen, Küchen und in Garagen
verwendet werden.
Jedes Modell benötigt eine bestimmte minimale Raumgröße, um den
Kaminofen
sicher, ohne zusätzliche Ventilation, betreiben zu können.
Wenn der betreffende
Raum kleiner als der angegebene Minimumwert ist, dann muß dafür gesorgt
werden, daß immer ein Fenster oder eine Tür einen Spalt breit offen bleibt (ca. 2,5
cm). Es ist wichtig, dass jeder Raum, in dem der Heizofen benutzt wird,
ausreichend belüftet und gut entlüftet wird (beide Öffnungen müssen einen
Querschnitt von mindestens 50 cm2haben). Änderungen am Sicherheitssystem sind
unzulässig und würden die Garantie einer einwandfreien Funktion des Luftfühlers
nichtig machen. Wenden Sie sich im Zweifelsfall an Ihren Händler.
Speziell für Frankreich: Ihr Heizofen wurde ausschließlich für den Betrieb mit
Brennstoff für mit flüssigem Brennstoff betriebene mobile Heizöfen gemäß den
Richtlinien vom 08.01.1998 und 18.07.2002 ausgelegt. Die Verwendung anderer
Brennstoffe ist verboten. Fragen Sie Ihren Händler. Die Adressen unserer Händler
finden Sie auf unserer Website.
Der mit flüssigem Brennstoff betriebene mobile Heizofen wurde als zusätzliches
Heizgerät ausgelegt und nicht als ständige Wärmequelle.
Speziell für Großbritannien: Verwenden Sie ausschließlich Petroleum-Brennstoff
der Klasse C1 gemäß BS2869 Teil 2 oder einen gleichwertigen Brennstoff.
Im Hinblick auf die richtige Verwendung muss der Benutzer folgende
Anweisungen befolgen:
ES IST VERBOTEN
- den mit flüssigem Brennstoff betriebenen mobilen Heizofen in Wohnwagen, auf
Booten und in Fahrerhäusern zu benutzen.
- den mit flüssigem Brennstoff betriebenen mobilen Heizofen in unzureichend
belüfteten Räumen (die Mindestmaße für zu beheizende Räume entnehmen Sie
bitte der Tabelle mit den technischen Daten), Kellerräumen bzw. in einer Höhe
von über 1500 m zu benutzen.
- Änderungen an den Sicherheitsvorrichtungen des Heizofens vorzunehmen.
Wenn diese Art von Heizung in öffentlich zugänglichen Räumen eingesetzt
werden soll, muss eine entsprechende Genehmigung vorliegen. Erkundigen Sie
sich rechtzeitig nach den entsprechenden Vorschriften.
DER RICHTIGE BRENNSTOFF
Ihr Kaminofen wurde für die Benutzung von wasserfreiem, sauberem Petroleum
hoher Qualität, wie Zibro Extra, Zibro Kristal oder Zibro Bio entwickelt. Nur dieser
Brennstoff sorgt für eine saubere und optimale Verbrennung. Brennstoff
geringerer Qualität kann zu folgenden Problemen führen:
!erhöhte Störungsanfälligkeit
!unvollständige Verbrennung
!verkürzte Lebensdauer des Kaminofens
!Rauch und/oder Geruch
!Niederschlag auf dem Gitter oder Gehäuse
Der richtige Brennstoff ist also wichtig für einen sicheren, effizienten und
komfortablen Gebrauch Ihres Kaminofens.
Eine Beschädigung bzw. eine Störung des Heizofens aufgrund der Verwendung
von anderem als hochwertigem wasserfreiem Petroleum fällt nicht unter die
Garantie.
Informieren Sie sich bei Ihrem Händler in Ihrer direkten Umgebung über den
richtigen Brennstoff für Ihren Kaminofen.
Nur mit dem richtigen
Brennstoff ist eine
sichere, effiziente und
komfortable Benutzung
Ihres Kaminofens
gewährleistet.
2
14

GEBRAUCHSANWEISUNG
ADIE INSTALLATION DES KAMINOFENS
Nehmen Sie den Kaminofen vorsichtig aus dem Karton und kontrollieren Sie
den Inhalt auf Vollständigkeit.
Außer dem Kaminofen muß folgendes vorhanden sein:
!eine Syphonpumpe
!ein Transportverschluß
!diese Gebrauchsanweisung
Bewahren Sie den Karton und das Verpackungsmaterial (Abb. A) zwecks
Lagerung und/oder Transport auf.
Öffnen Sie den Deckel des Brennstofftanks !und entfernen Sie das
Stückchen Karton.
Befüllen Sie den Brennstofftank wie in
Kapitel B
beschrieben.
Der Boden muß stabil und waagrecht sein. Stellen Sie den Kamin an eine
andere Stelle, falls er nicht waagrecht steht. Versuchen Sie nicht durch
Unterlage von Büchern oder ähnlichem den Stand zu korrigieren.
Stecken Sie den Stecker "in die Steckdose (230 Volt - AC/50 Hz) und
stellen Sie die aktuelle Uhrzeit über die Einstelltasten #ein
(siehe Kapitel C).
Ihr Kaminofen ist jetzt betriebsbereit.
BDAS BEFÜLLEN MIT BRENNSTOFF
Füllen Sie den Brennstofftank an einer dazu geeigneten Stelle (falls etwas
verschüttet wird). Gehen Sie wie folgt vor:
Der Kaminofen sollte ausgeschaltet sein.
Öffnen Sie den Deckel und ziehen Sie den Brennstofftank aus dem
Kaminofen (Abb. B). Achtung: der Tank kann kurz nachtropfen. Stellen Sie
den Brennstofftank ab (Tankverschluß nach oben, Griff auf dem Boden) und
drehen Sie den Tankverschluß auf.
Füllen Sie den Brennstofftank mit einer Brennstoffpumpe (siehe
Gebrauchsanweisung Brennstoffpumpe). Dabei ist darauf zu achten, dass der
Kanister höher steht als der Brennstofftank (Abb. C). Den geriffelten Schlauch
stecken Sie dann in die Öffnung des Brennstofftanks.
Achten Sie während des Füllvorgangs auf die Brennstoffanzeige des
Brennstofftanks (Abb. D). Wenn Sie sehen, daß der Tank fast voll ist, stellen
Sie den Füllvorgang ein. Den Tank niemals zu voll füllen. Vor allem nicht,
wenn der Brennstoff sehr kalt ist (Brennstoff dehnt sich aus, wenn er wärmer
wird).
Lassen Sie den Brennstoff, der sich noch in der Pumpe befindet, in den
Kanister zurückströmen und entfernen Sie die Pumpe vorsichtig. Schrauben
Sie den Tankverschluß wieder sorgfältig auf den Tank. Wischen Sie eventuell
verschütteten Brennstoff weg.
1
5
4
3
2
1
6
5
4
3
2
2
15
!!!!!!
D
leer voll
A
C
B
Table of contents
Languages:
Other Zibro Electric Heater manuals
Popular Electric Heater manuals by other brands

Harvia
Harvia TRC90E Instructions for installation and use

Applica
Applica Magna-Heat WHF10 Use and care book

Faber
Faber Varda Installation and operating instructions

TERMA
TERMA KTX 1 user manual

Airelec
Airelec Tactic Pro A693861 Installation & user guide

Haverland
Haverland HK Instructions and specifications

Heatscope
Heatscope MHS-SM1600BK.100 Original installation and instruction manual

ambe
ambe RIR2000-Slim Safety instructions and operation manual

Brandson Equipment
Brandson Equipment 305472 user manual

Creda
Creda Heating Solution brochure

Varmebaronen
Varmebaronen EK 13 Installation and Maintenance

flowair
flowair LEO EL 23 Operation manual