Zivid One+ S User manual


Table of Contents
1. Regulatory Information ...................................... 3
1.1 Compliance ........................................... 3
1.2 SafetyPrecautions ...................................... 4
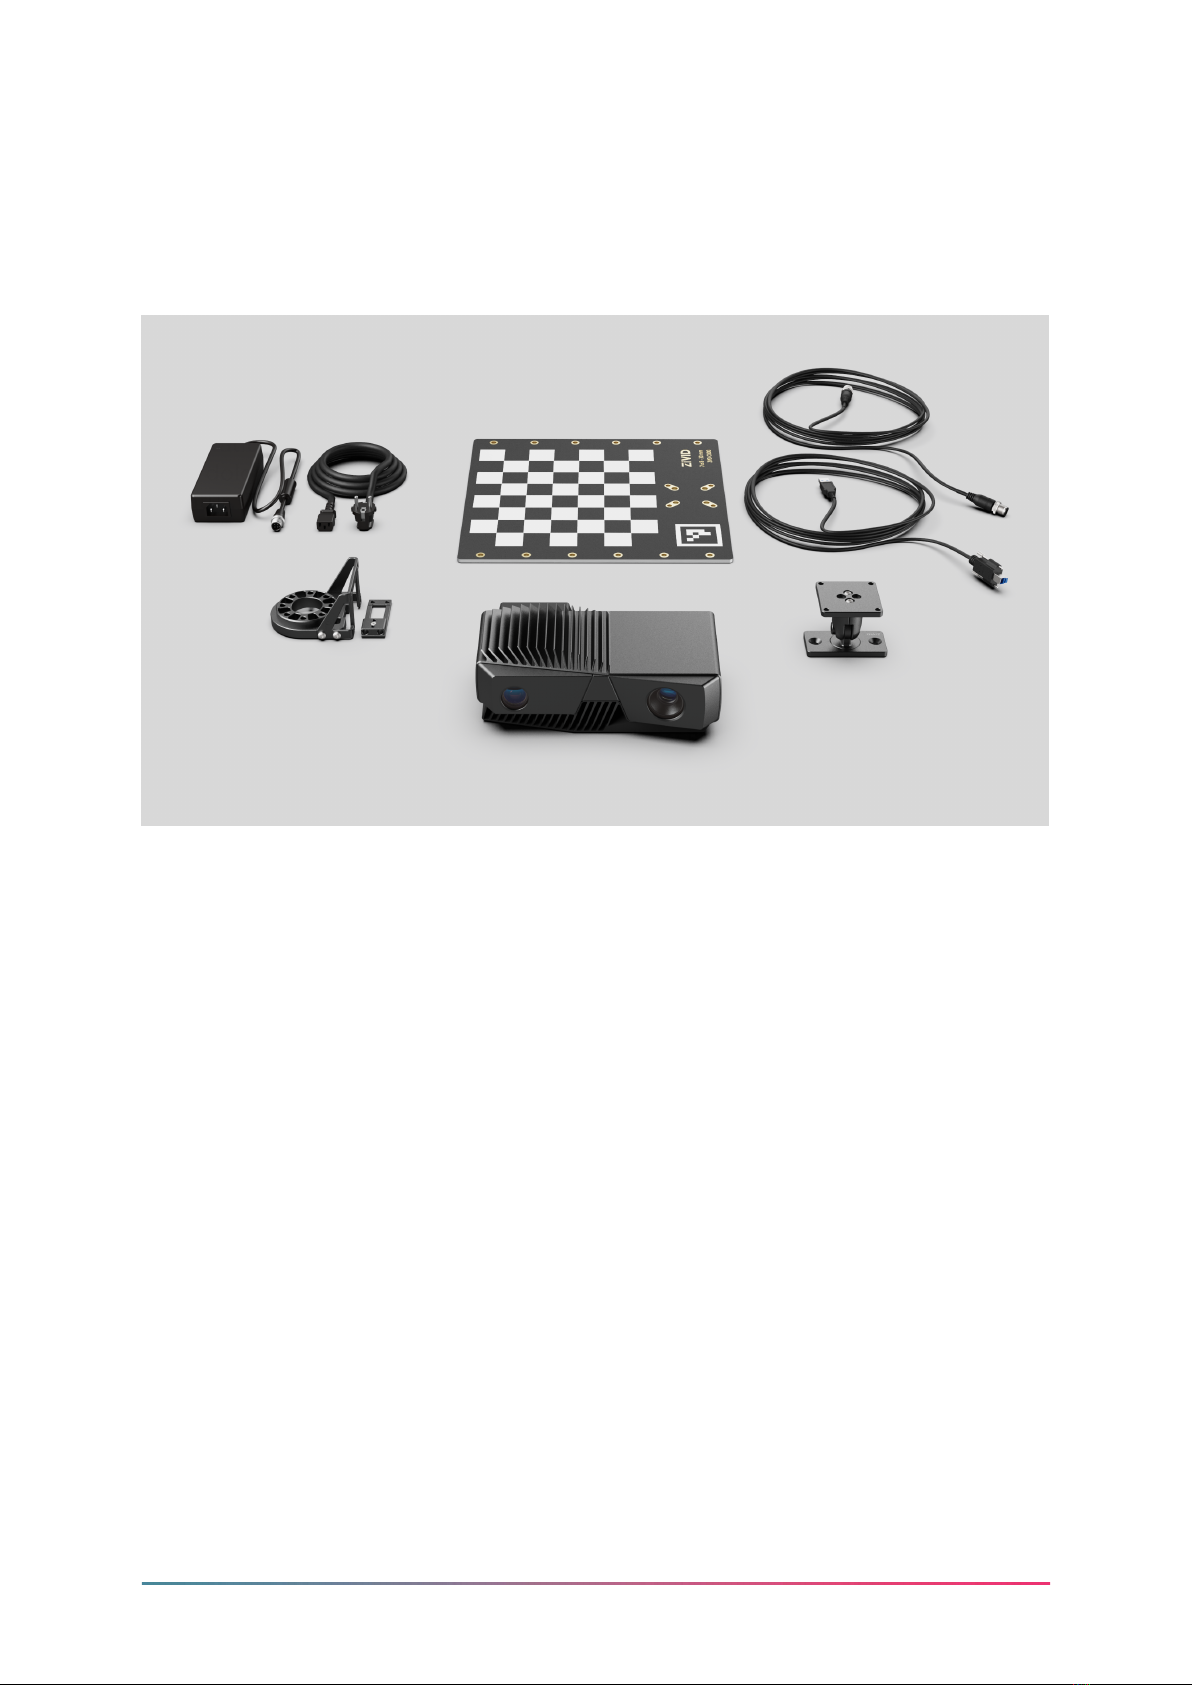
2. Unboxing ................................................ 5
3. System Requirements ....................................... 6
4. Mechanical Installation ...................................... 7
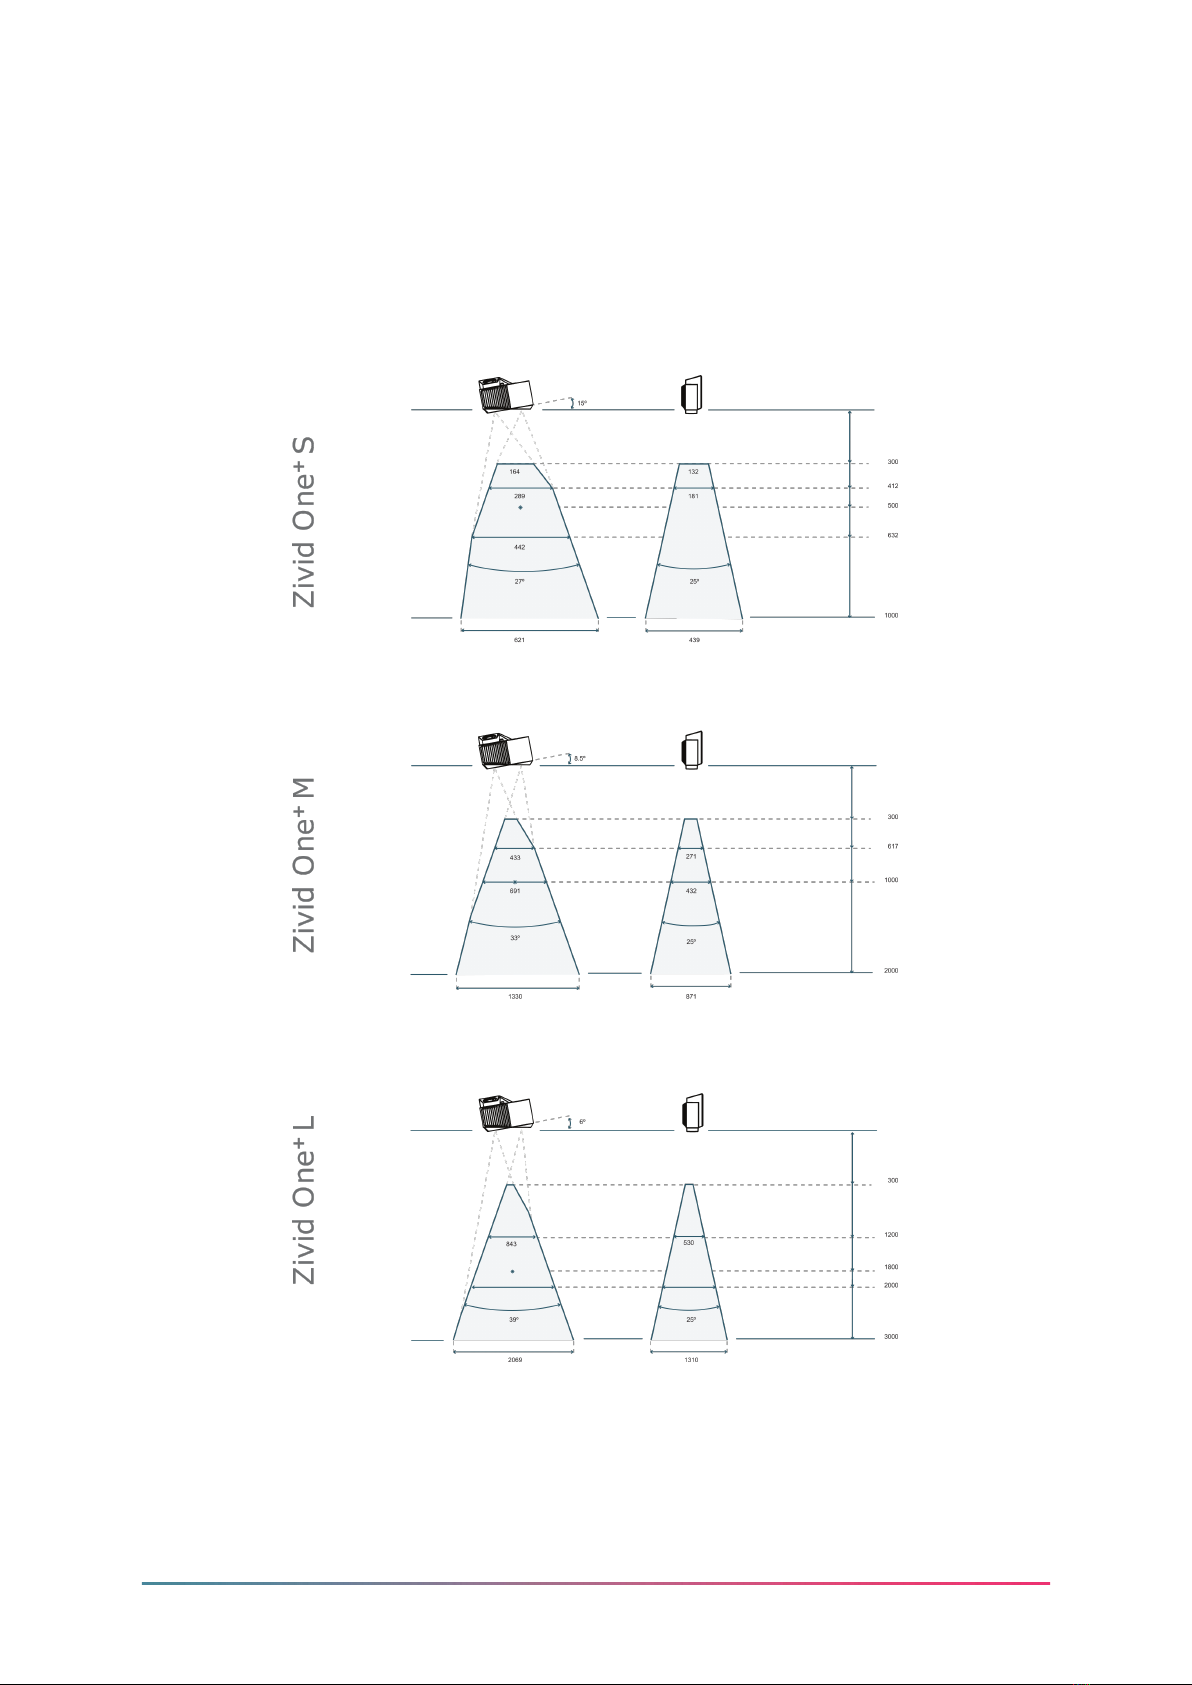
4.1 Working Distance and Field-of-View . . . . . . . . . . . . . . . . . . . . . . . . . . 7
4.2 MechanicalInterface ..................................... 8
4.3 MountingAccessories .................................... 9
4.4 PositioningCorrectly..................................... 10
Inbin-pickingapplications................................. 11
Coolingclearance ....................................... 11
Signalprotection........................................ 11
5. Connectivity and Power Supply ................................ 12
5.1 Connectors............................................ 12
Powersupplyinterface ................................... 12
5.2 Connecting to the Computer . . . . . . . . . . . . . . . . . . . . . . . . . . . . . . . 13
6. Software ................................................. 14
7. Support and Troubleshooting ................................. 15
8. Service and Maintenance ..................................... 16
9. About Zivid .............................................. 17

1. Regulatory Information
1.1 Compliance
The Zivid One+camera is compliant with EN 62368 1, FCC class A, CE, and CB envi-
ronmental standards.
This equipment has been tested and found to comply with the limits for a Class A
digital device, pursuant to part 15 of the FCC Rules. These limits are designed to
provide reasonable protection against harmful interference when the equipment
is operated in a commercial environment. This equipment generates, uses, and
can radiate radio frequency energy and, if not installed and used in accordance
with the instruction manual, may cause harmful interference to radio communi-
cations. Operation of this equipment in a residential area is likely to cause harm-
ful interference in which case the user will be required to correct the interference
at his own expense.
Note
Connections and assembly must be performed by competent technicians. Do not
connect external I/O signals to the device while it is powered; this may damage the
device.
1Cameras manufactured before January 2021 are compliant with EN 60950. Cameras manufactured
in 2021 and onwards are compliant with EN 62368.
Rev 1.3 - 11/2021 3 Zivid.com

1.2 Safety Precautions
Transport the device in its original packaging or make sure it is properly cushioned
during transportation.
The Zivid One+camera use a white light source, which is tested against IEC62471 and
is classied as Risk Group 2. IEC 62471 classies optical radiation sources based on
the level of hazard to the skin and eye. Risk group 2 is moderate risk with a maximum
exposure time of 100 s.
Do not look directly into the operating lamp. The light source should not pose a
hazard to the eyes, due to the aversion response (head turn or eye blink for example)
to very bright light sources, but to be on the safe side, one should avoid looking into
the camera/projector during operation.
Rev 1.3 - 11/2021 4 Zivid.com

2. Unboxing
In the Zivid box you will nd:
• Zivid One+3D camera
• 24 V power supply
• 5 m USB 3.0 cable (Machine Vision Certied)
Optional:
• Power extension cables, available in 5m, 10 m and 20 m
• Optical USB extension cables, available in 10 m and 25 m
Included in Development Kit:
• Calibration Board
• Mount of choice (Stationary Mount or On-Arm Mount)
• Tripod Adapter
Mounting accessories can be ordered separately.
Rev 1.3 - 11/2021 5 Zivid.com

3. System Requirements
OS Windows 10 or Linux Ubuntu 16.04/18.04/20.04
GPU Dedicated GPU
A dedicated GPU gives the best performance with Zivid. It is also
the best choice if the GPU will be used for more than Zivid’s compu-
tations. A medium to high-end AMD or NVIDIA GPU with at least 3
GB of memory is required for optimal performance. This is the pre-
ferred solution for Zivid.
Recommendations:
• NVIDIA GeForce GTX 1060 or better
• NVIDIA GeForce MX150 or better
• AMD Radeon RX 550 or better 1
GPU CPU with integrated GPU
This is the most cost-ecient solution for Zivid. The benet of an
integrated GPU is that the data transfer from GPU to CPU is fast. A
high-end integrated GPU with at least 3 GB of memory available is
required for optimal performance.
Recommendations:
• AMD Ryzen 5 2400G or better 1
• Intel i7 with HD630 or better
USB SuperSpeed USB3 port
1Radeon no longer supports SPIR on some GPUs, please verify your GPU drivers support SPIR to be
compatible with Zivid Software. Zivid no longer supports AMD on Ubuntu 16.04 (AMD dropped support
for Ubuntu 16.04 as of Radeon Software 18.50 for Linux).
Rev 1.3 - 11/2021 6 Zivid.com

4. Mechanical Installation
4.1 Working Distance and Field-of-View
Rev 1.3 - 11/2021 7 Zivid.com

4.2 Mechanical Interface
The Zivid One+camera has four M6 mounting holes and two Ø5 alignment holes. Use
the threaded holes on the bottom side of the device to mount it to a bracket. We
recommend using DIN 912 / ISO 4762 Hexagon or ISO 14579 Hexalobular socket head
cap screws in stainless steel (A2 or A4).
The camera must be completely still during the acquisition to deliver the spec-
ied 3D image quality. Otherwise, it is completely safe to move it, e.g. when
mounted on a robot or any other moving platform.
Note
Rev 1.3 - 11/2021 8 Zivid.com

4.4 Positioning Correctly
The 2D camera and the projector have an angle with respect to the center axis. This
should be considered if it is desired to have the camera perpendicular to the scene.
If possible, mount the camera at a slight tilt angle to avoid reections and interference
from the background. This also frees up space above the scene for easier access for
tools and robots.
Ambient light might reduce performance. Consider blocking direct light aecting
the scene.
Camera tilting is more important if the scene contains specular surfaces.
Note
Rev 1.3 - 11/2021 10 Zivid.com

In bin-picking applications
For bin-picking applications, place the Zivid camera projector above the back edge
or above the rear corner of the bin (see images below). Pan and tilt it so that the 2D
camera is looking at the bin center. The projector rays should not fall on the inner
surfaces of the two walls closest to the projector; they should almost be parallel to
those two walls. Mounting the camera this way minimizes interreections from the
bin walls.
Cooling clearance
Zivid cameras use active and passive cooling, allow some space around the device
for airow, and do not block the air opening on its front and rear sides. Advise the
technical specications for the operating temperature range for your camera.
Signal protection
Do not install Zivid cameras and cables next to high voltage devices that can generate
high levels of electromagnetic disturbance. Do not route camera cabling through
the same trunks/conduits with AC power cables and cables emitting high levels of
disturbance.
Rev 1.3 - 11/2021 11 Zivid.com

5. Connectivity and Power Supply
5.1 Connectors
A) USB3: Data
SuperSpeed USB3 type-B receptacle for PC connection.
Cables need to be “USB3 Vision” compliant.
PC must support USB 3.0 SuperSpeed.
Note
B) M12-5: Power Connector 24V, 5A DC
Power supply interface
Pinout Pin Purpose
1 24V DC +/- 20% (Max 5A)
2 24V DC +/- 20% (Max 5A)
3 GND
4 GND
5 Reserved, do not connect
Optional mating connector: TE Connectivity AMP 1838275-3 (Digikey: A97645-ND)
It is required to use both pins for 24V and for GND.
Tip
Rev 1.3 - 11/2021 12 Zivid.com

5.2 Connecting to the Computer
1. Plug the power supply into the “24V” port and into a power outlet.
2. Plug the USB cable into the “DATA” port and into a USB 3.0 port on your PC.
Ensure that all connections are screwed in tightly.
Note
Use the AC/DC adapter supplied with the unit to ensure compliance with emission
and immunity standards.
The Zivid unit is protected against reverse polarity and against overheating by a ther-
mistor that physically removes the power.
Using a direct cable from the PC to the Zivid camera works better than connect-
ing the camera via a USB hub. Use only Zivid approved cables and extenders.
Caution
Rev 1.3 - 11/2021 13 Zivid.com

7. Support and Troubleshooting
For more information, visit:
support.zivid.com
The Zivid Knowledge Base provides answers for commonly seen issues and ques-
tions related to Zivid products, for both software and hardware. You will also nd in
depth articles about our camera technology, best use practices, dierent types of 3D
imaging methods and structured light, to get a better understanding for how to use
this product.
Rev 1.3 - 11/2021 15 Zivid.com

8. Service and Maintenance
The device contains no user-serviceable parts inside. The product warranty will be
void if opened.
Follow the below instructions to ensure that your Zivid camera is well maintained:
• Check screw connections and connectors at regular intervals.
• Do not block the air opening on the front and rear sides of the product.
• The unit uses active and passive cooling, allow some space around the device
for airow.
• Use a small vacuum cleaner or a small canister of compressed air to remove
dust or other accumulated particles from the glasses or in between the ribs of
the heat sink.
• Regularly clean optical glass parts of the device.
• Check and update the calibration on a yearly basis by performing Ineld Cor-
rection (and Hand-Eye Calibration) when necessary.
Rev 1.3 - 11/2021 16 Zivid.com

9. About Zivid
Zivid is a market-leading provider of 3D machine vision cameras and software for
next generation robotics and industrial automation systems. Its Zivid One+and Zivid
Two products are regarded as the world's most accurate real-time 3D color cameras
and bring human-like vision to the smart factories and warehouses of Industry 4.0.
To nd out more about Zivid, visit:
www.zivid.com
Email
Sales: [email protected]om
General: info@zivid.com
Phone
Zivid HQ-Oslo, NO | +47 21 02 24 72
Zivid Sales-Austin, TX, US | +1 (847) 345-7691
Zivid Sales-Xiamen, CN | +86 139 5012 9074
Zivid Sales-Seoul, KR | +82 10 8984 5350
Zivid
Gjerdrums vei 10A
0484
Oslo, Norway
Rev 1.3 - 11/2021 17 Zivid.com

©23/08/2021, Zivid. All rights reserved. Subject to change without notice.
Rev 1.3 - 11/2021 18 Zivid.com
Other manuals for One+ S
1
This manual suits for next models
6
Table of contents
Other Zivid 3D Camera manuals
Popular 3D Camera manuals by other brands

ArduCAM
ArduCAM B0176 quick start guide

Full Spectrum Laser
Full Spectrum Laser MUSE FIBER GALVO 2 user manual

Matterport
Matterport Matterport Pro2 Lite quick start guide

EPC
EPC TOFcam-660 Installation and operation manual

GeoCue
GeoCue True View 410 Hardware user's guide

Matterport
Matterport Matterport Pro2 Lite user guide