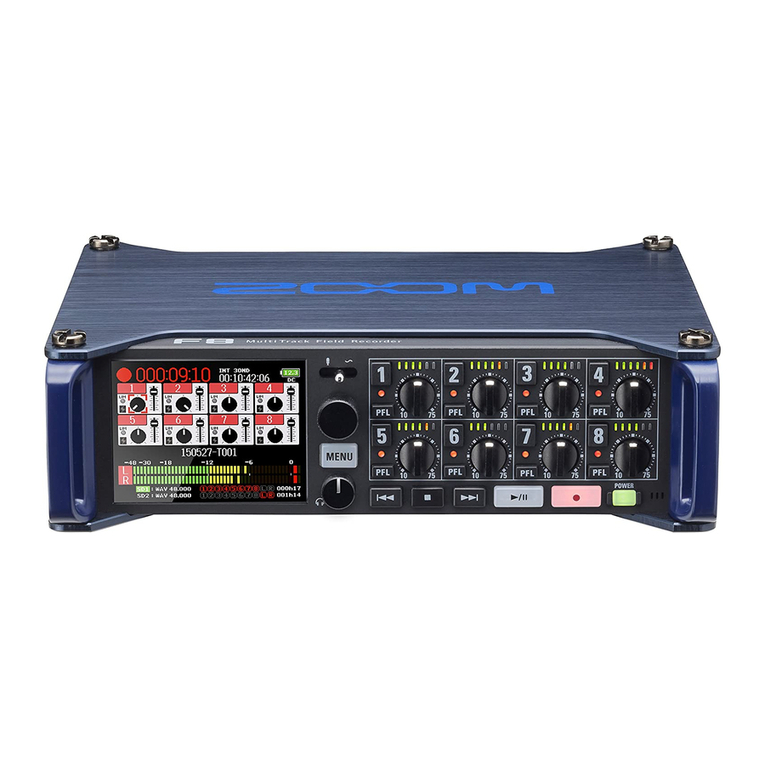
Zoom F8n Pro User manual

Operation Manual
You must read the Usage and Safety Precautions before use.
©2022 ZOOM CORPORATION
Copying or reprinting this manual in part or in whole without permission is prohibited.
Product names, registered trademarks and company names in this document are the property of their respective companies. All trademarks and
registered trademarks in this document are for identification purposes only and are not intended to infringe on the copyrights of their respective owners.
Proper display is not possible on grayscale devices.

Notes about this Operation Manual
You might need this manual in the future. Always keep it in a place where you can access it easily.
The contents of this document and the specifications of the product could be changed without notice.
• Windows® is a trademark or registered trademark of Microsoft® Corporation.
• Mac, macOS, iPadOS and iOS are registered trademarks of Apple Inc. in the USA and other countries.
• iOS is a trademark or registered trademark of Cisco Systems, Inc. in the USA and other countries, and it
is used under license.
• Google Play is a trademark of Google LLC.
• The SD, SDHC and SDXC logos are trademarks.
• Other trademarks and trade names are the property of their respective companies.
• Recording from copyrighted sources, including CDs, records, tapes, live performances, video works
and broadcasts, without permission of the copyright holder for any purpose other than personal use is
prohibited by law. ZOOM CORPORATION will not assume any responsibility related to infringements of
copyrights.
2

Contents
Notes about this Operation Manual........................................................................................................................ 2
F8n Pro overview.........................................................................................................................................................6
Achieving high audio quality throughout recording and editing......................................................................... 6
Functions of parts..................................................................................................................................................... 10
Overview of screens that are shown..................................................................................................................... 15
Recording process..................................................................................................................................................... 28
Making preparations.................................................................................................................................................29
Loading an SD card...................................................................................................................................................29
Supplying power........................................................................................................................................................ 30
Connecting input equipment...................................................................................................................................33
Turning the power on/off........................................................................................................................................ 40
Setting the date and time (first time starting up)................................................................................................41
Making input settings............................................................................................................................................... 43
Input and output signal flow...................................................................................................................................43
Adjusting the input signal monitoring balance.................................................................................................... 44
Setting the track knob function (Track Knob Option)......................................................................................... 45
Adjusting the L/R track volume...............................................................................................................................49
Monitoring the input signals of specific tracks (PFL/SOLO)................................................................................50
Setting the input source (Input Source)................................................................................................................ 51
Setting the monitoring sound on the PFL Screen (PFL Mode)........................................................................... 53
Cutting low-frequency noise (HPF)......................................................................................................................... 55
Using the input limiter (Input Limiter)...................................................................................................................57
Inverting the input phase (Phase Invert)...............................................................................................................66
Changing the phantom power settings (Phantom)..............................................................................................68
Changing the plugin power setting (Plugin Power)............................................................................................. 74
Delaying input signals (Input Delay).......................................................................................................................75
Converting mid-side input to ordinary stereo (Stereo Link Mode)................................................................... 77
Adjusting the input levels of multiple tracks simultaneously (Trim Link).........................................................80
Adjusting the side level of a mid-side mic capsule (Side Mic Level)..................................................................82
Changing the automatic mixing setting (Auto Mix)............................................................................................. 83
Setting the format of Ambisonic Mode................................................................................................................. 85
Setting the mic position used for ambisonic recording (Mic Position)............................................................. 90
Making output setting.............................................................................................................................................. 93
Setting signals sent to headphones (Headphone Routing)................................................................................ 93
Outputting alerts through headphones (Alert Tone Level)................................................................................ 96
Setting the headphone output Volume Curve..................................................................................................... 98
Boosting headphone output to alleviate interference from recorded sound (Digital Boost)......................100
Disabling outputs (Output On/Off).......................................................................................................................102
Setting the standard output level (Output Level).............................................................................................. 104
Setting output levels...............................................................................................................................................106
3

Delaying output signals (Output Delay)...............................................................................................................108
Using the output limiter (Output Limiter)...........................................................................................................110
Selecting signals sent to the main outputs (MAIN OUT Routing).................................................................... 115
Selecting signals sent to the sub outputs (SUB OUT Routing).........................................................................117
Recording..................................................................................................................................................................119
Enabling recording on SD cards and setting file formats.................................................................................119
Selecting inputs and adjusting levels...................................................................................................................121
Setting the sampling rate (Sample Rate).............................................................................................................123
Setting WAV file bit depth (WAV Bit Depth)........................................................................................................125
Setting MP3 file bit rate (MP3 Bit Rate)...............................................................................................................127
Capturing audio before recording starts (Pre Rec)............................................................................................128
Maximum file size (File Max Size).........................................................................................................................130
Showing total recording times for long recordings (Time Counter)................................................................132
Moving the previously recorded take to the FALSE TAKE folder.....................................................................134
Using timecode........................................................................................................................................................ 135
Setting the recording take..................................................................................................................................... 162
Using the slate mic and slate tone...................................................................................................................... 177
Recording.................................................................................................................................................................. 194
Playing recordings...................................................................................................................................................195
Playing recordings................................................................................................................................................... 195
Mixing takes............................................................................................................................................................. 196
Monitoring the playback signals of specific tracks during playback...............................................................198
Changing the playback mode (Play Mode)..........................................................................................................199
Managing files..........................................................................................................................................................201
Folder and file structure........................................................................................................................................ 201
Take and folder operations (FINDER).................................................................................................................. 204
Overview of take information (metadata) stored in files................................................................................. 215
Checking and editing take metadata................................................................................................................... 216
Writing sound reports (Create Sound Report)................................................................................................... 227
Using USB functions............................................................................................................................................... 231
Exchanging data with a computer (SD Card Reader)........................................................................................ 231
Using as an audio interface.................................................................................................................................. 233
Using the FRC-8....................................................................................................................................................... 244
Using the FRC-8 as a controller (Connect).......................................................................................................... 244
Setting the type of keyboard connected to the FRC-8 (Keyboard Type)........................................................ 246
Setting FRC-8 fader and knob operation (Knob/Fader Mode)......................................................................... 248
Setting user keys for the FRC-8 (User Key)......................................................................................................... 250
Setting the power supply used by the FRC-8 (Power Source)..........................................................................252
Powering the FRC-8 with USB bus power (USB Bus Power).............................................................................254
Setting the FRC-8 LED brightness (LED Brightness)...........................................................................................256
Updating the FRC-8 firmware................................................................................................................................258
Controlling the F8n Pro from a smartphone/tablet.......................................................................................... 261
Making various settings......................................................................................................................................... 262
Setting how timecode is shown (Home Timecode Display Size)..................................................................... 262
4

Setting level meter appearance (Level Meter)................................................................................................... 264
Setting the LED brightness (LED Brightness)......................................................................................................270
Making display settings (LCD)............................................................................................................................... 271
Adding marks when recording/playing (PLAY Key Option)...............................................................................274
Setting the keys held (Key Hold Target).............................................................................................................. 276
Setting the date and time (Date/Time (RTC))......................................................................................................278
Disabling the Automatic Power Saving function (Auto Power Off)................................................................. 281
Setting the power supply used (Power Source).................................................................................................283
Backing up and loading F8n Pro settings (Backup/Load Settings).................................................................. 286
Restoring factory default settings........................................................................................................................ 290
Managing SD cards................................................................................................................................................. 291
Checking SD card information (Information)......................................................................................................291
Testing SD card performance (Performance Test)............................................................................................ 292
Formatting SD cards (Format)...............................................................................................................................296
Managing the firmware..........................................................................................................................................298
Checking the firmware versions........................................................................................................................... 298
Updating the firmware........................................................................................................................................... 299
About the F8n Pro Shortcut function.................................................................................................................. 300
Checking the F8n Pro Shortcut function (Shortcut List)................................................................................... 300
List of shortcuts.......................................................................................................................................................301
Appendix...................................................................................................................................................................303
Troubleshooting.......................................................................................................................................................303
Detailed product diagrams.................................................................................................................................... 305
Metadata list............................................................................................................................................................ 307
Specifications............................................................................................................................................................312
5

F8n Pro overview
Achieving high audio quality throughout recording and
editing
With dual AD converter circuits and support for 32-bit float WAV files, the F8n Pro can maintain the highest
audio quality from recording to post-production.
Recording
Dual AD converter circuits enable recording the loudest to the quietest sounds without adjusting gain.
Post-production
Recording with 32-bit float WAV file formats allows the same audio quality to be retained when editing.
6

Dual AD converter circuit overview
For each input circuit, the F8n Pro has two AD converters with different input gains. This design enables
high-quality audio recording without the need to adjust gain settings, a step that is normally indispensable.
Providing amazing dynamic range
By combining two AD converters, a wide dynamic range not possible with a single AD converter has been
realized.
High-gain
AD converter
Low-gain
AD converter
AD converter
switches in
response to
input level
・Airplane
・Nearby thunder
・Train passing on tracks overhead
・Inside train
・Shouting
・Grand piano
・Noisy street
・Chimes
・Ordinary conversation
・Whispering
・Quiet library
・Late night in suburb
Wide dynamic range covered
by two AD converters
Input gain adjusted to
desired recording volume
Dual AD converters
Conventional equipment
7

Switching between two AD converters
The F8n Pro constantly monitors data from the two AD converters, and automatically selects the one that
provides the best recording results.
Low noise
because high-gain
AD converter selected
Low noise
because high-gain
AD converter selected
No clipping
because low-gain
AD converter selected
8

32-bit float WAV file overview
32-bit float WAV files have the following advantages over conventional 16/24-bit linear WAV files.
These features enable the quality of the sound during recording to be maintained even during post-
production.
Resolution advantage
32-bit float WAV files have the advantage of being able to maintain high resolution even at low volumes. As
a result, quiet sounds can be made louder when editing after recording without degrading their quality.
■ 16/24-bit linear WAV
Raise volume
Resolution low
■ 32-bit float WAV
Raise volume
Resolution high
Clipping advantage
If a waveform sounds clipped when output from the F8n Pro or in a DAW, it can be edited after recording
to lower its volume and restore an unclipped waveform because the data in the 32-bit float WAV file itself
is not clipped.
■ 16/24-bit linear WAV
Clipped recording
Reduce volume
Still clipped
■ 32-bit float WAV
Clipped recording
Reduce volume
Not clipped anymore
9

Functions of parts
Front
❶Display (LCD)
This shows the recorder status and Menu Screen. (→Overview of screens that are shown)
❷Selection encoder
Use this to select and to confirm in various menus.
❸Slate switch
Use this to record slate tones and with the slate mic.
❹PFL button
Press this to open the PFL Screen. The status indicator of the selected track will light orange. (→PFL
Screen)
❺Track button/status indicator
Press the track button, lighting the status indicator red, to enable that track for recording.
❻LED level meter
This lights according to the track input level.
❼Track knob
This controls the track fader.
Depending on the setting, this can also adjust trim or pan.
❽MENU button
Press this to open the Menu Screen or return to the previous screen.
❾Headphone volume knob
This adjusts the headphone volume.
10

❿REW button
Use this to search backward and to skip to the previous track.
⓫STOP button
This stops recording and playback.
⓬FF button
Use this to search forward and to skip to the next track.
⓭PLAY/PAUSE button
This starts and pauses track playback.
⓮REC button
This starts recording.
⓯Power button
This turns the power on/off.
⓰Slate mic
Use this for slate mic recording.
11

Back
❶12 V DC IN connector
Connect the dedicated AC adapter (ZOOM AD-19) here.
❷TIMECODE IN/OUT connectors
Use cables with BNC connectors to input and output timecode.
❸Battery cover
Open this when installing or removing AA batteries.
❹MIC IN connector
Mic capsules (sold separately) can be attached. (→Connecting mic capsules)
12

Left side
❶EXT DC IN connector
External DC power supplies that support Hirose 4-pin connectors can be connected here.
❷USB (Mini-B) port
Connect this to a computer, smartphone or tablet to use the F8n Pro as an SD card reader or audio
interface.
❸SD card slots
Up to 2 SD cards can be loaded.
❹Inputs 1–4
Connect mics and instruments to these. These can be used with XLR and TRS connectors.
When disconnecting the XLR plug, pull it while pressing Lock release button (“PUSH” area).
13

Right side
❶SUB OUT jack
This stereo mini jack (unbalanced) can be used to output sound.
❷Headphone jack
This can output sound to headphones.
❸MAIN OUT jacks
Use cables with TA3 connectors to output sound to speakers.
❹Inputs 5–8
Connect mics and instruments to these. These can be used with XLR and TRS connectors.
When disconnecting the XLR plug, pull it while pressing Lock release button (“PUSH” area).
14

Overview of screens that are shown
This section explains the screens shown on the F8n Pro display.
Screen list
Mixer Screen
You can check the input settings
and adjust the input level.
MAIN OUT /SUB OUT Setting
Screen
You can check/change the output
settings and adjust the output
level.
■ Home Screen
This appears on the display
when the F8n Pro power is
turned on.
Use to switch the
screens. Move the cursor to
the end when displaying the
MAIN OUT/SUB OUT Setting
Screen.
Level Meters Screen
You can check the level finely by
displaying horizontal level meter .
■ PFL Screen
The PFL Screen is opened by
pressing .
You can change the input setting
while monitoring the input signals
of specific tracks.
■ Menu Screen
The Menu Screen is opened
by pressing .
You can change the settings.
You can open the Home Screen
while displaying the Menu Screen
by pressing and holding .
15

Home Screen
■Mixer Screen
You can easily check the playing/recording elapsed time, input/output level, trim setting, input source, etc.
❶Status icon
This icon shows the recording status.
• : Stopped
• : Recording
• : Paused (during recording)
• : Playing
• : Paused (during playing)
❷Counter
This shows the elapsed recording time (during recording) or playback time (during playing).
❸Frame rate
• INT: internal timecode enabled
• EXT: external input timecode enabled
❹Timecode
This shows the recording/playing timecode.
❺Power type and remaining power
When the remaining battery charge becomes low, change the batteries (→Installing batteries), connect
an AC adapter (→Connecting an AC adapter) or connect an external DC power supply (→Using an
external DC power supply).
Power type
16

• DC: AC adapter
• EXT: external DC power supply
• AA: batteries
❻Track number
This shows the track number and status.
• Red: input enabled
• Green: playback track enabled
• Grey: input disabled
Stereo-linked inputs are displayed as .
❼Fader
This shows the fader location.
❽Phantom power status
• Lit: enabled
• Unlit: disabled
❾Limiter status
• Grey: disabled
• Red: enabled
• Yellow: functioning
❿Input source
This shows the selected input source. (→Setting the input source (Input Source))
⓫Trim
Use to display the adjusting status of the trim for each track.
Press to adjust the trim of the selected track.
⓬L/R tracks
⓭Limiter indicators
Light in yellow during limiter functioning.
⓮Clip indicators
These retain the peak levels of input/playback signals for a set amount of time after fader adjustment.
⓯Level meters
These show the track and L/R levels.
⓰Recording/playback take name
Press and hold when stopped to show the name of the next track to be recorded.
17

⓱Playback card
• Green: used for playback
• Grey: no card
⓲Recording/playback file format and sampling rate
Showed by card.
⓳Remaining time
The remaining recordable time (when recording) or remaining playback time (when playing) is
displayed by card.
18

■MAIN OUT /SUB OUT Setting Screen
The levels of MAIN OUT/SUB OUT are displayed and you can set/adjust the output setting such as ON/OFF,
standard output level/limiter setting, level adjusting, etc.
❶Status icon
This icon shows the recording status.
• : Stopped
• : Recording
• : Paused (during recording)
• : Playing
• : Paused (during playing)
❷Counter
This shows the elapsed recording time (during recording) or playback time (during playing).
❸Frame rate
• INT: internal timecode enabled
• EXT: external input timecode enabled
❹Timecode
This shows the recording/playing timecode.
❺Power type and remaining power
When the remaining battery charge becomes low, change the batteries (→Installing batteries), connect
an AC adapter (→Connecting an AC adapter) or connect an external DC power supply. (→Using an
external DC power supply)
Power type
• DC: AC adapter
19

• EXT: external DC power supply
• AA: batteries
❻MAIN OUT 1/2 setting area
You can set/adjust the following items.
• On/Off: Sets enabling/disabling of the output. (→Disabling outputs (Output On/Off))
• Level: Adjusts the standard output level. (→Setting the standard output level (Output Level))
• Limiter: Sets on/off of the limiter for output. (→Using the output limiter (Output Limiter))
• Fader: Adjusts the output level.
❼Recording/playback take name
Press and hold when stopped to show the name of the next track to be recorded.
❽Level meters
These show the output level for MAIN OUT/SUB OUT.
❾SUB OUT 1/2 setting area
You can set/adjust the following items.
• On/Off: Sets enabling/disabling of the output. (→Disabling outputs (Output On/Off))
• Level: Adjusts the standard output level. (→Setting the standard output level (Output Level))
• Limiter: Sets on/off of the limiter for output. (→Using the output limiter (Output Limiter))
• Fader: Adjusts the output level.
❿Playback card
• Green: used for playback
• Grey: no card
⓫Recording/playback file format and sampling rate
Showed by card.
⓬Recording/playback track
Red: Recording track
Green: Playback track
Gray: Tracks that are not recorded/played
⓭Remaining time
The remaining recordable time (when recording) or remaining playback time (when playing) is
displayed by card.
20
Other manuals for F8n Pro
3
Table of contents
Other Zoom Measuring Instrument manuals

Zoom
Zoom H5 User manual

Zoom
Zoom H6 Handy Recorder User manual

Zoom
Zoom H1essential User manual

Zoom
Zoom ZF8N User manual

Zoom
Zoom H1essential Mounting instructions

Zoom
Zoom MicTrak M3 User manual

Zoom
Zoom MicTrak M3 User manual

Zoom
Zoom H4n Pro User manual

Zoom
Zoom F4 Instructions and recipes

Zoom
Zoom H4N User manual

Zoom
Zoom F6 Instructions and recipes

Zoom
Zoom R4 User manual

Zoom
Zoom H4N User manual

Zoom
Zoom Handy REcorder H1 User instructions

Zoom
Zoom F8n Pro Instructions and recipes

Zoom
Zoom F2-BT User manual

Zoom
Zoom H4essential User manual

Zoom
Zoom Handy Recorder H8 Mounting instructions

Zoom
Zoom Handy REcorder H1 Installation guide

Zoom
Zoom Handy REcorder H1 User manual