Zoom G11 User manual

You must read the Usage and Safety Precautions before use.
Operation Manual
Multi-Effects Processor
© 2020 ZOOM CORPORATION
Copying or reprinting this manual in part or in whole without permission is prohibited.
Product names, registered trademarks and company names in this document are the property of their respective companies. All trademarks and reg-
istered trademarks in this document are for identification purposes only and are not intended to infringe on the copyrights of their respective owners.
Proper display is not possible on grayscale devices.

Notes about this Operation Manual
You might need this manual in the future. Always keep it in a place where you can access it easily.
The contents of this document and the specications of the product could be changed without notice.
◎Windows® is a trademark and registered trademark of Microsoft® Corporation.
◎iPhone, iPad, iPadOS and Mac are trademarks of Apple Inc.
◎App Store is a service mark of Apple Inc.
◎iOS is a trademark or registered trademark of Cisco Systems, Inc. (USA).
◎Other product names, registered trademarks and company names in this document are the property of
their respective companies.
Note: All trademarks and registered trademarks in this document are for identication purposes only and
are not intended to infringe on the copyrights of their respective owners.
2

Introduction
Thank you very much for purchasing a ZOOM G11 Multi-Effects Processor.
This Multi-Effects Processor includes numerous effects that can be combined for use together. Effect combinations
and parameter settings can be saved as patch memories to be used whenever you like. By simply switching between
preset patch memories, you can achieve dramatic changes in sound.
This Multi-Effects Processor allows you to easily enjoy a variety of sounds.
We hope you will enjoy using it for many years.
Main features of the G11
Amp and effect sounds that continue to evolve
Original amps and effects that utilize enhanced DSP processing power are included.
The impressive collection of effects has amp and cabinet models as well as boutique pedals that faithfully emulate
originals and includes the best of other recent members of the G Series,. Using the free Guitar Lab effect management
application on a computer (Mac/Windows) or iOS/iPad device, you can, for example, add effects that are distributed
online as well as edit and back up patch memories.
Craft sounds intuitively with easy operations
Using a 5-inch touchscreen, an interface that is easy to understand has been realized.
The amplier and effects sections have dedicated displays and controls enabling intuitive sound crafting.
Impulse response (IR) loader
WAV-format IR data with up to 2048 samples at sampling frequencies between 44.1 kHz and 192 kHz are supported.
Options are virtually unlimited since impulse responses (IR) from third parties can be loaded.
Flexible sound setups are possible with 2 send/return pairs and MIDI
The 2 send/returns allow you to insert your favorite effect boxes anywhere. They also support the 4 cable method
using the send/return jacks of a guitar amp.
Even more advanced sound setups can be created using the MIDI connectors.
Rhythm patterns and looper
The rhythm and looper functions are independent from the amps and effects, so they can be used anytime. The looper,
which can be synchronized with rhythm patterns, can record up to 5 minutes in stereo.
4-in/4-out USB audio interface
The USB audio interface supports the simultaneous recording of the G11 stereo output and the dry signal before
effects in a DAW, as well as the re-amplication of recorded performances.
Remote operation from iOS/iPadOS devices
Guitar Lab can be used with an iOS/iPadOS device by connecting a ZOOM wireless adapter (e.g. BTA-1).
3

Terms used in this manual
Patch memory
Combinations of amps and effects with their on/off settings and parameter values can be saved as “patch
memories” for easy recall. Effects are saved and recalled in patch memory units. A single patch memory can
include up to nine effects and one amp model, and up to 240 patch memories can be saved.
Bank
One group of 4 patch memories is a “bank”. Patch memories can be quickly recalled by switching banks. Up to 60
banks can be saved.
Effect type
The available effect types include various guitar effects and amp/cabinet simulation models. Effects can be
selected from these types to be added to patch memories.
Category
Effects are grouped into categories by type.
Preselect
This function allows you to switch to a patch memory at any location while continuing to use the tone of the
currently selected patch memory.
AUTOSAVE
This function automatically saves changes to patch memory and effect settings.
ECO mode
This function will automatically turn the power off 10 hours after the last operation.
Looper
Stereo phrases that are up to 5 minutes long can be recorded and played back repeatedly.
Layering phrases enables various live performance techniques, including a cappella choruses and beatboxing.
4

Notes about this Operation Manual �����������2
Introduction ��������������������������3
Terms used in this manual �����������������4
Contents ����������������������������5
G11 overview �������������������������7
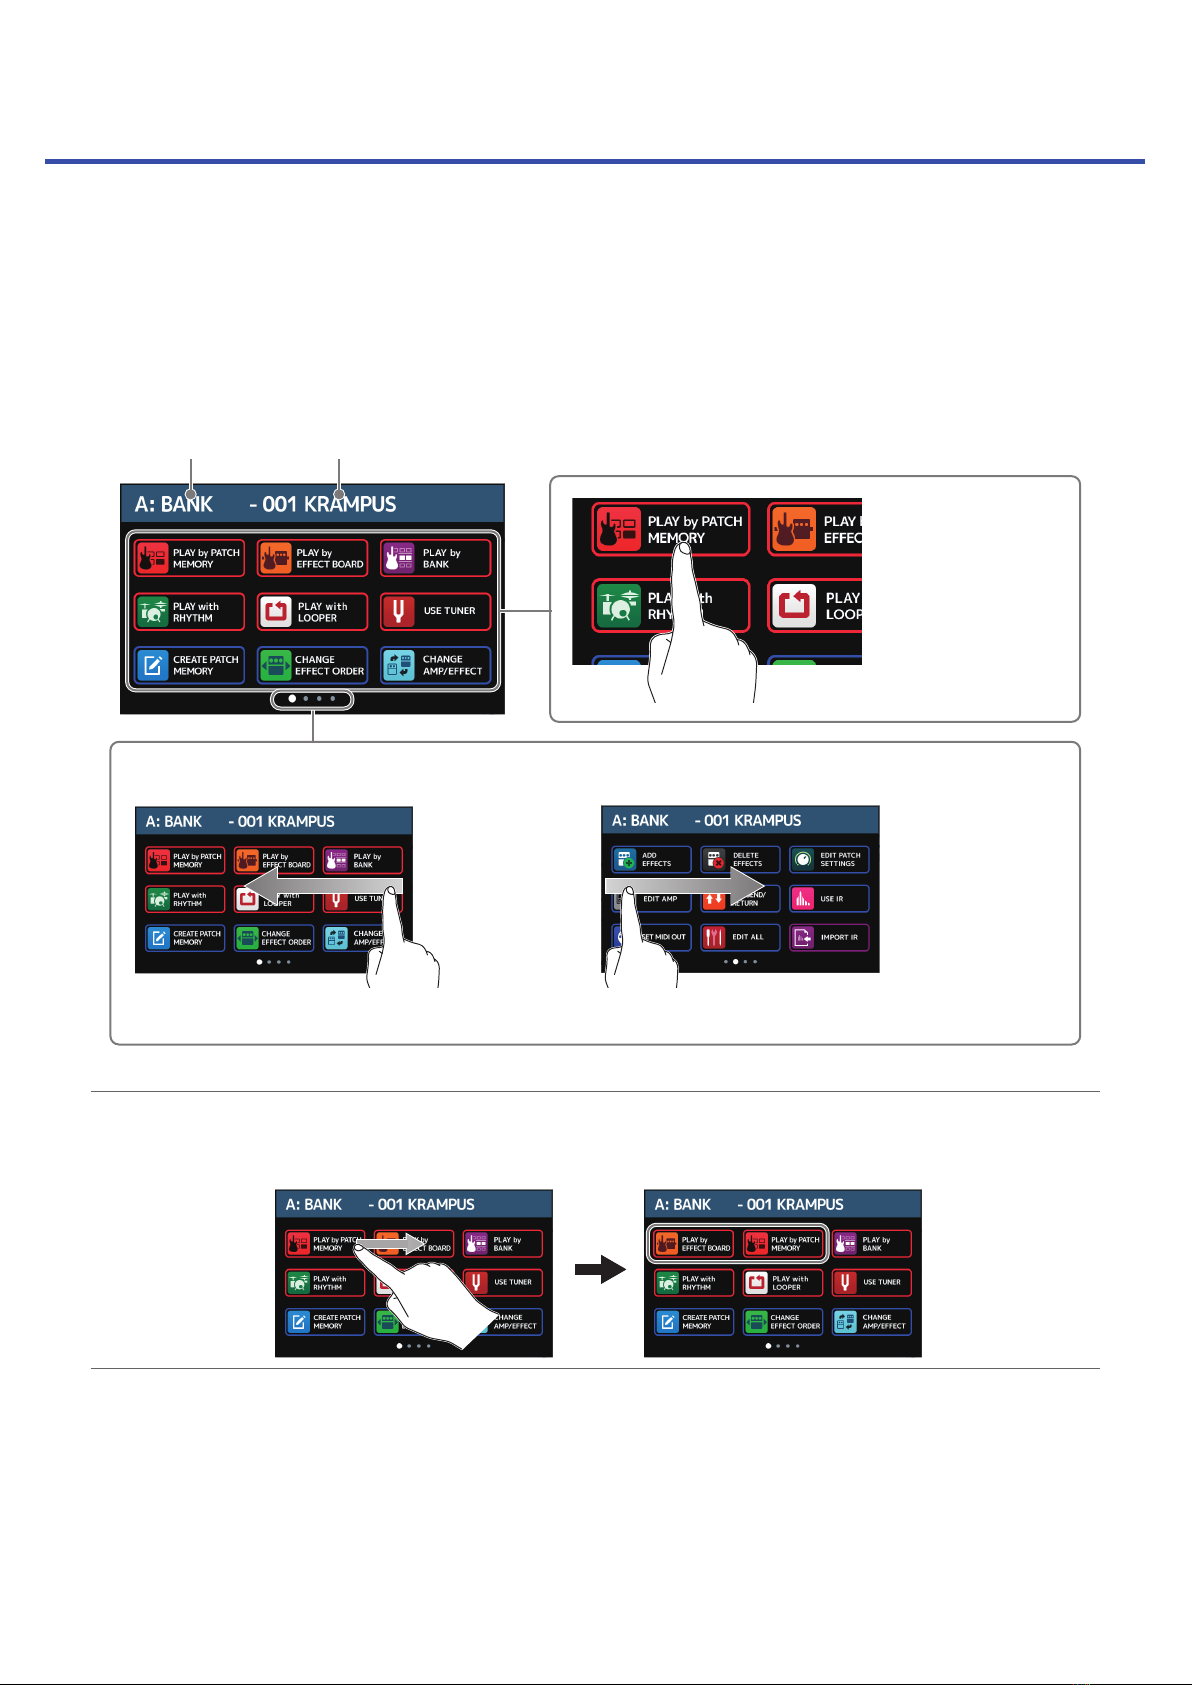
Using the touchscreen �������������������9
Functions of parts ���������������������11
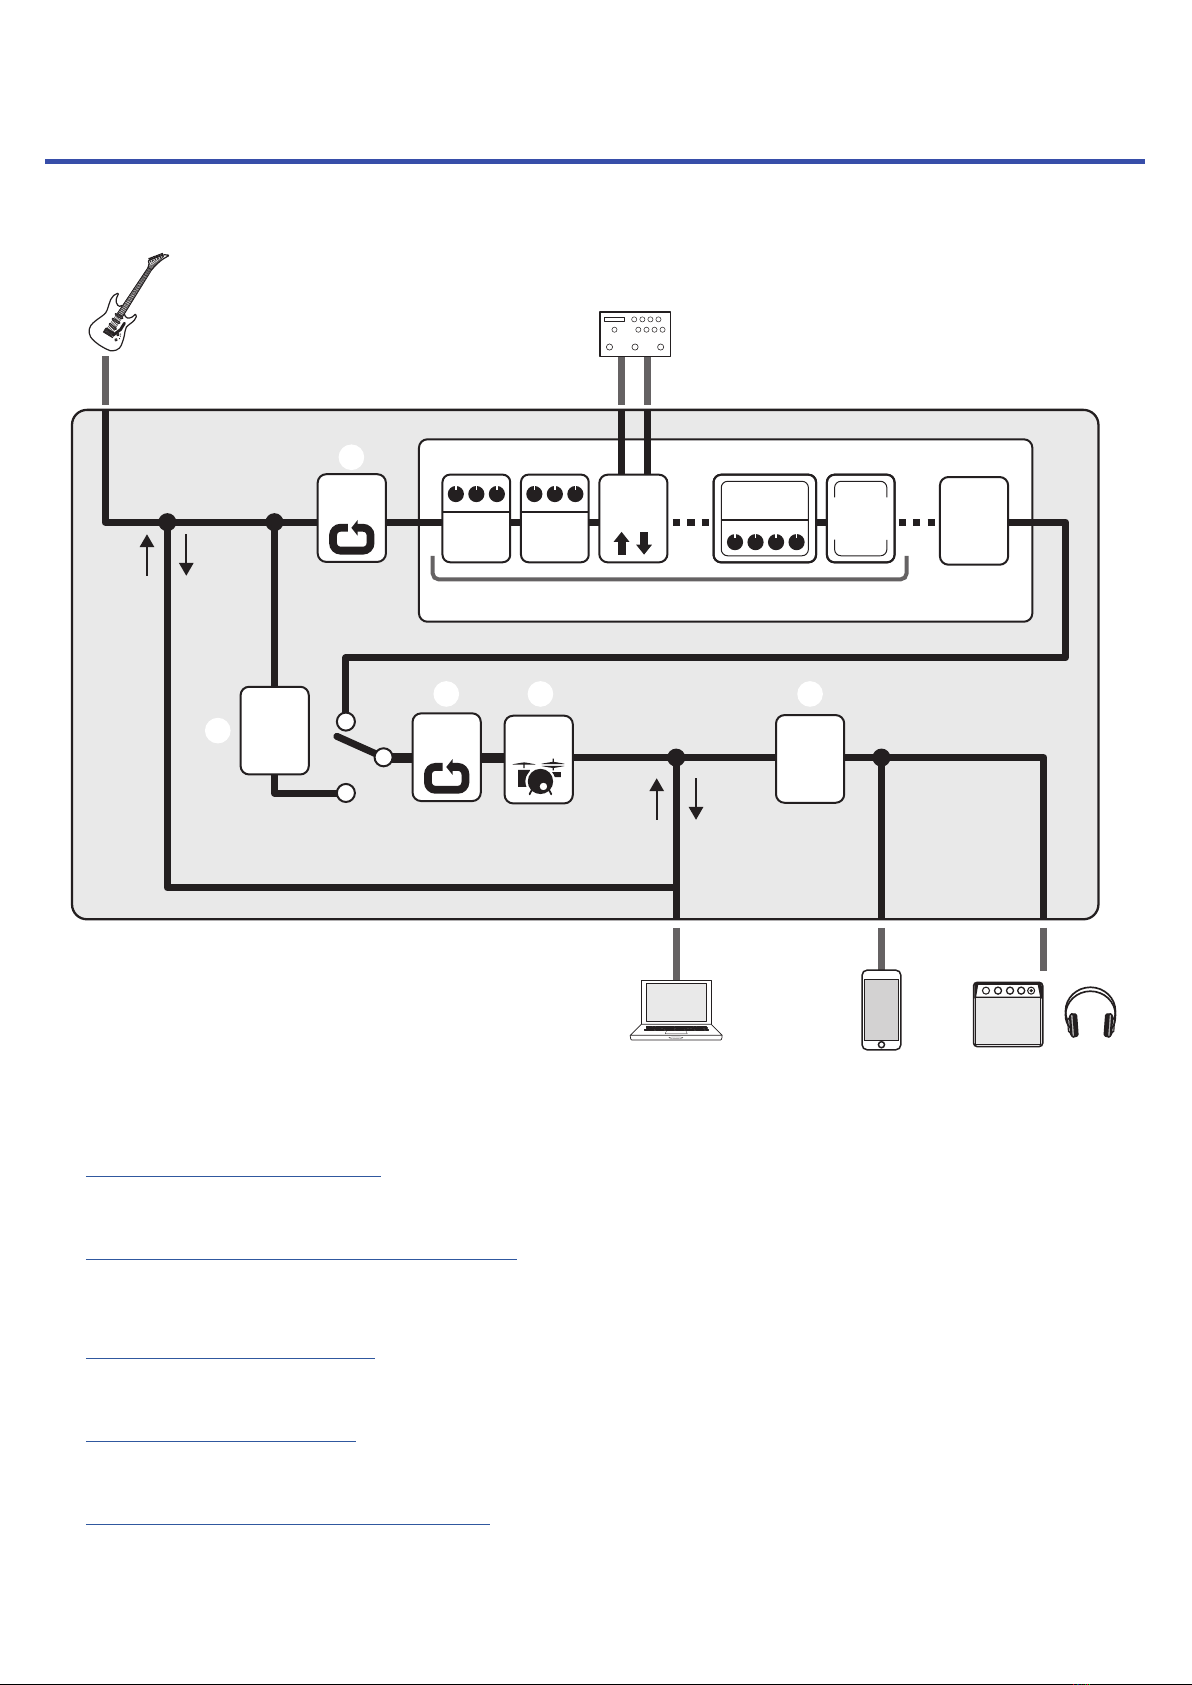
Connecting ��������������������������17
Turning the power on/off �����������������18
Turning the power on ������������������18
Turning the power off ������������������18
Adjusting the overall volume ��������������19
Showing the patch memory name while
performing ��������������������������20
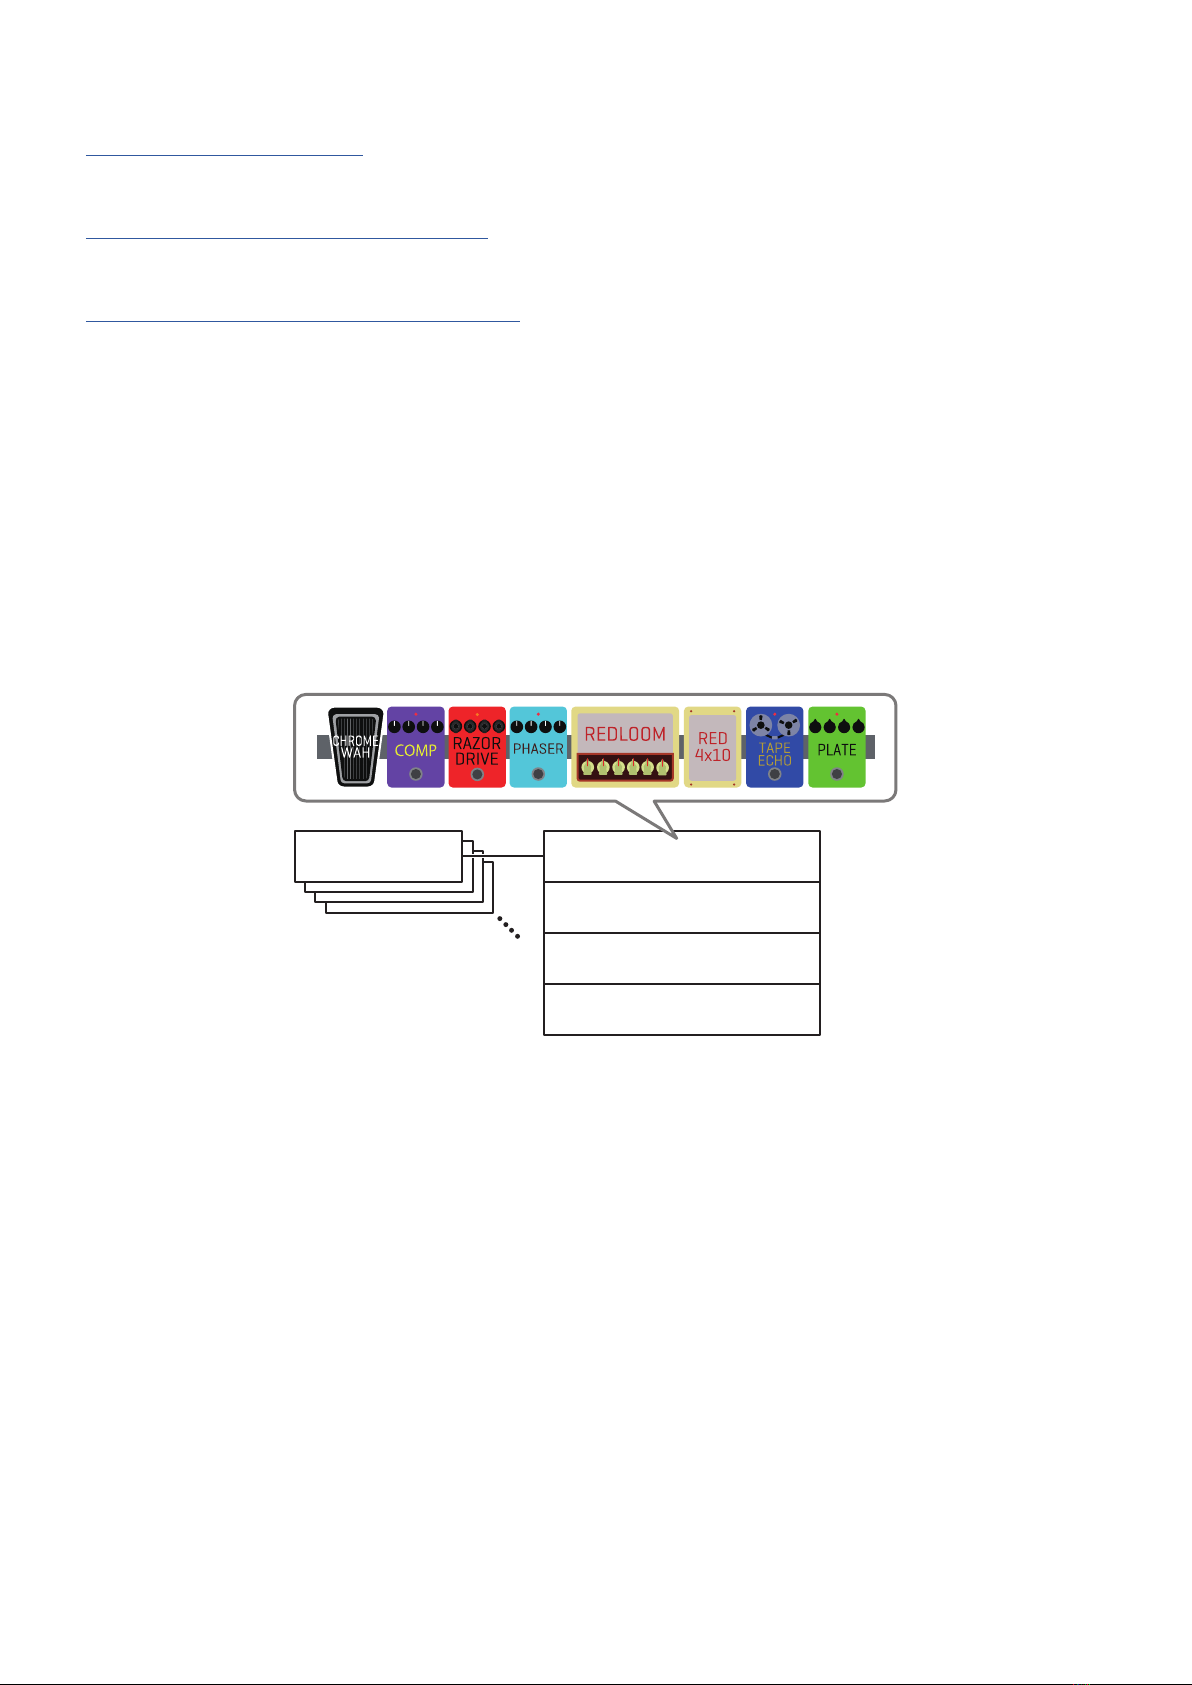
Showing the entire effects chain while
performing ��������������������������21
Showing the bank name while performing������22
Adjusting effects ����������������������23
Turning effects on and off ���������������23
Changing amps and effects ��������������24
Adjusting the amp ��������������������27
Adjusting effects ���������������������28
Changing effect order������������������30
Adding effects ����������������������31
Deleting effects����������������������33
Making all effect settings on one screen������34
Setting the patch memory level�������������37
Changing patch memory names ������������38
Adjusting the master tempo ���������������39
Managing patch memories����������������40
Saving patch memories ����������������40
Changing the order of patch memories ������42
Deleting patch memories ���������������43
Creating patch memories ���������������44
Managing banks ����������������������46
Changing the bank order ����������������46
Deleting banks ����������������������47
Creating banks ����������������������49
Using expression pedals �����������������51
Using the built-in pedal �����������������51
Adjusting the pedal �������������������53
Using an external pedal�����������������55
Using the tuner �����������������������57
Enabling the tuner ��������������������57
Changing tuner settings ����������������58
Using rhythms ������������������������60
Enabling rhythms���������������������60
Setting rhythms����������������������61
Starting/stopping rhythm playback ���������65
Rhythm patterns ���������������������66
Using the looper ����������������������67
Activating the looper ������������������67
Setting the looper ��������������������68
Recording and playing loops �������������73
Overdubbing loops��������������������75
Clearing the loop ���������������������76
Using the sends and returns���������������77
Connecting MIDI devices �����������������80
What can be done with connected MIDI devices�80
Making patch memory MIDI transmission
settings���������������������������81
Making other MIDI settings ��������������83
Using impulse responses (IR) ��������������86
Assigning impulse responses (IR) ����������86
Loading impulse response (IR) data. ��������87
Using audio interface functions ������������89
Installing the driver �������������������89
Connecting to a computer or iOS/iPadOS device 90
Making audio interface settings �����������91
Connecting to iOS/iPadOS devices wirelessly ���93
Contents
5

Making unit settings ��������������������94
Setting the reference output level ����������94
Setting the AUTOSAVE function �����������95
Setting the PRESELECT function �����������96
Adjusting the display brightness and contrast ��97
Setting the ECO mode �����������������98
Managing the rmware ������������������99
Checking the rmware versions �����������99
Checking license information ������������ 100
Updating ������������������������� 101
Restoring factory default settings ��������� 102
Troubleshooting���������������������� 103
Specications ����������������������� 104
MIDI implementation chart��������������� 105
6

G11 overview
█ Signal ow
USB audio
SEND IN/OUT
G11
AUX IN
PC REAMP
DATA
USB DRY
REC DATA
INPUT
OUTPUT
Patch memory
Rhythm
Looper
POST
Looper
PRE
Master
volume
Tuner
Effect Effect
Send/
return
PC REAMP
DATA
USB
REC DATA
Amp Speaker
cabinet
Patch
level
①
②
③
③
④ ⑤
⑦
⑥
⑧ ⑨
①The input guitar sound passes through the effects, amp and speaker cabinet in order.
(→“Adjusting effects” on page23)
②The patch memory level is adjusted.
(→“Setting the patch memory level” on page37)
③Recorded phrases can be played back in loops. The looper can be placed in either the PRE or POST position.
(→“Using the looper” on page67)
④Drum sounds can be played back using built-in rhythm patterns.
(→“Using rhythms” on page60)
⑤The overall volume is adjusted. This setting is retained even when the patch memory is changed.
(→“Adjusting the overall volume” on page19)
7

⑥This function is for tuning the connected guitar.
(→“Using the tuner” on page57)
⑦Up to two external effects can be used.
(→“Using the sends and returns” on page77)
⑧Audio data can be exchanged with a computer using the audio interface function.
(→“Using audio interface functions” on page89)
⑨Audio can be played back from a smartphone, mobile audio player or other device.
█ Memory overview (patch memories/banks)
Patch memories
These store the effects used, their order, on/off states and parameter setting values. Effects can be saved and
recalled in patch memory units. 240 patch memories can be stored.
Banks
These are groups of 4 patch memories. 60 banks can be stored.
Bank A Patch memory 001
Patch memory 002
Patch memory 003
Patch memory 004
8

Using the touchscreen
Operating and setting the G11 can be done using the touchscreen.
This section explains touchscreen operations.
█ Home Screen overview
This appears on the touchscreen when the G11 power is turned on.
All the functions are arranged as icons, so each one can easily be accessed by touch.
Current patch memory
Touch an icon to
select a function to
set or adjust.
The Home Screen has four pages. This shows which page is currently open.
To open the page to the right, swipe
left from the right edge.
To open the page to the left, swipe
right from the left edge.
Current bank
HINT
Icons can be reordered on the Home Screen by dragging them (moving them left, right, up and down while
touching them).
9

█ Using the function screens
Touch and drag to operate.
Touch an item to select it. Drag an item to move or adjust it (slide nger left, right, up or down).
█ Returning to the Home Screen
To return to the Home Screen from a function screen, swipe down from the toolbar at the top edge of the
touchscreen.
Toolbar
█ Returning to the previous screen
When “BACK” appears at the top left of the touchscreen, touch it to return to the previous screen.
█ Scrolling through lists
A scrollbar will appear at the right edge when a list has more items than can be shown on the screen. The items
shown can be scrolled by dragging up and down on the touchscreen.
Scrollbar
10

Functions of parts
█ Top
❶Touchscreen ❷ Amplier Section ❸Expression pedal
❹Effects Section ❺Footswitches
❶ Touchscreen
Operate the touchscreen to select and set patch memories as well as to make G11 settings, for example.
For details about operation procedures, see “Using the touchscreen” on page9.
❷ Amplier Section
Use the dedicated knobs and the display to adjust amplier settings as with a real amp.
① ② ③ ④ ⑤ ⑥ ⑦ ⑧
①AMPLIFIER button
This turns the amp on/off. (It lights when on.)
②AMPLIFIER display
This shows the name of the selected amp and the parameter being adjusted.
③GAIN knob
This adjusts the gain.
④BASS knob
This adjusts the volume of low frequencies.
⑤MIDDLE knob
This adjusts the volume of middle frequencies.
11

⑥TREBLE knob
This adjusts the volume of high frequencies.
⑦PRESENCE knob
This increases the gain particularly around high frequencies.
⑧VOLUME knob
This adjusts the volume.
NOTE
Items that can be adjusted depend on the selected amp.
❸ Expression pedal
Use the expression pedal to adjust the volume or a wah effect, for example. Press the front of the pedal to
turn the pedal effect on/off. ( lights when on.)
❹ Eects Section
Use to adjust effects.
Turn them on and off and adjust them like using stompboxes.
①
③④
②①Parameter knobs
Use to adjust parameters.
②Effect display
This shows the effect type, category and parameters.
③Effect indicator
This lights when the effect is on.
④Footswitch
This turns the effect on and off.
❺ Footswitches
Use these to select patch memories and banks, to open the tuner, and to operate the looper and rhythms.
① ② ③
①SCROLL
◀/▶switches
Use to scroll through the effects that are shown and can be operated in the Effects Section.
When using the looper, these record, stop and play back phrases, for example.
When using a rhythm, these start and stop playback.
②PATCH
▼/▲switches
These select patch memories.
③BANK
▼/▲switches
These select banks.
Press and hold the BANK ▼switch to use the tuner.
Press and hold the BANK ▲switch to enable tap tempo input.
12

█ Back
❶Pedal switch
❷EXTERNAL LOOPS jacks
❸OUTPUT jacks ❹MIDI connectors ❻Power switch
❺DC 12V AC adapter connector
❼INPUT jack ❽AUX IN jack ❾MASTER knob ⓭USB HOST port
⓬USB DEVICE (Type-C) port
⓫REMOTE connector
❿CONTROL IN jack
❶ Pedal switch
This turns the expression pedal effect on/off.
❷ EXTERNAL LOOPS jacks
Use these to connect external effects (two).
• Connect the SEND-1 and SEND-2 connectors to the input jacks of external effects.
• Connect the RETURN-1 and RETURN-2 connectors to the output jacks of external effects.
❸ OUTPUT jacks
Connect a guitar amp, monitor speakers or headphones here.
• RIGHT jack: Connect the right channel input jack when using stereo output.
• LEFT/MONO jack: Connect a guitar amp here.
Connect the left channel input jack when using stereo output.
• PHONES jack: Connect headphones here.
❹ MIDI connectors
Connect MIDI devices to these.
• OUT connector: Connect the MIDI IN connector of a MIDI device here.
• IN connector: Connect the MIDI OUT connector of a MIDI device here.
❺ DC 12V AC adapter connector
Connect the dedicated AC adapter (ZOOM AD-19) here.
❻ Power switch
This turns the power ON/OFF.
❼ INPUT jack
Connect a guitar here.
❽ AUX IN jack
Connect a portable music player or similar device here.
❾ MASTER knob
Use to adjust the G11 volume.
13

❿ CONTROL IN jack
Connect an expression pedal (ZOOM FP02M) to adjust a pedal effect.
⓫ REMOTE connector
Connect a ZOOM BTA-1 or other dedicated wireless adapter here.
This enables wireless control of the G11 from an iPhone/iPad using the iOS/iPadOS Guitar Lab app.
⓬ USB DEVICE (Type-C) port
Connect a computer here.
The G11 can be used as an audio interface, and it can be controlled using Guitar Lab.
⓭ USB HOST port
Use to connect USB ash drives (USB 2.0/3.0).
Use to import IR data and update the rmware.
14

█ Home Screen
This list introduces the functions of the icons shown on the Home Screen.
Icon Explanation Icon Explanation
Show patch memory names in large
characters on the touchscreen to
use for selection. ( →page20)
Show the effects used in the patch
memory on the touchscreen.
(→page21)
Use the footswitches to select the
four patch memories in the bank.
(→page22)
Use the rhythm function.
(→page60)
Use the looper. ( →page67) Use the tuner. ( →page57)
Create patch memories.
(→page44)
Change the order of effects in patch
memories. ( →page30)
Change the effects and amps in
patch memories. ( →page24)
Add effects to patch memories.
(→page31)
Remove effects from patch memo-
ries. ( →page33)
Set patch memory names, patch
levels and MIDI OUT settings.
(→page37, page38, page81)
Adjust amplier settings.
(→page27)
Make send/return settings.
(→page77)
Use the IR load function.
(→page86)
Make patch memory MIDI output
settings. ( →page81)
Edit all patch memory settings.
(→page34)Load IR data. ( →page87)
Create banks. ( →page49)Change the order of banks.
(→page46)
Change the order of patch
memories. ( →page42)Delete banks. ( →page47)
Delete patch memories.
(→page43)
Save patch memories.
(→page40)
Set the output level to INST or LINE.
(→page94)
Set the tempo used for the effects,
rhythms and looper. ( →page39)
15

Icon Explanation Icon Explanation
Make specic tuner settings.
(→page58)
Make USB audio settings.
(→page91)
Make MIDI settings.
(→page83)
Make specic pedal settings.
(→page53, page55)
Change and check system settings.
(→page94
,
page95
,
page96
,
page99)
Turn the AUTOSAVE function on/off.
(→page95)
Adjust the brightness and contrast
of each screen and turn ECO mode
on/off. ( →page97, page98)
HINT
Icons can be reordered on the Home Screen by dragging them (moving them left, right, up and down while
touching them).
16

Connecting
ZOOM BTA-1
or other dedicated wireless adapter
This enables wireless control of the
G11 from an iPhone/iPad using
the iOS/iPadOS Guitar Lab app.
Headphones
Expression pedal
(ZOOM FP02M)
A pedal can be used
to control effects.
External MIDI device
Connect with MIDI cables. The G11 can be used
in coordination with an external MIDI device.
USB ash drive
(USB 2.0/3.0)
Use to import IR data and
update the rmware.
Computer (Mac/Windows)
Connect with a USB cable (Type-C).
The G11 can be used as an audio
interface and with Guitar Lab.
AC adapter
(ZOOM AD-19)
AmpMonitor speakers
Guitar
Portable music player, etc.
Adjust the volume on the
connected device.
External effects (2 loops)
Connect the SEND 1/2 jacks to the input
jacks on effects and connect the RETURN
1/2 jacks to the output jacks on the effects.
USB Type-C
port
HINT
The computer or iOS/iPadOS Guitar Lab app can be used to manage patch memories and to edit and add
effects. Guitar Lab can be downloaded from the ZOOM website (www.zoom.co.jp).
17

Turning the power on/off
Turning the power on
2
1. Minimize the volume of the amp/monitor speakers.
2. Set to ON.
This turns the G11 power on and opens the Home Screen on the touchscreen.
3. Raise the volume of the amp/monitor speakers.
ECO mode overview
• By default, ECO mode is set to ON, so the power will automatically turn off if no use occurs for 10 hours.
• ECO mode can also be turned OFF. ( →“Setting the ECO mode” on page98)
HINT
When the power is turned on, the state when the power was last turned off will be restored.
Turning the power off
1. Minimize the volume of the amp/monitor speakers.
2. Set to OFF.
The touchscreen will become blank.
18

Showing the patch memory name while performing
Patch memory names can be shown with large characters on the touchscreen to use for selection.
1. Touch on the Home Screen.
Current patch memory
2. Swipe up or down on the touchscreen to select patch memories.
• Select the next patch memory.
• Select the previous patch memory.
HINT
The previous/next patch memory can also be selected by pressing / .
The patch memory in the previous/next bank can be selected by pressing / .
20
Other manuals for G11
1
Table of contents
Other Zoom Recording Equipment manuals
Popular Recording Equipment manuals by other brands

Native Instruments
Native Instruments AUDIO 8 DJ Operation manual

Lexicon
Lexicon MC-12 - REV 1 user guide

Telit Wireless Solutions
Telit Wireless Solutions LE910C series Technical documentation

Siemens
Siemens NIC-C installation instructions

OTARI
OTARI MX-505MKIII-2 Operation manual

McIntosh
McIntosh C40 owner's manual