Zoom F3 User manual

Operation Manual
You must read the Usage and Safety Precautions before use.
©2022 ZOOM CORPORATION
Copying or reprinting this manual in part or in whole without permission is prohibited.
Product names, registered trademarks and company names in this document are the property of their respective companies. All trademarks and
registered trademarks in this document are for identification purposes only and are not intended to infringe on the copyrights of their respective owners.
Proper display is not possible on grayscale devices.

Notes about this Operation Manual
You might need this manual in the future. Always keep it in a place where you can access it easily.
The contents of this document and the specifications of the product could be changed without notice.
• Windows® is a trademark or registered trademark of Microsoft® Corporation.
• Mac, macOS, iPadOS and App Store are registered trademarks of Apple Inc. in the USA and other
countries.
• iOS is a trademark or registered trademark of Cisco Systems, Inc. in the USA and other countries, and it
is used under license.
• Android and Google Play are trademarks of Google LLC.
• The microSD, microSDHC and microSDXC logos are trademarks.
• The Bluetooth® word mark and logo are registered trademarks of Bluetooth SIG, Inc., and these marks
are used under license by Zoom Corporation. Other trademarks and trade names are the property of
their respective companies.
• Recording from copyrighted sources, including CDs, records, tapes, live performances, video works
and broadcasts, without permission of the copyright holder for any purpose other than personal use
is prohibited by law. Zoom Corporation will not assume any responsibility related to infringements of
copyrights.
2

Contents
Notes about this Operation Manual........................................................................................................................ 2
F3 overview...................................................................................................................................................................5
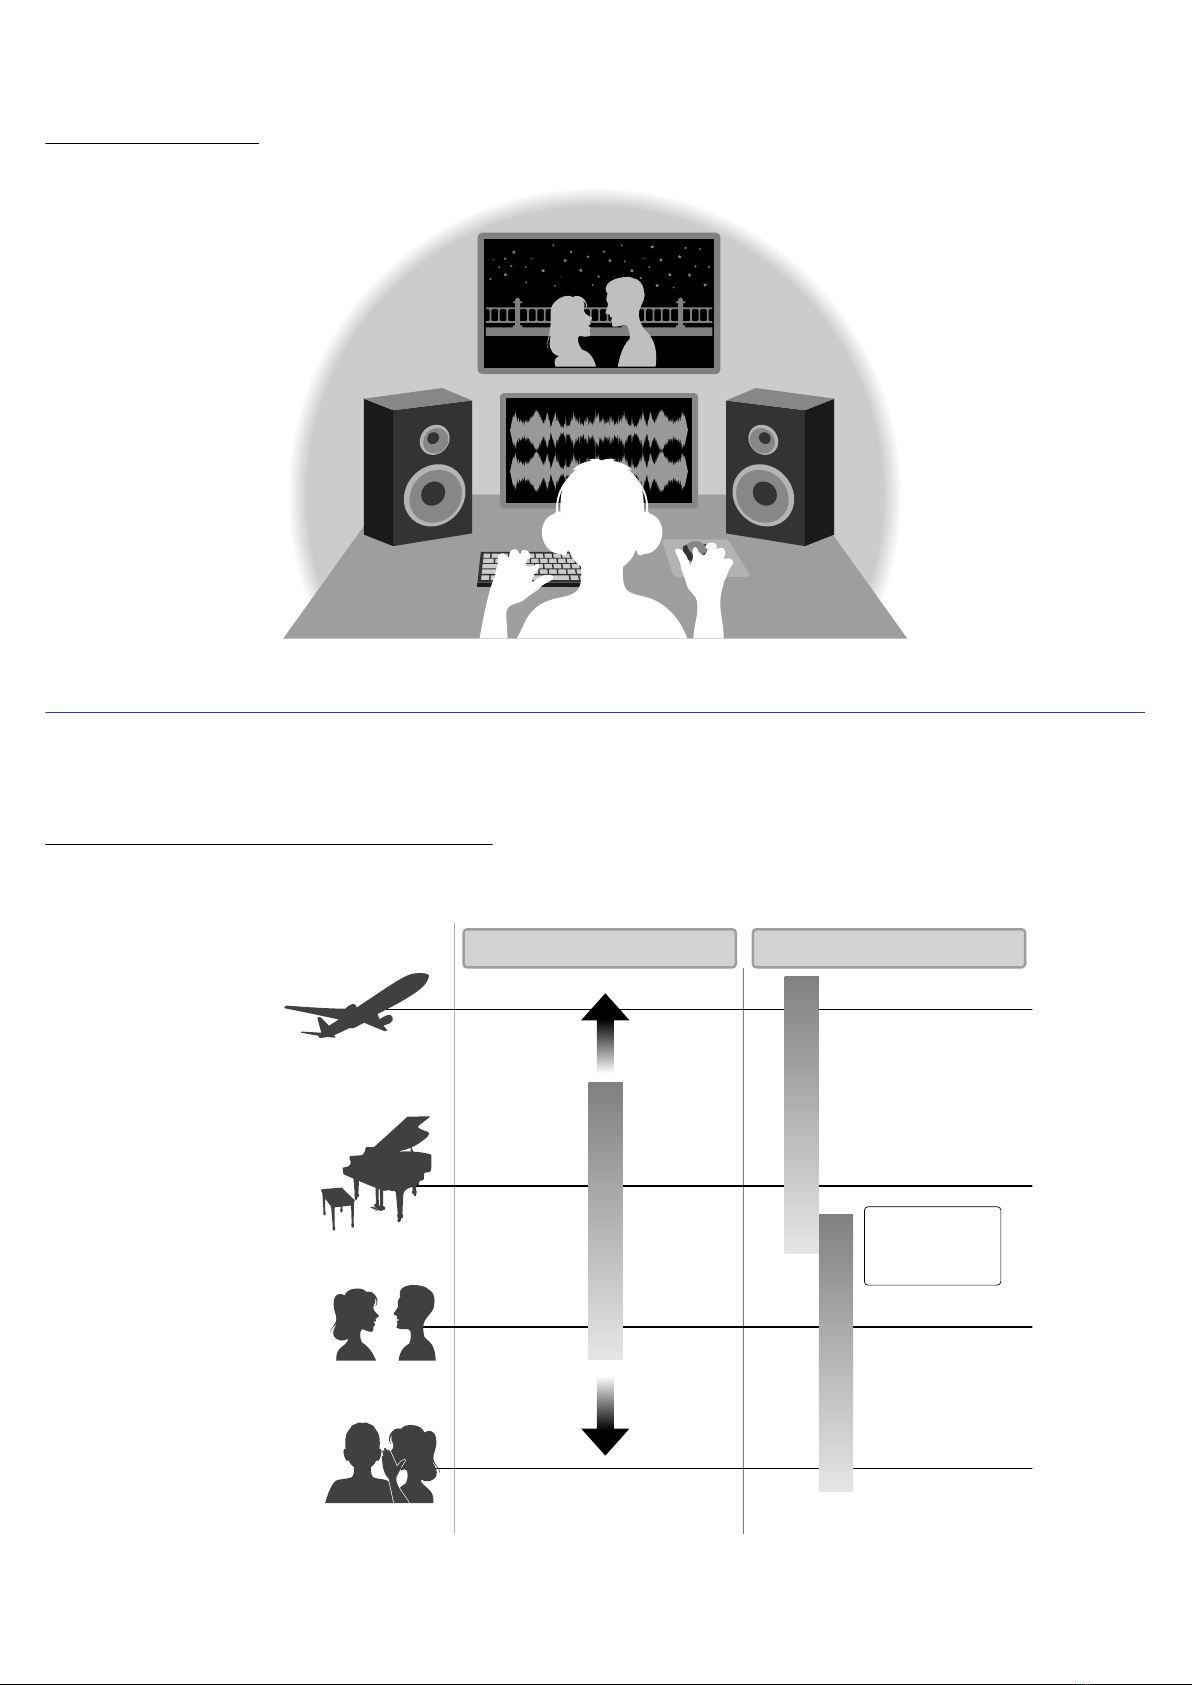
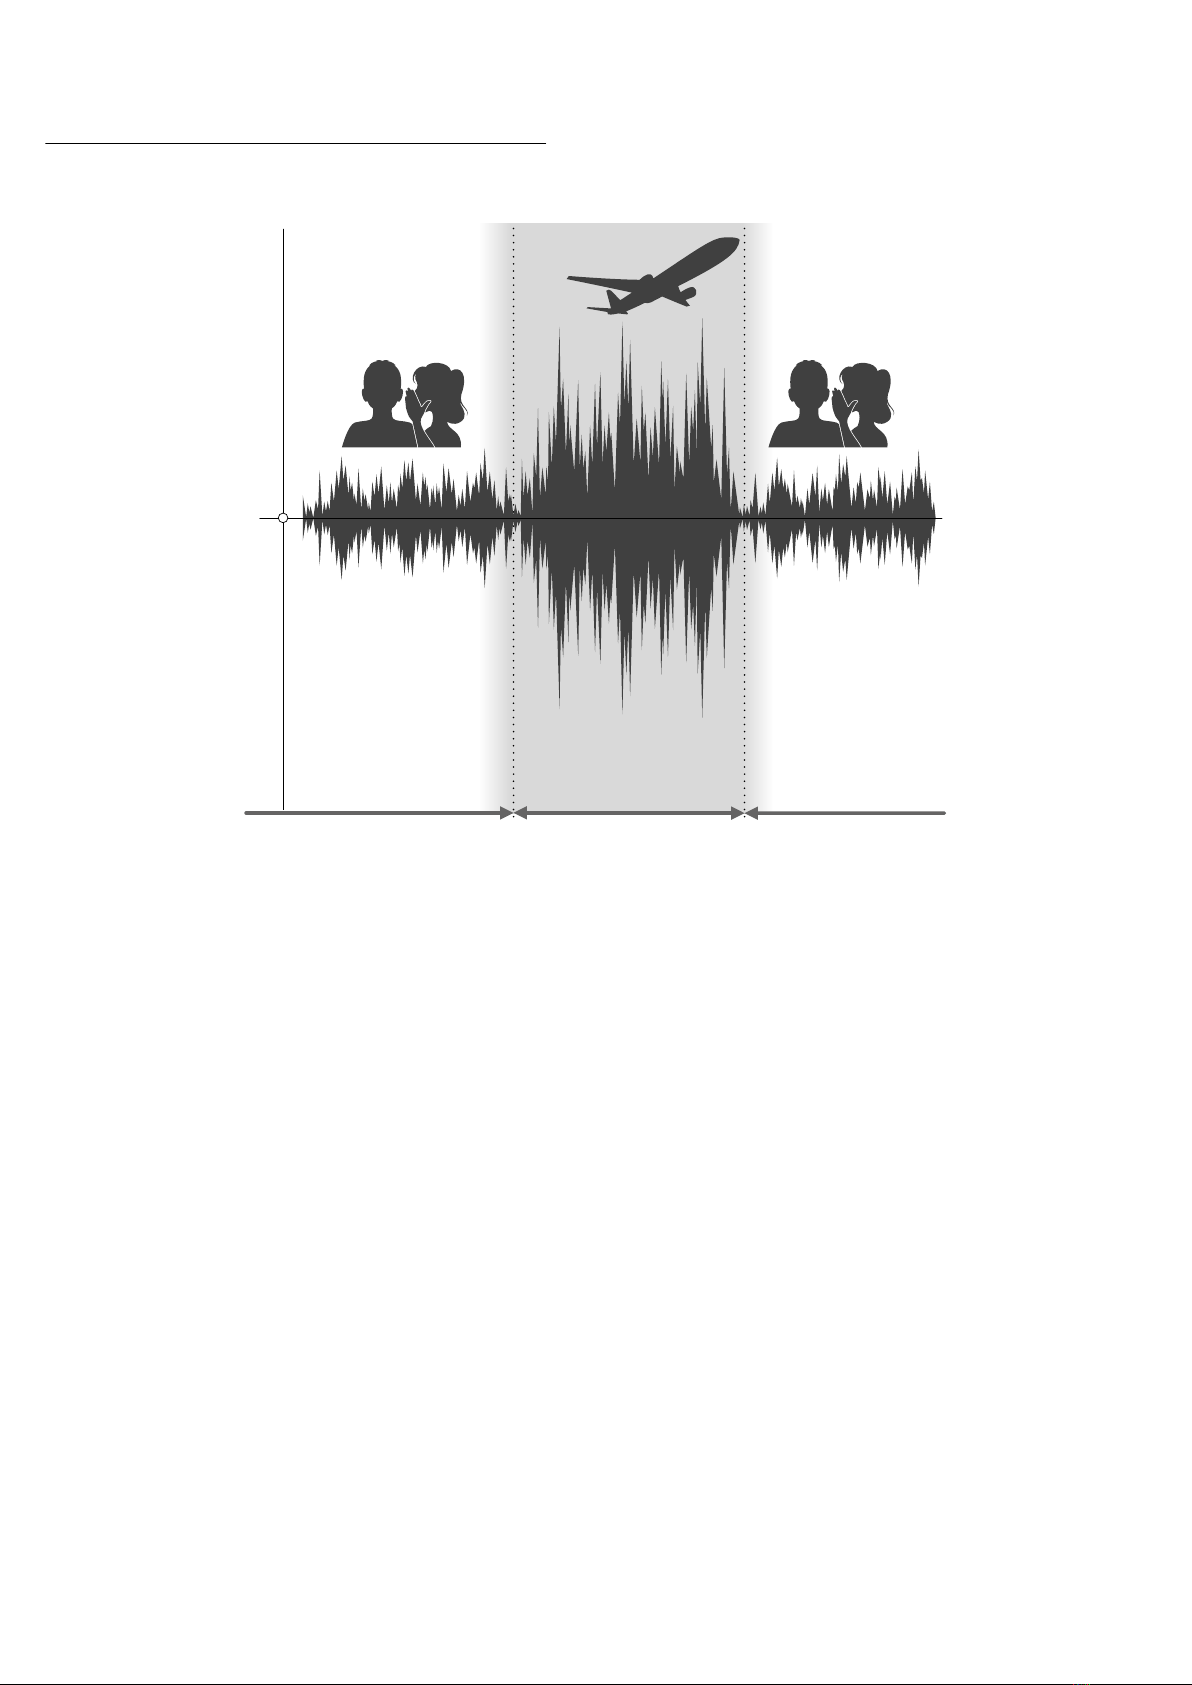
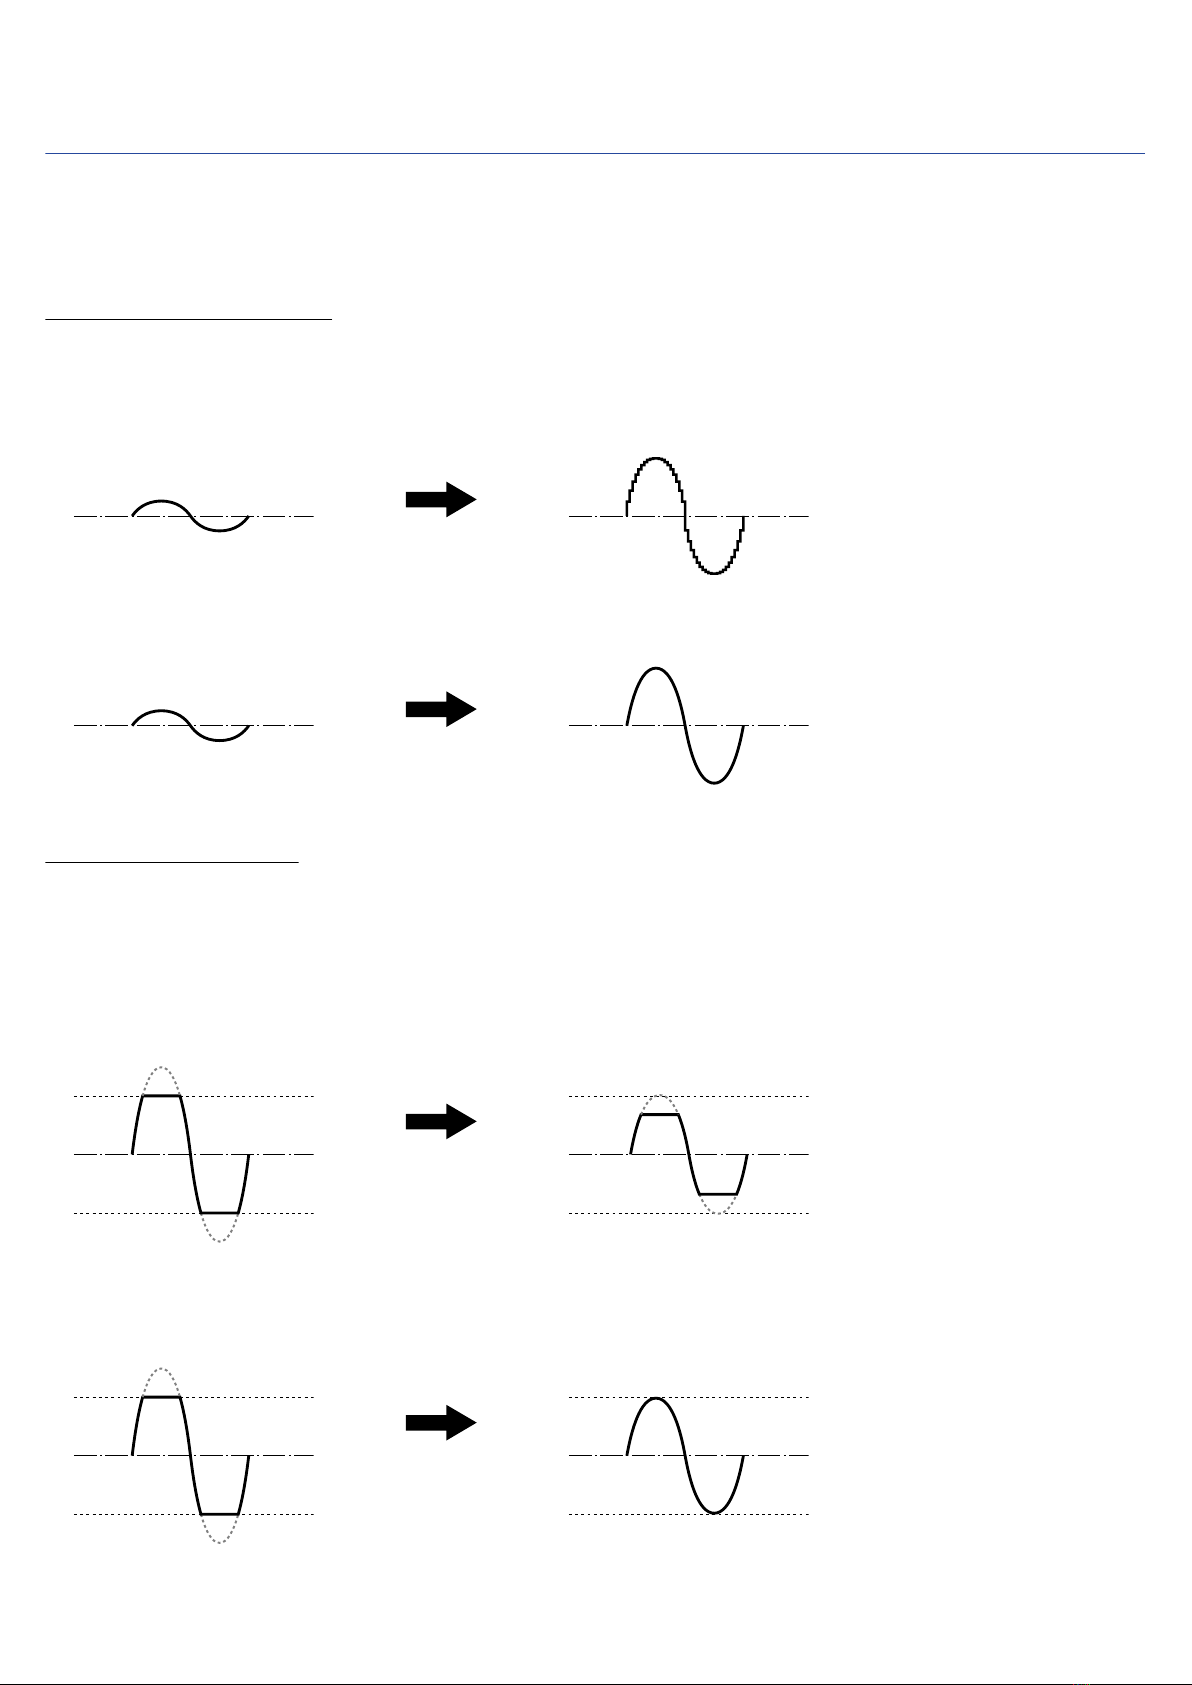
Achieving high audio quality throughout recording and editing......................................................................... 5
Functions of parts........................................................................................................................................................9
Overview of screens that are shown..................................................................................................................... 14
Recording process..................................................................................................................................................... 21
Making preparations.................................................................................................................................................22
Inserting microSD cards........................................................................................................................................... 22
Supplying power........................................................................................................................................................ 23
Connecting input equipment...................................................................................................................................25
Turning the power on/off........................................................................................................................................ 27
Setting the display language (first time starting up)........................................................................................... 28
Setting the date and time (first time starting up)................................................................................................29
Preventing misoperation (hold function)...............................................................................................................30
Making input settings...............................................................................................................................................31
Selecting inputs for making settings......................................................................................................................31
Turning inputs on/off................................................................................................................................................32
Setting input sources................................................................................................................................................33
Changing phantom power voltage......................................................................................................................... 35
Reducing noise (low-frequency cut)....................................................................................................................... 36
Inverting input phase................................................................................................................................................37
Applying delay to input signals............................................................................................................................... 38
Making output settings............................................................................................................................................ 39
Setting alert sound output through headphones................................................................................................39
Adjusting line output levels (playing test tones).................................................................................................. 41
Using the limiter on line output............................................................................................................................. 43
Applying delay to line output.................................................................................................................................. 44
Recording.................................................................................................................................................................... 45
Waveforms shown when recording....................................................................................................................... 45
Monitoring input/playback sounds.........................................................................................................................47
Making recording settings........................................................................................................................................48
Recording.................................................................................................................................................................... 56
Playing recordings..................................................................................................................................................... 57
Checking playback file information........................................................................................................................ 59
Deleting recording files............................................................................................................................................ 60
Managing files............................................................................................................................................................61
F3 folder and file structure......................................................................................................................................61
Selecting files for playback...................................................................................................................................... 62
Checking file information......................................................................................................................................... 63
3

Deleting files...............................................................................................................................................................64
Using as an audio interface.................................................................................................................................... 65
Connecting computers, smartphones and tablets.............................................................................................. 65
Making audio interface settings..............................................................................................................................68
Controlling the F3 from a smartphone/tablet...................................................................................................... 70
Disconnecting from a smartphone/tablet............................................................................................................. 71
Making various settings........................................................................................................................................... 72
Setting the type of batteries used..........................................................................................................................72
Setting the display backlight....................................................................................................................................74
Setting the display contrast.....................................................................................................................................75
Setting the display language................................................................................................................................... 76
Setting the date and time........................................................................................................................................77
Setting the date format............................................................................................................................................79
Setting the time until the power turns off automatically................................................................................... 81
When using timecode...............................................................................................................................................83
Timecode overview....................................................................................................................................................83
Connecting with an UltraSync BLUE...................................................................................................................... 85
Checking timecode information..............................................................................................................................87
Setting the time shown on the Home/Recording Screen................................................................................... 89
Exchanging data with computers........................................................................................................................... 91
Disconnecting a computer.......................................................................................................................................92
Testing microSD cards..............................................................................................................................................93
Conducting a quick test............................................................................................................................................93
Conducting a full test............................................................................................................................................... 95
Formatting microSD cards....................................................................................................................................... 97
Restoring factory default settings.......................................................................................................................... 98
Managing the firmware............................................................................................................................................99
Checking the firmware versions............................................................................................................................. 99
Updating the firmware............................................................................................................................................. 99
Appendix...................................................................................................................................................................100
Troubleshooting.......................................................................................................................................................100
Block diagram.......................................................................................................................................................... 102
Specifications........................................................................................................................................................... 103
4

F3 overview
Achieving high audio quality throughout recording and
editing
With dual AD converter circuits and support for 32-bit float WAV files, the F3 can maintain the highest audio
quality from recording to post-production.
Recording
Dual AD converter circuits enable recording the loudest to the quietest sounds without adjusting gain.
5

Post-production
Recording with 32-bit float WAV file formats allows the same audio quality to be retained when editing.
Dual AD converter circuit overview
For each input circuit, the F3 has two AD converters with different input gains. This design enables high-
quality audio recording without the need to adjust gain settings, a step that is normally indispensable.
Providing amazing dynamic range
By combining two AD converters, a wide dynamic range not possible with a single AD converter has been
realized.
High-gain
AD converter
Low-gain
AD converter
AD converter
switches in
response to
input level
・Airplane
・Nearby thunder
・Train passing on tracks overhead
・Inside train
・Shouting
・Grand piano
・Noisy street
・Chimes
・Ordinary conversation
・Whispering
・Quiet library
・Late night in suburb
Wide dynamic range covered
by two AD converters
Input gain adjusted to
desired recording volume
Dual AD converters
Conventional equipment
6

Switching between two AD converters
The F3 constantly monitors data from the two AD converters, and automatically selects the one that
provides the best recording results.
Low noise
because high-gain
AD converter selected
Low noise
because high-gain
AD converter selected
No clipping
because low-gain
AD converter selected
7

32-bit float WAV file overview
32-bit float WAV files have the following advantages over conventional 16/24-bit linear WAV files.
These features enable the quality of the sound during recording to be maintained even during post-
production.
Resolution advantage
32-bit float WAV files have the advantage of being able to maintain high resolution even at low volumes. As
a result, quiet sounds can be made louder when editing after recording without degrading their quality.
■ 16/24-bit linear WAV
Raise volume
Resolution low
■ 32-bit float WAV
Raise volume
Resolution high
Clipping advantage
If a waveform sounds clipped when output from the F3 or in a DAW, it can be edited after recording to
lower its volume and restore an unclipped waveform because the data in the 32-bit float WAV file itself is
not clipped.
■ 16/24-bit linear WAV
Clipped recording
Reduce volume
Still clipped
■ 32-bit float WAV
Clipped recording
Reduce volume
Not clipped anymore
8

Functions of parts
Top and bottom
■ Top ■ Bottom
❶PLAY button
This starts and pauses file playback.
❷STOP button
This stops recording and playback.
❸MENU button
This opens the Menu Screen and returns to the Home Screen.
❹Display
This shows the recorder status and the Menu Screen.
❺REC/HOLD switch
Use this to start recording and to disable button operation.
❻REC LED
This lights during recording.
❼ 1/operation button
When the Home Screen is open, this adjusts the amplification of the Input 1 waveform.
When other screens are open, this operates the function of the icon shown at the bottom of the
screen. (→ Operation button overview)
❽ 1/operation button
When the Home Screen is open, this is used to make Input 1 settings.
When other screens are open, this operates the function of the icon shown at the bottom of the
screen. (→ Operation button overview)
9

❾ 2/operation button
When the Home Screen is open, this adjusts the amplification of the Input 2 waveform.
When other screens are open, this operates the function of the icon shown at the bottom of the
screen. (→ Operation button overview)
❿ 2/operation button
When the Home Screen is open, this is used to make Input 2 settings.
When other screens are open, this operates the function of the icon shown at the bottom of the
screen. (→ Operation button overview)
⓫Tripod mounting threads
This can be used to attach the F3 to a tripod, for example.
⓬Battery compartment cover
Open this when installing or removing AA batteries.
10

■Operation button overview
When operation icons appear at the bottom of the display, including on the Menu, Playback and Input
Settings screens, the corresponding operation buttons (immediately below the icons) can be used to select
and confirm items on the screen.
■ Menu Screen example
❶Operation icons
The icons shown differ according to the screen.
❷ operation button
This returns to the previous screen.
❸ operation button
This selects the item above.
❹ operation button
This selects the item below.
❺ operation button
This confirms the selected item.
Other operation icons will appear. Details about them are provided in the procedure explanations for
various items.
■ Note about how procedures are written in this operation manual
In this operation manual, the use of operation buttons in procedures is indicated using icons in the
following manner.
For example, “Use the operation buttons that correspond to and to select ‘Finder’ and
press the operation button that corresponds to to confirm the selected item” is abbreviated as
follows.
Use / to select “Finder”, and press to confirm.
11

Left and right sides
■ Left side ■ Right side
❶USB port (Type-C)
Connect this to a computer, smartphone or tablet to use the F3 as an SD card reader or audio
interface. This supports operation on USB bus power.
❷microSD card slot
Insert a microSD card here.
❸REMOTE connector
Connect a ZOOM BTA-1 or other dedicated wireless adapter here.
This enables use of the F3 Control smartphone/tablet app to operate the F3 wirelessly.
Moreover, it also enables input of SMPTE timecode to the F3 using an UltraSync BLUE made by
Timecode Systems.
❹POWER switch
This turns the power on/off.
12

Front and back
■ Front ■ Back
❶LINE OUT jack
This stereo mini jack can be used to output sound.
❷PHONE OUT jack
This can output sound to headphones.
❸VOLUME buttons
Use these to adjust the headphone volume.
❹Input 1
Connect a mic here. This can be used with XLR plugs.
❺Input 2
Connect a mic here. This can be used with XLR plugs.
13

Overview of screens that are shown
This section explains the screens shown on the F3 display.
Home Screen
This appears on the display when the F3 power is turned on. This shows the recording state, input signal
waveforms and other F3 conditions.
❶Counter
This shows the available recording time when in recording standby and the current elapsed recording
time when recording. The remaining available recording time can also be shown when recording.
(→ Setting the recording time display)
❷Status icon
This icon shows the recording status.
• Stopped
• Recording
❸Remaining battery charge indicator
When the remaining battery charge becomes low, change the batteries (→ Installing batteries) or
connect an AC adapter (→ Connecting an AC adapter) or a mobile battery (→ Using other power
sources).
❹Waveform display (Input 1)
This shows the waveform of the signal input through Input 1. (→ Waveforms shown when recording)
❺Waveform display (Input 2)
This shows the waveform of the signal input through Input 2. (→ Waveforms shown when recording)
❻Waveform magnification (Input 1)
This shows the magnification of the Input 1 waveform display. (→ Waveforms shown when recording)
❼Input source (Input 1)
This shows the input source currently set for Input 1. (→ Setting input sources)
14

❽Waveform magnification (Input 2)
This shows the magnification of the Input 2 waveform display. (→ Waveforms shown when recording)
❾Input source (Input 2)
This shows the input source currently set for Input 2. (→ Setting input sources)
HINT:
When the Home Screen is not shown, press to return to the Home Screen. This is convenient for
opening the Home Screen quickly from various settings screens. (Moving directly to the Home Screen from
some screens is not possible.)
15

Playback Screen
This screen is shown on the display during playback. This shows the elapsed time, output signal waveforms
and other F3 playback states.
❶Status icon
This icon shows the playback status.
• Playing back
• Paused
• Searching backward
• Searching forward
❷Counter
This shows the elapsed playback time.
❸Remaining battery charge indicator
When the remaining battery charge becomes low, change the batteries (→ Installing batteries) or
connect an AC adapter (→ Connecting an AC adapter) or a mobile battery (→ Using other power
sources).
❹File format
This changes according to the format of the file playing back. (→ Selecting the recording file format
(Mono/Stereo))
• 1/2: File with recording of both Inputs 1 and 2 when “Recording” > “File Format” set to “Mono”
• 1: File with recording of either Input 1 or 2 when “Recording” > “File Format” set to “Mono”
• L/R: File with recording when “Recording” > “File Format” set to “Stereo”
❺Waveform display
This shows the waveform of the recording file that is playing back.
❻Playback position bar
This shows the current playback position.
16

❼Operation icons
Search forward/backward, delete files and view information by pressing the operation buttons below
the display that correspond to these icons. (→ Operation button overview)
❽Marker bar
This shows where a mark has been added to the playback file.
NOTE:
Marks can only be added by using the dedicated app on a smartphone or tablet. A BTA-1 or other dedicated
wireless adapter is necessary to use the app on the smartphone/tablet for control. See the F3 Control
operation manual for detailed explanations about marks.
17

Menu Screen
Use the Menu Screen to make various settings, including recording, output and system settings.
❶Menu title
❷Menu items
These show setting items and values and other information.
❸Operation icons
Press the operation buttons below the display that correspond to these icons to select menu items and
confirm selected items. (→ Operation button overview)
❹Remaining battery charge indicator
When the remaining battery charge becomes low, change the batteries (→ Installing batteries) or
connect an AC adapter (→ Connecting an AC adapter) or a mobile battery (→ Using other power
sources).
❺Scrollbar
This will appear when there are more items than will fit on the display.
■Opening the Menu Screen
1. Press when the Home Screen is open.
HINT:
When the Home Screen is not shown, press to return to the Home Screen. This is convenient for
opening the Home Screen quickly from various settings screens. (Moving directly to the Home Screen from
some screens is not possible.)
18

Character input screen
A character input screen will appear for inputting the User Defined Name used for the Rec File Name
setting.
Use the operation buttons below the display to input characters.
1. Use and to move the cursor ( ), and press to input the selected character
or execute the selected function.
❶Character input position
The character will be input at this position.
❷Character input area
This shows the input characters.
❸Character selection area
Select characters to input here.
❹Change character type
This changes the characters that can be selected in the character selection area.
❺Delete character
❻Move character input position
❼Confirm input text
❽Operation icons
Press the operation buttons below the display that correspond to these icons to input characters
and execute selected functions.
19

2. Repeat step 1 to input more characters. When done inputting, use / to select “Enter”
and use to confirm.
NOTE:
The characters and symbols that can be used are as follows.
! # $ ' ( ) + , - ; = @ [ ] ^ _ ` { } ~ (space) A-Z, a-z, 0-9
20
Other manuals for F3
1
Table of contents
Other Zoom Recording Equipment manuals
Popular Recording Equipment manuals by other brands

Drawmer
Drawmer 1977 Operator's manual

Audio enhancement
Audio enhancement MS-300 quick start guide

Superscope
Superscope PSD450mkII quick start guide

AudioSource
AudioSource EQ 8 Series II owner's manual

HMS Networks
HMS Networks Intesis INBACPAN001I000 quick start guide

Axxess
Axxess XSVI-2004 installation instructions