Zoom Palmtop Studio PS-04 User manual

© ZOOM Corporation
Reproduction of this manual, in whole or in part, by any means, is prohibited.
Operation Manual

2 ZOOM PS-04
Caution
W
arning
USAGE AND SAFETY PRECAUTIONS
In this manual, symbols are used to highlight warnings and
cautions for you to read so that accidents can be prevented. The
meanings of these symbols are as follows:
This symbol indicates explanations about extremely
dangerous matters. If users ignore this symbol and
handle the device incorrectly, serious injury or death
could result.
This symbol indicates explanations about dangerous
matters. If users ignore this symbol and handle the
device incorrectly, bodily injury and damage to the
equipment could result.
Please observe the following safety tips and precautions to
ensure hazard-free use of the PS-04.
Power requirements
Since power consumption of this unit is fairly high, we
recommend the use of an AC adapter whenever possible.
When powering the unit from batteries, use only alkaline
types.
[AC adapter operation]
• Be sure to use only an AC adapter which supplies 9 V
DC, 300 mA and is equipped with a "center minus"
plug (Zoom AD-0006). The use of an adapter other than
the specified type may damage the unit and pose a
safety hazard.
• Connect the AC adapter only to an AC outlet that
supplies the rated voltage required by the adapter.
•When disconnecting the AC adapter from the AC outlet,
always grasp the adapter itself and do not pull at the
cable.
• When not using the unit for an extended period,
disconnect the AC adapter from the AC outlet.
[Battery operation]
• Use four conventional IEC R6 (size AA) batteries
(alkaline).
• The PS-04 cannot be used for recharging.
Pay close attention to the labelling of the battery to
make sure you choose the correct type.
•When not using the unit for an extended period, remove
the batteries from the unit.
• If battery leakage has occurred, wipe the battery
compartment and the battery terminals carefully to
remove all remnants of battery fluid.
• While using the unit, the battery compartment cover
should be closed.
Environment
Avoid using your PS-04 in environments where it will be
exposed to:
• Extreme temperature
• High humidity or moisture
• Excessive dust or sand
• Excessive vibration or shock
Handling
Since the PS-04 is a precision electronic device, avoid
applying excessive force to the switches and buttons.
Also take care not to drop the unit, and do not subject it
to shock or excessive pressure.
Alterations
Never open the case of the PS-04 or attempt to modify the
product in any way since this can result in damage to the
unit.
Connecting cables and input and output jacks
You should always turn off the power to the PS-04 and all
other equipment before connecting or disconnecting any
cables. Also make sure to disconnect all cables and the
AC adapter before moving the PS-04.
Usage Precautions
• Electrical interference
For safety considerations, the PS-04 has been designed to
provide maximum protection against the emission of
electromagnetic radiation from inside the device, and protection
from external interference. However, equipment that is very
susceptible to interference or that emits powerful
electromagnetic waves should not be placed near the PS-04, as
the possibility of interference cannot be ruled out entirely.
With any type of digital control device, the PS-04 included,
electromagnetic interference can cause malfunctioning and can
corrupt or destroy data. Care should be taken to minimize the
risk of damage.
• Cleaning
Use a soft, dry cloth to clean the PS-04. If necessary, slightly
moisten the cloth. Do not use abrasive cleanser, wax, or solvents
(such as paint thinner or cleaning alcohol), since these may dull
the finish or damage the surface.
Please keep this manual in a convenient place for future
reference.
SmartMedia is a trademark of Toshiba Corporation.
Caution
W
arning
W
arning
W
arning
W
arning

ZOOM PS-04 3
Contents
USAGE AND SAFETY PRECAUTIONS....... 2
Introduction ................................................ 5
Getting to Know the PS-04........................ 6
PS-04 configuration ............................... 6
Recorder section ........................................... 6
Effects section ............................................... 6
Rhythm section ............................................. 6
Mixer section ................................................ 7
Operation modes of the PS-04 .............. 7
Names and Functions of Parts ................. 8
Top view ................................................ 8
Front view .............................................. 9
Rear view ............................................... 9
Side view ............................................... 9
Getting Connected .................................. 10
About SmartMedia .................................. 10
Operating the Unit on Batteries ............. 11
Power On/Off ........................................... 11
Power-on ..................................................... 11
Power-off .................................................... 11
Listening to the Demo Song ................... 12
Let's Record ............................................ 13
Quick Guide ............................................. 15
Step 1:
Preparations before recording ............. 15
1-1 Creating a new project .......................... 15
1-2 Selecting a rhythm pattern to use ......... 17
Step 2: Recording the first track .......... 19
2-1 Selecting the input source ..................... 19
2-2 Applying the insert effect ..................... 21
2-3 Selecting a track and starting to
record .................................................... 22
Step 3: Overdubbing ............................24
3-1 Adjusting input sensitivity and setting
the insert effect ..................................... 24
3-2 Selecting the track to record ................. 24
Step 4: Mixing ...................................... 26
4-1 Muting the input signal/rhythm
sound ..................................................... 26
4-2 Adjusting level/panning/EQ ................. 26
4-3 Applying the send/return effect ............ 28
Step 5: Mixdown ................................. 30
5-1 Applying the mastering effect ............... 30
5-2 Mixdown (bounce) preparations ........... 31
5-3 Carrying out mixdown (bounce) ........... 32
5-4 Playing the bounced tracks ................... 33
Reference [Recorder] .............................. 36
AUDIO mode screens .......................... 36
V-takes ................................................ 36
About V-takes ............................................. 36
Switching V-takes ....................................... 36
Moving to a desired location in the song
(Locate/Marker function) ..................... 37
Specifying time or measures ....................... 37
Setting a mark in a song .............................. 38
Locating a mark .......................................... 38
Deleting a mark ........................................... 38
Playing back the same passage
repeatedly (A-B Repeat function) ........ 39
Re-recording only a specified part
(Punch-in/out function) ........................ 40
Using manual punch-in/out ......................... 40
Using auto punch-in/out .............................. 41
Combining multiple tracks on another
track (Bounce function) ....................... 42
Making settings for the bounce target
track(s) ........................................................ 42
Selecting the bounce target V-take ............. 43
Carrying out bounce recording .................... 43
Changing the precount
operation ............................................. 44
Checking the grade setting of a
project ................................................. 45
Reference [Track Editing] ....................... 46
Editing a range of data ........................ 46
Basic steps for range editing ....................... 46
Copying a specified range of data ............... 47
Moving a specified range of data ................ 48
Erasing a specified range of data ................ 49
Trimming a specified range of data ............ 49
Editing using V-takes ........................... 50
Basic steps for V-take editing ..................... 50
Deleting a V-take ........................................ 51
Copying a V-take ........................................ 51
Exchanging V-takes .................................... 52
Reference [Mixer] .................................... 53
About the PS-04 mixer ........................ 53

Contents
4 ZOOM PS-04
Assigning input signals to tracks ......... 53
Selecting the input source ........................... 53
Selecting the recording track(s) .................. 55
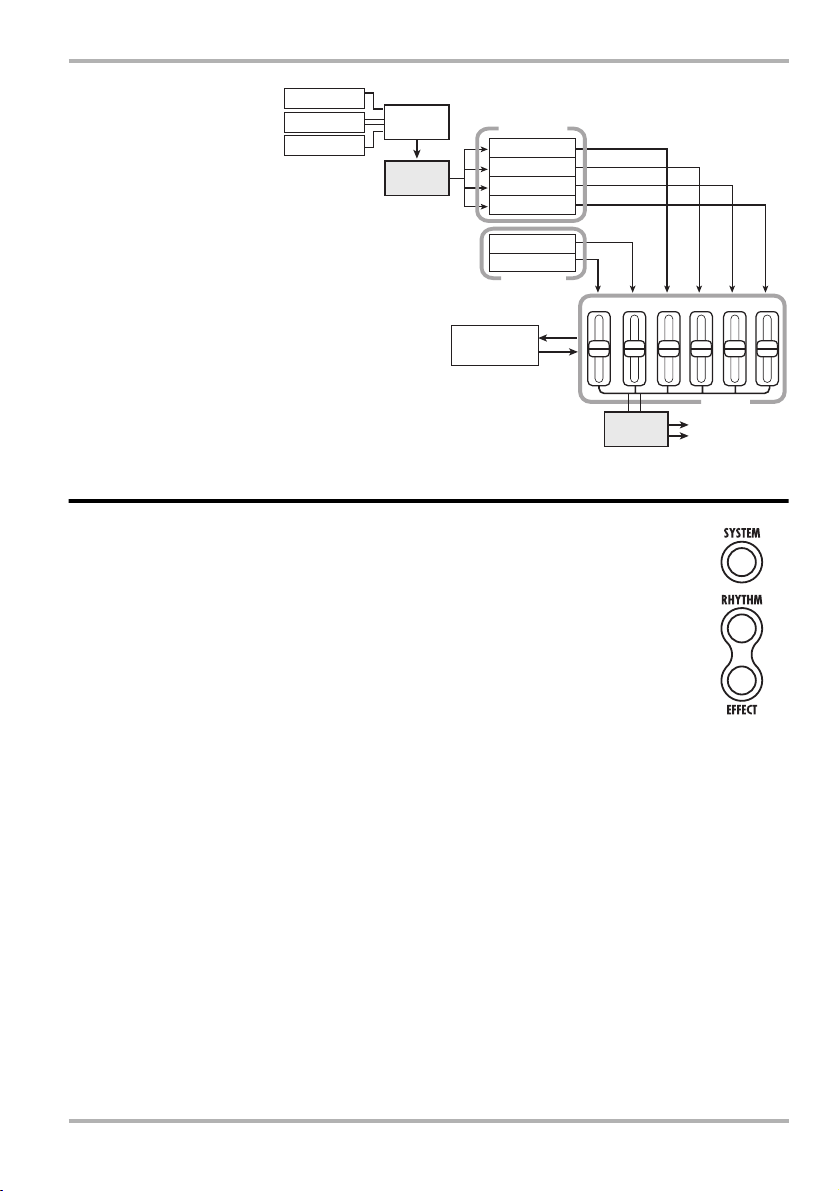
Mixing the playback sound from
tracks ................................................... 56
Making adjustments for each track
signal (track parameters) ..................... 56
Linking tracks (stereo link) ................... 58
Reference [Rhythm] ................................ 59
About the rhythm section .................... 59
Explanation of some important
terms .................................................... 59
PATTERN mode/SONG mode ................... 59
Pattern/song ................................................. 59
Drum track/bass track ................................. 60
Drum kit/bass program ................................ 60
PATTERN mode operation .................. 60
PATTERN mode screens ............................ 60
Selecting a pattern for playback .................. 60
Changing the tempo .................................... 61
Playing drum/bass sounds manually ........... 62
Creating a pattern ........................................ 63
Copying a pattern ........................................ 68
Deleting a pattern ........................................ 69
Changing the pattern parameters
(pattern edit) ................................................ 69
Setting PATTERN mode operation
(pattern utility) ............................................ 71
SONG mode operation ........................ 73
SONG mode screens ................................... 73
Creating a song ............................................ 73
Editing a song .............................................. 81
Clearing a song ............................................ 83
Importing pattern/song information from
another project ............................................. 83
Reference [Effects] ................................. 84
About the effects ................................. 84
Insert effect .................................................. 84
Send/return effect ........................................ 85
EFFECT mode screens ................................ 86
Basic steps for using the insert
effect .................................................... 86
Selecting the insert effect patch .................. 86
Editing an insert effect patch ....................... 87
Storing an insert effect patch ....................... 89
Changing an insert effect patch name ......... 90
Basic steps for using the send/return
effect .................................................... 90
Selecting the send/return effect
patch ............................................................ 90
Editing a send/return effect patch ............... 90
Storing a send/return effect patch ............... 91
Changing a send/return effect patch
name ............................................................ 91
Using the tuner function ...................... 92
Using the chromatic tuner ........................... 92
Using other tuning types ............................. 93
Reference [System] ................................. 95
SYSTEM mode screen ........................ 95
About projects ..................................... 95
Basic steps for handling projects ................ 95
Selecting a project ...................................... 96
Creating a new project ................................ 96
Copying a project ........................................ 96
Deleting a project ........................................ 97
Protecting a project ..................................... 97
Checking the remaining recording
time ............................................................. 97
Changing the name of a project .................. 98
Changing the operation of the level
meters ................................................. 98
Setting the built-in mic gain ................ 99
Turning the backlight on and off ......... 99
Formatting a SmartMedia card ......... 100
Specifications ........................................ 101
Troubleshooting .................................... 102
Problems during playback ................ 102
Problems during recording ................ 102
Problems with effects ........................ 103
Problems with rhythm section ........... 103
Other problems .................................. 103
Appendix ................................................ 104
Effect Parameters .............................. 104
Insert effect ............................................... 104
Send effect ................................................ 113
Rhythm patterns................................. 114
Effect patches ................................... 116
Insert effect ............................................... 116
Drum kits/Bass programs ................. 120
Compatibility with PS-02 and
MRS-4 ............................................... 121
PS-02 ........................................................ 121
MRS-4 ...................................................... 121
Files on SmartMedia card ................. 121
INDEX ..................................................... 122

ZOOM PS-04 5
Introduction
Thank you for selecting the
ZOOM PS-04 Palmtop Studio
(simply called the "
PS-04
" in this manual).
The PS-04 is a fascinating product with the following features.
• Four great functions in one compact unit
Weighing in at a mere 160 grams, the PS-04 combines a SmartMedia recorder, mixer, multi-effect
device, and drum/bass machine in a single pocket-size body. Whenever and wherever inspiration
strikes, the PS-04 is ready to help you create and record your very own sound.
• 4-track recorder with bounce capability
The recorder allows simultaneous playback of four tracks and simultaneous recording on two
tracks. Each track has ten virtual takes (V-takes). While playing back all four tracks, you can
bounce the combined sound onto two empty V-takes. A host of functions lets you process and edit
audio data after recording.
• Full-featured mixer section
The integrated mixer makes it simple to adjust level, Hi/Lo EQ, panning, and effect send level for
the audio tracks and drum/bass tracks to create the stereo mix. The input signal can also be sent
directly to the stereo mix.
• Two versatile effect streams
The PS-04 provides insert effects that can be applied to the input or output, and send/return effects
that are used via the mixer send/return loop. The insert effect provides a mastering effect function
for processing the stereo mix. This is great for adjusting the sound and dynamics during mixdown.
• Rhythm section provides solid backing
Realistic PCM sources produce drum and bass sounds in a variety of more than 500 patterns. By
combining patterns and programming the chord progression, you can create the accompaniment
for an entire song.
• Flexible tuner function
The built-in tuner can be used not only for standard chromatic tuning but also for 7-string guitar,
5-string bass and other unconventional tuning applications.
In order to get the most out of this sophisticated product, please read this manual carefully
before use.
We recommend that you keep the manual at hand for future reference.

6 ZOOM PS-04
Getting to Know the PS-04
PS-04 configuration
The PS-04 can be thought of as having four main sections, namely recorder, effects, mixer, and rhythm.
These are explained below.
■
Recorder section
The recorder in the PS-04 has 4 separate audio tracks (a
track is a separate portion for recording audio data). Up to 2
tracks can be recorded simultaneously, and up to 4 tracks
can be played back simultaneously. The tracks are
numbered 1 – 4, and each of these tracks has 10 virtual
tracks (so-called V-takes). When performing recording or
playback, you can select one of these V-takes. For
example, you could record a difficult guitar solo onto
multiple V-takes, and then compare them later to select the
best take.
■
Effects section
The PS-04 has two types of effects: insert effects and send/return effects. The insert effect, as its name
implies, can be inserted at a selected point in the signal path. It consists of a number of single effects
connected in series, such as compressor, amp simulator, chorus, etc. It can be used for effect processing
of the input signal during recording or for the stereo mix during mixdown.
The send/return effect is routed through the built-in mixer and applies to all tracks. Reverb, delay, or
chorus can be selected for this effect. The intensity of the send/return effect for each track can be
adjusted with the send level parameter (the higher the value, the stronger the effect).
■
Rhythm section
The PS-04 has an integrated rhythm machine
that always operates in sync with the recorder.
Drum sounds and bass sounds from a PCM
source are used to form accompaniment
patterns. The PS-04 has over 500 patterns built
in, and 346 patterns are already
preprogrammed. Of course, you can also edit
existing patterns or create your own patterns
from scratch.
By lining up the patterns in the desired order
and specifying parameters such as chord
progression, tempo, and beat, you can create
the rhythm accompaniment for an entire song.
1
1
2
3
4
5
6
7
8
9
10
23
4
Tracks
Currently selected V-takes
V-takes
Recorder
Rhythm section
Rhythm
To mixer
Track 1
Track 2
Track 3
Track 4
Rhythm Rhythm

Operation modes of the PS-04
ZOOM PS-04 7
Operation modes of the PS-04
The PS-04 has the following four operation modes. You can see which mode is
currently active by the light on/off status of the [EFFECT], [RHYTHM], and
[SYSTEM] keys on the panel.
●
AUDIO mode
This is the mode for recording and playing back audio. The PS-04 is always in this
mode after power-on and after you quit one of the other modes. In this mode, the
indicators of the [EFFECT], [RHYTHM], and [SYSTEM] keys are all out.
●
EFFECT mode
In this mode, you select patches for the insert effect and send/return effect, edit parameters, and perform
other effect related functions. To switch to this mode from any other mode, press the [EFFECT] key so
that the indicator lights up.
●
RHYTHM mode
In this mode, you control the various rhythm functions. To switch to this mode from any other mode,
press the [RHYTHM] key so that the indicator lights up.
The rhythm functions of the PS-04 are further divided into PATTERN mode for repeatedly playing
patterns, and SONG mode for playing the rhythm accompaniment to an entire song. By repeatedly
pressing the [RHYTHM] key, you can switch between these two modes.
●
SYSTEM mode
This mode is used to create new projects and to make settings that affect operation of the entire PS-04.
To switch to this mode from any other mode, press the [SYSTEM] key so that the indicator lights up.
Insert
effect
Send/return
effect
Insert
effect
[INPUT] jack
[LINE IN] jack
Built-in mic
Recorder
Rhythm
section
123 4DRUM BASS
Input
Mixer
[OUTPUT] jack
Track 1
Track 2
Track 3
Track 4
Bass track
Drum track
■
Mixer section
Using the mixer functions built into the
PS-04, you can adjust the level, panning,
EQ, and other parameters for audio tracks
1- 4 and the drum / bass track to produce
the final stereo mix.

8 ZOOM PS-04
[SYSTEM] key
[EDIT/
UTILITY] key
[EXIT] key
[ENTER] key
[U] key, [R/P]]key, [REC] key, [MARK] key
Built-in mic
Cursor [E]/[R]/[Q]/[W] keys
[RHYTHM] key
[EFFECT] key
[BOUNCE] key
[AUTO PUNCH IN/
OUT] key
[TRACK PARAMETER] key
[TUNER/BYPASS] key
[INSERT/DELETE
(COPY)] key
Dial
Faders 1 - 4
[MIC] key
Status keys 1 - 4
Display
Names and Functions of Parts
Top view

Front view
ZOOM PS-04 9
Front view
Rear view
Side view
Card slot
[OUTPUT] jack
[PHONES] jack
[LINE IN] jack
[INPUT] jack
[INPUT LEVEL] knob
[ON/OFF switch] [DC9V] jack

10 ZOOM PS-04
To monitor with headphones,
connect them to the
[PHONES] jack. This jack
carries the same signal as the
[OUTPUT] jack.
Connect a guitar, bass
guitar or other instrument
to the [INPUT] jack.
Connect a stereo device with line level
output such as a synthesizer or CD
player to the [LINE IN] jack.
Monitoring system
Headphones
CD player
AC adapter
Synthesizer
Guitar
PS-04 rear panel
PS-04 side panel
Bass
To power the PS-04 from an AC outlet, be sure
to use only the AC adapter ZOOM AD-0006
(available separately). Using any other AC
adapter will lead to damage.
Getting Connected
About SmartMedia
To use the PS-04, a SmartMedia card is required. Before turning
on the power, insert the supplied SmartMedia card into the card
slot, as shown in the illustration.
When inserting the card, push it fully into the slot.
N
OTE
•If you insert the SmartMedia card with the wrong orientation or
upside down, it will not go all the way in. Trying to push the
card in by force may damage it.
•Do not insert or remove the SmartMedia card while power is
turned on. Otherwise data loss may occur.
•Generic SmartMedia cards with a capacity from 16 MB to 128 MB (drive voltage 3.3 V)
may be used in the PS-04.
•To use a SmartMedia card that has already been formatted in a computer or a digital
camera, be sure to first format it once more in the PS-04 (→p. 100).
Card slot
SmartMedia

ZOOM PS-04 11
Operating the Unit on Batteries
The PS-04 can be operated on battery power. Purchase the
correct batteries and insert them as described below.
1.
Turn the PS-04 over and open the cover of
the battery compartment.
2.
Insert four IEC R6 (size AA) batteries into
the compartment. (Use alkaline batteries.)
3.
Close the cover of the battery compartment.
N
OTE
When the PS-04 is operating on battery
power and the batteries are getting low, the indication "BATT" will appear on the display.
Replace all four batteries with fresh ones as soon as possible.
Power On/Off
To turn the PS-04 on and off, proceed as follows.
■
Power-on
1.
Verify that power to the PS-04 and all connected equipment is off.
The volume controls of the connected instrument, PS-04, and the monitoring
system should be turned fully down.
2.
Insert the SmartMedia card into the card slot (➔p. 10).
3.
Set the [ON/OFF] switch on the side panel of the PS-04
to "ON".
The indication "PS-04" appears on the display and the PS-04 starts up.
4.
Turn power to the connected instrument and the
monitoring system on in that order.
■
Power-off
5.
Turn power to the monitoring system and the connected
instrument off in that order.
6.
Set the [ON/OFF] switch on the side panel of the PS-04 to "OFF".
The indication "GOODBYE" is briefly shown on the display and the PS-04 is shut down.
N
OTE
Never turn the PS-04 off by disconnecting the AC adapter. Otherwise data loss may occur.
C
aution
When using the AC adapter, always use the [ON/OFF] switch on the side panel of the
PS-04 to turn power on and off. Be especially careful when the card access indicator is lit.
Disconnecting the AC adapter in such a case may lead to fatal data loss.
PS-04 side panel
[ON/OFF] switch
Bottom of PS-04
Battery
compartment
cover
Battery
compartment
IEC R6 (size AA)
battery x 4

12 ZOOM PS-04
Listening to the Demo Song
This section shows how to play the demo song stored on the supplied SmartMedia card.
N
OTE
The demo song is write-protected. During playback you can change the level, panning,
and other parameters, but you cannot store the changed settings.
1.
Connect the monitoring system and the PS-04, and insert the supplied
SmartMedia card into the PS-04.
Before switching the power on, turn the volume control of the monitoring system down.
2.
Set the [ON/OFF] switch on the side panel of the PS-04 to "ON".
Project information saved on the SmartMedia card is automatically loaded. When the supplied
SmartMedia card has been inserted, the demo song project will be loaded.
3.
Press the [R/P] key.
The key lights up and playback of the demo song starts.
4.
To stop playback, press the [R/P] key once more.
The key goes out, and the recorder stops.
H
INT
If desired, you can use the faders 1 – 4 during playback to adjust the level of audio tracks
1 – 4. To adjust the level of the drum or bass track, press the [RHYTHM] key and then use
faders 1 and 2.
[ON/OFF] switch

ZOOM PS-04 13
Let's Record
This section shows how to record a guitar connected to the [INPUT] jack.
1.
Connect the guitar to the [INPUT] jack.
2.
Press the [SYSTEM] key and then the [ENTER] key.
The indication "SELECT" appears on the display.
3.
Use the cursor left/right keys to bring up the indication "NEW" on the display,
and press the [ENTER] key twice.
The following indication appears on the display, and the PS-04 is ready for recording.
4.
Press the [TRACK PARAMETER] key.
When you press the [TRACK PARAMETER] key for the first time, the indication "INPUT SEL"
is shown for a few seconds, and then the indication "INPUT" appears.
H
INT
In the default condition, the [INPUT] jack is selected as input source. To record a
synthesizer or other device connected to the [LINE IN] jack, or to record from the built-in
mic, switch the input source to the respective setting (→ p. 53).
5.
While playing your guitar, adjust the input sensitivity by turning the [INPUT
LEVEL] knob on the rear panel of the PS-04.
If the indication "-PEAK-" appears on the display, the input signal will be distorted. Turn the
[INPUT LEVEL] knob down.
OOOOOO
OOOOOO
000
INPUT
INPUT
-PEAK-
-PEAK-

Let's Record
14 ZOOM PS-04
6.
To adjust the track recording level, operate fader 2.
While this screen is shown, you can use fader 2 to adjust the recording level for the signal from the
[INPUT] jack. When the adjustment is complete, press the [EXIT] key.
H
INT
If the topmost segment (rectangular block) of the level meter comes on when you play your
guitar loud, reduce the recording level setting.
7.
Use the status keys to select the recording destination track.
Above the level meter, the indication "REC" appears for the track that has been set to recording
standby.
8.
To start recording, hold down the [REC] key and press the [R/P] key.
A precount of 4 clicks is heard, and recording starts. Play your guitar to record.
9.
To stop recording, press the[R/P] key once more.
The [REC] key and [R/P] key goes out.
10.
To check the recording, press the [U] key and then press the [R/P] key.
11.
To cancel the recording standby condition, press the status key 1 again so that
the "REC" indication goes out.
RECLVL
RECLVL
100

ZOOM PS-04 15
Quick Guide
This section explains some of the basic operation steps of the PS-04. You will learn how to make
preparations for recording, how to record tracks, do overdubs, use the mixer, and create the final stereo mix.
The explanation is divided into five major steps.
●Step 1: Preparations before recording
Establish connections, create a project, and make other preparations for recording.
●Step 2: Recording the first track
Record the first track while using the insert effect on the input signal.
●Step 3: Overdubbing
Record (overdub) the second and subsequent tracks while listening to the previously recorded
track.
●Step 4: Mixing
Adjust level, panning, and EQ for each track and use the send/return effect to create a stereo mix.
●Step 5: Mixdown
Bounce the finished stereo mix onto an empty pair of V-takes in the PS-04.
Step 1: Preparations before recording
1-1
Creating a new project
The PS-04 manages all information that is required to produce a song in units called "projects".
To perform a new recording with the PS-04, you first create a project.
1.
Connect the instrument from which to record and the monitoring system to the
PS-04 (➝ p. 10).
To monitor with headphones, connect them to the [PHONES] jack.
2.
Make sure that a SmartMedia card is inserted in the card slot. Then turn power
on in the order PS-04 ➝ monitoring system.
The PS-04 always comes on in AUDIO mode which serves for recording and playback. When the
PS-04 is turned on, it automatically loads the most recently used project from the SmartMedia
card.
3.
Press the [SYSTEM] key.
The [SYSTEM] key lights up and the PS-04 switches to SYSTEM mode. The display shows the
system menu which serves for controlling the project and making system-wide settings.
PROJEC
PROJEC
T

Quick Guide
16 ZOOM PS-04
4.
Verify that "PROJECT" is shown on the display, and then press the [ENTER]
key.
5.
Use the cursor left/right keys to bring up the indication "NEW", and press the
[ENTER] key.
You can now select the audio data quality level (recording grade).
6.
Use the dial to select one of the following two grade settings.
•HF (Hi-Fi)
Best sound quality setting (default)
•LG (Long)
Longer recording time setting. (Recording time is doubled compared to HF.)
7.
Press the [ENTER] key.
A new project is created, and this project is loaded automatically. The PS-04 returns to the AUDIO
mode and the [SYSTEM] key goes out. The current counter position is shown on the display. (This
is called the AUDIO mode top screen.)
N
OTE
•When you create a new project, the name "PROJxx" (where xx is the project number) is
automatically assigned.
• The project name can be changed if desired (→p. 98).
GRADE
GRADE
HF
Cursor
left/right keys
All out
OOOOOO
OOOOOO
000

Step 1: Preparations before recording
ZOOM PS-04 17
1-2
Selecting a rhythm pattern to use
The PS-04 incorporates a rhythm function that always operates in sync with the recorder. This function
can automatically repeat patterns that are several measures in length and contain drum sounds (drum
kit) and bass sounds (bass program). It is also possible to use a combination of patterns to form a longer
rhythm accompaniment (song). In this example, we will choose a simple pattern to use as guide rhythm
during recording.
1.
Press the [RHYTHM] key.
The [RHYTHM] key lights up and the PS-04 switches to RHYTHM mode which lets you make
various rhythm related settings.
The rhythm function has two modes: PATTERN mode for repeatedly playing patterns, and SONG
mode for playing the rhythm accompaniment to an entire song. By repeatedly pressing the
[RHYTHM] key, you can switch between these modes.
When you first select RHYTHM mode, the PATTERN mode is active, and the name of the
currently selected pattern appears on the display.
2.
Turn the dial to select the pattern you want to play.
The PS-04 has 511 pattern slots, of which 346 are preprogrammed. (The indication "EMPTY" is
shown instead of a pattern name for empty patterns.)
In this example, we will select pattern number 510 which plays a rim shot sound as a quarter note.
3.
Press the [R/P] key.
The selected pattern starts to play, and the [RHYTHM] key flashes in sync with the current tempo.
While the pattern is playing, you can also switch to other patterns simply by turning the dial.
H
INT
Immediately after creating a new project, the pattern playback volume will be set to zero.
To hear the rhythm play, you must raise the drum/bass monitor level.
Pattern name Pattern number
O8ST1
O8ST1
000
MTR44
MTR44
510

Quick Guide
18 ZOOM PS-04
4.
Operate faders 1 and 2 to adjust the playback volume of the pattern.
In RHYTHM mode, fader 1 controls the drum volume and fader 2 the bass volume. To monitor
only the drum track of the pattern, slide fader 2 fully down.
5.
To change the tempo, operate faders 3 and 4.
The current tempo value (BPM) appears on the display. Fader 3 changes the setting in units of 10
BPM, and fader 4 in units of 0.1 BPM. The original display will return after a while when you
have finished using the faders. By pressing the status key 3 or 4, you can check the current tempo
setting.
N
OTE
• The tempo set here applies to all patterns.
•When recording while playing a pattern, you should set the tempo before starting to
record the audio track. If you change the tempo after recording the audio track, there will
be a mismatch between the recorded audio and the rhythm tempo.
6.
To stop playback, press the [R/P] key once more.
7.
Press the [EXIT] key to return to the AUDIO mode top screen.
To return from other modes to the AUDIO mode, the [EXIT] key is used.
H
INT
The PS-04 automatically saves your progress (settings and recorded contents) when you
switch to another project or turn power off. There is no need to perform any special
storage steps.
Fader 1 Fader 2
Current tempo setting
Fader 3 or 4
BPM=13
BPM=13
0*0

Step 2: Recording the first track
ZOOM PS-04 19
Step 2: Recording the first track
Specify the input source and the track on which to record, and start the recording process.
2-1
Selecting the input source
The PS-04 lets you select the [INPUT] jack, [LINE IN] jack, or built-in mic as input source for
recording on the audio tracks. First select the source and then adjust the recording level.
1.
From the AUDIO mode top screen, press the [TRACK PARAMETER] key.
The track parameter screen appears. This screen gives access to various input and track related
settings. The first time you call up the screen, input is selected as operation target, and the
currently selected input source is shown.
During input source selection, the status keys and faders operate as follows.
N
OTE
• The function of the faders depends on the currently selected screen of the PS-04.
•Switching to a different screen and moving a fader there will not affect the fader setting
of the previous screen, because fader settings are saved individually for each screen.
2.
Use the status keys 1 – 4 to select the input source.
Depending on which input source is selected, the display changes as follows. (The "REC"
indication for the source changes from flashing to constantly on.)
INPUT
INPUT
Currently selected input source
Shows the currently
selected input source
Status keys 3/4 select
[LINE IN] jack as input source.
Faders 3/4 adjust recording level for
si
g
nal from [LINE IN] jack.
Status key 2 selects
[INPUT] jack as input source
Status key 1 selects
built-in mic as input source.
Fader 1 adjusts recording
level for signal from built-in mic.
Fader 2 adjusts recording
level for signal from [INPUT] jack.

Quick Guide
20 ZOOM PS-04
H
INT
•When the built-in mic is selected as recording source, the [MIC] key lights up. You can
also select the built-in mic by pressing the [MIC] key from the AUDIO mode top screen.
(In this case, there is no need to call up the above track parameter screen.)
• If desired, you can also combine multiple input sources (→p. 53).
• When the built-in mic can be used, the [MIC] key is flashing.
•When the insert effect algorithm is "GUITAR/BASS", the built-in mic cannot be used
(except when the effect type "CABI" is selected on the PRE AMP/DRIVE module or when
it is turned off). In this case, the "REC" indication for the built-in mic is out.
3.
When the [INPUT] jack has been selected as input source, play the instrument
connected to the jack and adjust the input sensitivity by turning the [INPUT
LEVEL] knob on the rear panel of the PS-04.
When using the [INPUT] jack, adjusting the input sensitivity with the
[INPUT LEVEL] knob is necessary. Make the adjustment so that the sound is
not distorted when playing the instrument at maximum level. (If the
indication "-PEAK-" is shown on the display, signal distortion has occurred.)
H
INT
•When the built-in mic is selected as input source, two gain settings (on-mic/off-mic) are
available. The default is on-mic, but this can be changed if desired (→p. 99).
•When the [LINE IN] jack is selected as input source, adjust the output level of the source
equipment so that there is no distortion in the input stage of the PS-04.
4.
While playing the instrument, operate the fader for the input source to adjust
the recording level.
While one of the above screens is being shown, faders 1 – 4 can be used to adjust the recording
level for each recording source. When you move a fader, the current setting value is shown on the
display. A rough indication of the setting for each source is given by the level meter segments.
INPUT
INPUT
LINE
LINE
MIC
MIC
When built-in mic (status key 1) is selected When [INPUT] jack (status key 2) is selected
When [LINE IN] jack (status key 3 or 4) is selected
Table of contents
Other Zoom Recording Equipment manuals

Zoom
Zoom A1 FOUR User manual

Zoom
Zoom PFX-9003 User manual

Zoom
Zoom MultiTrak R12 User manual

Zoom
Zoom RFX-1000 User manual

Zoom
Zoom Handy recorder H2 Operation instructions

Zoom
Zoom Handy Recorder H4 User manual

Zoom
Zoom G6 User manual

Zoom
Zoom PodTrak P8 User manual

Zoom
Zoom H2next User manual

Zoom
Zoom G11 User manual