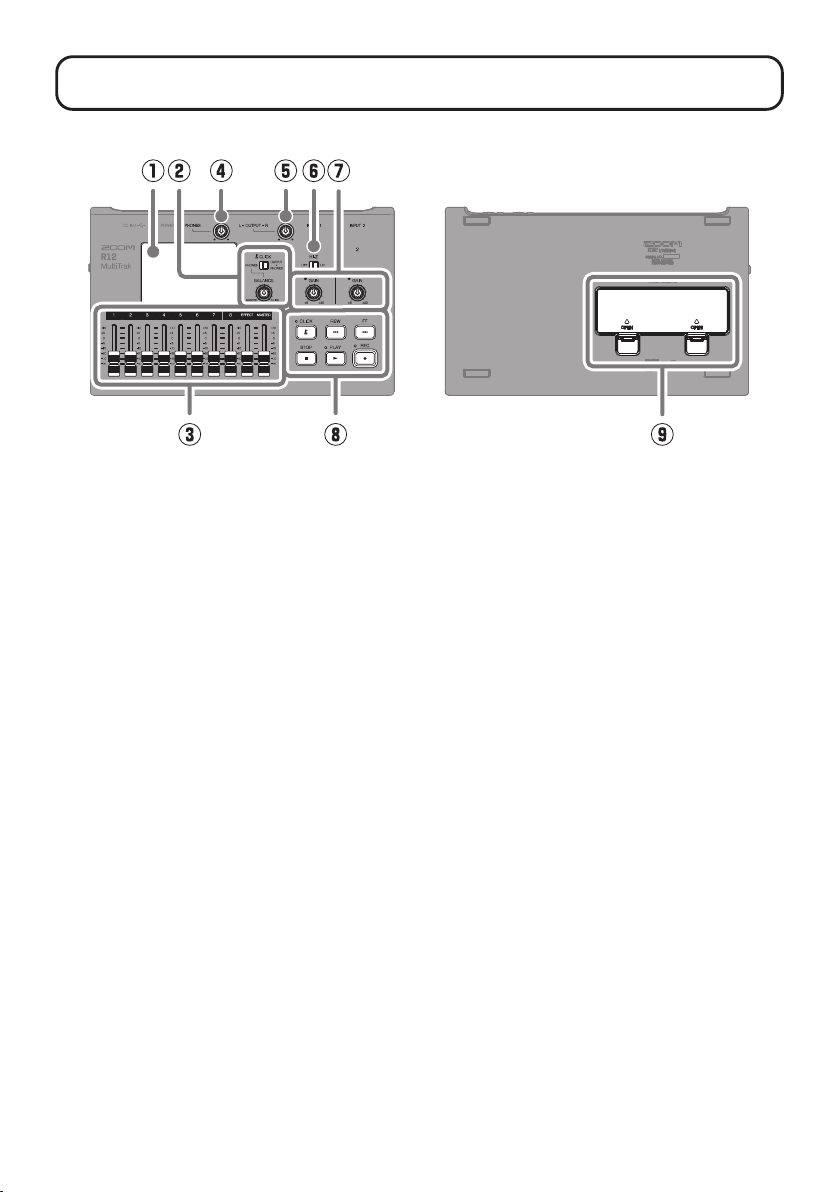
Zoom MultiTrak R12 User manual

Quick Tour
© 2022 ZOOM CORPORATION
Copying or reprinting this manual in part or in whole without permission is prohibited.
You might need this manual in the future. Always keep it in a place where you can access it easily.
The contents of this manual and the specifications of the product could be changed without notice.
You must read the Usage and Safety Precautions before use.
The Operation Manual can be downloaded from the ZOOM website.
www.zoom.jp/docs/r12

2
Inserting microSD cards
Supported recording media:
microSDHC: 4 GB – 32 GB
microSDXC: 64 GB – 512 GB
• Always turn the power off before inserting or removing a microSD card.
• To remove a microSD card, push it further into the slot and then pull it out.
Connecting
Dedicated AC adapter
(ZOOM AD-17)
USB port (Type-C)
Powered monitors
Headphones
• Turn on the powered monitors after starting up the R12.
• The power will automatically turn off if the R12 is unused for 10 hours.
If you want to keep the power on always, turn off the automatic power saving (Auto Power Off) function.
• Power can also be supplied through the USB (Type-C) port by connecting a commercially-available mobile battery.
• Dry cell batteries (alkaline, nickel-metal hydride and lithium) can also be used.
Turning the power on and setting up the rst time
█ Turning the power on
Press
and hold
Formatting microSD cards
We recommend formatting microSD
cards before using them for the rst
time with the R12 in order to maximize
their performance.
Be aware that all data previously
saved on a microSD card will be
deleted when it is formatted.
Turn the power on while pressing and holding the
button.

3
█ Setting the date and time
Creating projects
Templates include preset rhythm loops. Select the
desired template.
• Track view
This is the normal recording/editing screen.
Since recorded waveforms and their positions
can be examined easily, this is useful for thinking
about song structure and editing.
• Level meter view
This screen shows the level meters and
faders for all tracks.
This is useful for recording multiple channels
simultaneously and adjusting the mix.
Track type
buttons
Track number
or type
Recording/playback bars/beats
Recording/playback position Tempo and time signature
Home Screen
Screen switching
buttons
Magnication buttons
Rhythm loop
included when
using a template
Scroll the screen to
view other tracks and
bars.
Rhythm track
Synth track

4
Recording
█ Connections and preparation
Hi-Z ON:
Guitar/bass with passive
pickups (direct connection)
Hi-Z OFF:
Guitar/bass with active pick-
ups, synth or other electronic
instrument
Make sound and adjust so PEAK does not
quite light at maximum volume.
48V phantom power can be
supplied to condenser mics.
By default, INPUT 1 is assigned to track 1 and set to record. Track assignments can be
changed, for example, when alternately recording a guitar and a bass directly connected to
INPUT 1 (Hi-Z input).

5
█ Using effects
Effects are saved and recalled in units of patch memories. Patch memories store effect on/off states
and parameter setting values.
Select a track to use an effect on.
Add a to select a patch memory.
Make specic effect settings.

6
█ Recording
Press to stop recording.
Press when stopped to set the recording/playback position to the beginning.
█ Playing recordings
Adjust levels with the MASTER fader
and faders for tracks to be played.
Outputting the click
The click output can be changed.
The volume balance between the signal after
it passes through the MASTER fader and the
click sound can be adjusted. (This is only effec-
tive when the CLICK switch is set to PHONES.)
The click sound can be turned on/off.

7
█ Making individual track settings
Making individual track settings
Pan, EQ, send effect and stereo link settings can be
changed.
The stereo link function allows a pair of adjacent odd
and even-numbered tracks to be joined and handled
as a single stereo track. This allows their track set-
tings and fader operations to be shared.
Double
tap
Editing projects
Waveforms and MIDI notes added to
recorded tracks are called “regions”.
The R12 has audio, rhythm and synth
regions that can be edited to create projects. Regions
█ Moving regions
Highlight
A region can be elongated (enabling looping) by dragging at its right edge.

8
█ Editing regions
Double
tap
█ Adding regions
Rhythm
Rhythm loops are converted to match
the project tempo when added.
Audio
Double
tap
WAV les can be added.

9
Mixing down
Projects can be mixed down to stereo WAV les.
Since the project plays back while recording the mixdown, adjusting the faders during play-
back will affect the levels.
█ Adjusting the mix
After switching proj-
ects, the positions
of physical faders
will be applied again
once they have been
aligned with the
bright position
indicators.
Physical fader
position
Previous fader
position
While listening to play-
back, adjust the faders
to balance the levels as
desired.
█ Mixing down
The mixdown le will be saved in the “AUDIO”
folder on the microSD card.
Make it light red.
Switch to the Level Meter View Screen.
Mute tracks.
Output sound only
from selected tracks.
Mute/solo functions

10
Functions of parts
■Top ■Bottom
①Touchscreen
This shows various types of information
and allows operation by touch.
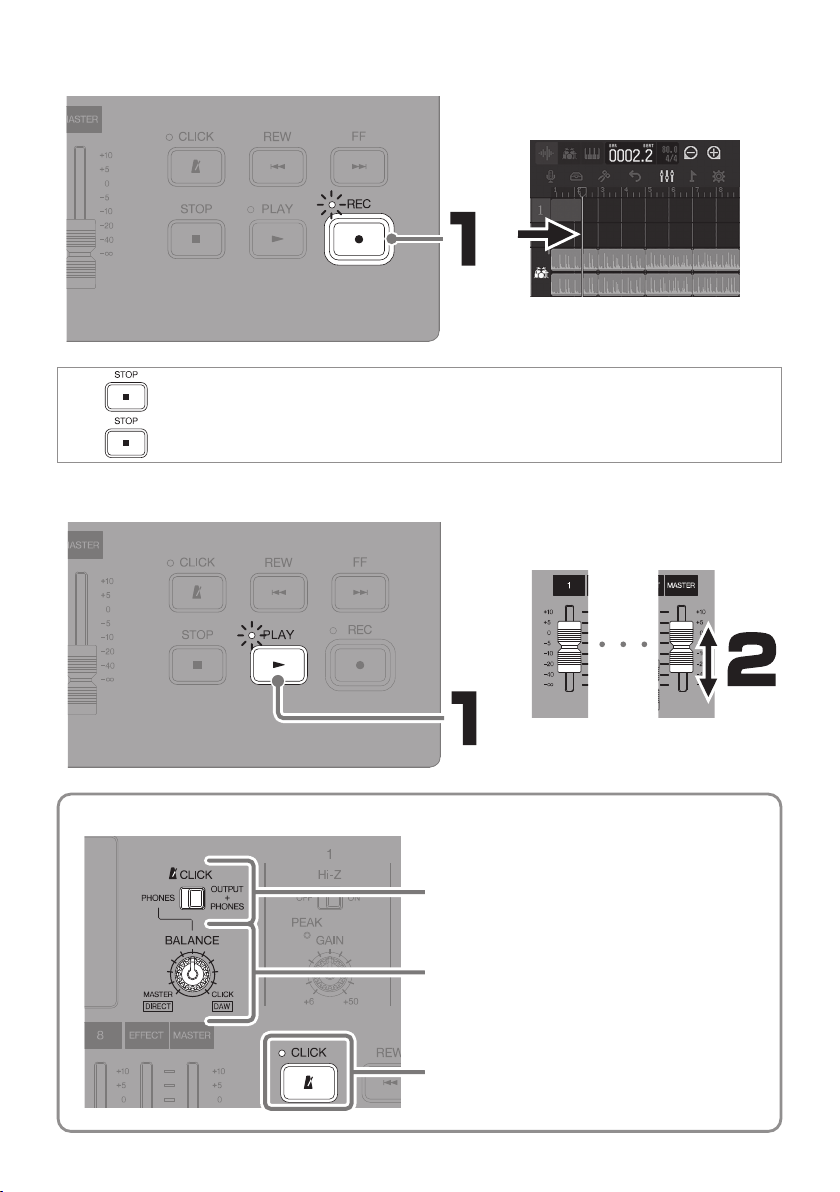
②CLICK switch / BALANCE knob
When the CLICK switch is set to PHONES,
use the BALANCE knob to adjust the
balance between the MASTER and CLICK
signals output from the PHONES output
jack.
③Channel/EFFECT/MASTER faders
Channel faders: These adjust individual
track signal levels in a range from −∞ to
+10 dB.
EFFECT fader: This adjusts the return level
of the send effect in a range from −∞ to
+10 dB.
MASTER fader: This adjusts the signal lev-
els output from the OUTPUT jacks and the
PHONES output jack in a range from −∞ to
+10 dB.
④PHONES output volume knob
This adjusts the headphone output volume.
⑤OUTPUT volume knob
This adjusts the OUTPUT volume.
⑥Hi-Z switch
Turn Hi-Z on/off for INPUT 1. Turn this on
as necessary for the connected guitar or
bass.
⑦PEAK indicators / GAIN knobs
Use these input gain knobs to adjust input
signals. Adjust these so that the PEAK
indicators do not light.
⑧Other buttons
CLICK: This turns the click sound on/off.
The indicator lights when it is on.
REW: This moves the playback position one
ruler unit back. Press and hold to search
backward.
FF: This moves the playback position one
ruler unit forward. Press and hold to search
forward.
STOP: This stops recording/playback.
Press when stopped to move the record-
ing/playback position to the beginning of
the project.
PLAY: This starts/pauses playback of
recorded les. The indicator lights during
playback.
REC: This starts recording. The indicator
lights during recording.
⑨Battery cover
Open this when installing or removing AA
batteries.

11
■Back ■Left side
①INPUT jacks
Connect mics, keyboards and guitars to
these. These support XLR and 1/4-inch
phone (unbalanced) plugs.
②OUTPUT jacks
Connect these to a power amplier, a PA
system or powered monitor speakers, for
example.
③PHONES output jack
Connect headphones to this.
④Power switch
This turns the power on/off.
⑤USB (Type-C) port
Using this, projects can be copied to and
imported from USB ash drives. USB MIDI
keyboards can also be connected and used
to play synth sounds.
Connecting to a computer also makes the
following possible.
• Using the R12 as an audio interface
• Using Guitar Lab to replace R12 effects
• Using the R12 as a card reader
• Using the R12 as a DAW controller
⑥microSD card slot
This supports cards that meet microSDHC/
microSDXC specications.
Other functions
Project operations Projects can be renamed, duplicated, deleted, rendered, and exported to USB ash drives.
Waveform editing Waveform editing functions can be used in audio and rhythm regions. A time stretch
function allows the lengths of regions to be changed without changing the pitch.
Snapping The positions of regions and notes (synth sounds) can be snapped to the ruler shown.
Stereo linking Adjacent even and odd-numbered tracks can be handled as stereo tracks.
Converting tracks to
audio les
All regions on a track can be converted to a single audio le. This can be used to avoid
limits on the number of regions and the use of effects and synths.
Adding WAV/MIDI les
from microSD cards and
USB ash drives
WAV and MIDI (Standard MIDI File (SMF)) les on SD cards and USB ash drives can be
added as new regions.
Markers Memos can be added at the beginnings of bars. The overall structure of a song can be
managed easily by adding memos to each part.
Click The metronome includes a pre-count and tone variations. In addition, CLICK output can
be assigned to the output of a specied track and output only to headphones.
Synth
The R12 has a built in synthesizer sound source. Notes can be input by connecting a USB MIDI key-
board and performing them in real-time or by using the piano roll on the touchscreen. In addition,
MIDI les can be imported as synth regions.
Physical controller When connected by USB to a computer or similar device, the R12 buttons and faders can
be used to control DAW transport and mixing operations.
USB audio interface When connected by USB to a computer or similar device, the R12 can be used as an
audio interface with 2 inputs and 2 outputs.

Z2I-4622-02
ZOOM CORPORATION
4-4-3 Kanda-surugadai, Chiyoda-ku, Tokyo 101-0062 Japan
zoomcorp.com
Guitar Lab connection A computer can be used to add effects that are distributed online as well as to edit and
back up patch memories, for example.
microSD card reader When the R12 is connected to a computer, data on the microSD card can be checked
and copied.
Playlist function
Multiple projects can be added in performance order to a playlist and played back
continuously.
This is useful for accompaniment during live performances.
Product names, registered trademarks and company names in this document are the property of their respective companies.
All trademarks and registered trademarks in this document are for identification purposes only and are not intended to infringe
on the copyrights of their respective owners.
Troubleshooting
Sound is not output or the volume is very low
→ Check the connections to the monitoring system and
its volume settings.
→ Conrm that the volume setting of the R12 is not too
low.
→ Adjust the CLICK switch and BALANCE knob.
Cannot hear sound from a mic or other connected
equipment or the volume is very low
→ Check the orientation of the mic or the volume settings of
the connected device.
→ Check the R12 input gain settings.
→ Check the R12 fader settings.
→ Check the R12 output level settings.
→ Check the R12 phantom power settings.
Cannot record
→ Conrm that the microSD card has open space.
→ Conrm that a microSD card is loaded properly in the
card slot.
Sound input through INPUT 1 is very noisy
→ Check the Hi-Z switch setting.
Cannot hear recorded sound or the volume is very
low
→ Conrm that the track faders are not too low.
→ Conrm that the tracks are not muted and that other
tracks are not soloed.
Not recognized by computer when connected
→ Conrm that the USB cable being used is not
designed only to provide power.
→ The operation mode must be set on the R12 to allow
the computer to recognize it.
Other manuals for MultiTrak R12
1
Table of contents
Other Zoom Recording Equipment manuals
Popular Recording Equipment manuals by other brands

Tascam
Tascam MINISTUDIO CREATOR US-42 quick start guide

Jupiter Avionics
Jupiter Avionics JA94-R62A Installation and operating manual

Harman Kardon
Harman Kardon CDR 2 quick guide

Expert Sleepers
Expert Sleepers Aloysius user manual

Pyramid Technical Consultants
Pyramid Technical Consultants M10 Series user manual

Pickering
Pickering 43-921 user manual