Zoom AMS-44 User manual

Operation Manual
You must read the Usage and Safety Precautions before use.
©2022 ZOOM CORPORATION
Copying or reprinting this manual in part or in whole without permission is prohibited.
Product names, registered trademarks and company names in this document are the property of their respective companies. All trademarks and
registered trademarks in this document are for identification purposes only and are not intended to infringe on the copyrights of their respective owners.
Proper display is not possible on grayscale devices.

Notes about this Operation Manual
You might need this manual in the future. Always keep it in a place where you can access it easily.
The contents of this document and the specifications of the product could be changed without notice.
• Windows® is a trademark or registered trademark of Microsoft® Corporation.
• Mac is a trademark of Apple Inc.
• Other product names, registered trademarks and company names in this document are the property of
their respective companies.
• All trademarks and registered trademarks in this document are for identification purposes only and are
not intended to infringe on the copyrights of their respective owners.
• Recording from copyrighted sources, including CDs, records, tapes, live performances, video works
and broadcasts, without permission of the copyright holder for any purpose other than personal use
is prohibited by law. Zoom Corporation will not assume any responsibility related to infringements of
copyrights.
2

Contents
Notes about this Operation Manual........................................................................................................................ 2
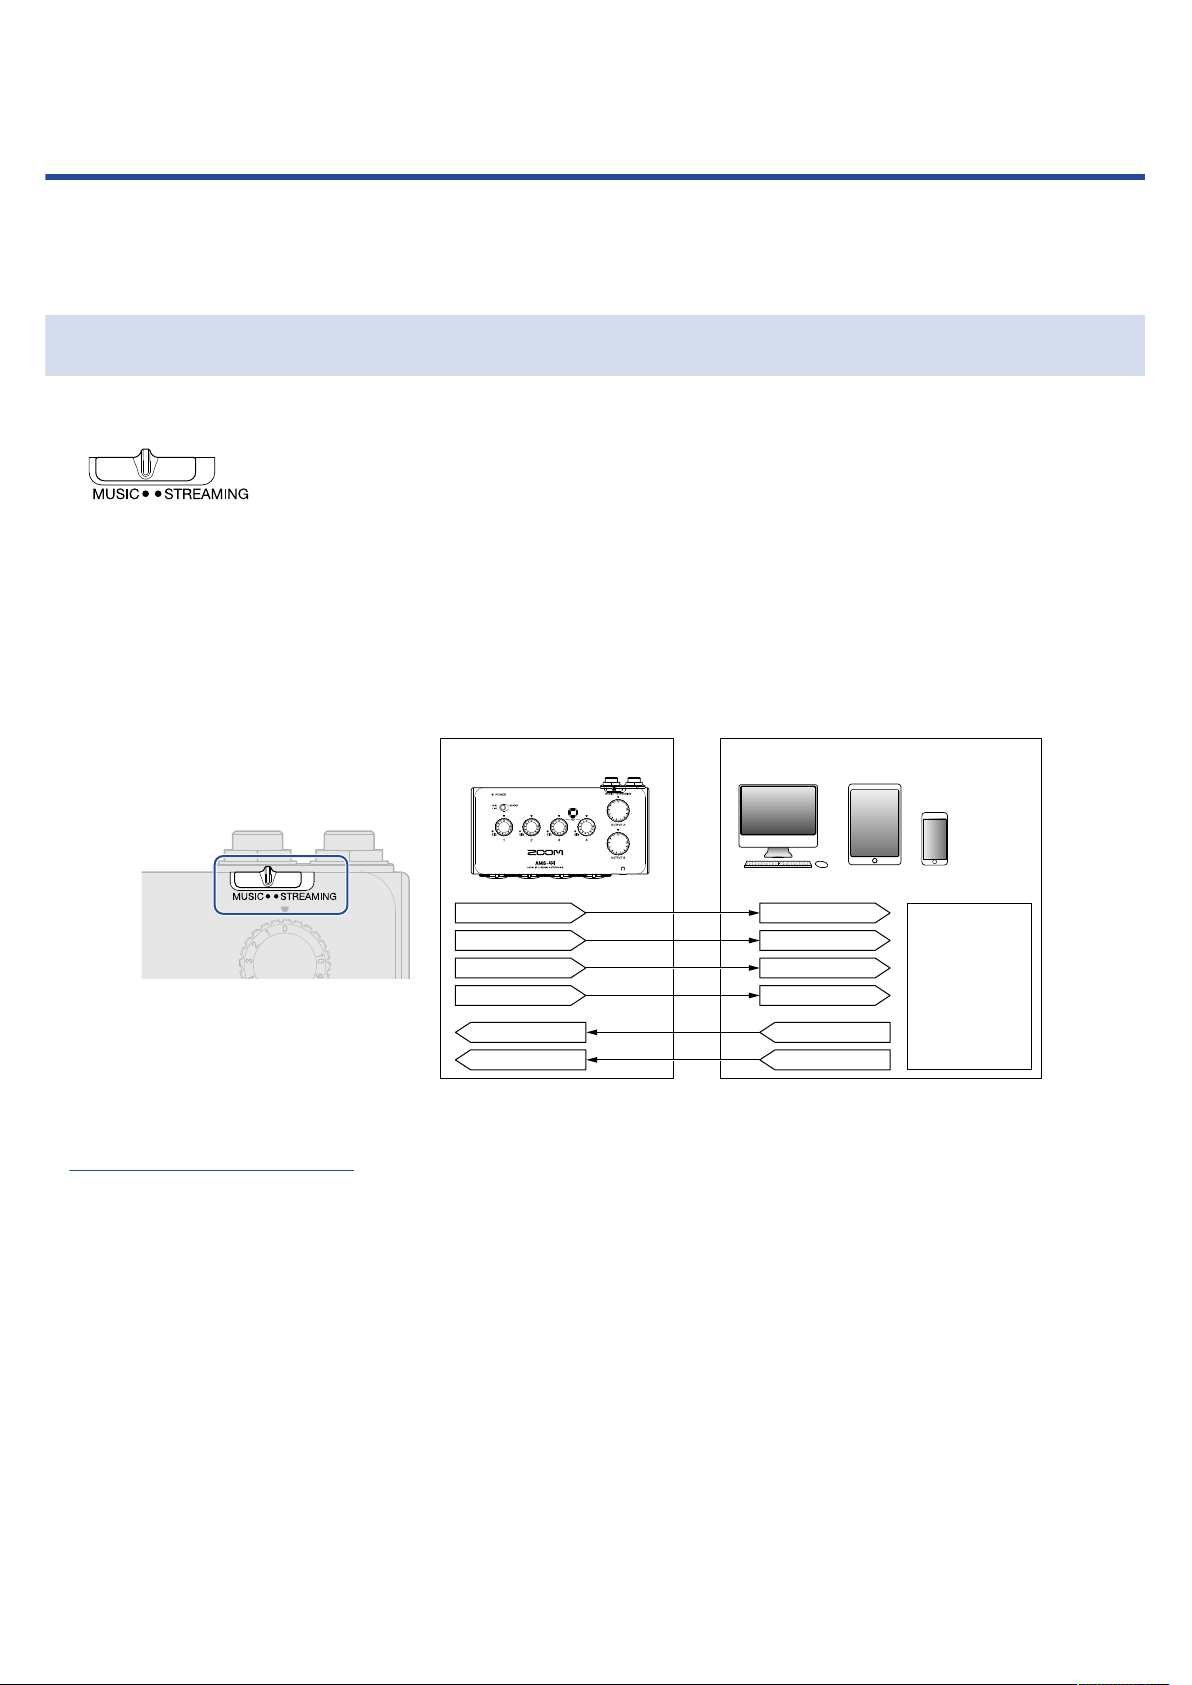
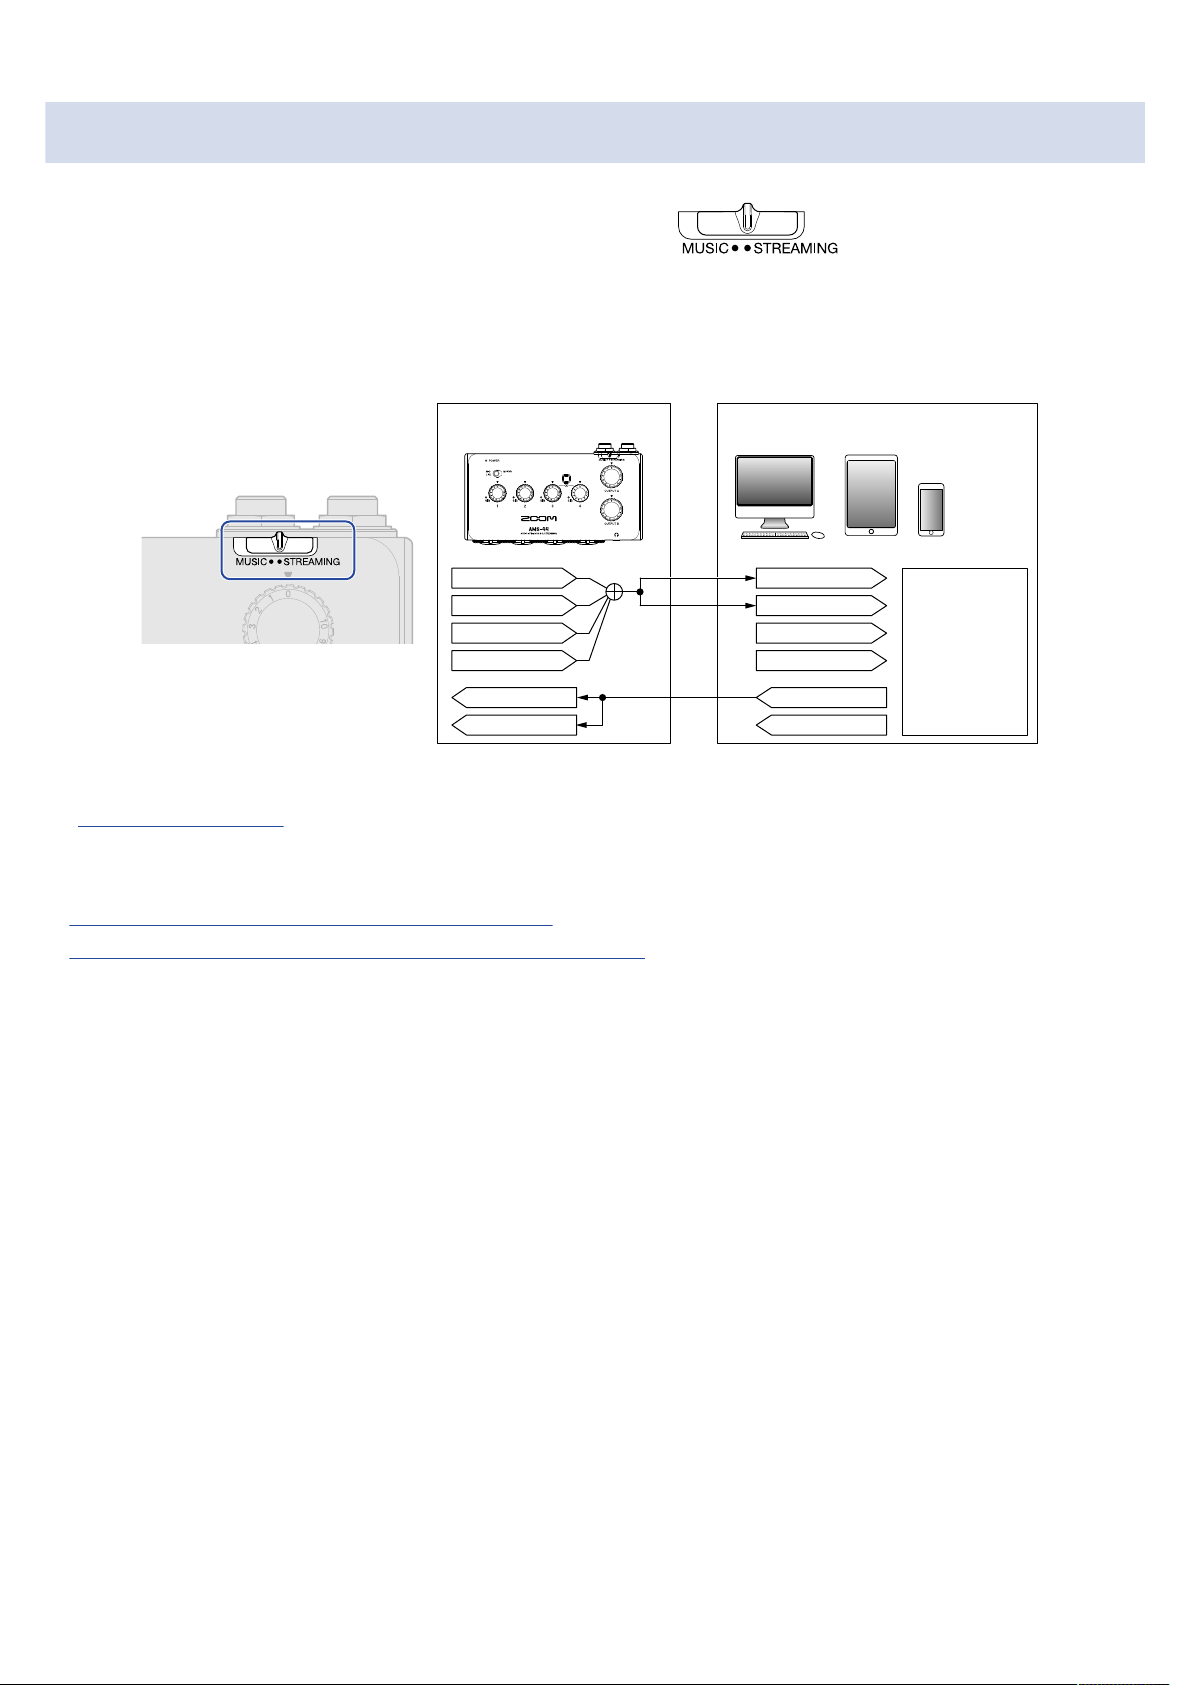
Overview of MUSIC and STREAMING modes.......................................................................................................... 4
MUSIC mode.................................................................................................................................................................4
STREAMING mode....................................................................................................................................................... 5
Functions of parts....................................................................................................................................................... 6
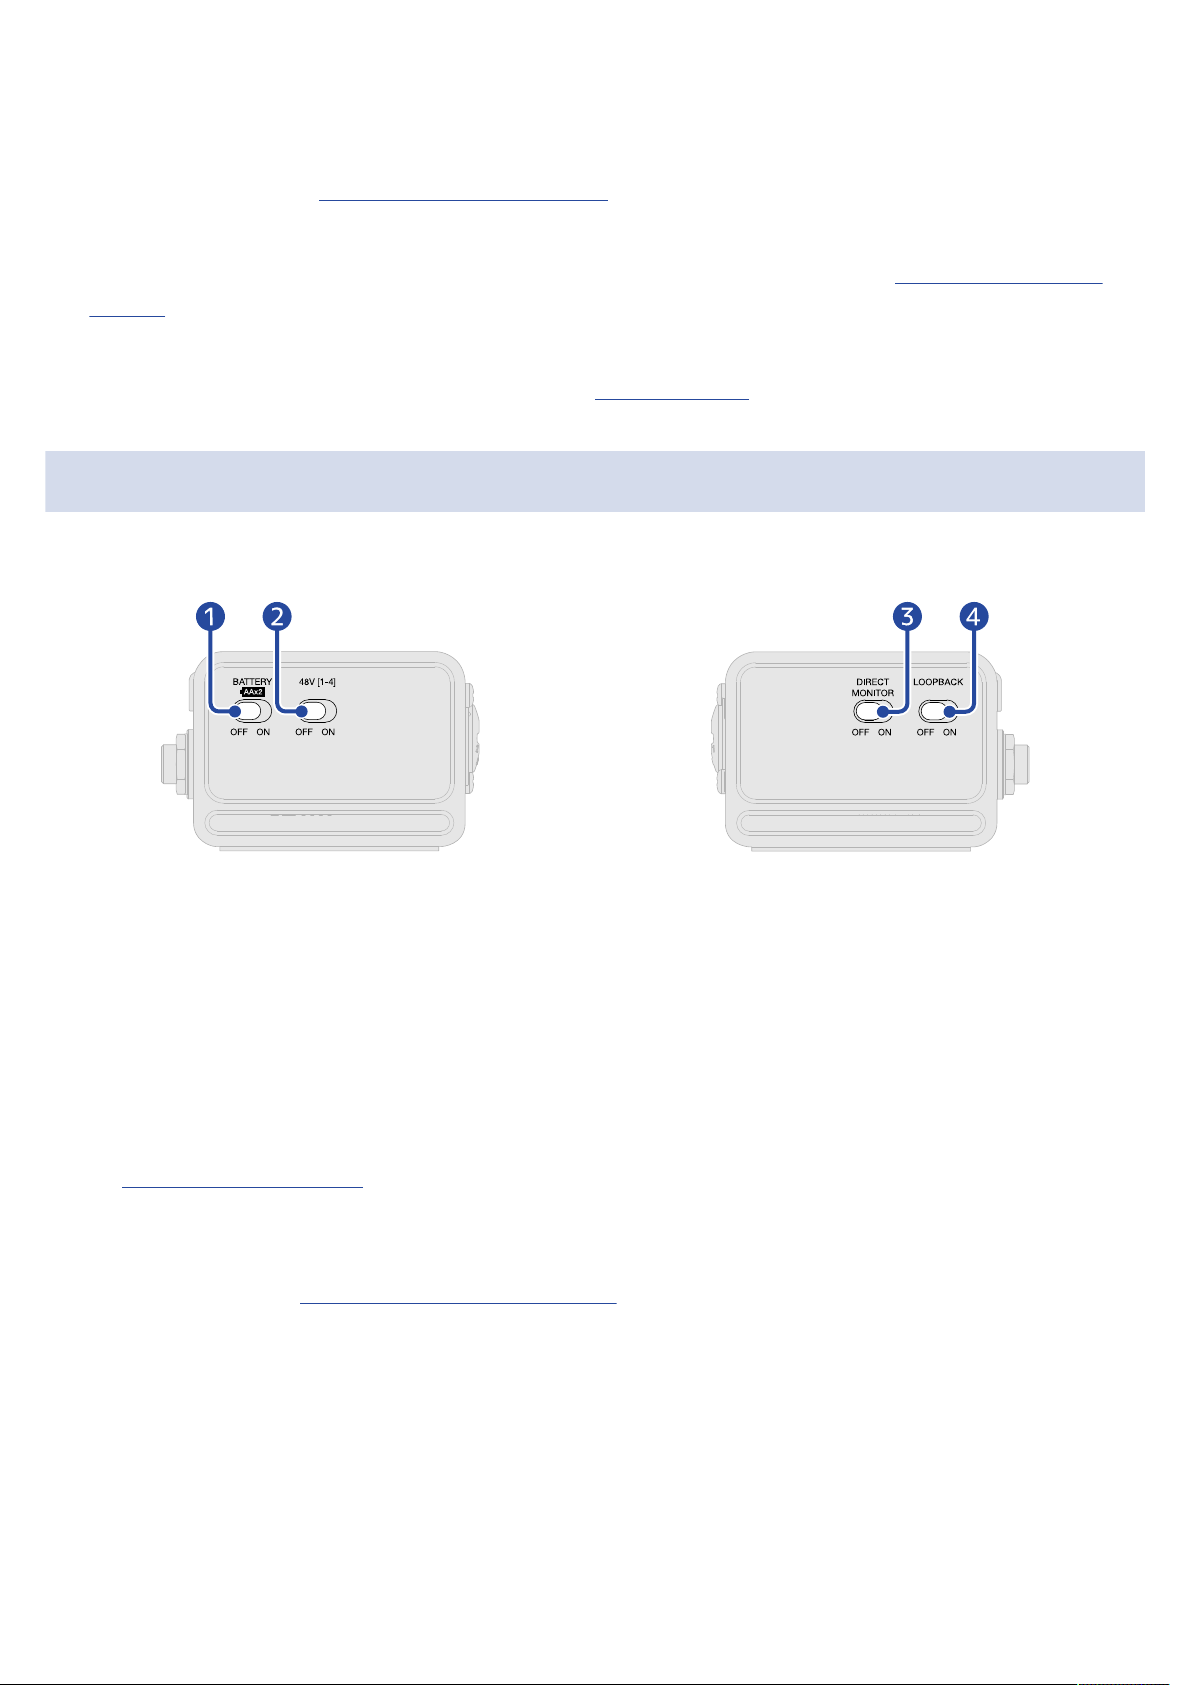
Top and bottom...........................................................................................................................................................6
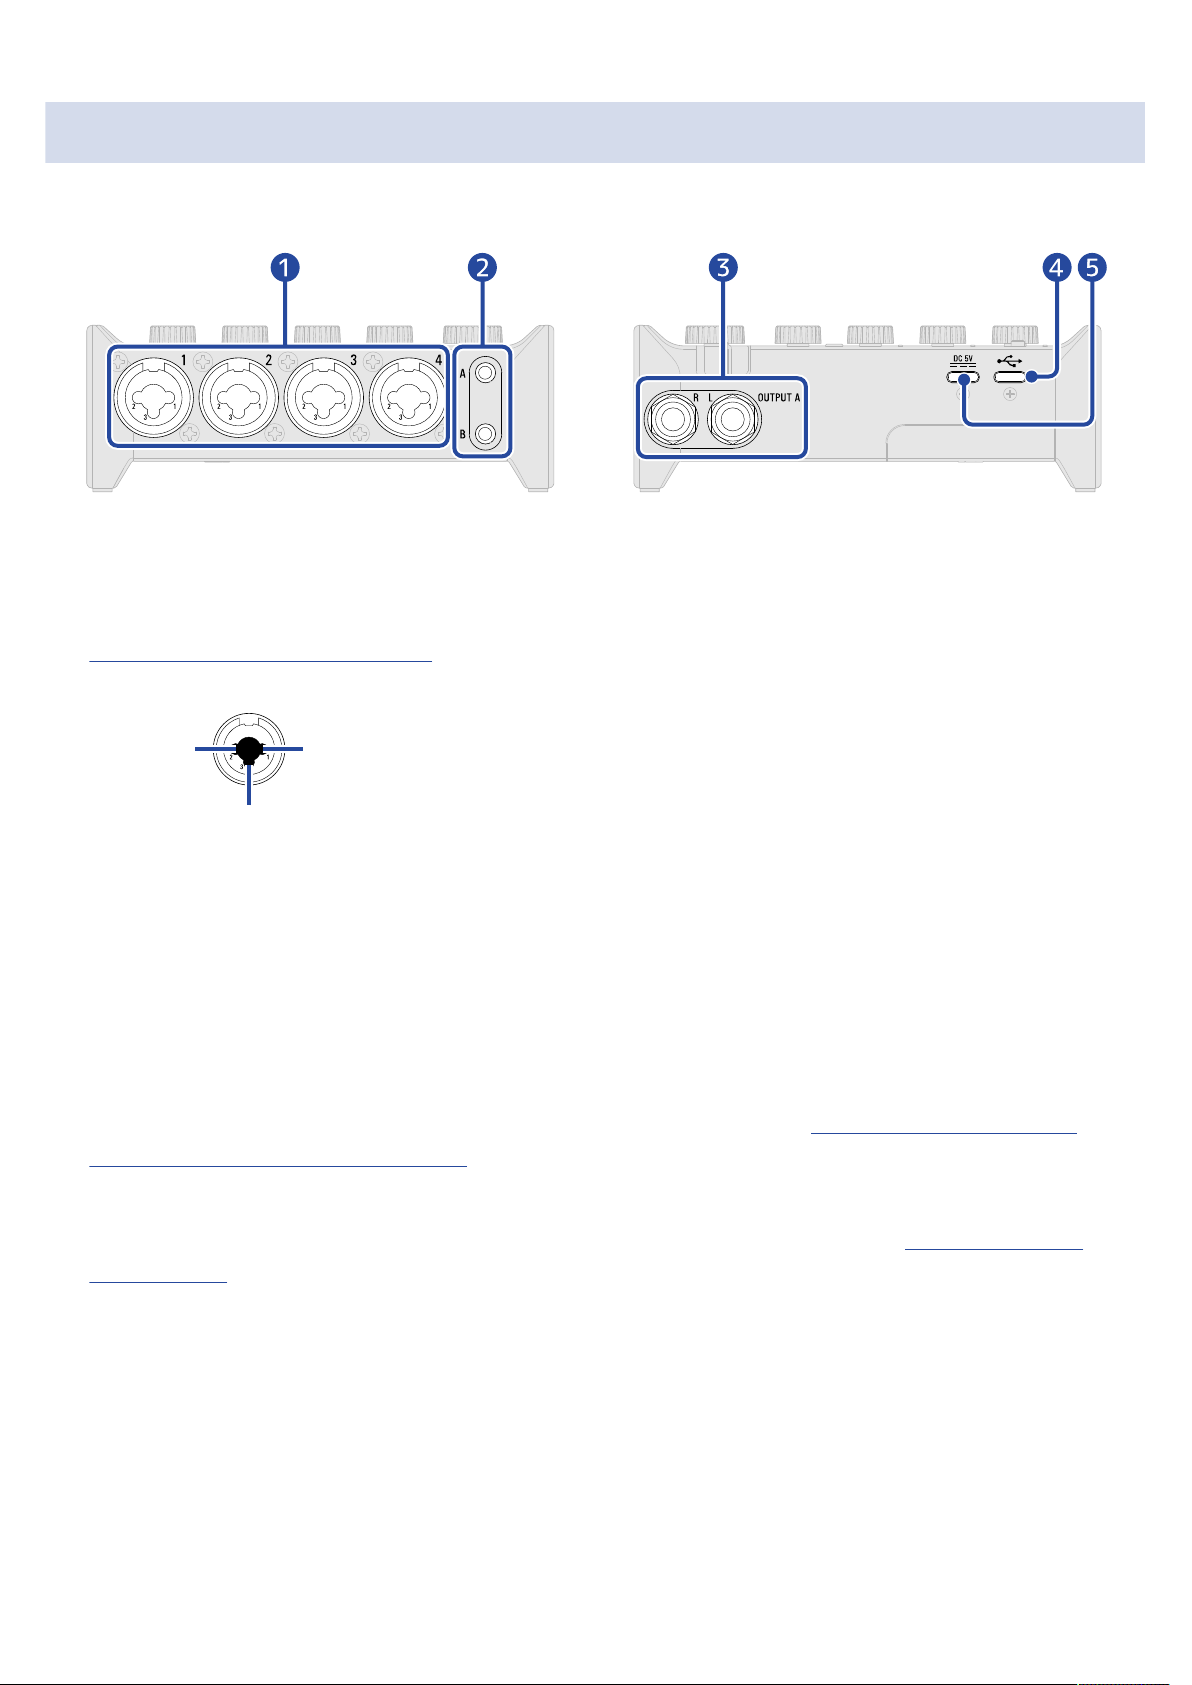
Left and right sides..................................................................................................................................................... 7
Front and back............................................................................................................................................................. 8
Connecting to a computer.........................................................................................................................................9
Installing the driver on Windows computers....................................................................................................... 10
Connecting smartphones and tablets....................................................................................................................11
Supplying power........................................................................................................................................................ 12
Connecting instruments and mics..........................................................................................................................14
Connecting instruments........................................................................................................................................... 14
Connecting mics.........................................................................................................................................................16
Stereo link overview..................................................................................................................................................17
Adjusting the input gain...........................................................................................................................................18
Using direct monitoring............................................................................................................................................19
Adjusting the volume................................................................................................................................................20
Adjusting OUTPUT A volume................................................................................................................................... 20
Adjusting OUTPUT B volume...................................................................................................................................20
Enabling the loopback function.............................................................................................................................. 21
Use example: Making music....................................................................................................................................23
Use example: Web streaming using a computer................................................................................................. 26
Use example: Web streaming using a smartphone/tablet................................................................................. 29
Mixer diagram............................................................................................................................................................32
Terms used in this manual......................................................................................................................................33
Troubleshooting.........................................................................................................................................................34
Cannot select or use the AMS-44 device...............................................................................................................34
The sounds of devices connected to input jacks are distorted, too quiet or silent........................................34
Cannot play or record.............................................................................................................................................. 34
Playback sound cannot be heard or is quiet........................................................................................................35
Recorded audio is too loud, too quiet or silent................................................................................................... 35
A smartphone or tablet cannot be used...............................................................................................................35
Sound skips during playback or recording........................................................................................................... 35
Specifications..............................................................................................................................................................36
3

Overview of MUSIC and STREAMING modes
Set this according to the use of the USB audio signal path.
MUSIC mode
The MUSIC mode setting is good for making music with a DAW, for example.
Set to MUSIC.
This mode is useful for recording a guitar and vocals simultaneously to separate tracks, for example. Input
sounds are handled as separate signals by the computer, smartphone or tablet in the same way as with an
ordinary audio interface.
Different sounds can be output from the computer, smartphone or tablet through headphone jacks A
and B. This enables recording while a person operating the computer and a person performing listen to
different sounds.
INPUT3
INPUT4
OUTPUT A
OUTPUT B
INPUT3 DAW
INPUT4
INPUT1
INPUT2
INPUT1
INPUT2
OUTPUT 1/2
OUTPUT 3/4
AMS-44
■ Use example
→ Use example: Making music
4

STREAMING mode
The STREAMING mode setting is good for web streaming. Set to STREAMING.
This mode is useful for streaming solo performances of vocals accompanied by guitar, for example. Input
sounds can be mixed like using an audio mixer and then sent to the computer, smartphone or tablet.
Since the sound from the computer, smartphone or tablet (USB OUTPUT 1/2) is output from both OUTPUT
A and B, this can also be used to record podcasts while two people monitor the same sound.
INPUT3
INPUT4
OUTPUT A
OUTPUT B
INPUT3 WEB
INPUT4
INPUT1
INPUT2
INPUT1
INPUT2
OUTPUT 1/2
OUTPUT 3/4
AMS-44
L
R
When the AMS-44 Stereo Link switch is on, Input 3 (left) and Input 4 (right) function as a stereo input.
(→ Stereo link overview)
■ Use examples
→ Use example: Web streaming using a computer
→ Use example: Web streaming using a smartphone/tablet
5

Functions of parts
Top and bottom
■ Top ■ Bottom
❶POWER indicator
This lights when the power is on. This blinks when the remaining battery charge is low.
❷Input type switch
Set this according to the equipment connected to Input 1.
❸Stereo Link switch
Turn this on when inputting a stereo signal through Inputs 3–4. Input 3 will become the left signal while
Input 4 will become the right signal. When the Stereo Link switch is on, the input gain for both Inputs 3
and 4 is controlled by Gain knob 3. (→ Stereo link overview)
❹Gain knobs
Use these to adjust input signal levels. (→ Adjusting the input gain)
❺Level indicators
These indicators show signal levels after gain knob adjustment.
The indicator colors change according to the signal levels.
Lit green: Input signal is present. (−48 dBFS or higher)
Lit red: Input signal is clipping. (−1 dBFS or higher)
❻MUSIC/STREAMING switch
This switches between MUSIC and STREAMING modes. Set it to MUSIC when using the AMS-44 to make
music with a DAW, for example. Set it to STREAMING when using it to stream on the web, for example.
(→ MUSIC mode, STREAMING mode)
6

❼OUTPUT A knob
Use this to adjust the volumes of signals output from the OUTPUT A standard phone jacks and the
Headphone A jack. (→ Adjusting OUTPUT A volume)
❽OUTPUT B knob
Use this to adjust the volume of signals output from the Headphone B jack. (→ Adjusting OUTPUT B
volume)
❾Battery cover
Slide this to remove it when loading batteries. (→ Using batteries)
Left and right sides
■ Left side ■ Right side
❶BATTERY switch
Set this to ON to use battery power. Set this to OFF to use USB bus power or an external power supply.
❷48V switch
This turns +48V phantom power ON/OFF. Set this to ON when connecting condenser mics. Phantom
power is supplied to Inputs 1–4 simultaneously.
❸DIRECT MONITOR switch
Set this to ON to directly monitor sounds from the INPUT jacks before they pass through the computer.
(→ Using direct monitoring)
❹LOOPBACK switch
Set this to ON to send a mix of the sounds played by the computer and input through the AMS-44 back
to the computer. (→ Enabling the loopback function)
7

Front and back
■ Front ■ Back
❶Input jacks 1–4
These input jacks have built-in mic preamps. Connect mics, keyboards, guitars and other audio sources
to them. These can be used with both XLR and standard phone (balanced or unbalanced) plugs. (→
Connecting instruments and mics)
XLR
1
2
3
1: GND
2: HOT
3: COLD
❷Headphone output jacks A–B
These output stereo signals. Connect headphones to these.
❸OUTPUT A standard phone jacks
These output the left (L) and right (R) channels of stereo signals. Connect these to speakers with built-in
amplifiers, for example.
❹USB port (Type-C)
Use this USB port to connect computers, smartphones and tablets. (→ Connecting to a computer,
Connecting smartphones and tablets)
❺DC 5V port (Type-C)
Use this power supply USB port to connect an AC adapter or mobile battery. (→ Using an external
power supply)
8

Connecting to a computer
The AMS-44 is compatible with USB bus power, so power can be supplied to it from a computer through a
USB cable. In addition to USB bus power, it can also be operated using an external power supply (dedicated
AC adapter or mobile battery) or batteries. (→ Using an external power supply, Using batteries)
1. Install the dedicated driver before using an AMS-44 to record for the first time with a DAW application
on a Windows computer. (→ Installing the driver on Windows computers)
NOTE:
A driver is not necessary when using a Mac.
2. Minimize the volume before connecting speakers, headphones or other output devices to the AMS-44.
(→ Adjusting the volume)
3. Use a USB cable to connect the AMS-44 USB port (Type-C) to a USB port on the computer.
USB Type-C
NOTE:
Use a USB cable that supports data transfer.
4. To use USB bus power, set to OFF.
9

5. Confirm that the POWER indicator is lit red.
Installing the driver on Windows computers
The dedicated driver must be installed on a Windows computer before using a DAW app on it to record.
1. Download the “ZOOM AMS-44 Driver” from zoomcorp.com to the computer.
NOTE:
The latest “ZOOM AMS-44 Driver” can be downloaded from the above website.
2. Launch the installer and follow the instructions to install the “ZOOM AMS-44 Driver”.
NOTE:
• Do not connect the AMS-44 to the computer during installation.
• See the Installation Guide included in the driver package for detailed installation procedures.
10

Connecting smartphones and tablets
During use with a smartphone or tablet, an external power supply or batteries must be used.
1. Minimize the volume before connecting speakers, headphones or other output devices to the AMS-44.
(→ Adjusting the volume)
2. Connect an external power supply or use batteries. (→ Using an external power supply, Using
batteries)
NOTE:
Power must be provided before connecting a smartphone or tablet to the AMS-44.
3. Use a USB cable to connect the AMS-44 USB port (Type-C) to the smartphone/tablet.
USB Type-C
To connect smartphones and tablets, prepare USB cables and adapters that match their connectors as
necessary.
Use a USB cable that supports data transfer.
Connector type Necessary USB cable/adapter
Lightning connector USB Type-A to Type-C cable, Lightning to USB 3 Camera
Adapter
Type-C connector USB Type-C to Type-C cable
11

Supplying power
Using an external power supply
A dedicated AC adapter (ZOOM AD-17) or a commercially-available USB mobile battery can be used.
1. Connect the USB connector of the dedicated AC adapter to the DC 5V port (Type-C), and plug the AC
adapter into an outlet.
HINT:
To use a USB mobile battery, connect its USB cable to the DC 5V port (Type-C).
2. Set to OFF.
3. Confirm that the POWER indicator is lit red.
12

Using batteries
Prepare two AA batteries.
1. Slide open the battery cover on the bottom of the AMS-44 and install the batteries.
2. Slide the battery cover to close it.
3. Set to ON.
4. Confirm that the POWER indicator is lit red.
NOTE:
• Use only one type of battery (alkaline, NiMH or lithium) at a time.
• The POWER indicator will blink when the battery charge becomes low. Replace the batteries with new
ones.
13

Connecting instruments and mics
Always set to 0 and to OFF before connecting instruments and mics.
Connecting instruments
1. Connect an instrument to the AMS-44.
• Use an instrument cable to connect a guitar or bass, for example, to the Input 1 jack.
• For stereo input, connect to the Input 3–4 jacks using instrument or TRS cables.
14

2. Set and according to the connected device.
■ Input jack 1
Switch position Explanation
Use this setting when connecting a passive guitar or bass.
Set this to GUITAR to support high-impedance (Hi-Z) input. This does not
need to be set to GUITAR when connecting an active guitar or bass.
Use this setting when connecting a mic or keyboard, for example.
■ Input jacks 3–4
When connecting a keyboard or other equipment with stereo output, turn on. (→ Stereo link
overview)
NOTE:
• Phantom power (48 V) is not supplied to the standard phone (TRS) connectors.
• When is set to GUITAR, phantom power (48 V) to the Input 1 jack is disabled. When
connecting a condenser mic to the Input 1 jack and using phantom power (48 V), set to
MIC/LINE.
15

Connecting mics
1. Use mic cables to connect dynamic and condenser mics to the Input 1–4 jacks.
2. When connecting a mic to the Input 1 jack, set to MIC/LINE.
3. Use to set phantom power according to the connected mics.
Phantom power is supplied to all XLR connectors of Inputs 1–4.
Switch position Explanation
Use this to supply phantom power to condenser mics.
Use this when connecting dynamic mics.
16

NOTE:
Do not set to ON when connecting equipment that is not compatible with phantom power. Doing so
could damage the equipment.
Stereo link overview
When direct monitoring in STREAMING mode, the stereo link controls the positions of the INPUT 3/4
sounds that are input to USB INPUT 1/2.
Turning on the stereo link enables stereo input with sound from Input 3 to the left and Input 4 to the right.
When connecting a keyboard or other equipment with stereo output, turn on the Stereo Link switch.
L
L
R
R
DIRECT MONITORDIRECT MONITOR
USB INPUT 1/2USB INPUT 1/2
Switch status Direct monitoring and USB Inputs 1/2 (when in STREAMING mode)
OFF
Inputs 3 and 4 are mono.
L: Inputs 1, 2, 3 and 4
R: Inputs 1, 2, 3 and 4
ON
Inputs 3 and 4 are stereo.
L: Inputs 1, 2 and 3
R: Inputs 1, 2 and 4
NOTE:
When the Stereo Link switch is on, the input gain for both Inputs 3 and 4 is controlled by Gain knob 3. (→
Adjusting the input gain)
17

Adjusting the input gain
The input sensitivity of Inputs 1–4 can be adjusted.
1. Use to adjust the input signals while inputting sound from instruments and mics.
Level indicators
: Input signal present. (−48 dBFS or higher)
: Input signal is clipping. (−1 dBFS or higher)
NOTE:
• Set these so that their level indicators do not light red.
• To minimize noise, set the gain for any input jack not being used to 0.
• When the Stereo Link switch is on, the input gain for both Inputs 3 and 4 is controlled by Gain knob 3. (→
Stereo link overview)
18

Using direct monitoring
When direct monitoring is turned on, sound input to the AMS-44 can be directly monitored using
headphones, for example, before it passes through the computer. This enables monitoring without latency.
1. Set to ON.
HINT:
When the Stereo Link switch is on, sounds from Inputs 3 and 4 can be monitored in stereo. (→ Stereo link
overview)
19

Adjusting the volume
The volume output from speakers and headphones connected to the AMS-44 can be adjusted.
The connected jacks have different knobs to adjust their volumes.
NOTE:
Set the AMS-44 volume to 0 before connecting speakers or headphones.
Failure to do so could result in unexpected loud sounds, causing harm to hearing, for example.
Adjusting OUTPUT A volume
Turn to adjust the volume for the Headphone A output jack on the front of the unit and OUTPUT A
standard phone jacks on the back of the unit.
Adjusting OUTPUT B volume
Turn to adjust the volume for the Headphone B output jack on the front of the unit.
20
Other manuals for AMS-44
1
Table of contents
Other Zoom Recording Equipment manuals

Zoom
Zoom Handy REcorder H1 Installation guide

Zoom
Zoom RFX-1000 User manual

Zoom
Zoom R8 Interface User manual

Zoom
Zoom Handy recorder H2 Operation instructions

Zoom
Zoom G5n User manual

Zoom
Zoom G5n User manual

Zoom
Zoom AMS-24 User manual

Zoom
Zoom AMS-44 User manual

Zoom
Zoom RFX-2000 User manual

Zoom
Zoom Q2n-4K Mounting instructions