Zoom R4 User manual

Operation Manual
You must read the Usage and Safety Precautions before use.
©2023 ZOOM CORPORATION
Copying or reprinting this manual in part or in whole without permission is prohibited.
Product names, registered trademarks and company names in this document are the property of their respective companies. All trademarks and
registered trademarks in this document are for identification purposes only and are not intended to infringe on the copyrights of their respective owners.
Proper display is not possible on grayscale devices.

Notes about this Operation Manual
You might need this manual in the future. Always keep it in a place where you can access it easily.
• The contents of this document and the specifications of the product could be changed without notice.
• The illustrations and display screens in this document could differ from the actual product.
• Recording from copyrighted sources, including CDs, records, tapes, live performances, video works
and broadcasts, without permission of the copyright holder for any purpose other than personal use
is prohibited by law. Zoom Corporation will not assume any responsibility related to infringements of
copyrights.
Trademarks
• Microsoft and Windows are trademarks of the Microsoft group of companies.
• iPadOS, Lightning and Mac are trademarks of Apple Inc.
• IOS is a registered trademark or trademark of Cisco Systems, Inc. and associated companies in the USA
and other countries and is used under license.
• The microSDXC logo is a trademark of SD-3C LLC.
• USB Type-C is a trademark of the USB Implementers Forum.
2

Terms used in this manual
• Effect
A wide variety of effects can be applied to sounds, including distortion, chorus and reverb. By adjusting
effect parameters, you can create your own original sounds.
• Bounce
This is the process of combining audio data from multiple tracks or files into one stereo or mono file. The
R4 is a 4-track multitrack recorder (MTR). By combining the audio already recorded on tracks 1–4 into a
separate track called the bounce track, however, additional new recordings can be added. The bounce
track can be layered repeatedly.
• Project
The R4 manages recording and playback data in units called projects. The audio files assigned to tracks,
panning and other settings, are saved in project files. Up to 1000 projects can be created on a single
card.
• Multitrack recorder (MTR)
A recorder that can record and play multiple tracks is called a multitrack recorder (MTR). The R4 can
simultaneously record up to 2 tracks and simultaneously play up to 4 tracks.
3

Contents
Notes about this Operation Manual........................................................................................................................ 2
Terms used in this manual........................................................................................................................................3
R4 overview.................................................................................................................................................................. 6
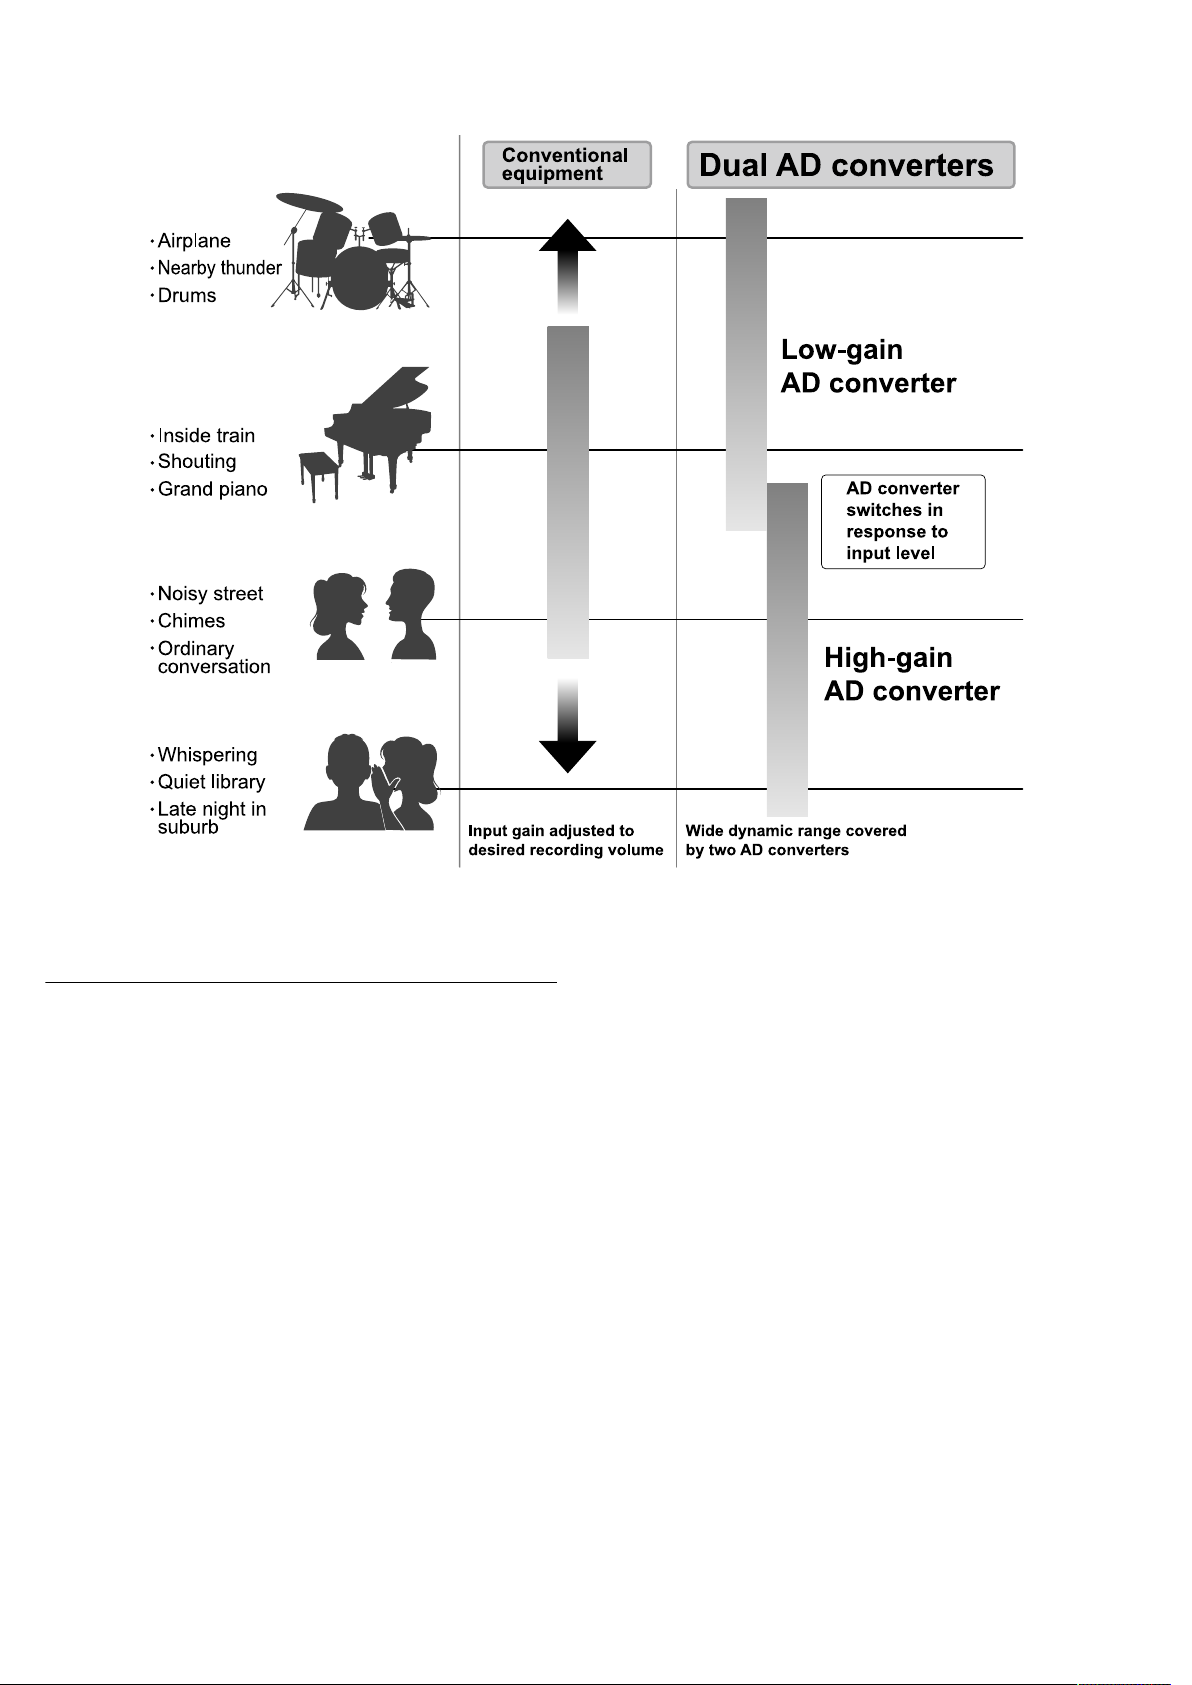
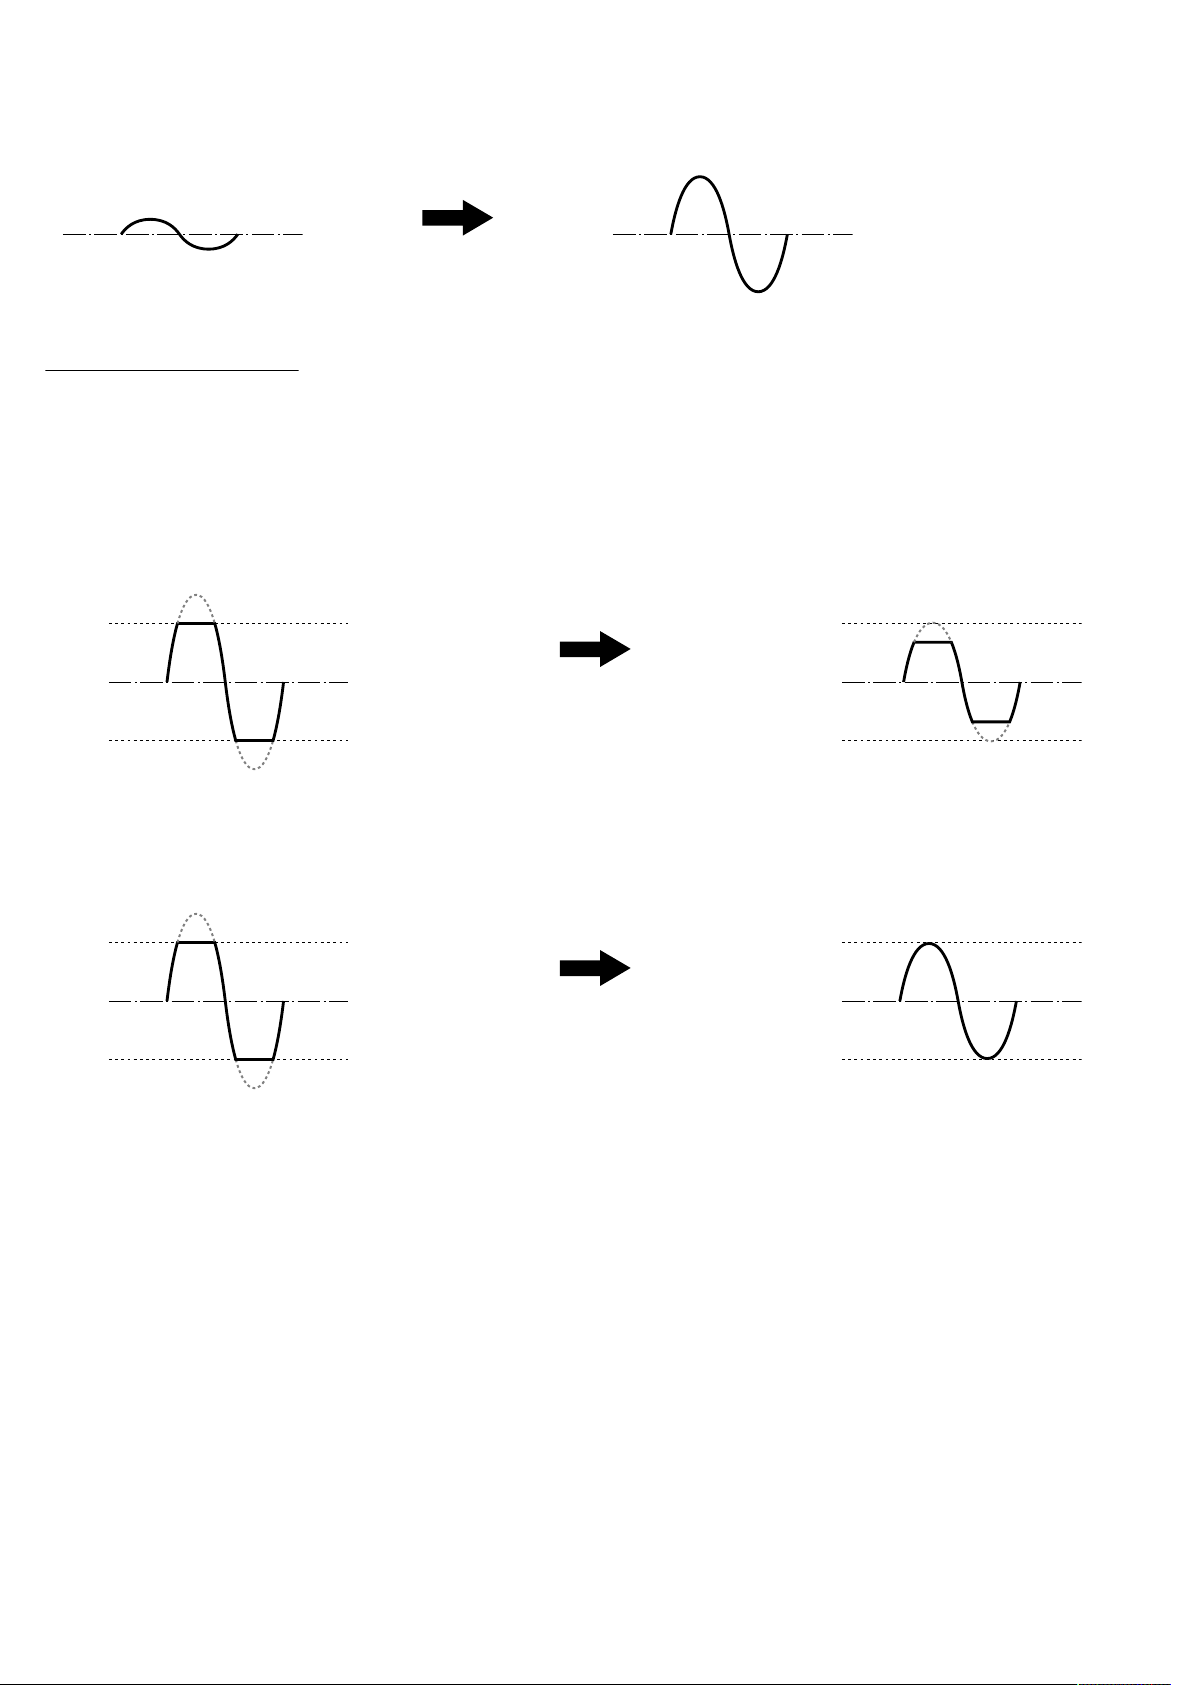
Achieving high audio quality throughout recording and editing......................................................................... 6
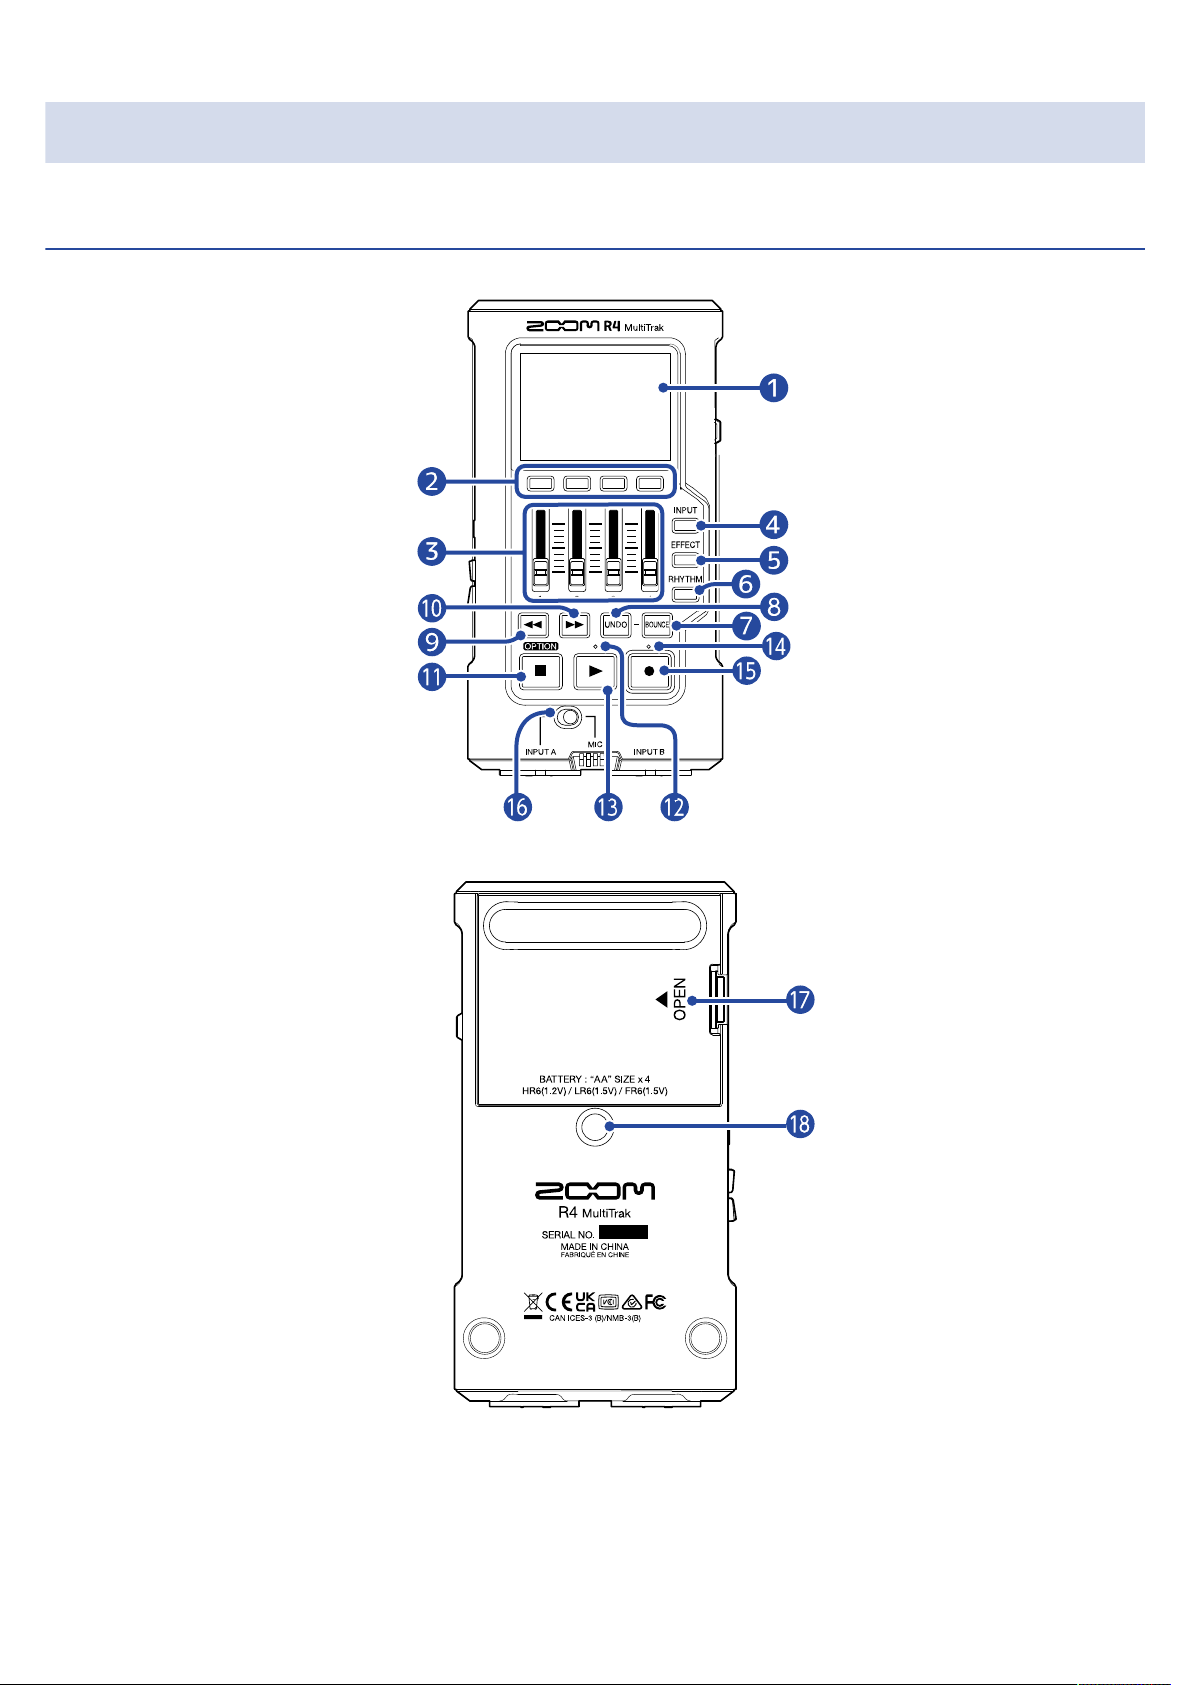
Functions of parts..................................................................................................................................................... 10
Overview of screens that appear........................................................................................................................... 15
Using menu screens................................................................................................................................................. 16
Recording process..................................................................................................................................................... 19
Making preparations.................................................................................................................................................22
Inserting microSD cards........................................................................................................................................... 22
Supplying power........................................................................................................................................................ 23
Connecting input equipment...................................................................................................................................24
Turning the power on/off........................................................................................................................................ 26
Setting up when first turned on............................................................................................................................. 27
Using the tuner..........................................................................................................................................................29
Tuner type options....................................................................................................................................................31
Setting the rhythm (pattern/click).......................................................................................................................... 32
Rhythm pattern types...............................................................................................................................................33
Recording.................................................................................................................................................................... 34
Opening projects....................................................................................................................................................... 34
Making input settings............................................................................................................................................... 36
Making track settings................................................................................................................................................40
Starting and stopping recording.............................................................................................................................42
Partially re-recording (punch-in recording)........................................................................................................... 43
Combining recorded tracks in a bounce track (bouncing)................................................................................. 45
Using effects...............................................................................................................................................................47
Using insert effects................................................................................................................................................... 48
Using send effects.....................................................................................................................................................51
Playing recordings..................................................................................................................................................... 53
Starting and stopping playback.............................................................................................................................. 53
Managing projects.....................................................................................................................................................54
Folder and file structure on microSD cards..........................................................................................................54
Opening the Project Menu...................................................................................................................................... 56
Changing project names.......................................................................................................................................... 57
Duplicating projects.................................................................................................................................................. 59
Deleting projects........................................................................................................................................................61
Assigning files to tracks............................................................................................................................................63
Exporting projects as audio files............................................................................................................................ 65
Deleting files...............................................................................................................................................................67
Using as an audio interface.................................................................................................................................... 68
4

For Windows...............................................................................................................................................................68
Connecting computers, smartphones and tablets.............................................................................................. 69
Disconnecting from computers, smartphones and tablets................................................................................73
Transferring files to computers and other devices............................................................................................. 74
Connecting computers, smartphones and tablets.............................................................................................. 74
Disconnecting from computers, smartphones and tablets................................................................................77
Managing microSD cards......................................................................................................................................... 78
Checking microSD card information...................................................................................................................... 78
Formatting microSD cards....................................................................................................................................... 80
Testing microSD cards..............................................................................................................................................82
Making various settings........................................................................................................................................... 84
Setting the date and time........................................................................................................................................84
Setting the type of batteries used..........................................................................................................................86
Setting display power saving...................................................................................................................................87
Setting the display brightness.................................................................................................................................88
Setting the function that automatically turns the power off............................................................................. 89
Restoring factory default settings.......................................................................................................................... 91
Managing the firmware............................................................................................................................................92
Checking the firmware versions............................................................................................................................. 92
Updating the firmware............................................................................................................................................. 93
Checking the latest information about the R4.....................................................................................................94
Appendix..................................................................................................................................................................... 95
Troubleshooting.........................................................................................................................................................95
Block diagram............................................................................................................................................................ 97
Specifications..............................................................................................................................................................98
5

R4 overview
The R4 is a compact 4-track MTR designed for musicians that enables musical ideas to be captured anytime
anywhere. The bounce function enables repeat recording to capture more than 4 tracks using the 2 XLR/TS
combo inputs, the built-in mic and the onboard effects. 32-bit float technology frees you from monitoring
levels when recording and allows you to focus on the creative aspects of music production.
Achieving high audio quality throughout recording and
editing
With the dual A/D converter circuits and support for 32-bit float WAV files, the R4 can maintain the highest
audio quality from recording to editing in a DAW or other software.
Recording
Dual A/D converter circuits enable recording sounds from quiet to loud without making gain adjustments.
Editing in DAWs and other software
Since 32-bit float WAV file format is used for recording, the same audio quality is retained during editing.
Dual A/D converter circuit overview
For each input circuit, the R4 has two A/D converters with different input gains. This design enables high-
quality audio recording without the need to adjust gain settings, a step that is normally indispensable.
Providing amazing dynamic range
By combining two A/D converters, a wide dynamic range not possible with a single A/D converter has been
realized.
6

Switching between two A/D converters
The R4 constantly monitors data from the two A/D converters, and automatically selects the one that
provides the best recording results.
7

32-bit float WAV file overview
32-bit float WAV files have the following advantages over conventional 16/24-bit WAV files. Thanks to these
advantages, the sound quality during recording can be retained when editing afterward using a DAW or
other software.
Resolution advantage
32-bit float WAV files have the advantage of being able to maintain high resolution even with quiet sounds.
As a result, quiet sounds can be made louder when editing after recording without degrading their quality.
■16/24-bit WAV
Volume raised
Resolution is low
8

■32-bit float WAV
Volume raised
Resolution is high
Clipping advantage
If a waveform sounds clipped when output from the R4 or in a DAW, it can be edited after recording to
lower its volume and restore an unclipped waveform because the data in the 32-bit float WAV file itself is
not clipped.
■16/24-bit WAV
Clipped recording
Volume lowered
Still clipped
■32-bit float WAV
Clipped recording
Volume lowered
Not clipped
9

Functions of parts
Front and back
■ Front
■ Back
❶Display
This shows various types of information.
10

❷TRACK/FUNCTION buttons
Use these to operate the icon shown at the bottom edge of the display.
❸Faders
Use these to adjust track signal levels.
❹INPUT button
This opens the INPUT SELECT Screen.
→ Selecting tracks for recording
❺EFFECT button
This opens the Effect Setting Screen.
→ Using effects
❻RHYTHM button
This opens the Rhythm Screen.
→ Setting the rhythm (pattern/click)
❼BOUNCE button
Use this to combine (bounce) 4 tracks that have already been recorded in the BOUNCE track and clear
tracks 1–4.
❽UNDO button
Restore recordings to the state just before the previous bounce.
❾Search backward button
Press briefly to move the playback position backward. Press continuously to move backward rapidly.
❿Search forward button
Press briefly to move the playback position forward. Press continuously to move forward rapidly.
⓫Stop button
Press this to stop recording and playback.
Press when stopped to move the playback position to the file beginning.
Press and hold when stopped to show the Option Menu at the bottom of the display. (The option menu
is shown while this is being pressed.)
⓬Play indicator
This lights during playback.
⓭Play button
This starts file playback.
⓮Recording indicator
This lights during recording.
⓯Record button
This starts recording.
11

⓰INPUT A/MIC (built-in) switch
Switched to INPUT A Sound from the device connected to the INPUT A jack will
be input.
Switched to MIC Sound from the built-in mic will be input.
⓱Battery cover
Open this when installing or removing AA batteries.
⓲Tripod mounting threads
This can be used to attach the R4 to a tripod, for example. The diameter is 1/4 inch.
12

Left, right and front sides
■ Right side
■ Left side
❶USB port (Type-C)
Connect this to a computer, smartphone or tablet to transfer files or use as a USB audio interface. This
supports operation on USB bus power.
❷microSD card slot
Insert a microSD card here.
❸POWER button
This turns the power on/off.
❹Headphone/line out jack
Connect headphones with a stereo mini plug here.
❺VOLUME buttons
Use these to adjust the volume output from the headphone/line out jack.
■ Front
❶INPUT A jack
Connect a mic or instrument here. This can be used with XLR and TS connectors.
13

NOTE
The polarity assignments of the INPUT A and INPUT B jacks are as follows.
❷Built-in mic
Use this to record acoustic instruments and vocals.
❸INPUT B jack
Connect a mic or instrument here. This can be used with XLR and TS connectors.
14

Overview of screens that appear
Home Screen
This screen appears whenever the unit is started (except the first time). This screen is shown during
ordinary playback and recording.
Option Menu Screen
Press and hold when the Home Screen is open to show this. When this is shown, press a button to
use the corresponding function.
When is released, this will stop being shown at the bottom of the display.
Settings Screen
Press on the Option Menu Screen to open this.
15

Using menu screens
Menu screen operation example
In the following example, we explain the beginning of the procedures to switch USB connection mode.
1. Press and hold when the Home Screen is open.
This opens the Option Menu.
2. While pressing , press the TRACK/FUNCTION button beneath .
This opens the Settings Menu.
HINT
In the rest of this manual, this operation is written as “While pressing , press .”
3. Use the TRACK/FUNCTION buttons beneath and to move the cursor to
“USB”.
16

HINT
In the rest of this manual, this operation is written as “Use and to select ‘USB’.”
4. Press the TRACK/FUNCTION button beneath .
This selects the item and switches the screen.
HINT
In the rest of this manual, this operation is written as “Use to confirm.”
5. Use and to select “Audio Interface” and use to confirm.
This selects the item and switches the screen.
17

Returning to the previous screen
1. Press the TRACK/FUNCTION button beneath .
This reopens the previous screen.
Returning to the Home Screen
1. Press the , or button.
This closes the menu and reopens the Home Screen.
18

Recording process
This chart illustrates a flow of operations from turning on the R4 to completing recording.
For detailed procedures, see the explanation pages for each operation.
• Inserting microSD
cards
• Supplying power
• Turning the power on
• Setting up when first
turned on
• Creating new projects
• Connecting input
equipment
• Selecting tracks for
recording
• Monitoring input/
playback sounds
• Using insert effects
• Setting the rhythm
(pattern/click)
19

• Starting and stopping
recording
• Starting and stopping
playback
Return to the step with
the above and
repeat the procedures to
record additional tracks as
necessary.
The following can also be done.
• Apply echo/reverb
• Adjust EQ
• Making track settings
To re-record just one part… • Partially re-recording
(punch-in recording)
Return to the step with
the above and
repeat the procedures to
record additional tracks as
necessary.
When tracks 1–4 are already used… • Combining recorded
tracks in a bounce track
(bouncing)
Return to the step with
the above and
repeat the procedures to
record additional tracks as
necessary.
• Exporting projects as
audio files
20
Other manuals for R4
1
Table of contents
Other Zoom Recording Equipment manuals

Zoom
Zoom AMS-44 User manual

Zoom
Zoom Studio 1202 User manual

Zoom
Zoom MicTrak M4 User manual

Zoom
Zoom 9150 User manual

Zoom
Zoom MRS-802 User manual

Zoom
Zoom R8 Interface User manual

Zoom
Zoom F8 Instructions and recipes

Zoom
Zoom Handy REcorder H1 User manual

Zoom
Zoom R16 User manual

Zoom
Zoom MRS-1044CD Owner's manual