1. Bring the sensor within direct range of
your Z-Wave gateway (hub).
2. Put the Z-Wave hub into exclusion
mode (not sure how to do that?
ask@getzooz.com).
3. Click the Z-Wave button with a
paperclip once (it will blink green).
4. Your hub will confirm exclusion and
the device will disappear from your
controller's device list.
If your primary controller is missing or
inoperable, you may need to reset the
device to factory settings. To complete
the reset process manually, remove the
back cover to trigger tamper switch.
Press and release the Z-Wave button
using a paperclip 10 TIMES quickly
(within 10 seconds).
NOTE: All previously recorded activity and custom
settings will be erased from the device’s memory.
The sensor’s wake-up interval is set to 12
hours by default to save battery life. You
can change the wake-up interval using
your controller’s advanced settings if
available.
During wake-up, the sensor receives
communication from the hub (setting
updates or network information). Long
wake-up interval will not affect how
oen the sensor reports motion and
other values to your gateway controller.
MANUAL WAKE-UP
Press and release the Z-Wave button
once to wake the device up. The LED
indicator will flash once (blue or orange).
You may need to wake the sensor up
manually IF:
1. It doesn’t fully configure during set-up
(values are not displayed or errors
pop up in your hub’s interface).
2. You change advanced settings for the
sensor and want them to update.
REMOVE THE SENSOR FROM YOUR HUB
FACTORY RESET
WAKE-UP MODE
ŸThis product should be installed
indoors upon completion of any
building renovations.
ŸPrior to installation, the device should
be stored in a dry, dust-and-mold-
proof place.
ŸDo not install the sensor in a place with
direct sun exposure, high temperature,
or humidity.
ŸKeep away from chemicals, water, and
dust.
ŸEnsure the device is never close to any
heat source or open flame to prevent
fire.
ŸEnsure the device is connected to an
electric power source that does not
exceed the maximum load power.
ŸNo part of the device may be replaced
or repaired by the user, except for the
battery.
WARNING
4-IN-1 SENSOR
ZSE40 700
Ÿ4 smart sensors in 1 compact device
Ÿ7 levels of motion sensitivity
Ÿ3 modes for motion / temperature LED
indicator notifications
ŸBuilt-in tamper protection
ŸLow battery alerts
ŸNew 700 series Z-Wave chip: faster
signal and longer battery life
ŸS2 Authenticated security with
encrypted communication
ŸSmartStart inclusion for easy and
secure pairing
ŸModel Number: ZSE40 700
ŸPower: 1 CR123A battery
ŸRange: Up to 200 feet line of sight
ŸMotion Detection: Up to 35 feet
ŸOperating Temperature: 5-104° F
ŸInstallation and Use: Indoor only
The LED indicator will blink red to signal
communication and green once the PIN is
entered, then turn off to confirm inclusion.
USER MANUAL FEATURES Z-WAVE CONTROL
ADD DEVICE to your hub
CLICK Z-WAVE BUTTON ONCE
INDOOR ONLY!
Initiate inclusion (pairing) in
the app (or web interface).
TROUBLESHOOTING
The sensor won’t add to your system?
Try this:
1. Initiate EXCLUSION and click the Z-
Wave button on the sensor once.
2. Make sure the battery cover is closed
tightly when adding the sensor.
3. Click the Z-Wave button once every
15 seconds for 2 minutes aer the
sensor joins the network to keep it
awake so it can fully configure.
4. Click the Z-Wave button on the sensor
6-7 times quickly when adding it.
5. Bring the sensor closer to your hub, it
may be out of range.
6. Double-check if the battery is
inserted correctly.
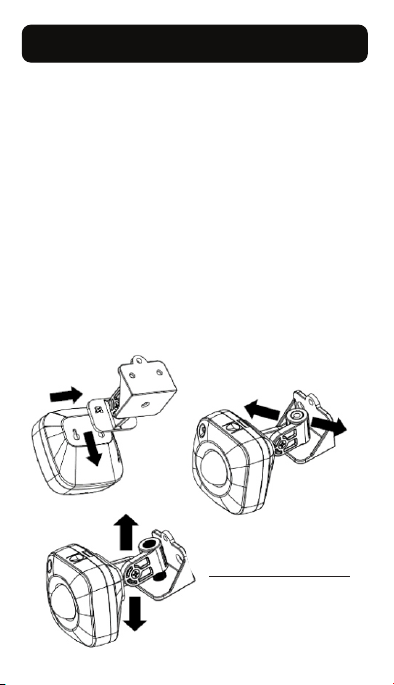
OPTION 1: MOUNTING BRACKET
Use the 2 screws included in the box to
fix the mounting bracket to flat surface
of your choice - at least 7 feet above the
ground for best results.
Once the bracket is securely installed,
carefully slide the 4-in-1 sensor onto the
bracket and position it by tilting it to
either side, upwards, or downwards -
just like in the images below.
OPTION 2: ADHESIVE TAPE
Use the supplied adhesive tape to fix the
sensor to a CLEAN flat surface of your
choice. Apply the tape as in the pictures
below.
SPECIFICATIONS
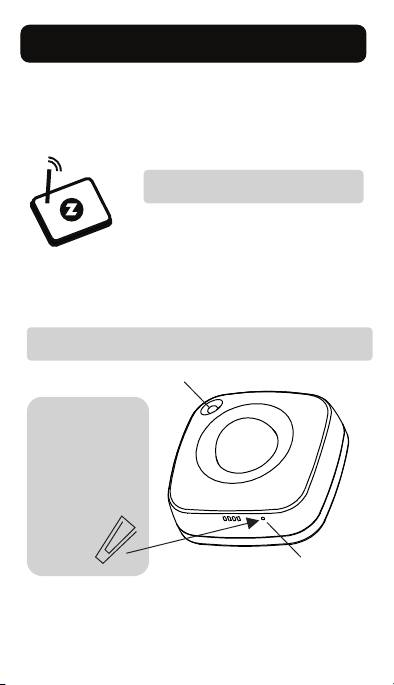
light sensor
Z-Wave button
Use a paperclip
to access the
Z-Wave button
for inclusion,
exclusion, reset,
and manual
wake-up.
1. Insert the battery.
2. Place the sensor near the location
where it will be mounted.
TECH SUPPORT
ask@getzooz.com
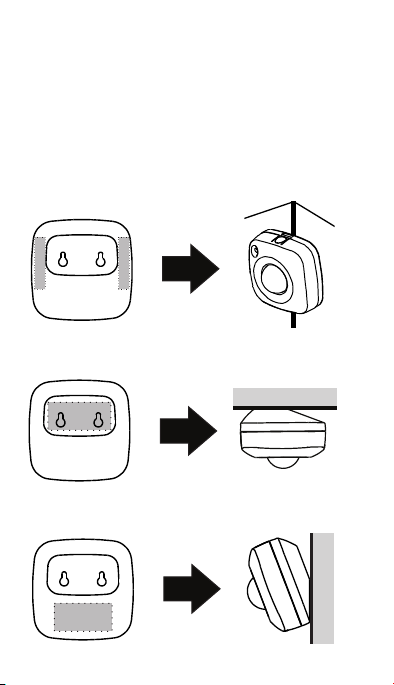
MOUNTING
CORNER
CEILING
WALL
This sensor may only be used and
installed indoors. Outdoor installation
will void its warranty.
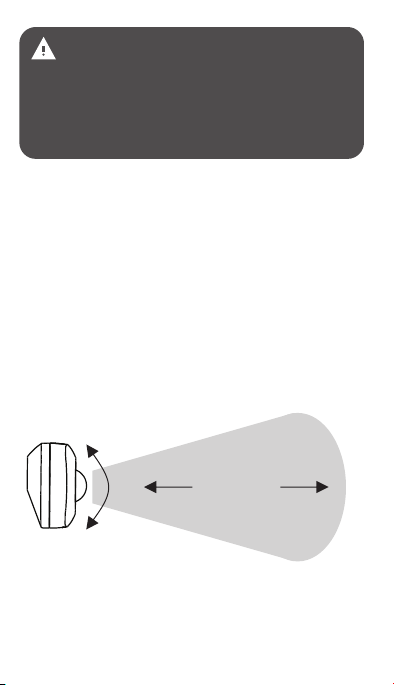
For best results, mount the sensor within
30 feet from the door and around 7 feet
from the ground. The 4-in-1 Sensor will
detect motion up to 40 feet depending
on mounting location and sensitivity
settings.
MOTION DETECTION RANGE
40 FEET
125º
125º
See Advanced Settings for ways to
optimize and customize motion
detection and activity reports.
www.getzooz.com
Flip the page for QR codes with
step-by-step instructions for
adding the sensor to SmartThings,
Vera, and Hubitat. F
Finalize inclusion at the sensor. Scan the QR
code or enter the PIN located under the back
cover if your hub supports SmartStart.