Zte A1 User manual

1
A1
LTE/WCDMA/GSM Mobile Phone
Quick Start Guide

2
LEGAL INFORMATION
Copyright
Copyright © 2015 ZTE CORPORATION
All rights reserved.
No part of this publication may be quoted, reproduced, translated
or used in any form or by any means, electronic or mechanical,
including photocopying and microfilm, without the prior written
permission of ZTE Corporation.
Notice
ZTE Corporation reserves the right to make modifications on print
errors or update specifications in this guide without prior notice.
We offer self-service for our smart terminal device users. Please
visit the ZTE official website (at www.zteusa.com) for more
information on self-service and supported product models.
Information on the website takes precedence.
Disclaimer
ZTE Corporation expressly disclaims any liability for faults and
damages caused by unauthorized modifications of the software.
Images and screenshots used in this manual may differ from the
actual product. Content in this manual may differ from the actual
product or software.
Trademarks
ZTE and the ZTE logos are trademarks of the ZTE Corporation.
Google and Android are trademarks of Google, Inc.

3
The Bluetooth®trademark and logos are owned by the Bluetooth
SIG, Inc. and any use of such trademarks by ZTE Corporation is
under license.
Manufactured under license from Dolby Laboratories. Dolby,
Dolby Audio, and the double-D symbol are trademarks of Dolby
Laboratories.
Qualcomm®Snapdragon™ processors are products of
Qualcomm Technologies, Inc.
Qualcomm and Snapdragon are trademarks of Qualcomm
Incorporated, registered in the United States and other countries.
Used with permission.
Other trademarks and trade names are the property of their
respective owners.
Version No.: R1.0
Edition Time: April 21, 2015

4
Getting to Know Your Phone
Earpiece
Front Camera
Auxiliary Microphone
Headset Jack
Proximity &
Light Sensor
Touch Screen
nano-SIM Card Tray
Volume Key
Home Key (with
Indicator Light)
Back Key
Recent Apps Key
Speaker
Main Microphone

5
Power Key
Press and hold to turn on or off airplane mode, restart, or
power off.
Press to turn off or on the screen display.
Home Key
Back Camera
Flash
Power Key
Camera Key
Charging/
micro-USB Jack

6
Touch to return to the home screen from any application or
screen.
Touch and hold to use Google search.
Recent Apps Key
Touch to see recently used apps.
Back Key
Touch to go to the previous screen.
Volume Key
Press or hold either end to turn the volume up or down.
Camera Key
When the camera app is launched, press or hold to take one
or multiple pictures.
In other screens, press twice to launch the camera and
automatically take a picture.
NOTE:
The positions of the Recent Apps Key and the Back Key are
interchangeable through Settings > Navigation key.
Installing the nano-SIM Card
1. Insert the tip of the tray eject tool into the hole next to the
nano-SIM card tray on the left side of the phone.

7
2. Pull out the nano-SIM card tray and place the nano-SIM card
on the tray, as shown. Then carefully install the tray back.
WARNING!
To avoid damage to the phone, do not use any other kind of
SIM card, or any non-standard nano-SIM card cut from a SIM
card. You can get a standard nano-SIM card from your
service provider.

8
Charging the Battery
WARNING!
Use only ZTE-approved chargers and cables. The use of
unapproved accessories could damage your phone or cause the
battery to explode.
CAUTION:
Do not change the built-in rechargeable battery in your phone by
yourself. The battery can only be changed by ZTE or ZTE
authorized service provider.
1. Connect the adapter to the charging jack. Ensure that the
adapter is inserted with the correct orientation. Do not force
the connector into the charging jack.
2. Connect the charger to a standard AC power outlet.
3. Disconnect the charger when the battery is fully charged.
NOTE:

9
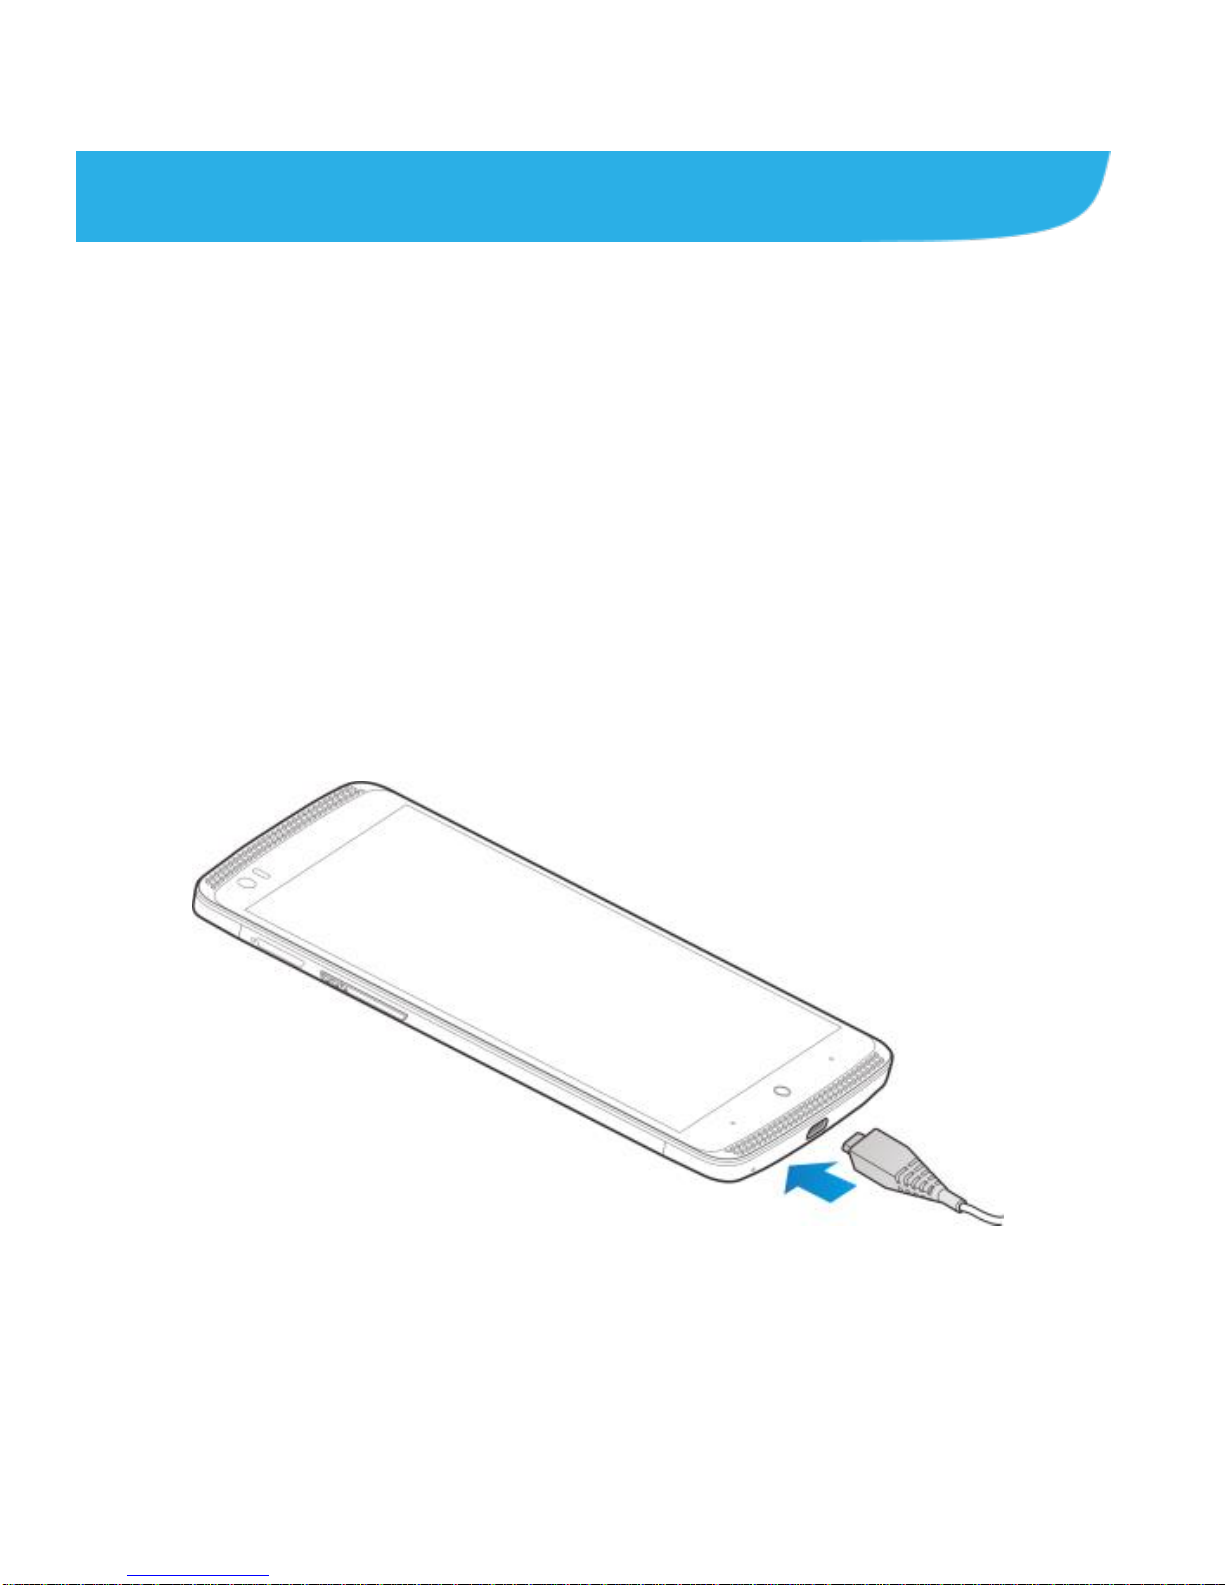
If the battery is extremely low, you may be unable to power on
the phone even when it is being charged. In this case, try again
after charging the phone for at least 20 minutes. Contact
customer service if you still cannot power on the phone after
prolonged charging.
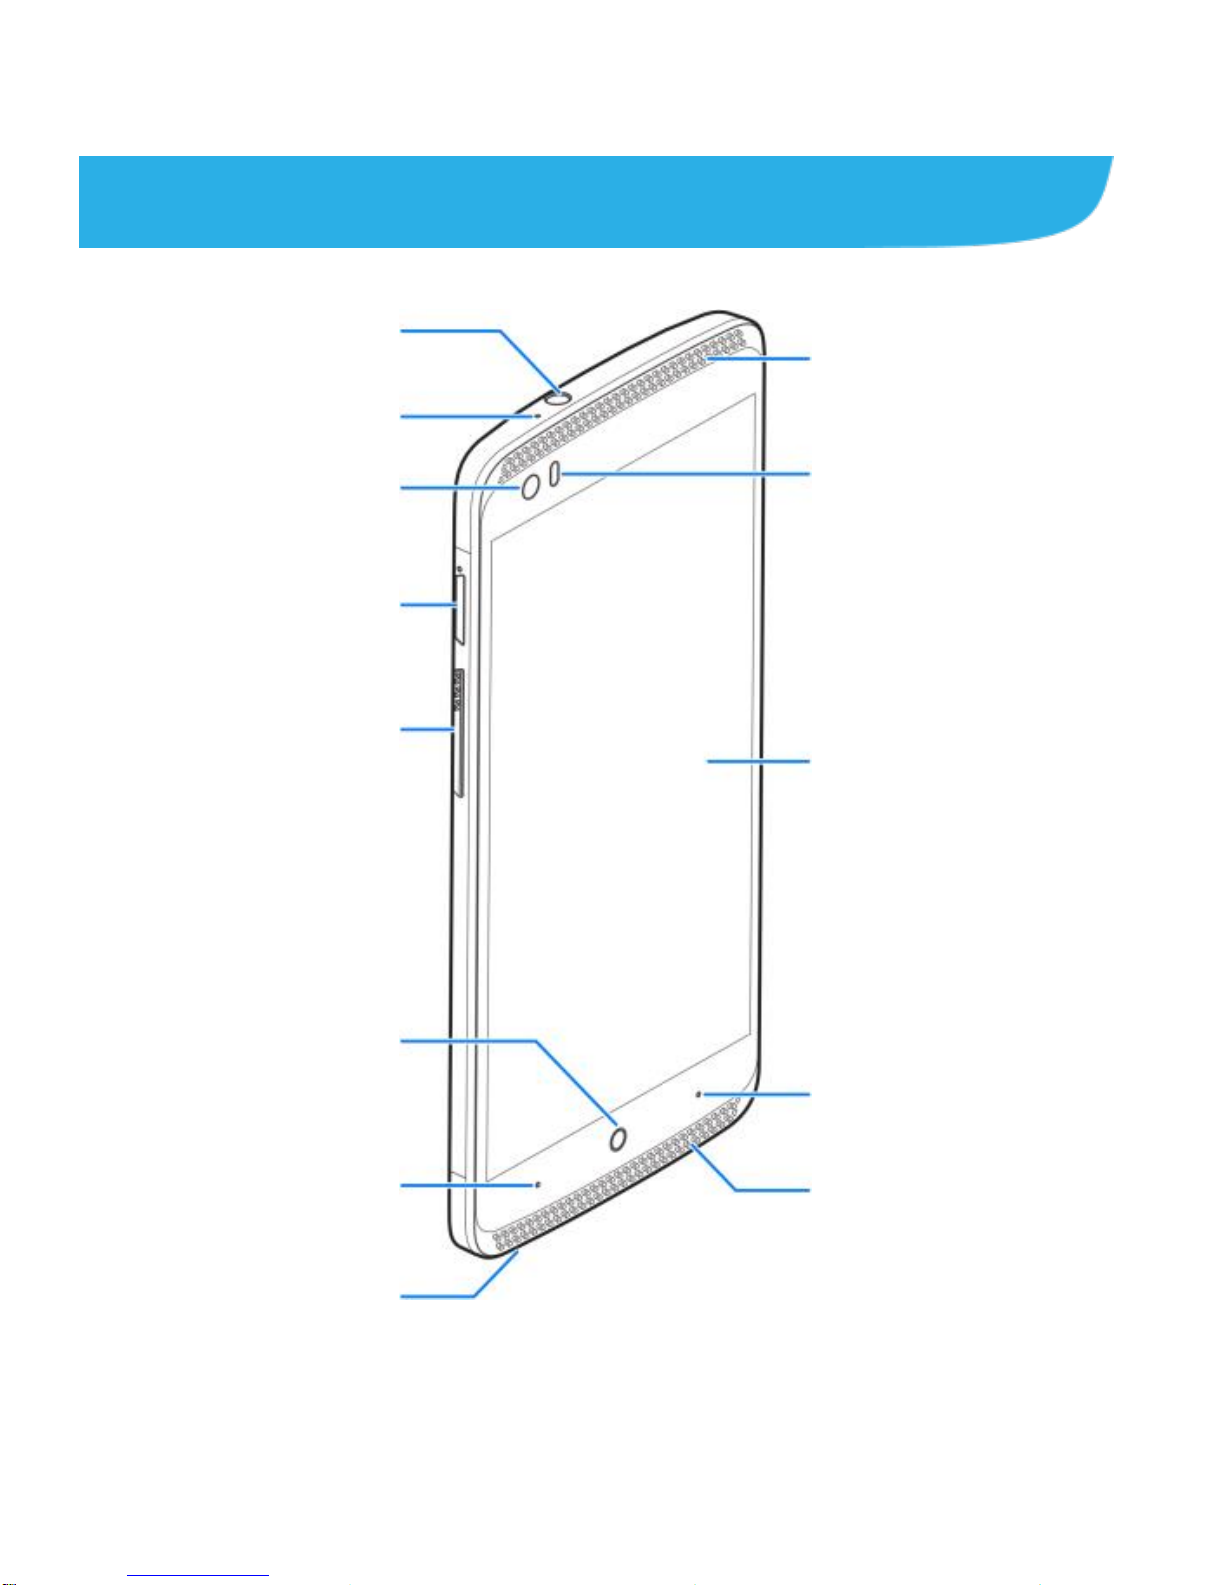
Touch Screen and Navigation
Your phone features a capacitive touch screen, so you can
gently touch, quickly swipe, or pinch with two fingers to
navigate.
Navigating Your Phone
Use your fingertip to lightly touch the screen.
Use quick flicks of your finger on the touch screen to swipe up,
down, left, and right.
Spread two fingers apart or pinch them together on the
screen to zoom in or out on a web page or a gallery image.
The status bar at the top of the screen provides quick access
to alerts including new messages, emails, missed calls, and
more. Swipe down on the bar to see more details.
To return to the previous screen, touch the Back Key.
Touch the Home Key to return to the main home screen.
Touch and hold the key to access Google search.
Touch the Recent Apps Key to view opened web pages in
Chrome and recently opened apps.
Touch to access applications on your phone.

10
Camera and Video Recording
Take pictures and record videos right from your phone with the
camera and camcorder and then share them with friends and
family.

11
Take a Picture
1. From the home screen, touch .
2. Touch icons on the left side (shown on the picture) to
adjust flash, HDR, countdown, and other settings. Zoom
in and out by pressing the Volume Key or
pinching/spreading two fingers on the screen.
3. Touch to take a photo.

12
Record a Video
1. From the home screen, touch .
2. Touch to start recording a video clip.
3. Touch to stop recording.
Share a Picture or Video
1. From the home screen, touch .
2. Touch an album and then touch a photo or video. Touch
and select an option for sharing.
Contacts and Phone Calls
Keep the contact information of your favorite people in the
address book. Call friends and family and check voicemail in

13
just a few simple steps.
Import Contacts From the nano-SIM
Card
1. From the home screen, touch .
2. Touch > Import/Export > Manage SIM card contacts.
3. If you have added contact accounts other than the phone,
select an account in which to save the contacts.
4. Touch > Import SIM Contacts.
5. Check the contacts you need and then touch .
Edit a Contact
1. From the home screen, touch .
2. Touch a contact name and then touch .
3. Change details as needed and touch .
Make a Call
1. From the home screen, touch .
2. Touch the search box at the top to search for a contact or
phone number, or touch and enter a phone number or

14
a contact name.
3. Touch the contact name or touch to place the call.
Check Voicemail
1. From the home screen, touch .
2. Touch .
3. Touch and hold the 1 Key.
4. Follow voice prompts to listen to messages.
Text and Multimedia Messaging
Send text or multimedia messages to communicate privately
and quickly.

15
Send a Text Message
1. From the home screen, touch .
2. Touch to start a new text message.
3. In the To field, enter a number or a contact name, or touch
to select recipients from your contacts or call log.
4. Touch the Type message field and enter your message.
5. Touch to send the message.

16
Send a Multimedia Message
1. Follow steps 1-4 above.
2. Touch .
3. Attach a file or a slideshow to message.
4. Touch or SEND to send the message.
WARNING!
Please don’t text and drive.
Email
Access your Gmail™, corporate email, and personal email

17
wherever you are!
Email Setup
1. From the home screen, touch > Email.
2. Select an email server and then enter your email address
and password and touch Next.
3. Wait for the phone to connect and complete the setup
automatically. Then set the email checking frequency and
download options and touch Next.
4. Name the account, enter your name as it will appear on
outgoing messages, and touch Next. Your email will begin
to synchronize with your phone.

18
Create and Send an Email
1. From your email inbox, touch .
2. Enter a contact name or email address in the ‘To’ field.
You can also touch to select recipients from your
contacts.
3. Enter the email subject and compose the email text. To
attach files to the email, touch > Attach file, and make
your selection.
4. Touch at the top right of the screen to send the
message.
NOTE:
To set up corporate email, contact your IT administrator.

19
Network Indicators
Your 4G LTE mobile phone will indicate which type of networks
you are connected to. A network indicator does not necessarily
mean that you will experience any particular upload or
download data speeds.
4G LTE: Connected to a 4G LTE network.
4G/3G: Connected to an HSPA+/3G network.
Edge: Connected to an EDGE/2G network.
NOTE:
Actual data upload and download speeds depend on various
factors, including the device, network utilization, file
characteristics, terrain, etc.
Bluetooth®and Wi-Fi®
Pair with other Bluetooth devices or connect to a Wi-Fi network.

20
Connect to a Bluetooth Headset
1. From the home screen, touch > Settings >
Bluetooth.
2. Touch to turn Bluetooth on.
3. Touch > Refresh.
4. Touch the name of the device to pair and connect with it.
Other manuals for A1
1
Table of contents
Other Zte Cell Phone manuals