manuals.online logo
Brands
  1. Home
  2. •
  3. Brands
  4. •
  5. Zte
  6. •
  7. Cell Phone
  8. •
  9. Zte BLADEV 8 User manual

Zte BLADEV 8 User manual

Other Zte Cell Phone manuals

Zte AWE User manual

Zte

Zte AWE User manual

Zte Telstra Qwerty-Touch User manual

Zte

Zte Telstra Qwerty-Touch User manual

Zte Blade L5 Installation and operation manual

Zte

Zte Blade L5 Installation and operation manual

Zte Boost MAX User manual

Zte

Zte Boost MAX User manual

Zte A261 User manual

Zte

Zte A261 User manual

Zte Blade A72s User manual

Zte

Zte Blade A72s User manual

Zte WARP 7 User manual

Zte

Zte WARP 7 User manual

Zte Z233 User manual

Zte

Zte Z233 User manual

Zte N762 User manual

Zte

Zte N762 User manual

Zte 8030 User manual

Zte

Zte 8030 User manual

Zte Blade A506 User manual

Zte

Zte Blade A506 User manual

Zte ZTEA7040C User manual

Zte

Zte ZTEA7040C User manual

Zte V9820 User manual

Zte

Zte V9820 User manual

Zte WCDMA User manual

Zte

Zte WCDMA User manual

Zte Switch X1 User manual

Zte

Zte Switch X1 User manual

Zte Vodafone 353 User manual

Zte

Zte Vodafone 353 User manual

Zte V865M User manual

Zte

Zte V865M User manual

Zte BLADE A452 User manual

Zte

Zte BLADE A452 User manual

Zte R259 User manual

Zte

Zte R259 User manual

Zte V969 DUAL SIM User manual

Zte

Zte V969 DUAL SIM User manual

Zte V8110 User manual

Zte

Zte V8110 User manual

Zte s188 User manual

Zte

Zte s188 User manual

Zte AT Z998 User manual

Zte

Zte AT Z998 User manual

Zte Blade V50 Design 5G User manual

Zte

Zte Blade V50 Design 5G User manual

Popular Cell Phone manuals by other brands

Nokia 6700 classic user guide

Nokia

Nokia 6700 classic user guide

LG L34C user guide

LG

LG L34C user guide

Ericsson T60d manual

Ericsson

Ericsson T60d manual

Sony Xperia Z1 Compact Startup guide

Sony

Sony Xperia Z1 Compact Startup guide

AT AT-Q5 user manual

AT

AT AT-Q5 user manual

Vingtor ACM-M-A-V2 Installation/configuration

Vingtor

Vingtor ACM-M-A-V2 Installation/configuration

Olitech EasyFlip 2 Quick setup guide

Olitech

Olitech EasyFlip 2 Quick setup guide

Alcatel IDEAL manual

Alcatel

Alcatel IDEAL manual

switel M222 user manual

switel

switel M222 user manual

LG LG-P503 user guide

LG

LG LG-P503 user guide

LG F2410 user guide

LG

LG F2410 user guide

Argom E500 manual

Argom

Argom E500 manual

Hisense U30 user manual

Hisense

Hisense U30 user manual

Argom Tech E401 user manual

Argom Tech

Argom Tech E401 user manual

Nokia 3595 - Cell Phone - GSM Manual Del Usuario

Nokia

Nokia 3595 - Cell Phone - GSM Manual Del Usuario

Nokia iSkoot 6600 user guide

Nokia

Nokia iSkoot 6600 user guide

Nokia RM-14 DISASSEMBLY AND REASSEMBLY INSTRUCTIONS

Nokia

Nokia RM-14 DISASSEMBLY AND REASSEMBLY INSTRUCTIONS

honor 8X user guide

honor

honor 8X user guide

manuals.online logo
manuals.online logoBrands
  • About & Mission
  • Contact us
  • Privacy Policy
  • Terms and Conditions

Copyright 2025 Manuals.Online. All Rights Reserved.

ZTE
Us
e
1
BLAD
E
e
r Manu
a
E
V8
a
l
A
bout
T
Thank you
your devic
e
keep it for
f
Copyrigh
Copyright
A
ll rights
r
No part of
t
or used in
a
including p
h
permission
Notice
ZTE Corpo
errors or u
p
This manu
a
the accura
c
and recom
m
warranty o
f
For Your S
a
We offer s
e
visit the ZT
information
Informatio
n
T
his Manual
for choosing thi
s
e
in its best cond
f
uture reference.
t
© 2017 ZTE C
O
r
eserved.
t
his publication
m
a
ny form or by a
n
h
otocopying and
of ZTE Corpora
t
ration reserves t
h
p
date specificati
o
a
l has been desi
g
c
y of its content.
m
endations cont
f
any kind, either
a
fety to be sure
t
e
lf-service for ou
r
E official websit
e
on self-service
a
n
on the website
t
2
s
ZTE mobile de
v
ition, please rea
d
O
RPORATION
m
ay be quoted, r
e
n
y means, elect
r
microfilm, with
o
t
ion.
h
e right to make
o
ns in this guide
g
ned with the ut
m
However, all st
a
ained therein do
expressed or i
m
t
o use your phon
r
smart terminal
d
e
(at www.ztede
v
a
nd supported p
r
t
akes preceden
c
v
ice. In order to
k
d
this manual an
e
produced, tran
s
r
onic or mechani
c
o
ut the prior writt
e
modifications o
n
without prior not
m
ost care to ens
a
tements, inform
a
not constitute a
m
plied. Please re
f
e properly and s
a
d
evice users. Pl
e
v
ice.com) for mo
r
r
oduct models.
c
e.
k
eep
d
s
lated
c
al,
e
n
n
print
ice.
ure
a
tion
f
er to
a
fely.
e
ase
r
e
3
Disclaimer
ZTE Corporation expressly disclaims any liability for faults and
damages caused by unauthorized modifications of the software.
Images and screenshots used in this manual may differ from the
actual product. Content in this manual may differ from the actual
product or software.
Trademarks
ZTE and the ZTE logos are trademarks of the ZTE Corporation.
Google and Android are trademarks of Google, Inc.
The Bluetooth®trademark and logos are owned by the Bluetooth
SIG, Inc. and any use of such trademarks by ZTE Corporation is
under license.
microSDXC logo is a trademark of SD-3C, LLC.
Qualcomm®Snapdragon™ processors are products of
Qualcomm Technologies, Inc.
Qualcomm and Snapdragon are trademarks of Qualcomm
Incorporated, registered in the United States and other countries.
Used with permission.
Manufactured under license from Dolby Laboratories. Dolby,
Dolby Audio, and the double-D symbol are trademarks of Dolby
Laboratories.
4
Manufactured under license from Dolby Laboratories. Dolby,
Dolby Atmos, and the double-D symbol are trademarks of Dolby
Laboratories.
Other trademarks and trade names are the property of their
respective owners.
Version No.: R1.0
Edition Time: January 3, 2017
Cont
e
Getting
Getti
Kno
w
Insta
Cha
r
Pow
e
Setti
n
Lock
Usin
g
Getti
Person
a
Cha
n
Adju
s
Swit
c
Appl
y
Cha
n
Setti
n
Prot
e
Usin
g
Knowi
n
Moni
Man
a
Conne
c
e
nts
Started.......
.
ng to Know You
r
w
ing the Keys....
lling the nano-S
I
r
ging the Battery
e
ring On/Off......
n
g Up for the Fir
s
ing/Unlocking th
e
g
the Touch Scr
e
ng to Know the
H
a
lizing .........
.
n
ging Ringtone
a
s
ting Volume.....
c
hing to Silent o
r
y
ing New Wallp
a
n
ging Screen Bri
g
n
g the Home Sc
r
e
cting Your Pho
n
g
Your Fingerpri
n
n
g the Basic
s
toring the Phon
e
a
ging Notificatio
n
c
ting to Netw
5
.
.....................
r
Phone..............
..........................
M Card and mic
..........................
..........................
s
t Time..............
e
Screen and K
e
e
en.....................
H
ome Screen ....
.
.....................
a
nd Notification
S
..........................
r
Vibration Mode
a
pers..................
g
htness.............
r
een Effect.........
n
e With Screen
L
n
t.......................
s
.....................
e
Status .............
n
s ......................
orks and De
v
.....................
.
.........................
.
.........................
.
roSDXC card....
.
.........................
.
.........................
.
.........................
.
e
ys ....................
.
.........................
.
.........................
.
.....................
.
S
ound................
.
.........................
.
.........................
.
.........................
.
.........................
.
.........................
.
L
ocks.................
.
.........................
.
.....................
.
.........................
.
.........................
.
v
ices.............
.
.
......8

.
........8

.
......10

.
......10

.
......12

.
......14

.
......14

.
......14

.
......16

.
......17

.
....18

.
......18

.
......18

.
......19

.
......19

.
......20

.
......20

.
......20

.
......21

.
....23

.
......23

.
......24

.
....25

6
Connecting to Mobile Networks.........................................25
Connecting to Wi-Fi®.........................................................27
Using Wi-Fi Direct®............................................................28
Connecting to Bluetooth®Devices.....................................29
Sharing Your Mobile Data Connection...............................30
Phone Calls ............................................................33
Placing and Ending Calls...................................................33
Answering or Rejecting Calls.............................................34
Checking Voicemail...........................................................35
Contacts .................................................................36
Adding a New Contact.......................................................36
Working With Favorite Contacts........................................37
Email .......................................................................38
Setting up the first email account ......................................38
Writing and sending an email ............................................39
Reply to or forward an email..............................................39
Changing general email settings.......................................40
Messaging ..............................................................41
Opening the Messaging Screen........................................41
Sending a Message...........................................................41
Replying to a Message......................................................42
Changing Message Settings..............................................42
Camera....................................................................43
Capturing a Photo .............................................................43
7
Recording a Video.............................................................45
Using Other Camera Modes..............................................46
Using Dual Camera Mode .................................................47
Troubleshooting.....................................................48
For Your Safety ......................................................52
General Safety...................................................................52
FCC RF Exposure Information (SAR)................................53
FCC Regulations ...............................................................54
Distraction..........................................................................56
Product Handling...............................................................56
Electrical Safety.................................................................61
Radio Frequency Interference ...........................................62
Explosive Environments ....................................................64
Gettin
Gettin
g
Touch
B
a
Pro
x
light
Fro
Indica
t
g Starte
d
g
to Know
screen
a
ck ke
y
x
imity &
sensor
nt flash
t
or light
8
d
Your Pho
n
n
e
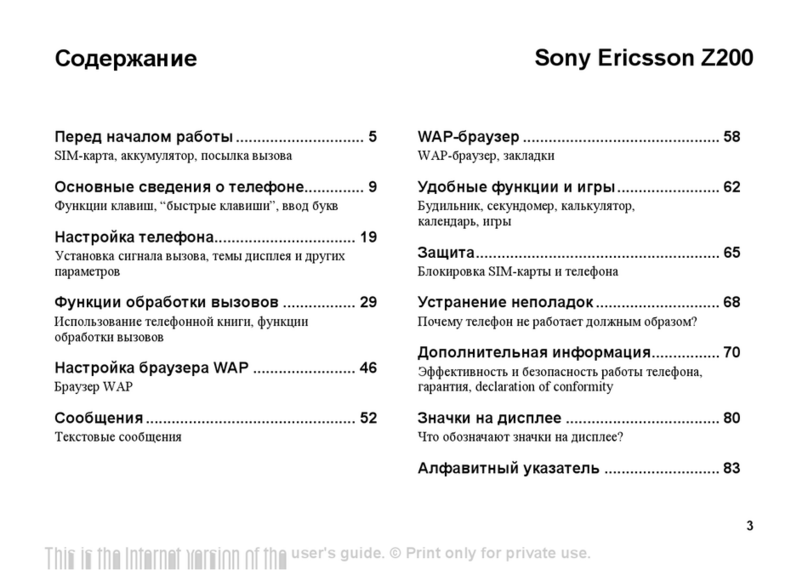
Earpiece
Home key/
Fingerprint s
e
Front camera
Volume keys
Power key
Recent apps
k
e
nsor
k
ey
9
Dual-lens camera
Headset jack
Flash
Charging/
micro-USB Jack
nano-SIM/
microSDXC
card tray
Speaker
Dual-lens camera
Knowi
n
Key
Power key
Home key
Recent apps
Back key
Volume keys
NOTE
The positio
interchang
e
keys
.
Installi
micro
S
Your phon
e
card (optio
n
A microSD
X
is turned o
n
removing it
n
g the Ke
y
Function

Press a
n
airplane

Press t
o

Press t
o
applicat
i

Used a
s
key Touch to se
e
Touch to go
Press or hol
d
:
ns of the
Recen
t
e
able through
S
e
ng the na
n
S
DXC card
e
supports one n
n
al, not included
)
X
C card can be
i
n
. You need to u
.
10
y
s
n
d hold to select p
h
mode, power off o
o
turn off or on the
s
o
return to the hom
e
on or screen.
s
the fingerprint se
n
e
the recently used
to the previous sc
r
d
either end to turn
t
apps
key and
t
e
ttings > Featur
e
n
o-SIM Ca
ano-SIM card a
n
)
.
i
nstalled or rem
o
n
mount the micr
o
h
one modes, turn o
r restart your phon
e
s
creen display.
e
screen from any
n
sor.
apps.
r
een.
the volume up or
d
t
he
Back
key ar
e
e
d > Navigatio
n
rd and
n
d one microSD
X
o
ved while the p
h
o
SDXC card be
f
n/off
e
.
d
own.
e
n
X
C
h
one
f
ore
WA
R
To avoid
cards, or
You can
g
1. Insert
nano-
2. Place
gold-
c
tray b
a
R
NING!
d
amage to the p
any non-standa
r
g
et a standard n
a
the tip of the tra
SIM card tray o
n
the nano-SIM/
m
c
olored contacts
a
ck into place.
11
hone, do not us
e
r
d nano-SIM car
d
a
no-SIM card fro
m
y eject tool into
t
n
the left side of
t
m
icroSDXC card
o
facing down. Th
e
e
any other kind
d
cut from a SIM
m
your service p
r
t
he hole next to t
t
he phone.
o
n the tray with
t
e
n carefully slid
e
of SIM
card.
r
ovider.
he
t
he
e
the
Chargi
Your phon
e
turn on, fin
d
charge the
If the batte
r
screen. As
exact batte
Screen an
d
WAR
N
Use only Z
T
unapprove
d
battery to
e
CAU
T
Do not cha
n
yourself. T
h
authorized
nano
-
car
d
microSDXC
c
ng the Ba
t
e
’s battery shoul
d
d
a signal, and
m
battery as soon
r
y is low, there
w
you charge you
r
ry level on the lo
d
Keys
.
N
ING!
T
E-approved ch
a
d
accessories c
o
e
xplode.
T
ION:
n
ge the built-in r
e
h
e battery can o
n
service provider
-
SIM
d
slot
c
ard
slot
12
t
tery
d
have enough
p
m
ake a few calls.
as possible.
w
ill be a pop-up
m
r
phone, the scr
e
ck screen. See
L
a
rgers and cabl
e
o
uld damage you
e
chargeable bat
t
n
ly be changed
b
.
p
ower for the ph
o
You should full
y
m
essage on the
e
en will tell you t
h
L
ocking/Unlocki
n
e
s. The use of
r phone or caus
e
t
ery in your pho
n
b
y ZTE or ZTE
o
ne to
y
h
e
n
g the
e
the
n
e by
1. Conn
e
adapt
e
the c
o
2. Conn
e
phon
e
appe
a
3. Disco
NO
T
If the bat
t
the phon
e
e
ct the adapter t
o
e
r is inserted wit
o
nnector into the
e
ct the charger t
o
e
is on, you’ll se
e
a
r on the status
b
n
nect the charg
e
T
E:
t
ery is extremely
e
even when it is
13
o
the charging j
a
h the correct ori
e
charging jack.
o
a standard AC
e
a charging icon
b
ar.
e
r when the batt
e
low, you may b
e
being charged.
a
ck. Ensure that
t
e
ntation. Do not
f
power outlet. If
t
, such as or
e
ry is fully charg
e
e
unable to pow
e
In this case, try
a
t
he
f
orce
t
he ,
e
d.
e
r on
a
gain
after charg
i
customer s
prolonged
c
Power
i

Press
a

To pow
e
options
NOTE
If the phon
e
and hold th
phone.
Settin
g
When you
f
reset it to f
a
using it.
Touch the l
and then t
o
up Wi-Fi,
G
Lockin
Keys
Your phon
e
the phone i
i
ng the phone fo
r
ervice if you still
c
harging.
i
ng On/Of
f
a
nd hold the
Po
w
e
r off, press and
menu. Touch
S
h
:
e
freezes or tak
e
e
Power
key for
g
Up for th
e
f
irst power on y
o
a
ctory settings,
y
anguage field to
o
uch
GET SATR
T
G
oogle services,
a
g/Unlocki
n
e
allows you to q
nto sleep mode
)
14
r
at least 20 min
u
cannot power o
n
f
w
er
key to turn o
n
hold the
Power
h
ut down
.
e
s too long to re
s
over 10 second
s
e
First Ti
m
o
ur phone after y
o
y
ou need to do s
o
select the lang
u
T
ED
. Then follo
w
a
dd fingerprint a
n
g the Sc
r
uickly lock the s
c
)
when not in us
e
u
tes. Contact
n
the phone afte
r
n
your phone.
key to open the
s
pond, you can p
s
to force restart
m
e
o
u purchase it o
r
o
me settings be
f
u
age you want to
w
the prompts to
nd other options
r
een and
c
reen and keys
(
e
and to turn the
r
ress
the
r
f
ore
use
set
.
(
put
screen b
a
To lock t
To quickl
y
key.
NO
T
To save
b
screen a
ft
receive
m
To unloc
1. Press
2. Drag
- or -
Youc
a
appli
c
NO
T

You c
when

If you
for yo
Lock
s
PIN/p
a
a
ck on and unlo
c
he screen and
k
y
turn the scree
n
T
E:
b
attery power, th
t
er some time o
f
m
essages and ca
k the screen a
n
the
Power
key
t
towards
a
n drag to
w
c
ation shortcuts.
T
ES:
an pull out the s
t
the screen is tu
r
have set an unl
o
u
r phone (see P
r
s
), you’ll need to
d
a
ssword to unlo
c
15
c
k it when you n
e
k
eys:
n
off and lock the
e phone automa
inactivity. You
w
lls while the pho
n
d keys:
t
o turn the scree
.
w
ards any direct
t
arts on the left f
o
r
ned on.
o
ck pattern, PIN
r
otecting Your P
h
d
raw the pattern
c
k your screen.
e
ed it.
keys, press the
tically turns off t
h
w
ill still be able t
o
ne screen is off.
n on.
ion to access th
e
o
r a quick view o
r
or Complex pas
s
h
one With Scre
e
or enter the
Power
h
e
o
e
r
action
s
word
e
n
16
Using the Touch Screen
Your phone’s touch screen lets you control actions through a
variety of touch gestures.
Touch
When you want to type using the onscreen keyboard, select
onscreen items such as application and settings icons, or
press onscreen buttons, simply touch them with your finger.
Touch and Hold
To open the available options for an item (for example, a
message or link in a web page), touch and hold the item.
Swipe or Slide
To swipe or slide means to quickly drag your finger vertically
or horizontally across the screen.
Drag
To drag, press and hold your finger with some pressure
before you start to move your finger. While dragging, do not
release your finger until you have reached the target position.
Pinch
In some apps (such as Maps, Browser, and Gallery), you can
zoom in and out by placing two fingers on the screen at once
and pinching them together (to zoom out) or spreading them
apart (to zoom in).
Rotate the screen
For most screens, you can automatically change the screen
orientation from portrait to landscape by turning the phone
sideways.
17
Getting to Know the Home Screen
The home screen is the starting point for your phone’s
applications, functions, and menus. You can customize your
home screen by adding folders, widgets, and more.
Extended Home Screens
Your home screen is extendable, providing more space for
shortcuts, folders, widgets, and more. Simply swipe left or right
on the screen to see the extended panels.
Status bar
Folder
Application icons
Primary icons
Wallpaper
Widget
Perso
Chang
i
Sound
You can cu
default noti
f
1. Press t
h
Sound
.
2. Touch
R
3. Touch
R
4. Scroll t
h
want to
5. Touch
O
A
djust
i
1. Press t
h
Sound
.
2. Drag th
e
Alarm
v
each ty
p
NOTE
You can ad
use by pre
s
press the
V
nalizing
i
ng Ringt
o
stomize the def
a
f
ication sound.
h
e
Home
key, sl
i
R
ingtones
.
R
ingtones/Mes
s
h
rough the ringt
o
use.
O
K
.
i
ng Volum
h
e
Home
key, sli
e
sliders below
N
v
olume
, and
Ri
n
p
e of audio.
:
just the media v
o
s
sing the
V
olum
e
V
olume
key to a
d
18
o
ne and N
o
a
ult incoming cal
l
i
de on the scree
n
s
age tone/Notifi
o
ne list and sele
c
e
de on the scree
n
N
otification vol
u
n
g volume
to ad
j
o
lume when a m
e
key. If no medi
a
d
just ringtone vol
o
tification
l
ringtone and th
e
n
and touch
Sett
cation tone
.
c
t the ringtone y
o
n
and touch
Sett
u
me
,
Media vol
u
j
ust the volume
f
edia application
a
application is a
ume (or the ear
p
e
ings >
o
u
ings >
u
me
,
f
or
is in
ctive,
p
iece
19
volume during a call).
Switching to Silent or Vibration Mode
You can set the phone to silent or vibration mode by using one of
the following methods.
Swipe down from the top of the screen to open the notification
panel and drag the panel downwards. Touch Normal or
Vibrate to switch the phone to vibration or silent mode.
Press the Home key, slide on the screen and touch Settings >
Sound > Sound mode and select Vibrate or Silent to switch
to vibration or silent mode.
Press and hold the Power key and touch Ring or Mute to
switch to silent or vibration mode.
Applying New Wallpapers
You can set the wallpaper for the home screen and lock screen.
1. Press the Home key, slide on the screen and touch Settings >
Themes & wallpapers > Wallpapers.
2. Touch Home screen wallpaper or Lock screen wallpaper
and select a built-in static wallpaper, or touch Gallery to
select a picture, crop it, and use it as the wallpaper.
NOTE:
Other way to set the home screen wallpaper and the lock screen
wallpaper:
Touch and hold an empty area of the home screen and select
Customize launcher > Wallpaper tab. Then select a built-in
image or a
n
to take a p
h
Chang
i
1. Press t
h
Displa
y
2. Drag th
e
NOTE
With the pr
o
adjust the
s
brightnes
s
feature on
o
Settin
g
Set the ani
m
on the ho
m
1. Touch
a
2. In the
w
launch
e
3. Pick an
Touch
o
Protec
t
Locks
You can pr
o
n
image from yo
u
h
oto as the wall
p
i
ng Scree
n
h
e
Home
key, sl
i
y
> Brightness l
e
slider to manu
a
:
o
ximity and light
s
creen brightnes
s
s
box in the
Brig
o
r off.
g
the Hom
e
m
ation effect th
a
m
e screen betwe
e
a
nd hold an emp
w
indow that app
e
e
r > Effect
.
effect and the p
o
ther effects unti
t
ing Your
P
o
tect your phon
e
20
u
r gallery. You c
a
p
aper.
n
Brightn
e
i
de on the scree
n
evel
.
a
lly adjust the s
c
sensor, your ph
o
s
for available li
g
h
tness level
sc
r
e
Screen
E
a
t appears when
e
n different pane
ty area of the h
o
e
ars at the botto
m
hone will demon
l you find the fa
v
P
hone Wi
t
e
by creating a s
c
a
n also touch Ca
m
e
ss
n
and touch Sett
c
reen brightness
.
o
ne can automa
t
g
ht. Check
A
uto
m
r
een to turn the
E
ffect
you swipe left o
r
ls.
o
me screen.
m
, touch Custo
m
strate how it wo
r
v
orite one.
t
h Screen
c
reen lock. Whe
n
m
era
ings >
.
t
ically
m
atic
r
right
m
ize
r
ks.
n
it is
21
enabled, you need to swipe the screen, draw a pattern or enter a
numeric PIN or a password to unlock the phone’s screen and
keys.
1. Press the Home key, slide on the screen and touch Settings >
Security > Screen lock.
2. Touch Swipe, Pattern, PIN or Complex Password.
NOTE:
Remember the pattern, PIN, or password you set. Otherwise, you
will have to upgrade the phone software to use the phone.
Using Your Fingerprint
With the fingerprint sensor on the Home key of your phone, you
can register up to 5 fingerprints and use them to unlock the
phone or open a bound app.
NOTE:
The fingerprint feature is only usable when the screen lock
(Pattern, PIN number or Complex password) is enabled. When
the screen lock is reset to Swipe, all registered fingerprints are
erased.
Register a Fingerprint
1. Press the Home key, slide on the screen and touch Settings >
Security > Fingerprint.
2. Select your backup screen lock method and set whether to
use it to further protect your phone .
3. Touch Register or Fingerprint management > Add
22
fingerprint.
4. Follow the prompts to record the center and then the edges of
a finger.
5. Touch OK.
NOTE:
Touch an existing fingerprint record to change its name or delete
it.
Set Fingerprint Functions
1. Press the Home key, slide on the screen and touch Settings >
Security > Fingerprint.
2. Set the functions you need.
Unlock your phone: Place your finger on the fingerprint
sensor to unlock the phone when the screen is off or
locked.
Simple touch: Place your finger on the fingerprint sensor
to launch a bound app when the screen is off or locked.
Kno
w
Monit
The statu
service s
t
icons yo
u
E
D
3G
4G
Air
No
Si
g
No
ins
G
P
w
ing the
B
o
ring the
P
s bar at the top
o
t
atus icons on th
e
u
may see.
D
GE/2G connected
/HSPA+ connecte
d
connected
p
lane mode
signal
g
nal strength
nano-SIM card
talled
P
S on
23
B
asics
P
hone St
a
o
f the home scr
e
e
right side. Bel
o
Batt
d
Batt
/
Batt
Vibr
a
Blu
e
Con
Alar
a
tus
e
en provides pho
o
w are some of t
h
ery low
ery full
ery charging
a
tion mode
e
tooth on
nected to a Wi-Fi
n
m set
ne and
h
e
n
etwork
Manag
Notifica
The status
icons on th
e
N
N
/
N
M
C
C
U
/
S
ing Notifi
c
tion Icons
bar at the top of
e
left. Below are
N
ew message
N
ew email
N
ew Gmail messag
e
M
issed call
C
all in progress
C
all on hold
U
SB connected
S
ong is playing
24
c
ations
the home scree
n
some of the ico
n
Upco
m
Incomi
e
New
W
Downl
o
Sendi
n
USB t
e
Portab
direct i
s
n
provides notifi
c
n
s you may see.
m
ing event
ng file via Bluetoot
h
W
i-Fi network detec
t
o
ading data
n
g data
e
thering is on
le Wi-Fi hotspot or
s
on
c
ation
h
t
ed
Wi-Fi
Con
n
Devi
c
Conn
e
Contr
o
You can
u
card.
To enabl
e
1. Press
Mobil
2. Touc
h
To get d
a
1. Press
Mobil
2. Touc
h
NO
T
Data roa
m
Select
1. Press
Mobil
2. Touc
h
3. Selec
t
n
ecting t
o
c
es
e
cting to
M
o
l Mobile D
a
u
se or disable th
e
or disable da
t
the Home key,
s
e networks.
h
the switch next
a
ta services wh
the Home key,
s
e networks.
h
the switch next
T
E:
m
ing may incur
s
Preferred
N
the Home key,
s
e networks.
h
Preferred net
w
t
the network ty
p
25
o
Networ
k
M
obile Net
a
ta Use
e mobile data s
e
t
a access:
s
lide on the scre
to Data enable
d
en roaming:
s
lide on the scre
to Data roamin
g
s
ignificant roami
n
N
etwork Typ
s
lide on the scr
e
w
ork type.
p
e you would pre
k
s and
works
e
rvice of the nan
o
en and touch S
e
d
.
en and touch S
e
g
and touch OK
.
n
g charges.
e
e
en and Setting
s
fer the phone to
o
-SIM
e
ttings >
e
ttings >
.
s
>
connec
t
Select
N
1. Press t
h
Mobile
2. Touch
N
networ
k
3. Touch
a
You ca
n
preferr
e
Set Acc
e
To connec
t
Names (A
P
the service
1. Press t
h
Mobile
2. Touch
A
3. Touch
e
service
4. Touch
NOTE
To set the
A
t
with.
N
etwork Op
e
h
e Home key, sl
i
networks.
N
etwork operat
o
k
s.
a
network in the
n
n
also touch Ch
o
e
d network auto
m
e
ss Point N
t
to the Internet
y
P
N). And if you
w
provider to get t
h
e Home key, sl
i
networks.
A
ccess Point N
a
e
ach item to ent
e
provider.
> Save to co
m
:
A
PN to default s
e
26
e
rato
r
i
de on the scree
n
o
rs to search fo
r
n
etwork list to re
o
ose automatic
a
m
atically.
ames
y
ou can use the
d
w
ant to add a ne
w
he necessary in
f
i
de on the scree
n
a
mes > .
e
r the informatio
n
m
plete.
e
ttings, touch
n
and touch Sett
r
all available
gister manuall
y
.
a
lly to select
d
efault Access
P
w
APN, please c
o
f
ormation.
n
and touch Sett
n
you get from y
o
> Reset to def
a
ings >
P
oint
o
ntact
ings >
o
ur
a
ult.
Conn
e
Wi-Fi is a
Internet
a
the Wi-Fi
Turn
W
Netwo
r
1. Press
Wi-Fi
.
2. Slide
t
3. Touc
h
4. If the
Conn
NO
T
Your pho
n
networks
Add a
W
You can
a
its name
(
range.
To conne
security
d
1. Press
Wi-Fi
.
2. Slide
t
e
cting to
W
wireless netwo
r
a
ccess at distan
c
router and your
W
i-Fi On an
d
r
k
the Home key,
s
.
t
he switch next t
o
h
a network nam
e
network is secu
r
ect.
T
E:
n
e automatically
when they are i
n
W
i-Fi Netw
o
a
dd a Wi-Fi net
w
(
SSID) or add a
W
ct to a secured
n
d
etails from the
n
the Home key,
s
.
t
he switch next t
o
27
W
i-Fi
®
r
king technology
c
es of up to 100
m
surroundings.
d
Connect t
o
s
lide on the scre
o
Wi-Fi to turn o
e
to connect to i
t
r
ed, enter the pa
s
connects to pre
v
n
range.
o
rk
w
ork if the netwo
r
W
i-Fi network w
h
n
etwork, you firs
t
n
etwork's admini
s
s
lide on the scre
o
Wi-Fi to turn o
that can provide
m
eters, dependi
n
o
a Wi-Fi
en and touch S
e
n Wi-Fi.
t
.
s
sword and touc
v
iously used Wi-
r
k does not broa
d
h
en you are out
o
t
need to get the
s
trator.
en and touch S
e
n Wi-Fi.
n
g on
e
ttings >
h
Fi
d
cast
o
f
e
ttings >
3. Touch
4. Enter t
h
or othe
r
5. Touch
S
Using
W
Wi-Fi Dire
c
by connect
i
points (hot
s
NOTE
Activating t
connection
1. Press t
h
Wi-Fi.
2. Touch
device
s
3. Touch
a
The ot
h
to acce
p
commo
4. Once c
o
the Wi-
F
>Add netwo
r
h
e network SSID
r
network config
u
S
ave.
W
i-Fi Dire
c
c
t allows Wi-Fi d
e
i
ng to each othe
r
s
pots).
:
his feature will d
.
h
e Home key, sl
i
> Wi-Fi Direc
s
enabled with W
a
device name b
e
er device will re
c
p
t the request.
B
n PIN.
o
nnected the de
v
F
i Direct screen
28
r
k.
(name). If nece
s
u
ration details.
c
t
®
e
vices to share fi
r
without the ne
e
isconnect your
c
i
de on the scree
n
t. Your phone w
i
i-Fi Direct conn
e
e
low Peer devi
c
c
eive a connecti
o
B
oth devices ma
y
v
ice is displayed
.
s
sary, enter sec
u
les and data dir
e
e
d for wireless a
c
c
urrent Wi-Fi net
w
n
and touch Sett
i
ll search for oth
e
e
ctions.
c
es to connect w
i
o
n prompt and n
e
y
need to enter a
as “Connected”
u
rity
e
ctly
c
cess
w
ork
ings >
e
r
i
th it.
e
ed
in
29
Connecting to Bluetooth®Devices
Bluetooth®is a short-range wireless communication technology.
Phones or other devices with Bluetooth capabilities can
exchange information wirelessly within a distance of about 10
meters (32.8 feet). The Bluetooth devices must be paired before
the communication is performed.
Turn Bluetooth On/Off
1. Press the Home key, slide on the screen and touch Settings >
Bluetooth.
2. Slide the switch next to Bluetooth to turn on or off Bluetooth.
When Bluetooth is on, the icon appears in the status bar.
Pair With Another Bluetooth Device
1. Press the Home key, slide on the screen and touch Settings >
Bluetooth.
2. Slide the switch to turn Bluetooth on if Bluetooth is off.
Your phone automatically scans for and displays the IDs of all
available Bluetooth devices in range.
3. Touch the device you want to pair with.
4. Confirm that the Bluetooth passkeys are the same between
the two devices and touch Pair. Alternately, enter a Bluetooth
passkey and touch Pair.
Pairing is successfully completed when the other device
accepts the connection or the same passkey is entered.
NOTE
The Blueto
o
headsets a
1234 (the
m
that device
Sharin
g
You can sh
by activati
n
hotspot.
Share
Yo
You can a
c
tethering f
e
connection
NOTE
You canno
t
via USB w
h
1. Conne
c
2. Press t
h
More.
3. Switch
o
created
NOTE
To stop sh
a
or disconn
e
:
o
th passkey ma
y
nd handsfree ca
m
ost common p
a
.
g
Your M
o
are your phone’
s
n
g the mobile hot
Yo
ur Mobile
D
c
cess the Interne
e
ature of your ph
o
on a mobile net
w
:
t
transfer files b
e
h
ile the phone is
c
t your phone to
y
h
e Home key, sl
i
o
n USB tetheri
n
on your compu
t
:
a
ring your data
c
e
ct the USB cabl
30
y
be fixed for ce
r
r kits. You can t
r
a
sskeys) or refer
bile Data
C
s
data capabilitie
s
pot feature to c
r
D
ata Conn
e
t on your compu
o
ne. The featur
e
w
ork and may r
e
e
tween your pho
n
USB tethered.
y
our computer
w
i
de on the scree
n
n
g. A new netwo
r
t
er.
c
onnection, switc
e.
r
tain devices suc
r
y entering 0000
to the documen
t
C
onnectio
s through tetheri
r
eate a portable
W
e
ction via U
S
ter via the USB
e
needs data
e
sult in data char
n
e and your com
w
ith a USB cable
.
n
and touch Sett
r
k connection wi
l
h off USB tethe
r
h as
or
t
s for
n
ng or
W
i-Fi
S
B
ges.
puter
.
ings >
l
l be
r
ing
Share
Y
Blueto
If your co
you can
c
with your
1. Pair y
2. Confi
g
Bluet
o
docu
m
3. Press
More
.
4. Switc
h
shari
n
NO
T
To stop s
tetherin
g
Share
Y
Wi-Fi
H
You can
s
by turnin
g
needs da
t
data cha
r
NO
T
When th
e
use your
Y
our Mobil
e
oth
mputer can obta
c
onfigure your p
h
computer.
our phone with
y
g
ure your comp
u
o
oth. For more i
n
m
ents.
the Home key,
s
.
h
on Bluetooth
t
n
g your phone's
d
T
E:
haring your data
g
.
Y
our Mobil
e
H
otspot
s
hare your phon
e
g
your phone int
o
t
a connection o
n
r
ges.
T
E:
e
portable Wi-Fi
h
phone’s Wi-Fi c
a
31
e
Data Con
n
in an Internet co
h
one to share its
y
our computer vi
a
u
ter to obtain its
n
n
formation, plea
s
s
lide on the scre
t
ethering. Your
c
d
ata connection.
connection, swi
t
e
Data Con
n
e
’s data connect
o
a portable Wi-
F
n
a mobile netwo
h
otspot feature i
s
a
pability to acce
s
n
ection via
nnection via Blu
e
mobile data con
n
a
Bluetooth.
n
etwork connect
i
s
e see your com
p
en and touch S
e
c
omputer is now
t
ch off Bluetoot
h
n
ection as a
ion with other d
e
F
i hotspot. The f
e
rk and may resu
s
enabled, you c
a
s
s the Internet.
Y
e
tooth,
n
ection
i
on via
p
uter's
e
ttings >
h
e
vices
e
ature
lt in
a
nnot
Y
ou still
remain con
1. Press t
h
Wi-Fi h
2. Switch
o
After a
networ
k
3. On ano
t
with it t
o
NOTE
To stop sh
a
nected to the In
t
h
e Home key, sl
i
otspot.
o
n Wi-Fi hotsp
o
moment, the ph
o
k
name (SSID).
t
her device, loc
a
o
start using the
:
a
ring your data
c
32
t
ernet via your m
i
de on the scree
n
o
t.
o
ne starts broad
c
a
te your phone vi
phone’s mobile
d
c
onnection, switc
obile data netw
o
n
and touch Sett
c
asting its Wi-Fi
a Wi-Fi and con
n
d
ata.
h off Wi-Fi hots
p
o
rk.
ings >
n
ect
p
ot.
Pho
n
You can
p
apps or
w
see a ph
o
Placi
n
Place
a
1. Press
2. Enter
t
N
As yo
matc
h
place
numb
e
3. Touc
h
NO
T

To m
a
enter
follow
n
e Calls
p
lace calls from
t
w
idgets that displ
o
ne number, you
n
g and En
d
a
Call by Di
a
the Home key
a
the phone num
b
t
o delete incorre
c
N
OTE:
u
enter digits, y
o
h
. If you see the
n
the call immedi
a
e
r.
h
belo
w
T
ES:
a
ke an internatio
the plus (+) sym
ed by the city/ar
e
33
t
he Phone app, t
h
ay contact infor
m
can usually tou
c
d
ing Calls
a
ling
a
nd touch .
b
er with the on-s
c
c
t digits.
o
ur phone searc
h
n
umber you wan
a
tely without ent
e
w
the keypad to
d
n
al call, touch a
n
bol. Next, enter
t
e
a code and the
n
h
e People app,
o
m
ation. Whereve
c
h it to dial.
c
reen keypad. T
o
h
es for contacts
t
t to dial, touch it
e
ring the rest of t
d
ial.
n
d hold the 0 ke
y
t
he country cod
e
n
the phone nu
m
o
r other
r you
o
uch
t
hat
to
he
y
to
e
,
m
ber.
34
To redial the last call you made, just touch to when
the phone number field is empty to enter the number
automatically.
End a Call
During a call, touch on the screen.
Answering or Rejecting Calls
When you receive a phone call, the incoming call screen opens,
displaying the caller ID or the information about the caller that
you've entered in the Contacts app. You can answer or reject the
call, or reject it with a text message.
Answer a Call
When you receive a phone call, slide down to answer the
call.
NOTE:
To silence the ringer before answering the call, you can press the
Volume key or the Power key.
Reject a Call
When you receive a phone call, slide up to reject the call.
35
Checking Voicemail
If you have set the phone to divert calls to voicemail, callers can
leave voicemail messages when they cannot reach you. Here’s
how to check the messages they left.
1. Press the Home key and touch > Phone.
2. If the dialpad is closed, touch to display it.
3. Touch and hold the 1 key in the dialer. If prompted, enter your
voicemail password.
4. Follow the voice prompts to listen to and manage your
voicemail messages.
Conta
You can p
u
the contact
support co
n
To see you
r
and touch
of the scre
e
contacts.
A
ddin
g
1. Press t
h
2. Touch
3. Touch t
h
where t
o
phone,
a
the pho
n
4. Enter t
h
and ot
h
5. Touch
S
cts
u
t contacts on yo
s in your Googl
e
n
tact syncing.
r
contacts, pres
s
. From ther
e
e
n to quickly swi
t
g
a New C
o
h
e Home key, sl
i
to add a n
e
h
e account field
n
o
save the conta
c
a
nano-SIM card
n
e.
h
e contact nam
e
h
er information.
S
ave.
36
ur phone and sy
e
account or oth
e
s
the Home key,
e
, you can touch
t
ch to contact gr
o
o
ntact
i
de on the scree
n
e
w contact.
n
ear the top of th
c
t. You can save
, or a web accou
n
e
, phone numbe
r
nchronize them
w
e
r accounts that
slide on the scr
e
the tabs on the
t
o
ups or favorite
n
and touch
e screen to choo
s
the contact on t
h
n
t you have add
e
r
s, email addres
s
w
ith
e
en
t
op
.
s
e
h
e
e
d on
s
es,
Worki
Favorite
c
access.
Add a
You can
a
you can f
i
1. Press
2. Touc
h
Remo
v
1. Press
2. Touc
h
ng With F
a
c
ontacts are list
e
C
ontact to
F
a
dd the contacts
i
nd them quickly
the Home key,
s
h
a contact and t
h
v
e a Contac
t
the Home key,
s
h
a favorite cont
a
37
a
vorite C
o
e
d at the top of t
h
F
avorites
you use freque
n
.
s
lide on the scr
e
h
en touch
a
t
From Fav
o
s
lide on the scr
e
a
ct and then tou
c
o
ntacts
h
e contacts list f
o
n
tly to favorites
s
e
en and touch
a
t the top.
o
rites
e
en and touch
c
h at the to
p
o
r easy
s
o that
.
.
p
.
Email
Press the
H
it to receiv
e
accounts,
u
ActiveSyn
c
Settin
g
1. When
y
addres
s
2. Touch
N
3. Enter y
o
4. Touch
N
automa
NO
You ca
n
MANU
A
5. Follow
t
Your phon
e
download
e
H
ome key, slide
o
e
and send emai
l
u
sing POP3 or I
M
c
account for you
g
up the fi
r
y
ou open Email
f
s
.
N
EXT.
o
ur password.
N
EXT to let the
p
ticall
y
.
TE:
n
also enter thes
e
A
L SETUP or w
h
t
he on-screen in
s
e
will show the i
n
e
mail messages.
38
o
n the screen a
n
l
s from your we
b
M
AP, or access
y
r corporate ema
i
r
st email a
f
or the first time,
p
hone retrieve th
e
e
details manual
h
en automatic se
s
tructions to fini
s
n
box of the email
n
d select Email.
U
b
mail or other
y
our Exchange
i
l needs.
ccount
enter your email
e
network para
m
ly by touching
tup fails.
s
h the setup.
account and st
a
U
se
m
eters
a
rt to
Writi
n
1. Open
N
If you
phon
e
to us
e
2. Enter
Sepa
r
N
O
To se
n
recipi
e
name
s
3. Enter
4. Touc
h
as att
a
5. Touc
h
mess
a
Repl
y
1. Open
2. Do th
e

T
o
n
g and se
n
your email Inbo
x
OTE:
have more than
e
, touch the sen
d
e
for sending the
a contact name
r
ate each recipie
O
TE:
n
d a carbon cop
y
e
nts, touch >
A
s
or email addre
s
the email subje
c
h
to add im
a
a
chments.
h
at the top
r
a
ge.
y
to or for
w
the email you w
a
e
following as y
o
o
reply to the sen
39
n
ding an e
m
x
and touch
one email acco
u
d
er line to select
t
message.
or email addres
s
nt with a comm
a
y
or blind carbon
A
dd Cc/Bcc an
d
s
ses.
c
t and compose
t
a
ges, videos an
d
r
ight of the scre
e
w
ard an e
m
a
nt to reply to or f
o
o
u need:
der, touch .
m
ail
.
u
nt added on th
e
t
he account you
s
in the To field.
a
.
copy to other
d
enter the cont
a
t
he email text.
d
other types of
f
e
n to send the
m
ail
o
rward from the I
e
want
a
ct
f
iles
nbox.

To r
e
em
a

To f
o
For
w
3. Edit yo
u
Chang
i
1. Genera
2. Open
E
3. Touch
4. Make t
h
e
ply to the send
e
a
il, touch
o
o
rward the emai
w
ard.
u
r message and
i
ng gener
a
l settings apply
t
E
mail to get the I
n
> Settings
>
h
e changes and
t
40
e
r and all recipie
o
r > Reply all
l to someone el
s
touch .
a
l email s
e
o all email acco
u
n
box screen.
>
General setti
n
t
ouch when
nts of the origin
a
.
s
e, touch o
r
e
ttings
u
nts you add.
n
gs.
you finish.
a
l
r
>