Zte R550 User manual

Thank you for purchasing this mobile. For the best performance, we recommend
that you read the manual carefully.
R550
Quick Start
And
Device Warranty Guide

Chapter 1 Phone overview
Main Display 160*128px System Used GSM900+
GSM850+DCS1800+PCS1900
Phonebook
capacity
SIM
according
to card’s
type;
100 in the
mobile
Camera/ video
record
Support
Hands free Supported MP3/Recorder Supported
SMS Support Call waiting Support
Incoming
number
Display
Support USB
Mode/Memory
Card
Supported (T-flash card)
Alarm
clock/Calendar
Supported

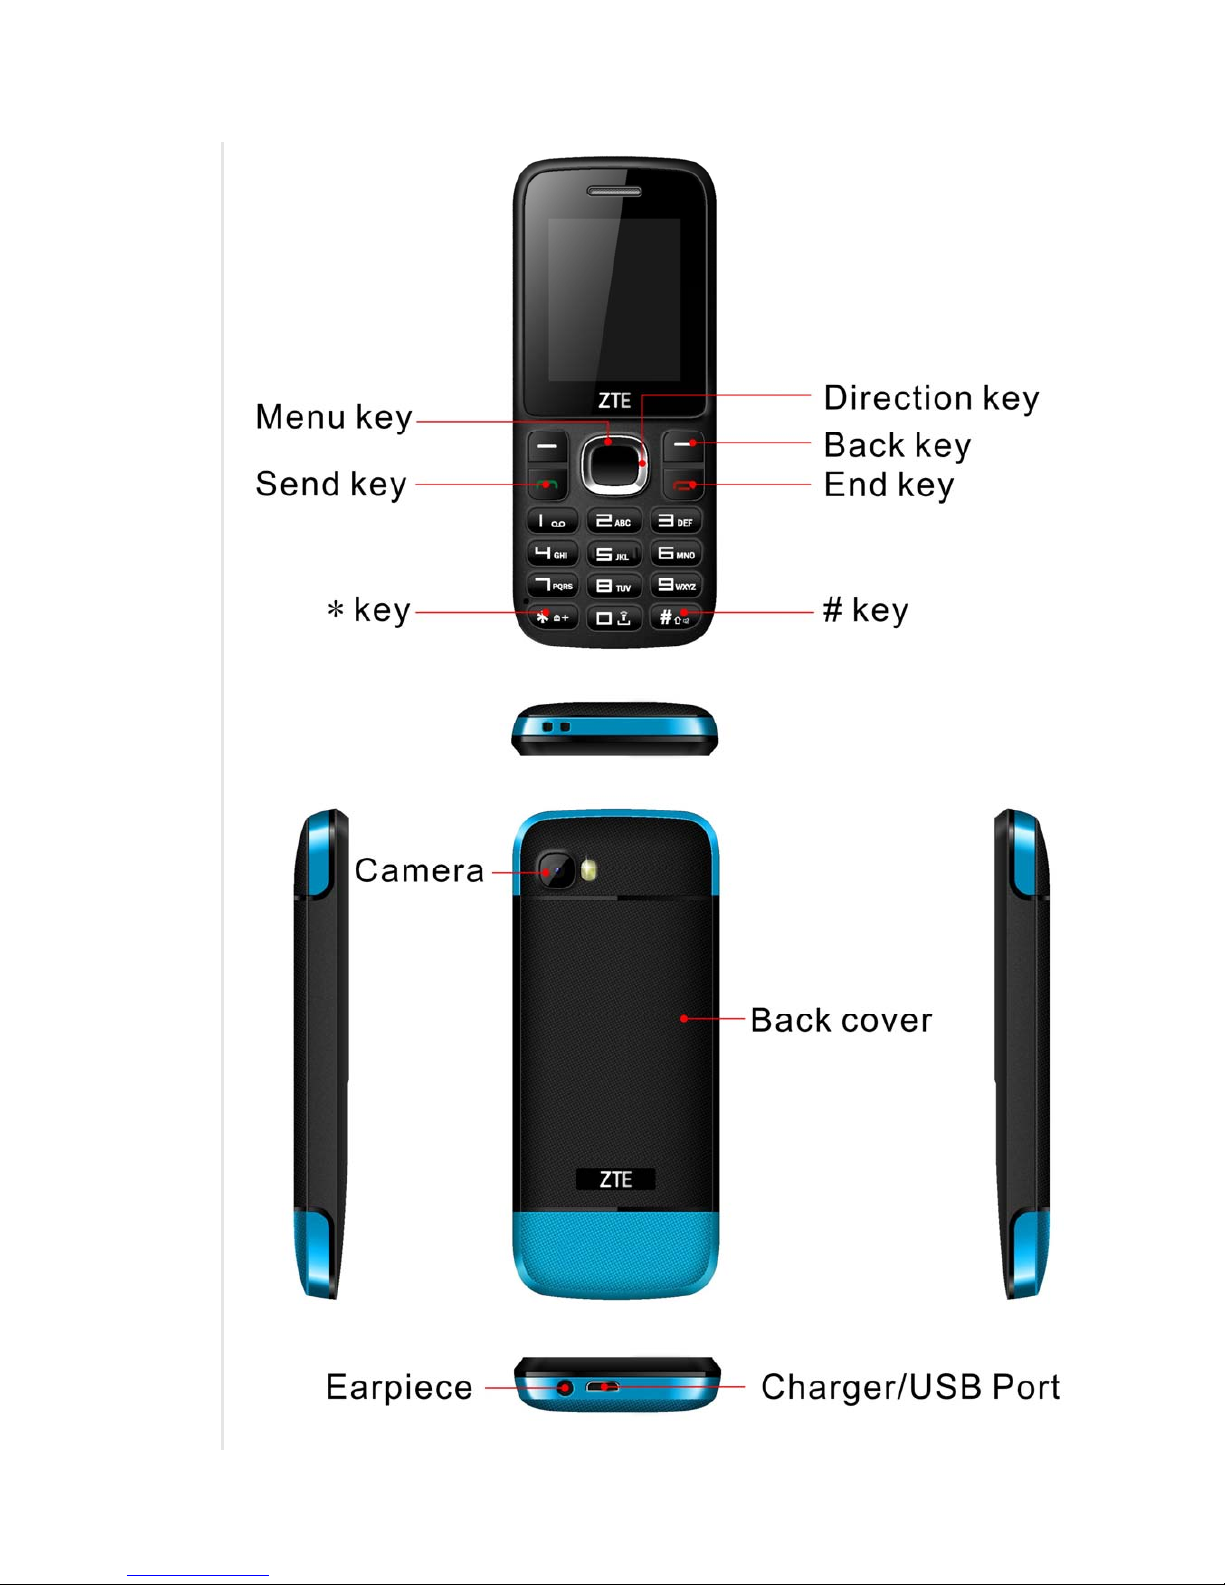
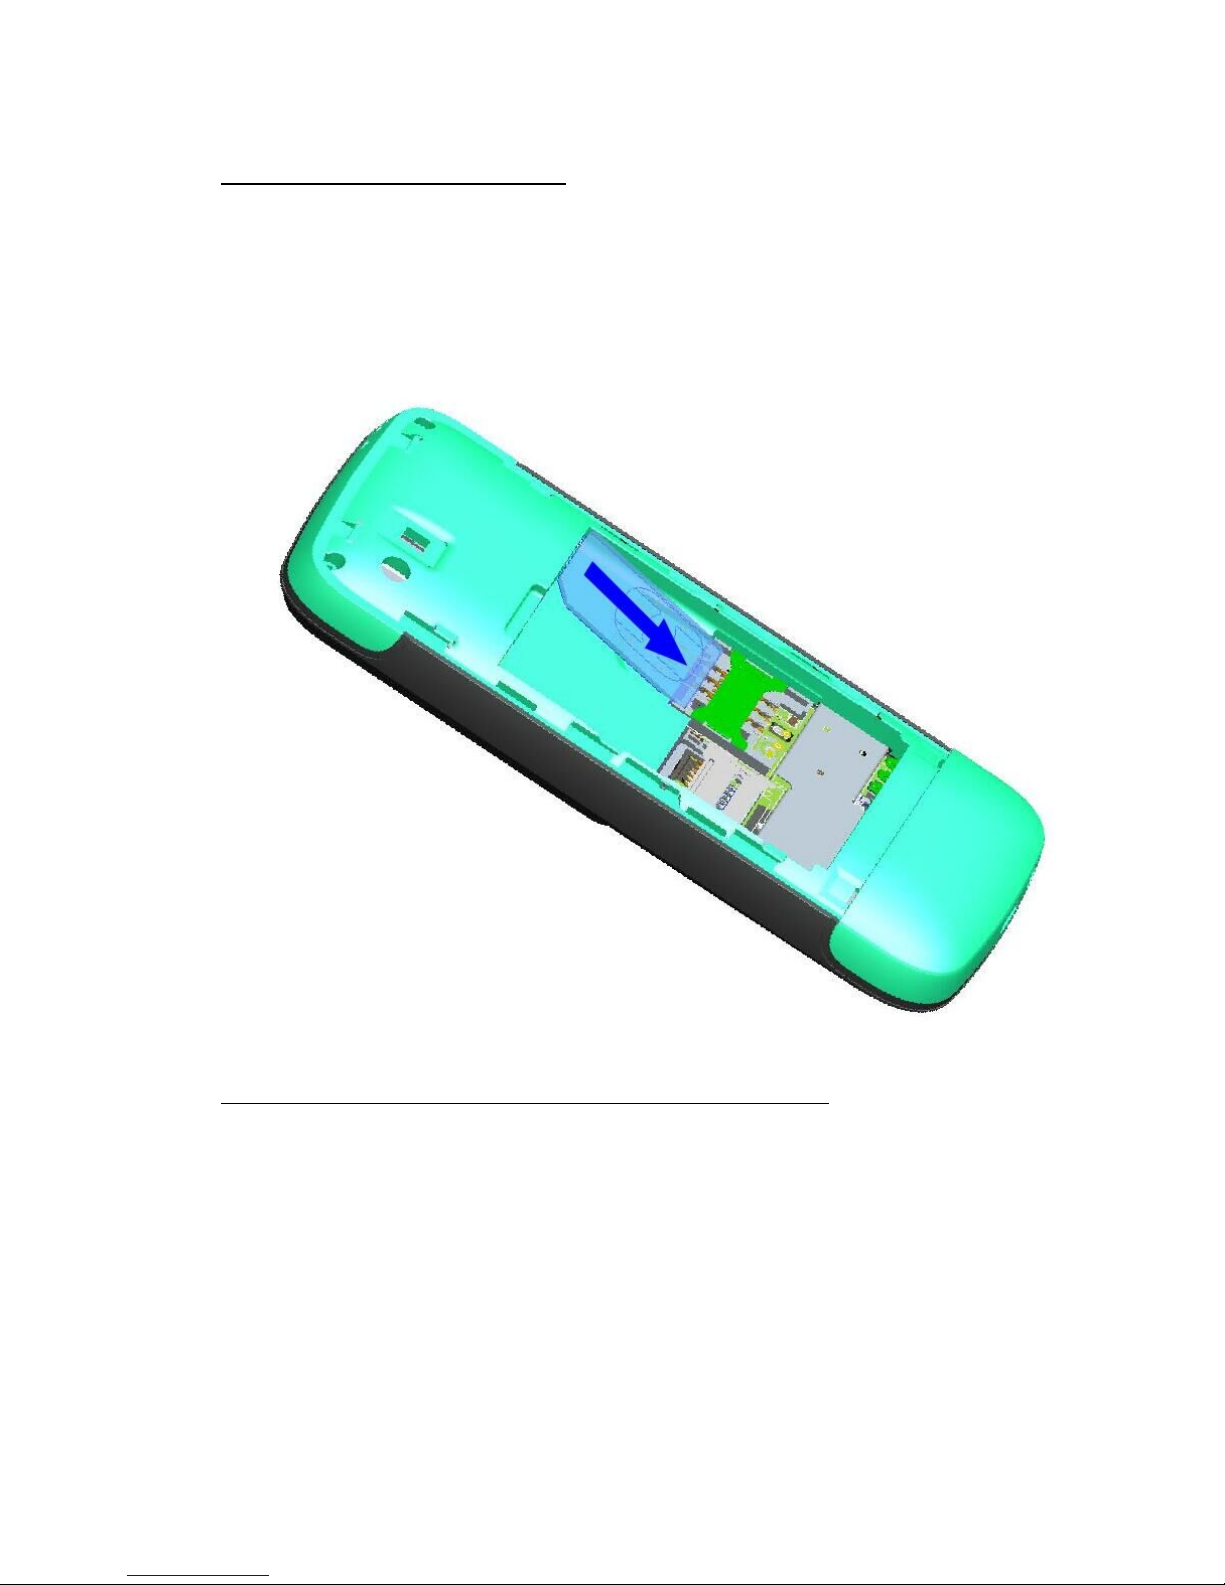
Chapter 2 Key Instruction
Key Name Function Description
Menu key 1.In standby interface can enter the main menu
2. answer a call
Send key 1. Make or answer a call
2. Press Send key in standby mode to show the entire call log.
Back key End an active call or reject a call
End key 1.End an active call or reject a call
2.Hold this key to power on/off
3.Exit form any interface to standby mode
Up/Down key 1. Scroll the cursor up and down
2. Up the fast Dedicated Keys
3. Under the fast came Alarm
Left/Right key 1. Scroll the cursor left and right
2. Left the fast profiles
3. Right the fast write message
0~9 key 1. Enter numbers or characters while editing text
2. Press 0 key to insert a space while editing message, excluding the
number input mode
3. Press 0 key to turn on, turn off the flashlight
4. Press 1 key to insert common symbols while editing text, excluding

the numbers input mode
#key / *key #key
Press # key to change the input mode while editing text
*Key
Press * key to display the symbols window in the text input mode
Hold * key to input + 、P、W


Chapter 3 Insert SIM card
1. Power off the phone and remove other external power.
2. Take off the back cover and remove the battery of the phone.
3. Insert SIM card into the SIM card slot in the phone.
Chapter 4 Install and Remove the battery
The attached Li-ion battery along with the phone can be used after unpacking.
For the first three times, please use up the power and charger it fully for new
battery to perform well.

Install the battery
1. Put the battery in the battery compartment; note that the metal end of the
battery should be firstly inserted.
2. Put on the back cover.
Remove the Battery
1. Take off the back cover.
2. Put finger on the side finger grip, and then lift up the battery from the finger
grip to remove the battery.

Chapter 5Power on/Off your phone
1. Hold the End key to power on the phone. The phone will automatically
search for the network.
2. When the phone is powered on, hold the End key to power off the phone.
Charging Your Phone
1. Connect the phone charger to the wall socket/outlet.
2. Connect the charger to the device.

3. After charging is complete (battery indicator shows full bars), disconnect
the charger from the device, then from the wall outlet.

C
h
Ico
n
C
h
Me
s
ap
p
Wri
[Te
x
Yo
u
Ple
Ple
Yo
u
too
tw
o
h
apter 6
n
h
apter 7
s
saging is
p
ly to your
te messa
g
x
t messa
g
u
create S
M
ase click
o
ase click
o
u
r phone s
long mea
n
o
or more t
e
Interfa
c
Descri
GSM
s
Profile
s
Blueto
o
New
m
Power
Alarm
Messa
g
a service
network o
p
g
e:
g
e]
M
S mess
a
o
n the # k
e
o
n the * ke
y
upports th
n
ing more
e
xt messa
c
e Icon
s
ption
s
ystem sig
n
s
-General
o
th
m
essage
indicato
r
g
es
provided
b
p
erator be
a
ges in thi
s
e
y to switc
h
y
punctua
t
e texts m
e
than the
a
ges.
s
n
al streng
t
b
y your ne
t
fore sendi
n
s
menu. Y
o
h
the curre
t
ion into th
e
e
ssaging f
u
a
llowed 16
0
t
h
t
work prov
n
g and re
c
o
u can:
nt input m
e
e
symbol.
u
nction. If
t
0
characte
ider; you
m
c
eiving me
s
e
thod.
t
he messa
g
rs, it will b
e
m
ay need
t
s
sages.
g
e conten
t
e
divided i
n
t
o
t
is
n
to

In the options menu you can select the following:
Send to:Edit the recipient, and then choose to send, edit recipient, remove
the recipient, remove all the recipients, or save to the Drafts.
Input method:You can use this menu to set the required input method and
to insert symbols.
Insert template :You can insert common language in a text message.
Advanced: In this submenu you can insert number or insert name.
Save: The edited message can be saved to the draft box through this
menu.
Inbox
Select Inbox to view message received
Click the options you can:
View: check the received SMS
Reply: reply the sender via text message.
Call sender:You can call the sender's phone number
Forward: Forwards the original message or modified message to others
selected or inputted contacts.
Delete: deletes the current message.
Delete all: delete all messages in the inbox.
Mark several: You can SMS bulk delete, copy, move.
Advanced: SMS can batch Copy, move and Use number , Use USSD , Use

URL.
Drafts
View the draft you saved.
Outbox
View the unsent message.
Sent messages
View the sent message.
View: check the received SMS
Forward: Forwards the original message or modified message to others
selected or inputted contacts.
Delete: deletes the current message.
Delete all: delete all messages in the inbox.
Mark several:You can SMS bulk delete, copy, move.
Advanced: SMS can batch Copy, move and Use number, Use USSD , Use
URL.
SMS templates
You can insert common language in a text message.

SMS settings
Set the message configuration and can be view the memory information of
message box.
SMSCnumberoriginNumberretrievedfromSIM
SMS‐TypeTex t
SMS–ValidityperiodThedefault6hours
SMS–ReadreceiptsOff
Chapter 8Phonebook
When you enter phonebook press up/down key to select quick search, Search
Contact, Add New Contact, Delete,phonebook Settings etc.
Press soft right key to enter phonebook in standby mode. Select a number,
then you can view, send message, call, edit, delete, copy, Add to Blacklist,
Mark several and phonebook settings.
For each telephone recording, press the "Options" button, you can do the
following:
View: View the content of the telephone records.
Send SMS: to select contacts to send text messages.
Call: You can call the selected contact phone.
Edit: Edit the article calls.
Delete: delete the clause phone records from the phone book.
Copy: You can copy the phone records to the phone / SIM card, or copy

records SIM card to the phone / SIM card.
Add to Blacklist:The contacts can be added to the blacklist
Mark several: You can mark off mass text messages and delete records
marked contacts operation; wherein a tag number to send text messages to
send up to 20 contacts.
Phonebook settings:You can view the storage capacity of the phone book,
phone book inside the batch number to delete, copy, move.
Chapter 9 Call logs
Call history
1. Missed calls: Display the missed calls about the latest time and date, caller’s
number and calling times.
2. Dialed calls: Display the dialed calls about the latest time and date, caller’s
number and calling times.
3. Received Calls: Display the answered calls about the latest time and date,
caller’s number and calling times.
[View]: See the current record.
[Call]: Call the current number.
[Send text messages]: send text messages to the current record.
[Save to phonebook]: save the phone number to phonebook.
[Add to Blacklist]: Add the current to the blacklist.

[Edit before call]: on the current record for editing.
[Delete]: choose to delete the current record.
4. AllCalls:With this feature, you can check recent missed calls, he had to
answer the phone, dial the phone records had 20 words each record.After
entering this function, press the up or down navigation key to select a phone
number. Press the OK button to view the content of the telephone records.
5. Deletecall logs:Respectively delete dialed calls, missed calls, received calls,
phone records of all calls.
6. Call timers:You can view all of talk time.
Call settings
Call transfer and call waiting and other functions can be set in the menu.
[Call waiting]:Select the functions of open, close or inquire call waiting.
[Call divert]:Choose to open, close or enquire the call forwarding function.
[Call barring]:You can Outgoing calls, Incoming calls and Cancel all
constraints
[Line switching]:You can choose Line1 or Line2.
[Advanced Setting]:Set Blacklist , Auto redial , Auto Call Record , Call time
display , Call time reminder , Reject by SMS , Vibrate when connect and
Answer mode
2. Advance settings

1. [Blacklist]:
[Reject number in blacklist]: choose open or close this function
[Blacklist numbers]: Insert the blacklist number
2. [Auto redials]: Choose whether automatic redial will be implemented
when the called party is in the busy or have no response.
3. [Auto Call Recording]: Switch on or off the function of auto recording
4. [Call time display]: Set the Call time display
5. [Call time reminder]: Set the Call time reminder
6. [Answer mode]: Choose answer mode, you can choose “Any key” or
“Auto answer when headset mode”.
Chapter 10Settings
User Profiles
Your mobile provides several situation modes: General, Silent, Meeting and
Outdoor.
1、Activate
Select a mode (except for Headset need plug in earphone), press the left
software into select "activate" button, each scene mode (except for silent mode)

can edit the look content
2、Customize
[Alert type]: Set alert type
[Ring type]:Set ring type
[Ringtone ]:Set ring for incoming calls
[Ringtone volume]: Set the volume of incoming ring
[Message]: Set message ring
[Message volume]: SMS tone volume settings
[Keypad]: Set up the keypad tone
[Keystone volume]: Set the volume of Keystone
[System alert]:Setting the alarm system is turned on
3、Reset
Restore the User profiles settings to default.
Phone settings
1. Time and date
◆ Set home city: Choose the home city.
◆ Set time/date: Set the date and time.
◆ Set format: Choose the time and date format.
◆ Update with time zone: You can choose to open or close, the time will be

different according to the time zone is changed after opening.
◆ Auto update time: After opening date will be automatically updated.
2. Language
Display Language for your mobile. The mobile phone in the English language
by default
3. Pref. input method
Set the Pref. input method.
4. Display
◆ Wallpaper:Set the stand-by wallpaper.
◆ Auto keypad lock :choose the keypad lock for off、15secs、30secs、1min、
5mins
◆ Power On display:Set switch-on animation.
◆ Power Off display:Set switch-off animation.
◆ Show date and time: Activate or deactivate displaying time and date in the
stand-by screen.
5.Dedicated keys
You can select shortcuts inside menus.

6. Flight mode
In the “phone setting”-“fight mode”Choose the Flight Mode or Normal mode .
7. Misc.settings
Set the time limit for the back light of main screen to be off when there is no
operation.
Security settings
SIM security:
Asked to enter the SIM card PIN code.After entering the correct before setting.
If the SIM card is set to ON, each time you boot, you need to enter the PIN
code, when entered incorrectly three times, it is required to enter your PUK
(Personal Unblocking Key). PUK code is used to unlock and change the
locked PIN code. If the PUK code is not provided or is lost, please contact your
network operator.
Mobile Security Settings:
Use the phone lock operation,enter the password when opening or closing
operation of the phone lock when the phone is turned off, you will be asked to
enter the phone password at boot time. Phone password is 4 to 8 digits. The
default password is “1122”.
change the password.

Change password.
Privacy protection:After setting the privacy protection into different menus are
required to enter a password
Network settings:
Network -> mode selection: 2G only.
Connectivity
1.Activate or deactivate the Bluetooth.
[Power] Activity the Bluetooth function.
[Visibility] Activity /Deactivate this function.
[My devices] Display the connected Bluetooth.
[Search audio device] Display the Bluetooth earphone and other device, and
search the equipment.
[My name] View the Bluetooth name and can be edit the Bluetooth name.
[Advanced]
◆Audio path: To "Leave in phone" or "Forward to Bluetooth." Note: Due to
this Bluetooth headset has the voice channel switching function, so when set
to "remain in the mobile phone", click the multi-function Bluetooth headset
button can also be connected to telephones, voice, but remain in the mobile
phone side. Please refer to the specific operational guidelines of the
Other manuals for R550
1
Table of contents
Other Zte Cell Phone manuals