3SIXT 3S-0684 User manual
FULL HD SPORTS
ACTION CAMERA
with Wi-Fi
3S-0684
USER GUIDE

2
IMPORTANT SAFETY INFORMATION
Please read the instructions carefully before using this
camera for proper and safe operation.
•Using a wall/car charger other than a 5V 1A Charger can
damage the camera baery and could result in fire or
leakage. Only use chargers marked: Output 5V 1A.
•Please check the camera operates normally before use.
•Do not expose the camera to direct sunlight, or point its lens to
sunlight - the image sensor may get damaged.
•Take good care of the camera and prevent water or sand
particles from entering the housing when it is used on the
beach or in water. Water, sand particles, dust or composites
containing salt may cause damage.
•Keep the camera free of dust and chemical materials. Place
it in a cool, dry and well ventilated environment. Do not place
the camera in a high temperature, moist or dusty place.
•If dust or dirt is accumulated on the camera or on its lens -
use a so, clean and dry cloth to wipe away gently.
•Do not use a cloth to wipe sand particles. Blow them away
gently then wipe the camera gently with a cloth suitable for
optical devices.
•Do not use solvents to clean the camera.
•Do not touch the lens’ surface with your fingers.

3
TABLE OF CONTENTS
The Basics .....................................................................................................4
Installing and Charging the Baery.................................................6
Installing the microSD Card..................................................................8
Turning the Camera ON/OFF...............................................................9
Capture/Playback Modes.................................................................... 10
Camera Seings Menu..........................................................................17
In-Vehicle Seings..................................................................................19
Downloading the APP ..........................................................................20
Connecting to the APP.........................................................................21
Transferring Video and Images to PC or Mac ..........................22
Playback Video and Images on a TV with a HDMI port ......22
Included Accessories.............................................................................23
System Requirements..........................................................................28
Technical Specifications......................................................................28
Limitation of Liability and Indemnity...........................................29
Warranty .....................................................................................................30
4
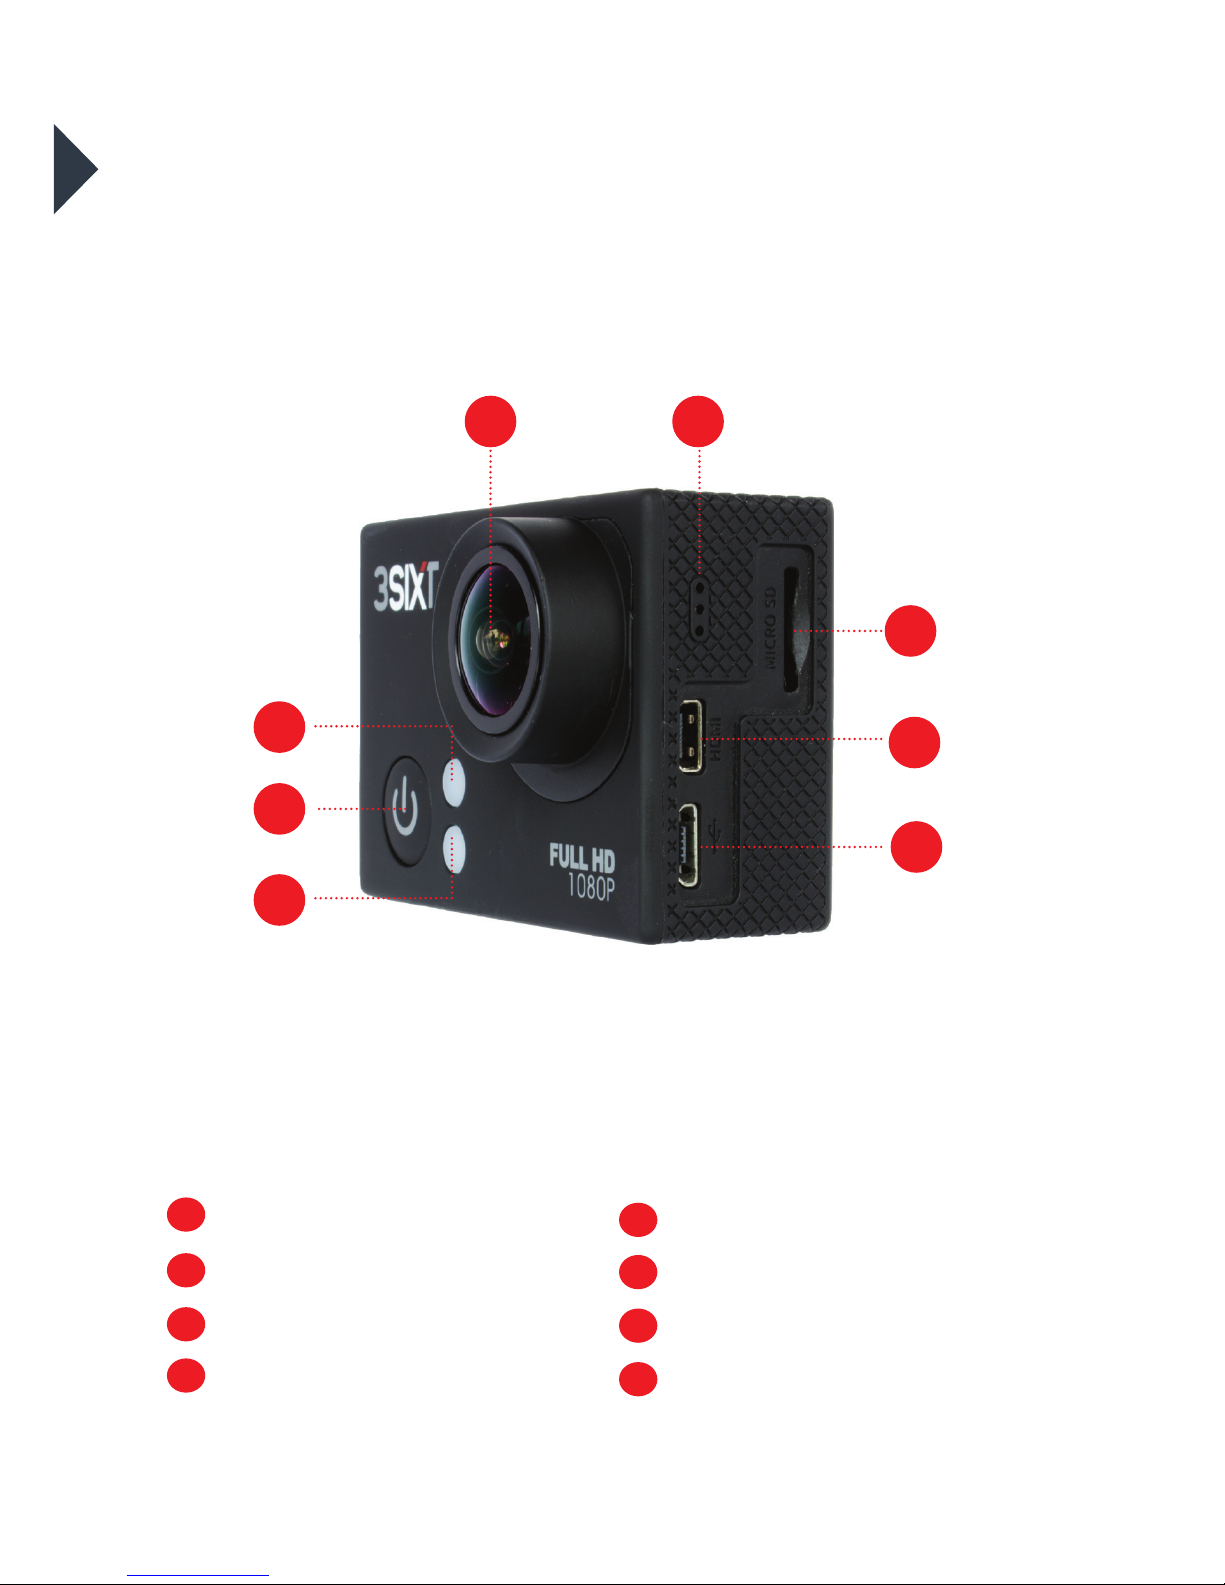
THE BASICS
1
15
37
8
26
4
2
3
4 5
6
7
8
Power/Mode Buon
Status Indicator Light
Charging Status Light
Lens
Microphone
microSD Slot
Micro HDMI Port
Micro USB Port

5
9
11
10
12
13
11
10
12
Screen
Wi-Fi Buon
Shuer/Select Buon
Speaker
Baery Door
9
13
6
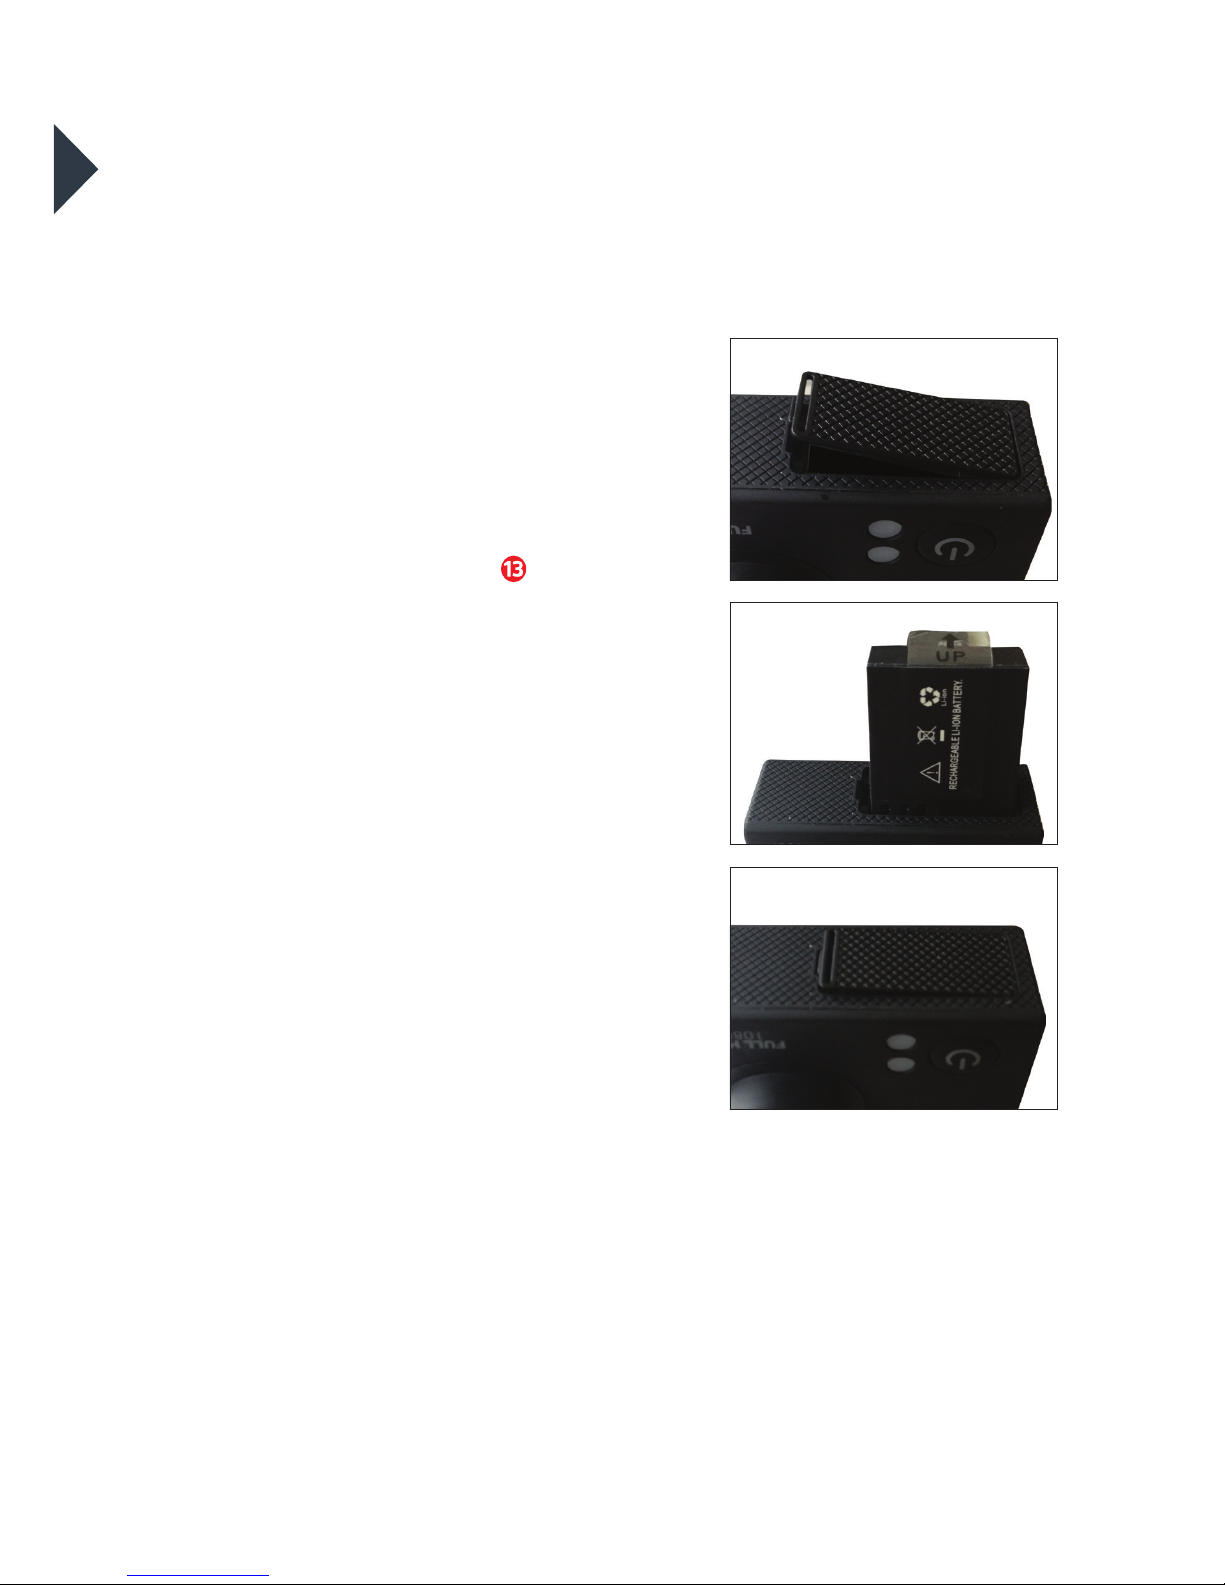
INSTALLING AND
CHARGING THE BATTERY
INSTALLING THE BATTERY
1. First, make sure that the camera
is OFF when inserting or removing
the baery.
2. Remove the camera from
it’s housing.
3. Li up the baery door with
your fingernail. Remove the baery
door and place the baery door in
a safe location.
4. Insert the lithium-ion baery into
the baery compartment. Make
sure the contacts of the baery
are corresponding to the symbols
on the camera body.
5. Return the baery door in it’s
original location until it clicks
into place.

7
CHARGING THE BATTERY
1. Make sure that the camera is
switched OFF.
2. To start charging the baery,
connect the supplied micro USB
cable into the camera’s micro
USB port into a PC, MAC or
wall adaptor’s USB 2.0 port
(1A only). The Charging Status
Light will be lit blue while
charging and will disappear when
charging is completed.
WARNING: Using a wall/car
charger other than a 5V 1A
Charger can damage the camera
baery and could result in fire
or leakage. Only use chargers
marked: Output 5V 1A.
Charging Status Light
Micro USB Port
Micro USB cable
8
3
8
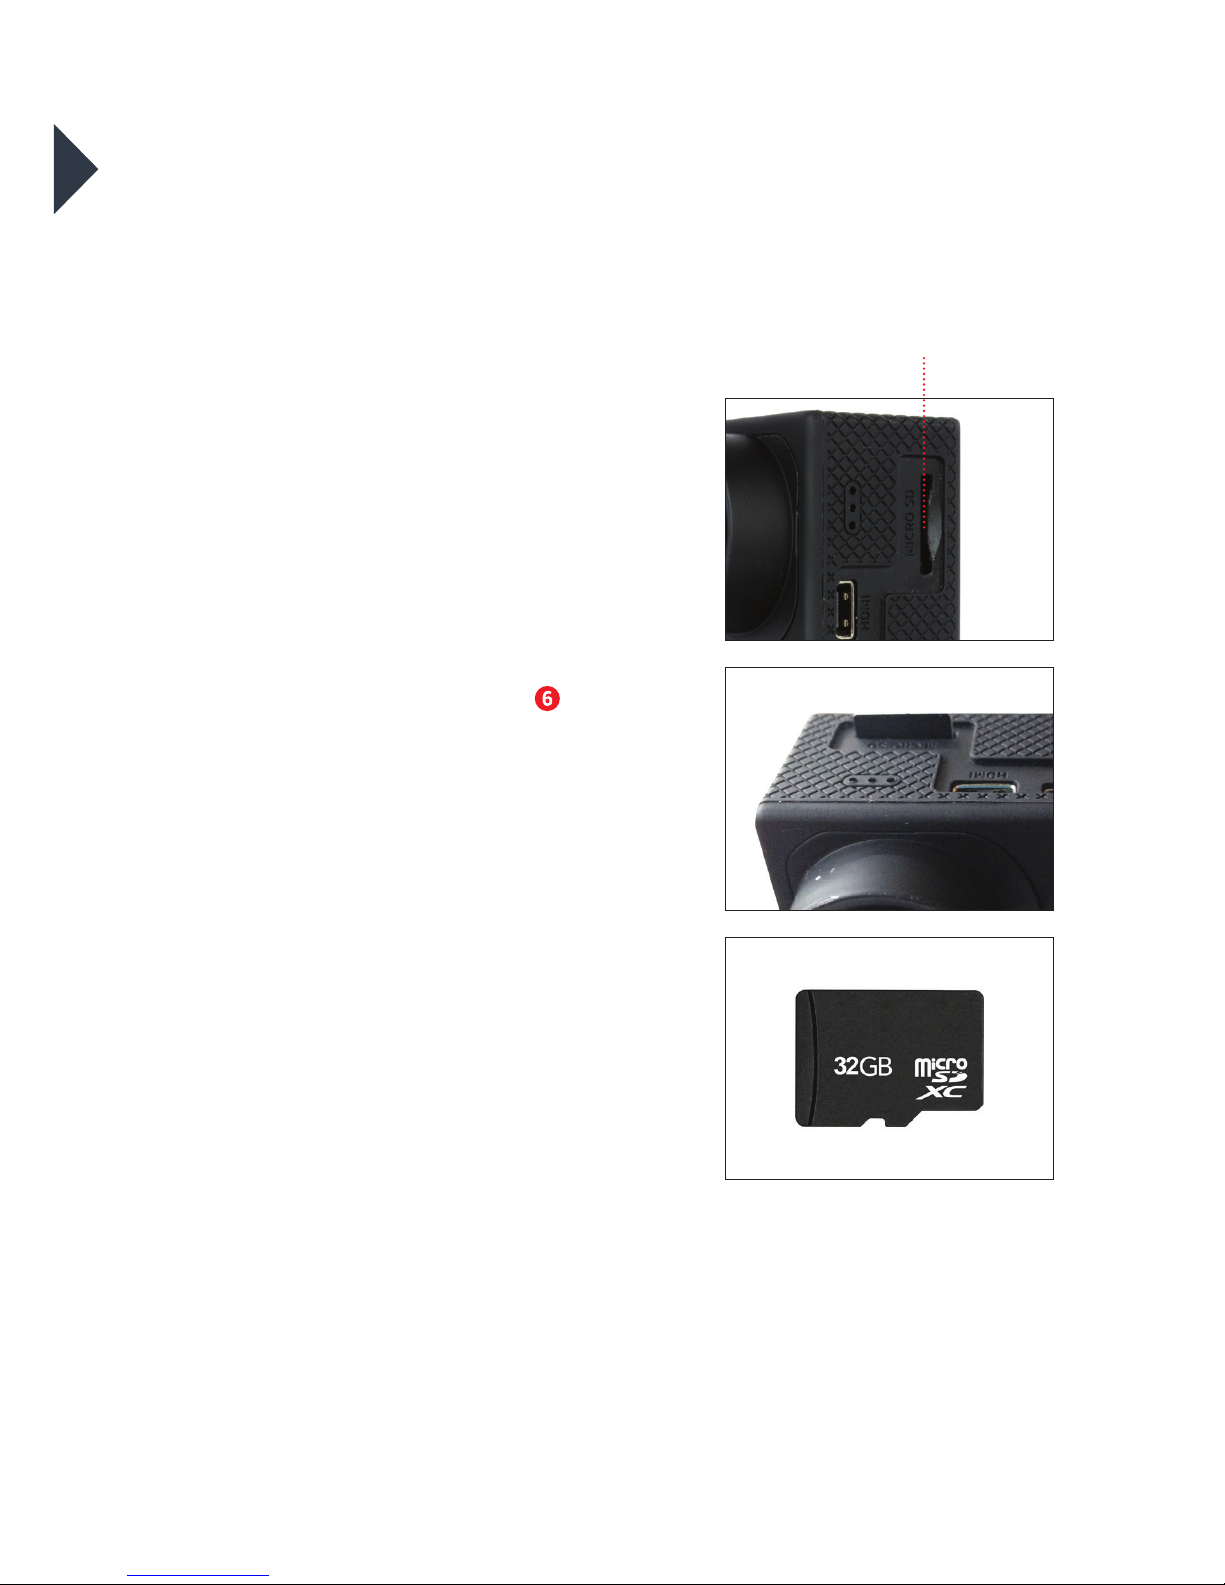
INSTALLING THE
MICROSD CARD
It is recommended to use
32GB Class 10 microSD cards for
maximum performance.
1. Make sure the camera is OFF
when inserting or removing the
microSD card.
2. Make sure the memory card is
inserted in the correct direction (the
gold contacts of the microSD card
should face the front of the camera)
into the microSD card slot . Failure
to do so may lead to damaged or
lost data.
3. To remove the microSD card, press
down on the card with your fingernail
until it clicks and pops up.
4. If a microSD card is removed or
power supply is interrupted when
the camera or computer is connected
to the card (i.e. during reading,
writing and formaing), your
captured images and video may be
lost or damaged.
microSD Slot

9
TURNING THE CAMERA
ON/OFF
Install the baery, charge fully
and insert the microSD card as
described on page 8.
TURNING ON THE CAMERA
•Press and hold the Power/Mode
Buon for 4 seconds until the
LCD Screen displays ON and a
sound is heard.
TURNING OFF THE CAMERA
•Press and hold the Power/Mode
Buon for 4 seconds until the
LCD Screen displays OFF.
•Aer 5 minutes of inactivity the
camera will be automatically shut
down to conserve baery life.
Power/Mode Buon
Startup screen
9
10
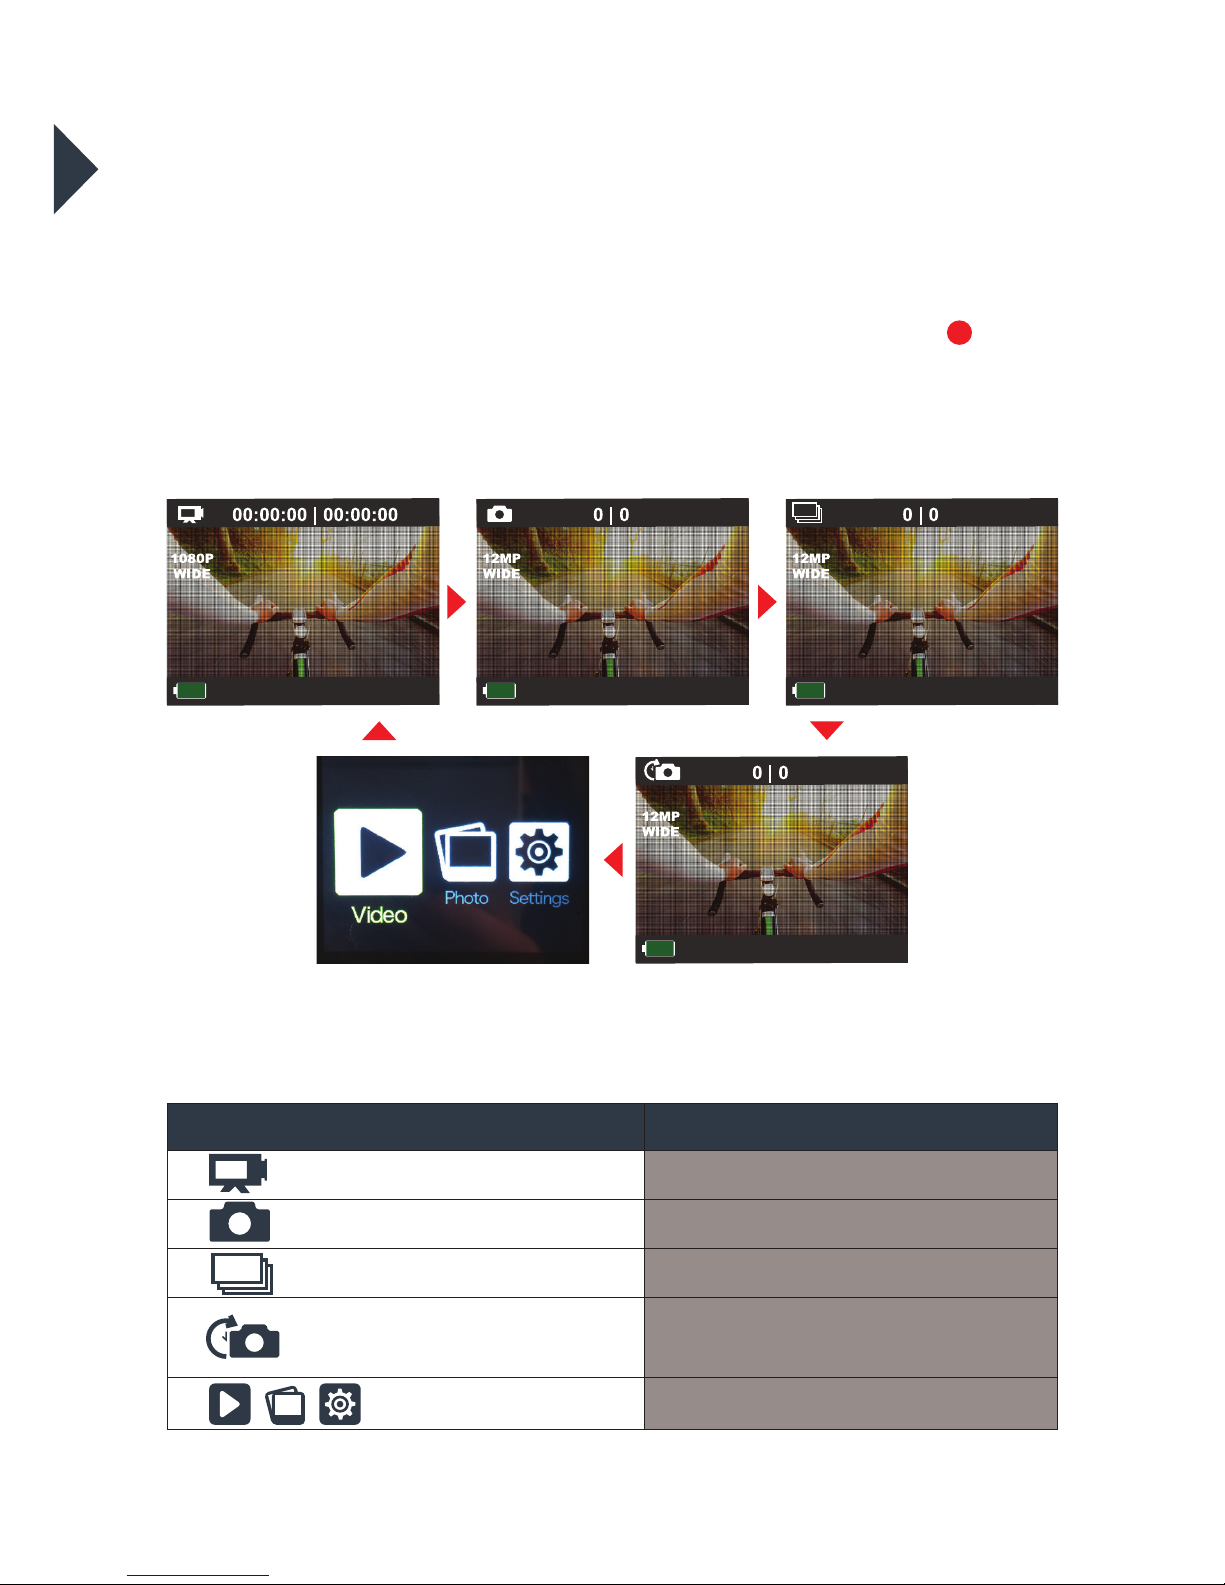
CAPTURE/PLAYBACK MODES
Cycling through and selecting capture and playback modes
VIDEO IPHOTO IBURST ITIME LAPSE IPLAYBACK
Turn camera ON and repeatedly press the Power/Mode Buon to
cycle through camera modes and seings. The modes will appear in the
following order:
VIDEO PHOTO BURST
TIME LAPSESETTINGS
Mode Description
Video Record video
Photo Capture a single photo
Burst Photo Capture photo bursts
Time Lapse Shoot a series of photos at set
time intervals
Seings Video and photo playback
1
11
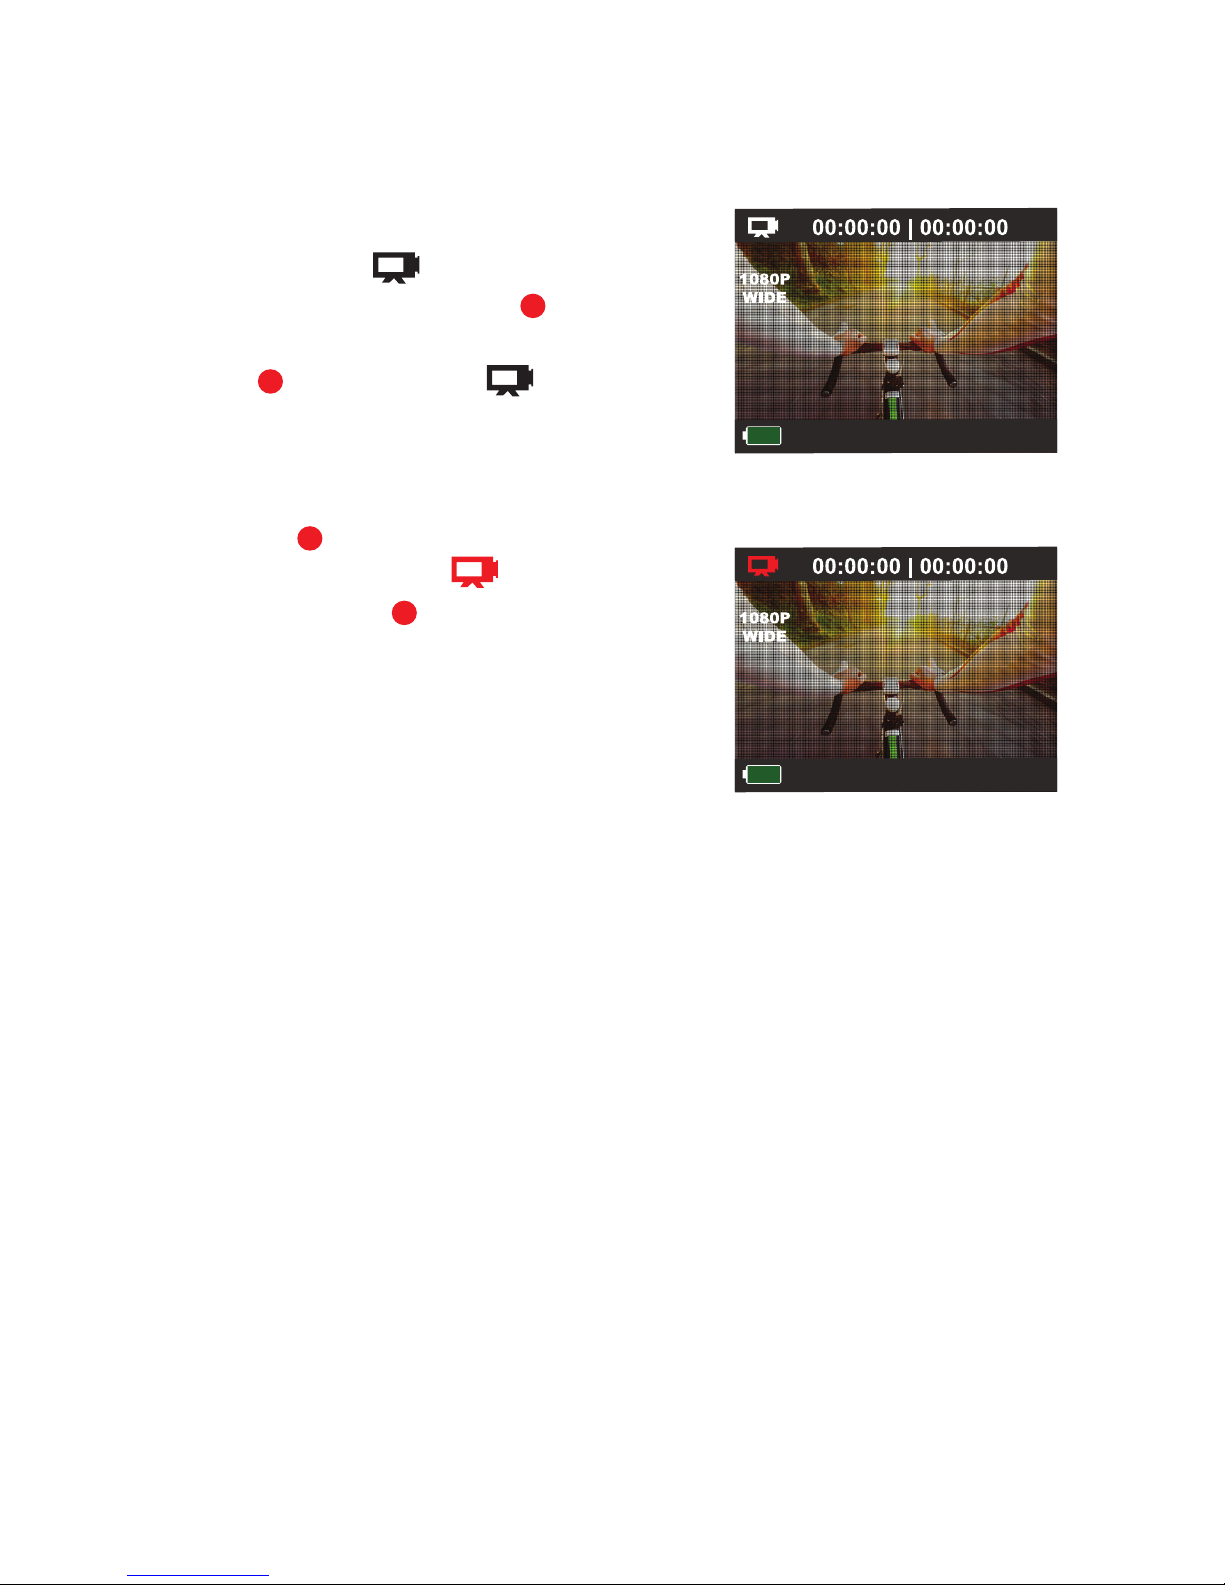
VIDEO MODE
To record a video, make sure the camera
is in Video mode which should be
displayed on the LCD Screen . If not,
short press the Power/Mode
Buon repeatedly until appears.
TO START RECORDING
•Short press the Shuer/Select
Buon . The video icon on the LCD
Screen will turn red . The Status
Indicator Light will illuminate, flash
red and emit a short beep to indicate
recording is in progress.
•While in Video Recording mode, the
LCD Screen will display:
∙elapsed recording time
(top centre le);
∙remaining recording time
(top centre right);
∙date and time stamp
(boom le); and
∙the baery level indicator
(boom le).
LCD Screen in ‘Video’ mode
LCD Screen in Video ‘Recording’ mode
9
1
11
12

12
TO STOP RECORDING
•Short press the Shuer/Select Buon .
•The video icon on the LCD Screen will
return to white. The Status Indicator
Light will also stop flashing which
indicates that a recording has ceased.
•When the microSD card is full or the
baery is drained, recording will cease
automatically. The recorded video will be
saved before the camera switches o.
PHOTO MODE
SINGLE IMAGE
To take a photo, make sure the camera is
in Photo mode which should be
displayed on the LCD Screen. If not, short
press the Power/Mode Buon repeatedly
until appears.
TO TAKE A PHOTO:
•Press the Shuer/Select Buon. The
camera will make a short beep then emit
the camera shuer sound.
11
9
2
1

13
•While in Single Image mode, the LCD
Screen will display:
∙number of images taken
(top centre le);
∙number of images remaining
(top centre right); and
∙the baery level indicator
(boom le).
BURST MODE
To take a burst photo, make sure the
camera is in Burst mode which
should be displayed on the LCD Screen.
If not, short press the Power/Mode
Buon repeatedly until appears.
TO TAKE A BURST PHOTO
•Press the Shuer/Select Buon. The
camera will make a short beep then
emit the camera shuer sound. In
Burst mode, your camera takes 3
photos in 1.5 seconds.
•While in Burst mode, the LCD Screen
will display:
∙number of images taken
(top centre le);
∙number of images remaining
(top centre right); and
∙the baery level indicator
(boom le).
LCD Screen in ‘Single Image’
photo mode
LCD Screen on ‘Burst’ Mode
1
14
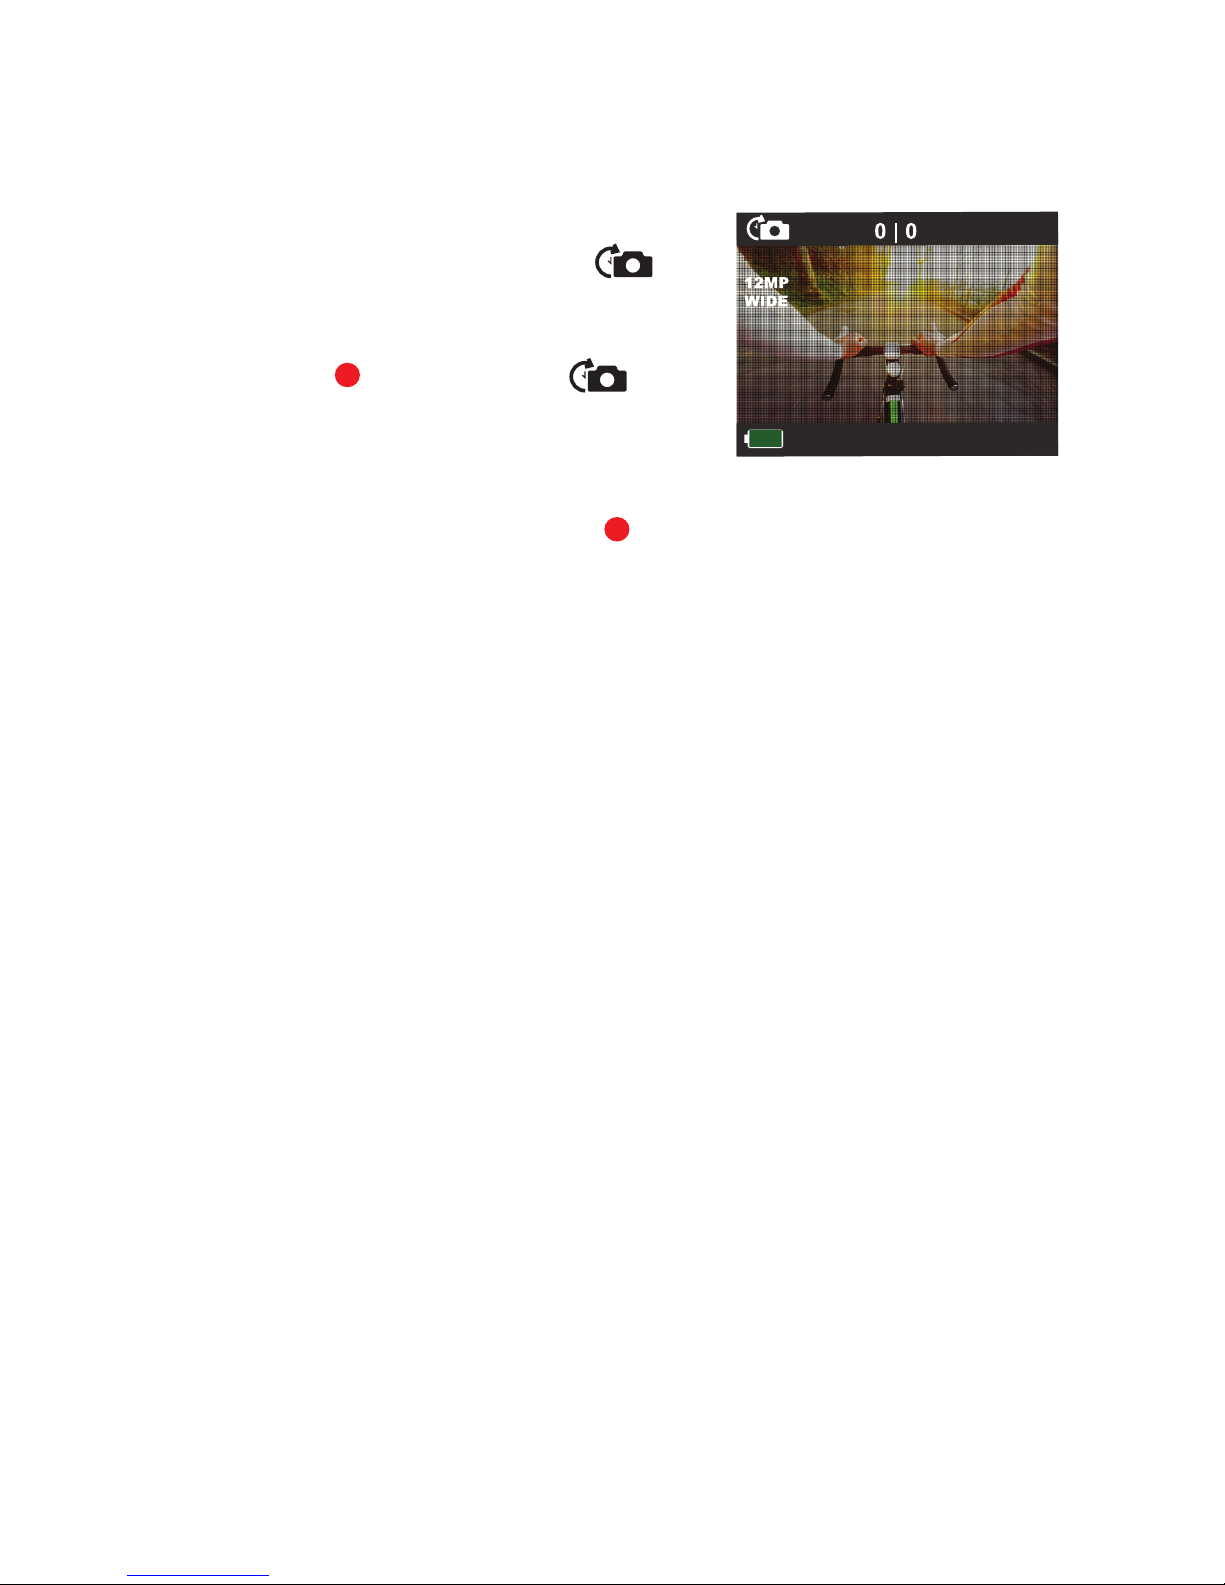
TIME LAPSE MODE
To take a Time Lapse photo, make sure
the camera is in Time Lapse mode
which should be displayed on the LCD
Screen. If not, short press the Power/
Mode Buon repeatedly until
appears.
TO TAKE A PHOTO
•Press the Shuer/Select Buon .
The camera will make a short beep
then emit the camera shuer sound.
In Time Lapse mode, your camera
captures a series of photos at 2, 3, 5,
10, 20, 30 or 60 second intervals.
•While in Time Lapse mode, the LCD
Screen will display:
∙number of images taken
(top centre le);
∙number of images remaining
(top centre right); and
∙the baery level indicator
(boom le).
LCD Screen in ‘Time Lapse’
Photo mode
1
11

15
PLAYBACK/REVIEW MODE
To view your videos and photos make
sure the camera is in Video or Photo
Playback mode which should be
displayed on the LCD Screen by short
pressing the Power/Mode Buon
repeatedly until Video Playback
appears or Photo Review appear.
•Choose either the Video or
Photo by pressing the Shuer/
Select Buon . Use the Power/Mode
Buon to scroll through your videos
or photos. Press the Shuer/Select
Buon to review a video.
•To return to the Playback menu,
press the Wi-Fi Buon .
LCD Screen when ‘Video Playback’
is selected
LCD Screen when ‘Photo Playback’
is selected
9
1
2
10
16
QUICK MODE
Quick Mode allows you to quickly access
the menu seings from Stand By Mode.
TO ENTER QUICK MODE
•Verify the camera is in standby Video
or Camera Mode (where camera in ON
and NOT recording). Press and hold the
Shuer/Select Buon for 3 seconds.
The Quick Mode menu will appear.
•Short press the Power/Mode Buon
repeatedly to scroll through the Quick
Mode options.
•To select a Quick Mode press the
Shuer/Select Buon.
•To exit Quick Mode, hold down the
Shuer/Select Buon for 3 seconds.
LCD Screen in ‘Quick Mode’
11
1

17
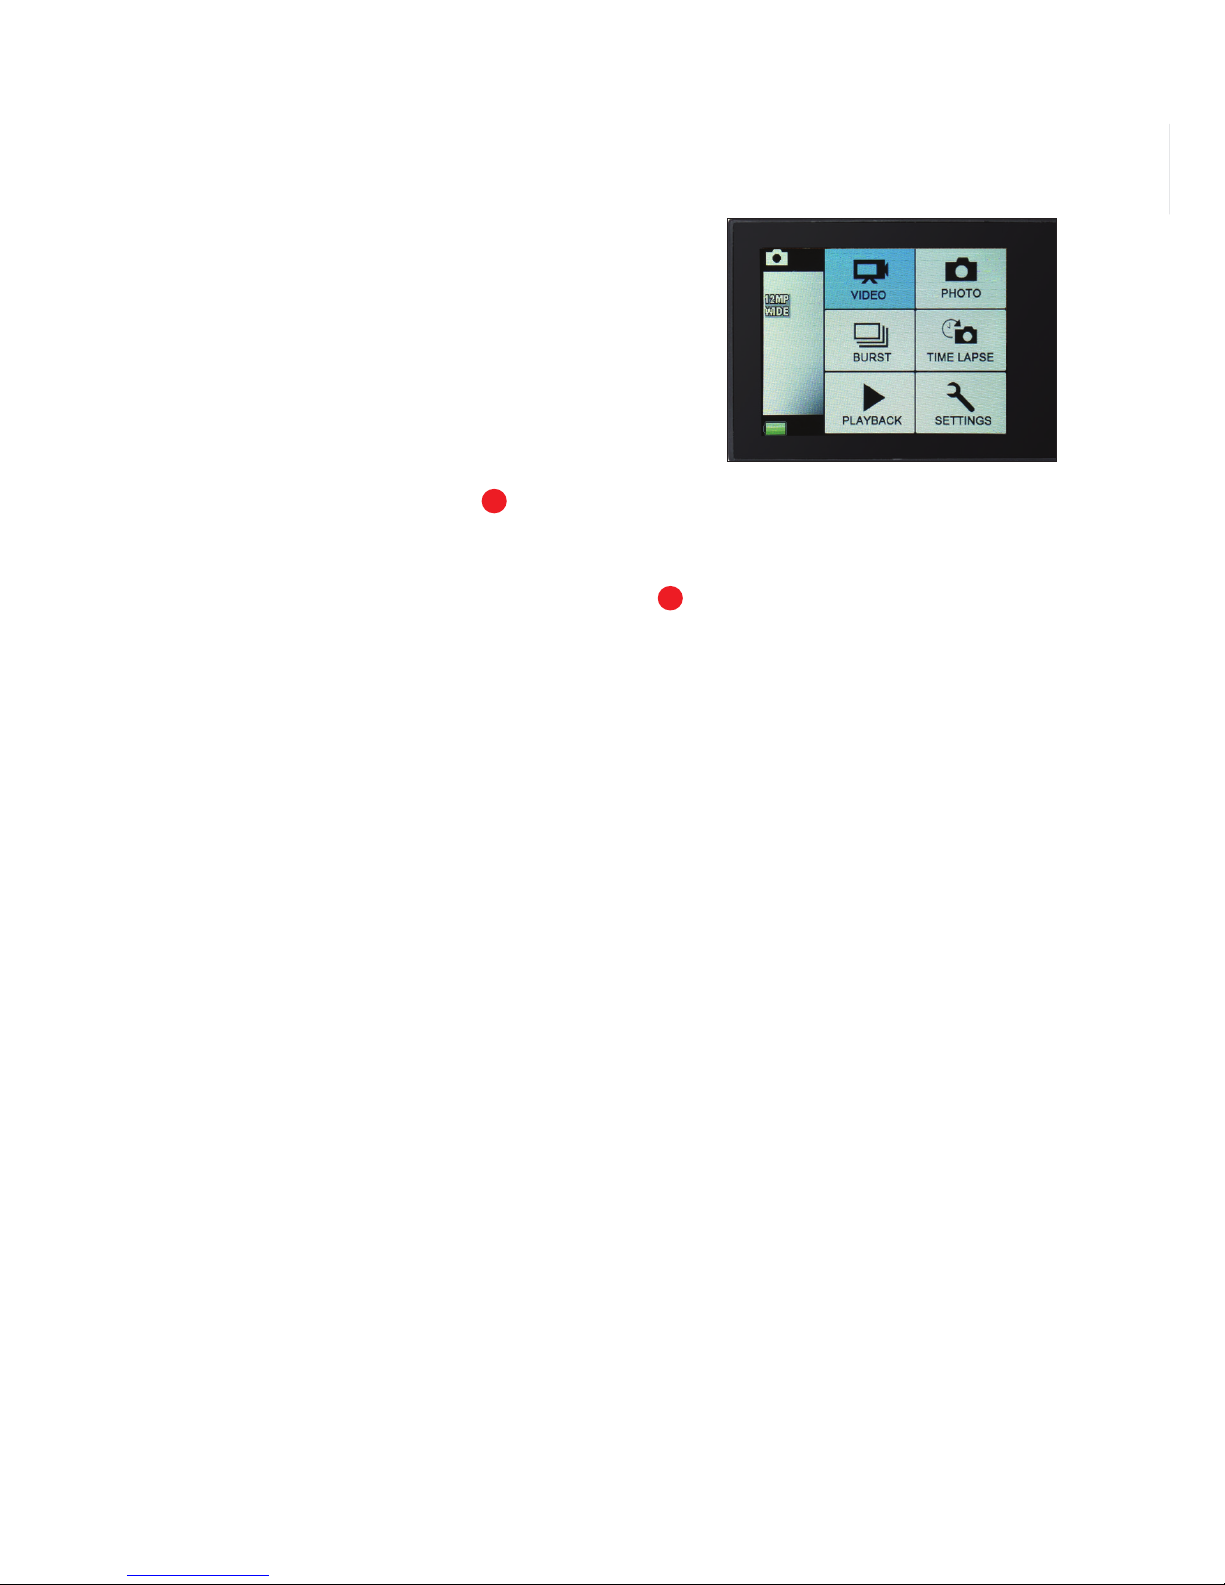
CAMERA SETTINGS
Turn camera ON and repeatedly
press the Power/Mode Buon
to cycle through camera modes
and stop at the Seings screen.
•Press the Shuer/Select Buon
to enter the Seings main menu.
•To select a menu item, press the
Shuer/Select Buon.
•To scroll through the sub-menu options,
press the Power/Mode Buon.
•To select/change one of the sub-menu seings options,
press the Shuer/Select Buon.
•Once a menu option has been changed you will be returned to
the main seings menu.
•To exit the sub-menu or main menu, press the Wi-Fi Buon or
scroll to the buon on the LCD Screen by using the Power/
Mode Buon and pressing the Shuer/Select Buon.
LCD Screen when ‘Seings’
is selected
1
2
10
9

18
Seing Description Options Default
Driving
(In-vehicle)
Recorder
The Driving Recorder activates the
‘Auto Record’ feature if plugged into
a USB Car Charger
ON/OFF OFF
Video
Resolution
Set the Video Resolution to your
preferred output 1080P 30fps/720P 30fps 1080P
Looping Video Choose the Loop Recording time ON/OFF/1/2/5/10 mins OFF
Time Stamp Turn the Date & Time Stamp ON/OFF OFF/Date/Date & Time Date & Time
Exposure Set the camera aperture Exposure level +-2.0/+-1.7/+-1.3/
+-1.0/+-0.7/+-0.3/0 0.0
Photo
Resolution
Set the Photo Resolution to your
preferred output 12MP/8MP/5MP/2MP 12MP
Burst Photo Turn the Photo Burst function ON/OFF ON 3 Photos ON
Time Lapse Set the Time Lapse time (seconds) 2s/3s/5s/10s/20s/30s/60s 5s
Continuous
Lapse
Turn Continuous Lapse video
recording ON/OFF ON/OFF OFF
Power
Frequency Set the Power Frequency 50Hz/60Hz/Auto Auto
Language Set the language EN/SC/TC/FR/SP/IT/POR/
DU/POL/RU/JP EN
Date & Time Set the Date & Time format MM/DD/YY, YY/MM/DD,
or DD/MM/YY YY/MM/DD
Sound Indicator Menu
Shuer Sound Turn the Shuer sound ON/OFF ON/OFF ON
Start Up Sound Turn the Startup sound ON/OFF ON/OFF ON
Beep Turn the Beep sound ON/OFF ON/OFF ON
Volume Set the volume of Audio 0/1/2/3 3
Upside Down Change the image orientation on the
LCD Screen ON/OFF OFF
Screen Saver Turn the Screen Saver ON/OFF or set
the delay OFF/1 min/3 mins/5 mins OFF
Power Saver Turn the Power Saver function ON/OFF
or set the delay OFF/1 min/3 mins/5 mins OFF
Format Format the microSD card No/Yes No
Reset Reset the camera to the Factory
Default Seings No/Yes No
Version Current Firmware and
Batch Number
Firmware Version/
Batch Number
CAMERA SETTINGS MENU GUIDE

19
IN-VEHICLE SETTINGS
To set your camera up for in-vehicle
crash cam recording:
•In the seings menu, turn the “Driving
Recorder” seing to ON;
•In the seings menu, turn the
“Looping Video” seing to ON;
•Join the Suction Mount and the
Camera Clip Housing together.
Tighten the screw. Insert the camera
into the Camera Clip Housing. Place
the Suction Mount and camera in a
suitable position on windscreen of
your vehicle.
To activate ‘Auto Record’ mode:
•Connect a 5V 1.0A Micro USB car
charger (not included) to the camera;
•When your car is in operation, the
camera will automatically start to
record in Looping Video mode. If you
wish to record your entire journey turn
o the Looping Video mode. Power
and recording will automatically stop
when your car is turned o.
To activate manual recording please
follow the instructions on page 11.
+

20
DOWNLOADING THE APP
The iSmart DV App lets you control your camera remotely using a
smartphone or tablet. Features include camera control, live preview,
photo playback and sharing of content and more.
Download the iSmart DV App to your smartphone or tablet via the
Apple App Store or Google Play Store. Do not open the App.
or search on the App
Store for ‘iSmart DV*’
Requires iOS 8.0 or later.
Compatible with iPhone, iPad,
and iPod touch.
or search on Google
Play for ‘iSmart DV*’
Requires Android 4.1
or later.
*Playback may not be supported on some devices. iSmartDV is a third-party App that is supported by the developer.
Compatibility varies by device. Content playback, sharing and access to the camera’s memory card might be not
available on some devices.
Table of contents
Other 3SIXT Action Camera manuals


