Acova Versus User manual

40019728
www.acova.fr
NOTICE D’UTILISATION
INSTRUCTION FOR USE
40019728
NOTICE D’UTILISATION
INSTRUCTION FOR USE

1Généralités 2
2 Installation du radiateur
2.1 Avertissements 4
2.2 Emplacement du radiateur 5
2.3 Raccordement du radiateur 6
3 Utilisation de l’appareil avec le panneau de contrôle
3.1 Présentation 8
3.2 Utilisation 9
4Utilisation de l’appareil avec la télécommande
4.1 Présentation 10
4.2 Introduction des piles et mise en service 11
4.3 Choix du mode 13
4.4 Temps et réglage du programme 16
4.5 Verrouillage des touches 17
5Nettoyage et entretien 17
6Services et garantie 18
3
FR
FRANÇAIS 01
ENGLISH 19

4 5
FR FR
40019728 12/2019
tives à l’utilisation de l’appareil en toute sécurité leur ont
été données et si les risques encourus ont été appréhen-
dés. Les enfants ne doivent pas jouer avec l’appareil. Le
nettoyage et l’entretien par l’usager ne doivent pas être
effectués par des enfants sans surveillance.
Cet appareil ne doit être branché ou raccordé, selon
les règles et normes en application, que par une personne
habilitée.
Il est protégé contre les projections d’eau et peut être
installé dans le volume 2, sous réserve que les dispositifs
de commande électrique ne puissent être touchés par une
personne utilisant la baignoire ou la douche.
L’alimentation électrique doit être protégée par un dis-
positif différentiel résiduel de courant assigné au plus égal
à 30 mA, notamment dans le cas d’une installation dans un
local contenant une baignoire ou une douche.
IMPORTANT : Si le câble d’alimentation est endom-
magé, il doit être remplacé par le fabricant, son service
après-vente ou des personnes de qualication simi-
laire an d’éviter un danger.
IMPORTANT : L’appareil de chauffage ne doit pas être
placé juste en dessous d’une prise de courant.
IMPORTANT : Cet appareil n’est pas destiné à être
utilisé à des altitudes au-delà de 2000 m.
1. GÉNÉRALITÉS
Madame, Monsieur
Nous vous remercions d’avoir choisi ce radiateur. Elaboré avec le
plus grand soin selon notre charte qualité, nous vous en souhaitons une entière satis-
faction. Pour proter pleinement de toutes ses possibilités, nous vous invitons à lire
attentivement cette notice et à la conserver à proximité de votre appareil. Merci de
votre conance.
AVERTISSEMENTS
MISE EN GARDE : Pour éviter une surchauffe, ne
pas couvrir l’appareil de chauffage.
Attention surface très chaude. Caution, hot surface.
ATTENTION - Certaines parties de ce produit
peuvent devenir très chaudes et provoquer des
brûlures. Il faut prêter une attention particulière en
présence d’enfants et de personnes vulnérables.
Il convient de maintenir à distance les enfants de moins
de 3 ans, à moins qu’ils ne soient sous une surveillance
continue.
Les enfants âgés entre 3 ans et 8 ans doivent unique-
ment mettre l’appareil en marche ou à l’arrêt, à condition
que ce dernier ait été placé ou installé dans une position
normale prévue et que ces enfants disposent d’une sur-
veillance ou aient reçu des instructions quant à l’utilisation
de l’appareil en toute sécurité et en comprennent bien les
dangers potentiels. Les enfants âgés entre 3 ans et 8 ans
ne doivent ni brancher, ni régler ni nettoyer l’appareil, et ni
réaliser l’entretien de l’utilisateur.
Cet appareil peut être utilisé par des enfants âgés
d’au moins 8 ans et par des personnes ayant des capa-
cités physiques, sensorielles ou mentales réduites ou
dénuées d’expérience ou de connaissance, s’ils (si elles)
sont correctement surveillé(e)s ou si des instructions rela-

6 7
FR FR
40019728 12/2019
IMPORTANT : L’exemple montré ici ne concerne que
le cas d’une baignoire. Pour les autres types d’équi-
pements de salle de bains, consultez obligatoirement
votre installateur.
IMPORTANT : L’installation doit être équipée d’un
dispositif de coupure omnipolaire ayant une distance
d’ouverture de contact d’au moins 3 mm.
Instructions pour les autres pays
L’installation doit être conforme aux normes en vigueur
et aux règles de l’art du pays dans lequel il est mis en oeuvre.
2.2 EMPLACEMENT DU RADIATEUR
Pour proter pleinement de votre appareil et pour votre
plus grand confort, nous vous recommandons:
– De réaliser l’installation si possible à proximité
des emplacements à fortes déperditions (fenêtres,
portes… ) ;
– De disposer tout objet (meubles, fauteuils) au mini-
mum à 50 cm de la face avant de l’appareil pour
favoriser la circulation de l’air ;
– De positionner le bas du boîtier au minimum à
15 cm du sol ;
– L’appareil de chauffage ne doit pas être placé juste
en dessous d’une prise de courant ;
– D’utiliser des vis de xation adaptées à la nature de
votre mur.
IMPORTANT: Le radiateur ne doit pas être soumis
à une humidité ambiante intensive ou permanente
(douche, piscine, etc.).
2. INSTALLATION DU RADIATEUR
2.1 AVERTISSEMENTS
IMPORTANT : Avant toute opération d’entretien, placez
le bouton sur la position et attendez que le radiateur
ait refroidi. Débranchez-le ensuite du réseau électrique.
Le câble souple monté d’origine est destiné à être re-
lié au réseau par l’intermédiaire d’une boîte de connexion
qui devra être placée derrière l‘appareil, sans interposition
d’une che prise de courant. Dans une cuisine ou une salle
de bains, la boîte de connexion sera placée au moins à
25 cm du sol.
Au-delà des règles prescrites dans cette notice, l’ins-
tallation doit être conforme aux normes européennes et
françaises en vigueur, telles que CEI 60364.7.701 et NF
C15-100, ainsi qu’aux règles de l’art.
Volume 0
Volume 1Volume 2
0,60 m
2,25 m

8 9
FR FR
40019728 12/2019
PRINCIPE DE RACCORDEMENT AVEC FIL PILOTE :
(CLASSE II - MARCHÉ FRANÇAIS)
Votre appareil est muni d’un l pilote lui permettant d’être raccordé à une
centrale de programmation l pilote (non fournie avec l’appareil).
À noter : Votre appareil étant muni d’une régulation électronique inté-
grée, notre responsabilité ne saurait être engagée en cas d’utilisation
avec des centrales de programmation l pilote fonctionnant par cou-
pure de tension d’alimentation (consulter la notice de votre centrale).
PRINCIPE DE RACCORDEMENT SANS FIL PILOTE :
(CLASSE II - MARCHÉ FRANÇAIS)
Si le l pilote n’est pas raccordé, la sécurité impose de l’isoler. Il ne doit en
aucun cas être raccordé à la terre.
N (bleu ou gris) Neutre
Phase
Fil pilote (centrale)
L (brun)
Fil pilote (noir)
Phase
Neutre
Fil pilote (noir)
L (brun)
N (bleu ou gris)
IMPORTANT: Votre radiateur ne doit jamais être ins-
tallé avec son boîtier récepteur en position haute.
ATTENTION : Procédez toujours à la coupure de l’ali-
mentation électrique (disjoncteur + l pilote) avant
toute opération de raccordement.
À NOTER :
L’ajout d’une che de prise de courant est interdit.
2.3 RACCORDEMENT DU RADIATEUR
Les caractéristiques techniques de votre radiateur sont indiquées sur son
étiquette signalétique disposée à l’arrière de celui-ci. Merci d’en prendre note préala-
blement à son installation.
Le raccordement au réseau électrique doit être effectué en respectant:
– la tension et la puissance indiquées sur cette étiquette
– les couleurs conventionnelles :
- bleu ou gris: neutre
- brun : phase
- noir: l pilote (France)
- vert et blanc : prise de terre (Suisse)
Serial : numéro de fabrication
IP : indice de protection de votre
appareil contre les projections d’eau
xxxV xxxxW : tension et puissance
à respecter lors de l’installation
Référence de l’appareil

10 11
FR FR
40019728 12/2019
3.2 UTILISATION
Lors du raccordement à l’alimentation électrique, tous les témoins lumineux
s’allument pendant 2 secondes et un bip prolongé est émis ; ensuite, L1 et L8
restent allumés.
Si vous souhaitez réchauffer la pièce à basse température, appuyez sur T2.
Les témoins verts L2 et L7 s’allument et un bip est émis. Lorsque la surface
du radiateur atteint la température programmée L7, il s’éteint et se rallume
cycliquement pour maintenir la température souhaitée.
Si vous souhaitez réchauffer la pièce à une température moyenne, appuyez
sur T3. Les témoins verts L3 et L7 s’allument et un bip est émis. Lorsque la
surface du radiateur atteint la température programmée L7, il s’éteint et se
rallume cycliquement pour maintenir la température souhaitée.
Si vous souhaitez réchauffer la pièce à une température maximum, appuyez
sur T4. Le témoin vert L7 s’allume et un bip est émis. Lorsque la surface du
radiateur atteint la température programmée L7, il s’éteint et se rallume cycli-
quement pour maintenir la température souhaitée.
Si vous souhaitez atteindre la température superficielle maximum pendant
une durée limitée (2 heures), appuyez sur la touche T5 ; les témoins L5 et L7
s’allument. Le radiateur fonctionnera à la température maximum pendant 2
heures, puis il recommencera à fonctionner selon la fonction choisie pré-
cédemment.
Pour bloquer le clavier une fois les réglages effectués, appuyez sur la touche
T6 pendant 5 secondes ; 4 bips confirmeront la programmation.
En appuyant sur les autres touches, le témoin 6 clignotera pendant
2-3 secondes pour indiquer le blocage en cours.
Seule la touche T1 continue à fonctionner pour mettre l‘appareil en veille à
tout moment.
Pour rétablir le fonctionnement du clavier, appuyer sur la touche T6 pendant
5 secondes ; 4 bips consécutifs confirmeront l’opération.
3. UTILISATION DE L’APPAREIL AVEC LE
PANNEAU DE CONTRÔLE
3.1 PRÉSENTATION
Les radiateurs Acova sont équipés d’un système avancé de contrôle avec
des commandes tactiles et des indications lumineuses qui signalent la fonction
programmée.
Les modications de programmation sont également mises en évidence par un
signal sonore.
Panneau de contrôle avec les symboles et fonctions :
Écran
tactile Fonction LED
T1 VEILLE L1
T2 Réchauffement à basse
température (45°c) L2
T3 Réchauffement à tempéra-
ture moyenne (55°c) L3
T4 Réchauffement à tempéra-
ture maximum (65°c) L4
T5 Boost de 2 heures à la
température maximum L5
T6 Blocage du clavier L6
Témoin rouge qui signale
que le radiateur est en
mode chauffage
L7
Appareil sous tension L8
T1 T2 T3 T4 T5 T6
L1 L2 L3 L4 L5 L6
L8
L7

12 13
FR FR
40019728 12/2019
4.2 INTRODUCTION DES PILES ET MISE EN SERVICE
Mise en place des piles :
Ôter le couvercle situé à l’arrière de la télécommande en
appuyant légèrement sur la partie en relief et en faisant
glisser le couvercle vers le bas.
Introduire deux piles alcalines AAA de 1,5 V en respectant
les signes + et -. Remettre le couvercle en le faisant glisser
jusqu’à entendre le clic.
Mise en place de la télécommande :
Vous pouvez utiliser les deux bandes adhésives situées à
l’arrière du socle de la télécommande pour xer celui-ci au
mur. Pour une meilleure adhésion vous pouvez déposer
sur la zone prévue à cet effet une petite quantité de la
colle fournie dans l’emballage.
Une cheville (diamètre 5mm et longueur 25mm) et une vis
sont également fournies.
Pour placer la télécommande dans son socle, insérez-la par le
haut puis descendez en faisant correspondre le crochet du socle
avec l’encoche de la télécommande (voir schéma de droite pour
une insertion correcte).
Indicateur de température
Indicateur de piles usagées
Indicateur comportemental
Modes de fonctionnement
Mode Boost 2 heures
Horloge
Mode programme
Indicateur de verrouillage
Indicateur de détection
de fenêtre ouverte
Mode Chrono
Indicateur de jour
Bande
adhésive Zone pour
collage
4. UTILISATION DE L’APPAREIL AVEC LA
TÉLÉCOMMANDE
4.1 PRÉSENTATION
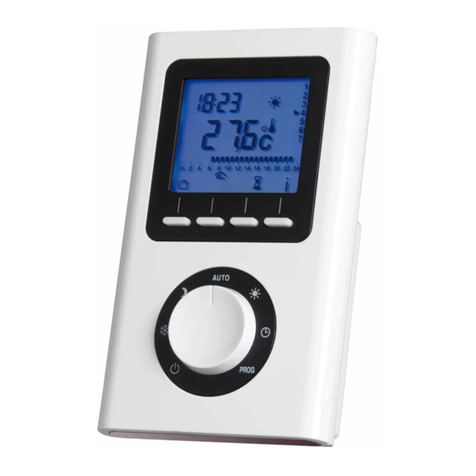
Les radiateurs Acova sont accompagnés d’une télécommande infrarouge qui
permet de communiquer au capteur le contrôle de la température ambiante et de
choisir différents programmes de fonctionnement.
Lorsque le capteur reçoit l’information, le témoin L8 clignote pour conrmer
qu’il a reçu la communication ; il reste ensuite allumé pour indiquer que l’appareil a été
programmé.
Pour une bonne communication, orienter la télécommande vers le récepteur de
l’appareil. Le signal de la télécommande est envoyé au récepteur une seconde après
le dernier appui sur une touche.
La distance entre la télécommande et le récepteur ne doit pas dépasser 7 m.
Communication double infrarouge, un en haut et un en bas de la télécom
-
mande.
Touche Mode
Touche Plus
Touche
Détection fenêtre
Touche Boost 2H
Touche Moins
Touche Chrono
Touche
Marche / Stand-by

14 15
FR FR
40019728 12/2019
4.3 CHOIX DU MODE
Une fois le réglage date/heure/minutes terminé, la télécommande entrera en
mode « Comfort ».
En mode « Comfort », lorsqu’on appuie sur la touche « Mode », on entre en
mode « Night ».
De même, en appuyant de nouveau sur la touche « Mode », les modes de la
télécommande deviendront : mode Comfort – Mode Night – Mode antigel – Mode hor-
loge – Mode Fil pilote - Mode Comfort.
Symbole Mode Description de la fonction
Comfort La température de l’appareil est contrôlée par les
réglages « Comfort mode ».
Night La température de l’appareil est contrôlée par les
réglages « Night mode ».
Antifreeze La température de l’appareil est contrôlée par les
réglages « Anti-freeze mode ».
Fil-pilot La température de l’appareil est contrôlée par le fil
Fil-pilote.
Chrono La température de l’appareil est contrôlée par l’état
du programme « Comfort » ou « Nuit ».
Boost 2H L’appareil réchauffe la pièce à la puissance
maximum.
Lock Les touches de l’appareil sont bloquées.
Window
open L’appareil active la fonction « fenêtre ouverte ».
Stand-by L’appareil n’est pas en fonction.
Eco Inactif sur cet appareil.
ASC Inactif sur cet appareil.
Modes Comfort et Night, réglage de la température
Entrer en mode « Night » ou en mode « Comfort » pour régler la température à
l’aide des touches « Plus » ou « Moins » ; en appuyant une fois sur la touche « Plus »,
la température augmente de 0,5 degré ; en appuyant une fois sur la touche « Moins »,
elle diminue de 0,5 degré.
La température peut être réglée de 7 à 30 degrés.
Réglage
jour
Réglage
minutes
Réglage heures
Télécom-
mande
initialisée
Après avoir installé les piles, l’écran LCD afchera tous les symboles pendant
1 seconde.
Vous pouvez ensuite régler la date et l’heure ; la date clignotera : l’utilisateur
peut régler la date à l’aide des touches « Plus » ou « Moins ».
Appuyer ensuite sur la touche « Mode » ; l’heure clignotera ; régler l’heure à
l’aide des touches « Plus » ou « Moins ».
Appuyer encore une fois sur la touche « Mode » ; les minutes clignoteront ;
régler les minutes à l’aide des touches « Plus » ou « Moins ».
Appuyer de nouveau sur la touche « Mode » pour terminer le réglage des
Minutes et entrer en mode « Confort ».
Piles déchargées
Lorsque la tension des piles est inférieure à 2,2 V, l’inscription
« Batt » s’afche pendant 3 secondes par minute dans la zone de l’hor-
loge ; l’utilisateur devra remplacer les piles.
En cas de remplacement des piles ou d’élimination de la télécom-
mande, les piles doivent être ôtées et éliminées conformément aux lois en
vigueur, car elles sont dangereuses pour l’environnement.

16 17
FR FR
40019728 12/2019
Mode Stand-by
Dans n’importe quel mode, en appuyant sur le bouton « stand-by », la télécom-
mande entrera en veille et l’appareil arrêtera de fonctionner.
En appuyant de nouveau sur cette touche, la télécommande reviendra au
mode précédent.
Mode Window open « fenêtre ouverte »
Dans ce mode, votre radiateur sera capable de détecter une chute de tempé-
rature signicative liée, par exemple, à l’ouverture prolongée d’une fenêtre en hiver.
Il adaptera alors son fonctionnement automatiquement an de vous faire réaliser des
économies d’énergie.
Dans ce cas l’appareil désactive la résistance pendant 30 minutes maximum
ou jusqu’à ce que hausse de température dans la pièce lui indique que la fenêtre a
été fermée.
En appuyant simultanément sur la touche « Détection fenêtre » et sur la
touche « - », le capteur de fenêtre ouverte sera activé. L’icône s’afche à l’écran.
En appuyant de nouveau simultanément sur la touche « Détection fenêtre » et
sur la touche « - », la fonction sera désactivée. L’icône disparaît.
IMPORTANT :
An de proter au mieux de cette fonction, votre radiateur doit être positionné
près de l’ouvrant sans interposition d’un meuble ou d’un quelconque objet. La
qualité de la détection d’ouverture / fermeture de fenêtre dépendra de nom-
breux facteurs tels que l’emplacement de l’appareil, la rapidité de la chute /
remontée de température dans la pièce, etc.
Appui sur
stand-by
Mode
Confort
Mode
Stand-by
Mode
Confort
Appui sur
stand-by
Le réglage de la température en mode « Night » ne peut être supérieur à celui
du mode « Comfort ».
Par exemple : si l’on règle la température du mode « Comfort » à 25 degrés,
en mode « Night », il ne sera plus possible d’augmenter la température à l’aide de la
touche « plus » lorsque celle-ci aura atteint 25 degrés.
Mode antigel
Entrer en mode « Antigel » ; la température est xe à 7 degrés ; en appuyant
sur les touches « Plus » ou « Moins », il est impossible d’augmenter ou de diminuer
la température.
Mode Chrono
Entrer en mode « Chrono » ; l’écran LCD afchera la température, le jour,
l’heure et l’état du programme journalier.
Voir le chapitre 4.4 pour dénir le programme.
Mode Fil pilote
Entrer en mode « Fil pilote » ; l’appareil reconnaîtra les commandes reçues du
Fil pilote (Comfort / Night / antigel / ECO / Stand-by).
Mode Boost 2 heures
Ce mode peut être utilisé pour réchauffer rapidement la pièce ou accélérer le
séchage des serviettes.
Appuyer sur la touche « Boost 2H » jusqu’à ce que l’écran afche l’icône .
L’appareil chauffera à pleine puissance pendant 2 heures pour une tempéra-
ture maximum de 30° dans la pièce. À la n des deux heures l’appareil revient auto-
matiquement dans son mode de fonctionnement précédent.
Il est possible de quitter le boost et de changer de mode de fonctionnement à
tout moment en appuyant de nouveau sur la touche « Boost 2H ».
Appui sur
Boost 2H
Mode
Confort
Mode
2 heures
Mode
Confort
Appui sur
Boost 2H

18 19
FR FR
40019728 12/2019
4.5 VERROUILLAGE DES TOUCHES
En appuyant simultanément sur les touches « Mode » et « Plus » pendant
3 secondes, le symbole de verrouillage s’afchera et toutes les touches seront
bloquées ; de cette façon, la télécommande ne répond pas lorsqu’on appuie sur une
touche quelconque.
En appuyant de nouveau simultanément sur les touches « Mode » et « Plus »
pendant 3 secondes, le symbole de verrouillage disparaîtra et les touches recommen-
ceront à fonctionner.
5. NETTOYAGE ET ENTRETIEN
Avant toute opération, assurez-vous que l’appareil a complètement refroidi et
débranchez-le de l’arrivée électrique.
Pour le nettoyage, utilisez un chiffon doux et humide et un produit nettoyant
neutre pour vitres. N’utilisez jamais de produits de nettoyage abrasifs, corrosifs ou
contenant des solvants.
En cas de problème technique, adressez-vous à un personnel qualié.
Appui sur
Mode et +
Mode
Confort
Mode Confort +
touches verrouillées
Mode
Confort
Appui sur
Mode et +
Indicateur comportemental
Votre interface de commande intègre un indicateur comportemental qui vous
aide à appréhender le niveau de consommation énergétique correspondant au niveau
de température que vous avez choisi. Le curseur se positionnera devant le pavé
coloré correspondant au niveau de consommation d’énergie (vert=basse, jaune=
moyenne, rouge=élevée).
4.4 TEMPS ET RÉGLAGE DU PROGRAMME
Depuis le mode Chrono, en appuyant sur la touche « Chrono », la date cligno-
tera ; l’utilisateur peut régler le jour à l’aide des touches « Plus » ou « Moins », et le
programme journalier sera afché.
En appuyant sur la touche « Mode », l’heure clignotera et l’utilisateur pourra
régler l’heure actuelle à l’aide des touches « Plus » ou « Moins ».
En appuyant de nouveau sur la touche « Mode », les minutes clignoteront et
l’utilisateur pourra régler les minutes à l’aide des touches « Plus » ou « Moins ».
Lorsque les minutes clignotent, en appuyant sur la touche « Mode », on com-
mencera à entrer le programme du Lundi et « heure 0 » clignotera ; en appuyant sur
les touches « Plus » ou « Moins », l’utilisateur peut mettre à l’heure le mode « Comfort
temperature » ou « night temperature » (en appuyant sur « Plus », le point s’afchera
pour indiquer que le mode « Comfort temperature » sera exécuté à l’heure courante,
tandis qu’en appuyant sur la touche « Moins », le point disparaîtra pour indiquer que
le mode « Night temperature » sera exécuté à l’heure courante ; ensuite, le point de
l’heure suivante clignotera lui aussi pour être paramétré.
En appuyant de nouveau sur la touche « Mode », le jour suivant s’afchera, et
l’utilisateur pourra régler de la même façon les modes pour les heures 0 – 23.
Une fois le 7è jour programmé, le programme revient automatiquement au
mode Chrono.
Touche
Statut du
programme

20
FR
40019728
1 General 19
2 Installing the radiator
2.1 Warnings 22
2.2 Positioning the radiator 23
2.3 Connecting the radiator 24
3 Using your appliance with the control panel
3.1 Overview 26
3.2 Use 27
4 Using your appliance with the remote control
4.1 Overview 28
4.2 Battery introduction and commissioning 29
4.3 Switching modes 31
4.4 Time and program setting 34
4.5 Keypad lock 35
5 Cleaning and maintenance 35
6 Services and guarantee 36
6. SERVICES ET GARANTIE
Service après-vente
En cas de non fonctionnement ou de besoin en pièces détachées, contactez
votre installateur ou votre revendeur.
Au préalable, pour permettre la bonne compréhension et un traitement rapide
du problème, assurez-vous d’avoir bien relevé :
- les éléments gurant sur l’étiquette signalétique de l’appareil (voir chapitre 2.3),
- la référence commerciale gurant sur votre facture d’achat datée.
Garantie
(Voir conditions générales de vente dans le pays concerné)
La garantie ne s’applique pas notamment en cas de mise en oeuvre, d’installa-
tion ou d’entretien non conforme à la norme en vigueur du pays, aux règles de l’art et
à la notice d’utilisation.
Pour toute autre question concernant la garantie, contactez votre installateur
ou votre revendeur.
- Les radiateurs et les sèche-serviettes doivent être utilisés conformément à la
notice d’utilisation fournie avec les appareils.
- Il convient de prendre toutes les précautions normales de la vie domestique,
et notamment celles concernant l’utilisation par des enfants, an d’éviter tout dom-
mage corporel.
Règlementations environnementales
Traitement des appareils électriques et électroniques en n de vie.
Ce symbole indique que ce produit ne doit pas être traité avec les dé-
chets ménagers. Il doit être remis à un point de collecte approprié qui se
chargera de son recyclage. En s’assurant que ce produit est bien mis au
rebut de manière correcte, vous aiderez à prévenir les conséquences
négatives potentielles pour l’environnement et la santé humaine.
21
EN

22 23
EN EN
40019728 12/2019
This appliance should be plugged or connected, accor-
ding to rules and standards in application, only by an autho-
rized person.
It is protected from splashes of water, and can be ins-
talled within volume 2 as long as the electrical controls are
out of reach of anyone using the bath or shower.
The electricity supply must be protected by a residual
current device with a maximum of 30mA, especially when
installed in a room containing a bathtub or shower.
IMPORTANT If the power cable is damaged, for sa-
fety reasons it must be replaced by the manufacturer,
the manufacturer’s after sales service department or a
similarly qualied person.
IMPORTANT The heating appliance must not be
placed underneath a power outlet.
IMPORTANT This appliance is not intended for use at
altitudes exceeding 2000 m.
1. GENERAL
Dear customer
Thank you for choosing this radiator. This product has been manufactured in
accordance with our stringent quality requirements to give you total satisfaction. To get
the most out of your radiator, we advise you to read these instructions carefully and
keep them to hand. Thank you for your purchase.
WARNINGS
CAUTION: To avoid overheating, do not cover the
heating appliance.
Caution, hot surface.
CAUTION - Some parts of this product can become
very hot and cause burns. Particular attention has to be
given where children and vulnerable people are present.
Children of less than 3 years should be kept away
unless continuously supervised.
Children aged from 3 years and less than 8 years shall
only switch on/off the appliance provided that it has been
placed or installed in its intended normal operating position
and they have been given supervision or instruction concer-
ning use of the appliance in a safe way and understand the
hazards involved. Children aged from 3 years and less than
8 years shall not plug in, regulate and clean the appliance or
perform user maintenance.
This appliance can be used by children aged from 8
years and above and persons with reduced physical, senso-
ry or mental capabilities or lack of experience and knowledge
if they have been given supervision or instruction concer-
ning use of the appliance in a safe way and understand the
hazards involved. Children shall not play with the appliance.
Cleaning and user maintenance shall not be made by child-
ren without supervision.

24 25
EN EN
40019728 12/2019
IMPORTANT The example shown only concerns a
bathtub. For other bathroom xtures, please consult
your installer.
IMPORTANT The system must be tted with an
omnipolar circuit-breaker with a minimum contact
opening of 3mm.
2.2 POSITIONING THE RADIATOR
To gain the full benet of your appliance and enjoy the
highest standards of comfort, we advise you to:
- install the radiator near places of high heat loss
(windows, doors, etc.) wherever possible;
- ensure that an area of at least 50 cm in front of the
appliance is clear of objects which might hinder air
circulation (furniture, armchairs, etc.);
- ensure that the bottom of the control unit is
positioned at least 15 cm from the oor;
- not place the heating appliance underneath a power
outlet;
- use mounting screws suitable for your wall.
IMPORTANT The radiator must not be exposed to
intensive or on-going ambient humidity (shower, swim-
ming pool, etc.).
2. INSTALLING THE RADIATOR
2.1 WARNINGS
IMPORTANT: Before performing any maintenance
work, put the dial in the position, allow the appliance
to cool completely and disconnect it from the mains.
The exible cable supplied with your appliance is desi-
gned to be connected to the mains via a junction box that
must be placed behind the appliance, with no need for a
plug. In a kitchen or bathroom, the junction box must be
positioned at least 25 cm from the oor.
The appliance must be installed as described in this
document and in accordance with the applicable European
and French standards, including CEI 60364.7.701 and
NF C15-100, as well as the rules of good professional prac-
tice. For other countries (apart from France), the appliance
must be installed in accordance with standards in force and
with rules of good professional practice in the country of
use.
Volume 0
Volume 1Volume 2
0.60 m
2.25 m

26 27
EN EN
40019728 12/2019
CONNECTING PRINCIPLE WITH PILOT WIRE:
(CLASS 2 - FRENCH MARKET)
Your appliance is equipped with a pilot wire for connection to a pilot wire
programming base unit (not supplied with the appliance).
Note: Your appliance is equipped with an integrated electronic control
system so we cannot accept any liability should the appliance be used
with Pilot Wire programming base units that function by disconnecting
the supply voltage (refer to the instructions supplied with your control
unit).
CONNECTING PRINCIPLE WITHOUT PILOT WIRE:
(CLASS 2 - FRENCH MARKET)
If the pilot wire is not connected, it must be insulated for safety reasons. Under
no circumstances must it be connected to earth.
CONNECTION SYSTEM WITH MAINS PLUG READY-FITTED:
For other countries (apart from France), the appliance must be installed in
accordance with standards in force and with rules of good professional practice in the
country of use.
The exible cable supplied with the appliance is designed to be connected to
the mains via a plug.
N (blue or grey) Neutral
Live
Pilot wire (base unit)
L (brown)
Pilot wire (black)
Live
Neutral
Pilot wire (black)
L (brown)
N (blue or grey)
Switzerland
(class I) Europe
(class II)
IMPORTANT This appliance should never be installed
with the electrical connection box positioned topside.
NOTE The exible cable supplied with the appliance is
designed to be connected to the mains via a plug or a
junction box (according to local standards).
CAUTION Always turn off the electricity supply (circuit-
breaker + pilot wire) before making any connections.
2.3 CONNECTING THE APPLIANCE
The technical specications of your radiator are shown on its nameplate.
Please note these down before installing it and before requesting any after-
sales assistance.
When connecting the appliance to the mains, you must observe:
• The voltage indicated on the nameplate
• Conventional colour coding:
- blue or grey: neutral
- brown: live
- black: pilot wire (France)
- green and white: ground terminal (Switzerland)
IP: protection level of your appliance
against the ingress of solid foreign
bodies and water spray
Serial number
xxxV xxxxW: voltage and power
required for installation
Appliance reference number

28 29
EN EN
40019728 12/2019
3.2 USE
When connecting the power supply, all the LEDs light up for
2 seconds and you will hear a long “beep”. After this, only L1 and L8
will remain on.
Touch T2 if you wish to heat up the room at low temperature. The L2
and L7 green LEDs will light up and you will hear a “beep”. When the
surface of the radiator reaches the set temperature, L7 switches on
and off cyclically in order to maintain the set temperature.
Touch T3 if you wish to heat up the room at medium temperature.
The L3 and L7 green LEDs will light up and you will hear a “beep”.
When the surface of the radiator reaches the set temperature, L7
switches on and off cyclically in order to maintain the set temperature.
Touch T4 if you wish to heat up the room at maximum temperature.
The L7 green LED will light up and you will hear a “beep”. When the
surface of the radiator reaches the set temperature, L7 switches on
and off cyclically in order to maintain the desired temperature.
Touch the T5 button if you wish to have the maximum surface tem-
perature for a limited time (2 hours), the L5 and L7 LEDs will light up.
The radiator will operate at maximum temperature for 2 hours, after
which, it will go back to operate in the function set before the Boost
function.
If after the settings you wish to lock the keypad, press the T6 button
for 5 seconds - you will hear 4 beeps confirming the setting.
When touching the other buttons lightly, the L6 LED will flash for
2-3 seconds indicating the keypad is currently locked.
Only the T1 button will remain operational, so to put the appliance
on stand-by at any time.
To reactivate the keypad, press the T6 button for 5 seconds -
4 consecutive beeps will confirm the setting.
3. USING YOUR APPLIANCE WITH THE
CONTROL PANEL
3.1 OVERVIEW
The Acova radiators are equipped with an advanced control system with touch-
screen controls and light indicators which indicate the set function.
Changes in settings are also remarked by an acoustic signal.
Control panel with symbols and functions:
Touch
screen Function LED
T1 STAND-BY L1
T2 Low-temperature heating
(45°c) L2
T3 Medium-temperature heating
(55°c) L3
T4 Maximum-temperature
heating (65°c) L4
T5 Maximum-temperature
2-hours boost L5
T6 Keypad Lock L6
Red LED indicates radiator is
heating up L7
Appliance in tension L8
T1 T2 T3 T4 T5 T6
L1 L2 L3 L4 L5 L6
L8
L7

30 31
EN EN
40019728 12/2019
Mode key
Plus key
Window open
detection button
Boost 2h key
Minus key
Chrono key
On / Stand-by key
4. USING YOUR APPLIANCE WITH THE
REMOTE CONTROL
4.1 OVERVIEW
The Acova radiators are equipped with infrared remote control, allowing to
communicate room temperature control to the sensor and to set different operating
programs.
When the sensor receives the information the L8 LED ashes to indicate the
reception of communication, it will then stay lit to indicate that the device has been
programmed.
For good communication, point the remote control towards the receiver unit of
the appliance. The signal from the remote control is sent to the receiver one second
after the last key press.
The distance between remote control and receiver must not exceed 7 m.
Double infrared communication, one at the top and one at the bottom of the
remote control.
4.2 BATTERY INTRODUCTION AND COMMISSIONING
Placing the batteries:
Remove the cover on the back of the remote control by
lightly pressing the raised part and sliding the cover down.
Insert two 1.5 V - AAA alkaline batteries in the right position
paying attention to + and – polarity. Replace the cover by
sliding it until you hear the click.
Setting up the remote control:
You can use the two adhesive strips on the back of the
base of the remote control to attach it to the wall. For a
better adhesion you can deposit on the area provided for
this purpose a small amount of glue provided in the pac-
kaging.
A dowel (diameter 5mm and length 25mm) and a screw
are also provided.
To place the remote control in its base, insert it from the top and
then down by matching the hook of the base with the notch of the
remote control (see diagram on the right for correct insertion).
Temperature indicator
Battery indicator
Behavioral indicator
Operating modes
Boost mode 2 hours
Clock
Program mode
Lock indicator
Open window detection
indicator
Chrono Mode
Day indicator
Adhesive
strip Glue
area

32 33
EN EN
40019728 12/2019
4.3 SWITCHING MODES
Once date/hour/minutes are set, the remote control will switch to “Comfort”
mode.
From the «Comfort» mode, by pressing the “Mode” button, the “Night” mode
will be activated.
Similarly, by pressing the “Mode” button again, the remote control’s modes will
switch to: Comfort Mode – Night Mode – Antifreeze Mode – Clock Mode – Pilot-Wire
Mode – Comfort Mode.
Symbol Mode Function description
Comfort The temperature of the appliance is controlled by
the “Comfort mode” settings
Night The temperature of the appliance is controlled by
the “Night mode” settings
Antifreeze The temperature of the appliance is controlled by
the “Anti-freeze” settings
Fil-pilot The temperature of the appliance is controlled by
the pilot-wire
Chrono The temperature of the appliance is controlled by
the mode of either the “comfort” or “night” programs
2 hr boost The appliance heats up the room at maximum
power
Lock Locks the keypad of the appliance
Window
open The appliance activates the “Window open” function
Stand-by The appliance is not in operation
Eco Inactive on this device
ASC Inactive on this device
Comfort and Night Modes – setting of the mode’s temperature
Go to “Night” or “Comfort” mode - use “Plus” or “Minus” buttons for temperature
setting: by pressing the “Plus” button once, the temperature will rise by 0.5 degrees, by
pressing the “Minus” button once, the temperature will drop by 0.5 degrees.
Temperature can be adjusted from 7 up to 30 degrees.
Once the batteries are installed, the LCD display will be showing all symbols
for 1 second.
You can then set the date and time; the date will ash: the user can set the date
using the «+» or «-» keys.
Then press the «Mode» key; the hour will ash; set the time using the «+» or
«-» keys.
Press the «Mode» key once more; the minutes will ash; set the minutes using
the «+» or «-» keys.
Press the «Mode» button again to nish setting the Minutes and enter the
«Comfort» mode.
Day
adjustment
Setting
minutes
Hour setting
Initialized
remote
control
Low Batteries
When the batteries’ tension is lower than 2.2 V, the “Battery
symbol will be displayed for 3 seconds every minute in the clock
zone. The user will have to replace the batteries.
Both in case of replacement of the batteries and of disposal of the
remote control, batteries must be removed and disposed of in compliance
with applicable laws, as they are harmful for the environment.

34 35
EN EN
40019728 12/2019
The “Night” mode temperature setting cannot be higher than the “Comfort”
mode’s one.
Example : If the “Comfort” mode’s temperature has been set to 25 degrees,
when switching to “Night” mode and wanting to set the temperature, once it reaches 25
degrees, the temperature will not rise, even when pressing the “Plus” button.
Antifreeze Mode
Go to “Antifreeze” mode, the temperature is xed to 7 degrees, by pressing the
“Plus” or “Minus” buttons, the temperature cannot be neither risen nor reduced.
Chrono Mode
Go to “Chrono” mode, the LCD display will be showing temperature, date, time
and state of the daily program.
See chapter 4.4 to set the program.
Pilot-Wire Mode
Go to “Pilot-Wire” mode – the device will recognise the commands received
from the Pilot-Wire (Comfort / Nigh / Antifreeze / ECO / Stand-by)
Boost mode 2 hours
This mode can be used to quickly warm the room or speed up the drying of the
towels.
Press the «Boost 2h» button until the display shows the icon.
The unit will heat at full power for 2 hours for a maximum temperature of 30° C
in the room. At the end of the two hours the unit automatically returns to its previous
operating mode. It is possible to exit the boost and change the operating mode at any
time by pressing the «Boost 2h» button again.
Press
Boost 2h
key
Comfort
mode
2 hours
mode
Comfort
mode
Press
Boost 2h
key
Stand-by Mode
In any mode, by pressing the «Stand-by» button, the remote control will go into
stand-by mode and the device will stop operating.
By pressing this button again, the remote control will go back to the previous
mode.
« Window open » Mode
In this mode, your radiator will be able to detect a signicant drop in tempera-
ture, caused by a window standing open in winter, for instance. It will then adapt its
operation automatically so that you make energy savings.
In this case the device switches off the resistance for up to 30 minutes or until
the temperature rise in the room indicates that the window has been closed.
By simultaneously pressing the «Window open detection» button and the «-»
button, the open window sensor will be activated. The icon appears on the screen.
Pressing the «Window open detection» button and the «-» button simulta-
neously deactivates the function. The icon disappears.
IMPORTANT:
Your radiator should be placed close to the opening with no furniture or other
object nearby, to make the best use of this function. The quality of the window
open/closed function depends on a number of factors, such as the position
of the appliance, how fast the temperature in the room rises/falls, the type of
window, etc.
Press
stand-by
key
Comfort
mode
Stand-by
mode
Comfort
mode
Press
stand-by
key

36 37
EN EN
40019728 12/2019
4.5 KEYPAD LOCK
By pressing the “Mode” and “Plus” buttons simultaneously for 3 seconds, the
block symbol will be displayed and all buttons will be locked. Thus, at the pressing of
any buttons the remote control will not respond.
By pressing once again the “Mode” and “Plus” buttons simultaneously for
3 seconds, the block symbol will disappear and the buttons will go back to being
operational.
5. CLEANING AND MAINTENANCE
Before starting any operation make sure that the equipment is completely cold
and that it is disconnected from the mains.
For cleaning, use a soft damp cloth with a neutral detergent for cleaning glass.
Never use abrasive or corrosive cleaning agents or solvents.
For technical issues, contact a qualied professional.
Press
Mode and
«+»
Comfort
mode
Comfort mode +
locked keys
Comfort
mode
Press
Mode and
«+»
Behavioral indicator
Your control panel helps you understand the energy consumption level which
corresponds to your chosen temperature level. The cursor is placed opposite the
coloured block which corresponds to the energy consumption level of this setpoint
temperature (green = low, yellow = medium, red = high).
4.4 TIME AND PROGRAM SETTING
In any mode, by pressing the “Chrono” button, the date will start ashing – the
user will then be able to set the current date by using the «Plus» or «Minus» buttons.
The daily program will also be displayed.
By pressing the «Mode» button, the hour section will start ashing and the user
will be able to set the current hour by using the «Plus» or «Minus» buttons.
By pressing the «Mode» button again, the minutes section will start ashing
and the user will be able to set the minutes by using the «Plus» or «Minus» buttons.
When the Minutes section is ashing, by pressing the “Mode” button, the user
may proceed to set the Monday program and the “0 time” point will start ashing. The
user may then use the “Plus” or “Minus” buttons to set the “Comfort temperature” or
“Night temperature” to current time (by pressing “Plus” the point indicating that at the
current time the “Comfort temperature” mode will be activated. While by pressing the
«Minus» button, the point will disappear to indicate that at current time the “Night tem-
perature” mode will be activated. Subsequently, the point of the following hour will ash
in the same way for the setting.
By pressing the “Mode” button again, the subsequent day will be displayed and
the user will be able to set, in the same way, the modes for the hours from 0 to 23.
Once the 7th day has been programmed, the program automatically returns to
Chrono mode.
Key
Program
status

38
EN
40019728
6. SERVICES AND GUARANTEE
After-sales service
If your appliance stops working or you require spare parts, contact your installer
or dealer.
Prior to making contact and to ensure your problem is dealt with quickly and
effectively, please make a note of:
- the details shown on the appliance’s nameplate (see chapter 2.3),
- the sales reference for your appliance shown on your dated purchase invoice.
Guarantee
(See general conditions of sale for your country)
The guarantee shall not apply if the appliance is installed, used or maintained
in a way that does not comply with standards in force in the relevant country, good
professional practice, or the manufacturer’s instructions.
For any other warranty questions, contact your installer or retailer.
- The radiators and heated towel rails must be used in accordance with the use
and maintenance manual supplied with the appliance.
- Take the usual safety precautions in the home to prevent injuries, and espe-
cially in relation to children who may come into contact with the appliance.
Environmental regulations
Disposal of end-of-life electrical and electronic appliances.
This symbol indicates that this product should not be disposed of with
household waste. It must be taken to a suitable collection point to be
recycled. By disposing of this product correctly, you will help prevent
potential negative consequences for the environment and human health.
Table of contents
Languages:
Other Acova Heater manuals

Acova
Acova 874110 User manual

Acova
Acova Z23290 User manual

Acova
Acova 40005902 User manual

Acova
Acova Z22940 User manual

Acova
Acova ANGORA XS User manual

Acova
Acova TAL2 Series User manual

Acova
Acova TVXD150-150LF User manual

Acova
Acova Z 23150 User manual

Acova
Acova ANGORA XS User manual

Acova
Acova Z23010 User manual