Acova ANGORA XS User manual

FRANÇAIS . . . . . . . . . . . 1
ENGLISH . . . . . . . . . . . . 9
MONTAGE . . . . . . . . . . . 17
Démarrage rapide / Q ick start
Bo ton MARCHE / ARRÊT
ON / OFF b tton
Réglez la min terie de 30 à 180 min tes.
Set the timer from 30 to 180 min tes.
FR | 1
FRANÇAIS
1) INFORMATIONS IMPORTANTES
Lisez attentivement et conservez po r référence f t re.
MISE EN GARDE : Po r éviter to t danger po r les très je nes
enfants, il est recommandé d’installer cet appareil de façon telle
q e le barrea cha ffant le pl s bas soit a moins à 600 mm a -
dess s d sol.
Il convient de maintenir à distance les enfants de moins de 3 ans,
à moins q ’ils ne soient so s ne s rveillance contin e.
Les enfants âgés entre 3 ans et 8 ans doivent niq ement mettre
l’appareil en marche o à l’arrêt, à condition q e ce dernier ait été
placé o installé dans ne position normale prév e et q e ces
enfants disposent d’ ne s rveillance o aient reç des instr ctions
q ant à l’ tilisation de l’appareil en to te séc rité et en
comprennent bien les dangers potentiels. Les enfants âgés entre 3
ans et 8 ans ne doivent ni brancher, ni régler ni nettoyer l’appareil,
et ni réaliser l’entretien de l’ tilisate r.
Cet appareil pe t être tilisé par des enfants âgés d’a moins 8 ans
et par des personnes ayant des capacités physiq es, sensorielles
o mentales réd ites o dén ées d’expérience o de
connaissance, s’ils (si elles) sont correctement s rveillé(e)s o si
des instr ctions relatives à l’ tilisation de l’appareil en to te séc rité
le r ont été données et si les risq es enco r s ont été
appréhendés. Les enfants ne doivent pas jo er avec l’appareil. Le
nettoyage et l’entretien par l’ sager ne doivent pas être effect és
par des enfants sans s rveillance.
MISE EN GARDE : Cet appareil de cha ffage n'est pas éq ipé d' n
dispositif po r contrôler la températ re ambiante. Ne pas tiliser cet
appareil de cha ffage dans des petits loca x, lorsq 'ils sont

FR | 2
occ pés par des personnes incapables de q itter le local se les, à
moins q ' ne s rveillance constante ne soit prév e.
UTILISATION DES APPAREILS CHROMÉS : Parmi les différents
états de s rface d radiate r, le chromage est cel i q i transmet la
pl s forte sensation de chale r a to cher. Il est conseillé de ne
pas s’app yer s r la façade de l’appareil lorsq e cel i-ci est en
fonctionnement afin d’éviter to t risq e de brûl re, notamment s r
les finitions chromées.
Le radiate r sèche-serviettes doit être tilisé conformément à
l’ sage a q el il est destiné et non comme console, chaise, je ,
échelle…
Cet appareil ne doit être branché o raccordé, selon les règles et
normes en application, q e par ne personne habilitée.
IMPORTANT : Si le câble d’alimentation est endommagé, il doit
être remplacé par le fabricant, son service après-vente o des
personnes de q alification similaire afin d’éviter n danger.
IMPORTANT : L’appareil de cha ffage ne doit pas être placé j ste
en desso s d’ ne prise de co rant.
IMPORTANT : Cet appareil n’est pas destiné à être tilisé à des
altit des a -delà de 2000 m.
2) INSTALLATION DE VOTRE APPAREIL
Le câble so ple monté d’origine est destiné à être relié a résea
par l’intermédiaire d’ n boîtier de connexion q i devra être placé
derrière l’appareil, sans interposition d’ ne fiche prise de co rant
(marché français).
L’ajo t d’ ne fiche de prise de co rant est interdit.
Procédez to jo rs à la co p re de l’alimentation électriq e avant
to te opération de raccordement.
FR | 3
Il est protégé contre les projections d’ea et pe t être installé dans
le vol me 2 de la salle de bain, so s réserve q e les dispositifs de
commande électriq e ne p issent être to chés par ne personne
tilisant la baignoire o la do che.
L’alimentation électriq e doit être protégée par n dispositif
différentiel résid el de co rant assigné a pl s égal à 30mA,
notamment dans le cas d’ ne installation dans n local contenant
ne baignoire o ne do che.
Dans ne c isine o ne salle de bains, le boîtier de connexion
sera placé a moins à 25 cm d sol.
A -delà des règles prescrites dans cette notice, l’installation doit
être conforme a x normes e ropéennes et françaises en vig e r,
telles q e IEC 60364.7.701 et NF C15-100, ainsi q ’a x règles de
l’art.
Po r les pays a tres q e la France, l’installation doit être conforme
a x normes en vig e r et a x règles de l’art d pays dans leq el
elle est mise en œ vre.
IMPORTANT : L’installation doit être éq ipée d’ n dispositif de
co p re omnipolaire ayant ne distance d’o vert re de contact
d’a moins 3 mm.
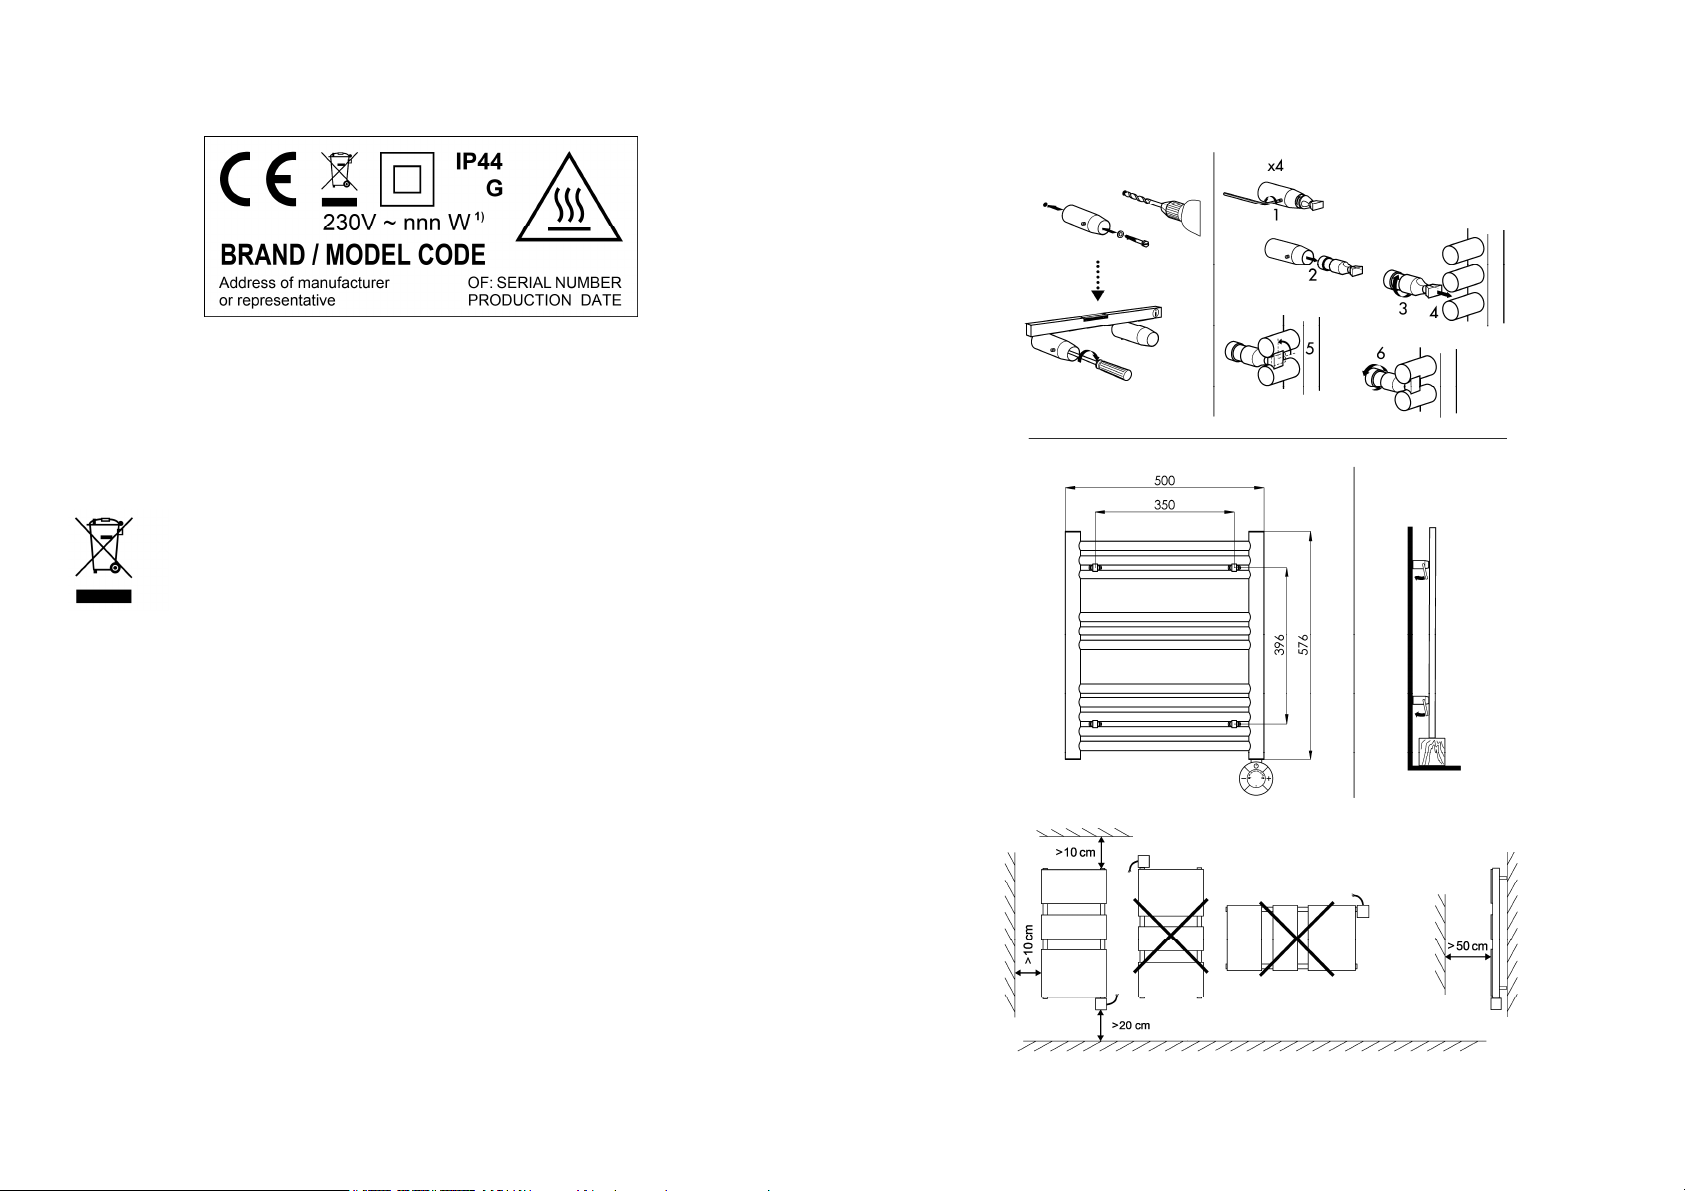
Po r garantir la séc rité de votre installation, vo s devez :
• disposer to t objet (me bles, fa te ils) a minim m à 50 cm
de la face avant de l’appareil po r favoriser la circ lation de
l’air ;
• gardez a moins 10 cm d'espace libre s r les côtés et s r le
dess s de l'appareil et a moins 20 cm s r le bas ;
• positionner ne tablette a minim m à 10 cm d ha t de votre
radiate r ;
• tiliser des vis de fixation adaptées à la nat re de votre m r ;
• de ne pas so mettre le radiate r à ne h midité ambiante
intensive o permanente.
Cet appareil ne doit jamais être installé avec son boîtier
d’alimentation en position ha te.

FR | 4
3) UTILISATION
App yez s r le bo ton MARCHE / ARRÊT po r
all mer l'appareil.
Le voyant d'état (LED d bas) est all mé:
• en vert q and l'appareil est en mode veille,
• en ro ge q and l'appareil est en cha ffe.
La cha ffe démarre immédiatement po r ne
d rée de 60 mn. Les 2 premières LED (ble e et
verte) sont all mées.
Si vo s so haitez modifier la d rée po r la
séq ence en co rs, tilisez les bo tons [+] et [−].
La d rée pe t être réglée de 30 à 180 mn par pas
de 30 mn. Chaq e LED représente 30 mn de
fonctionnement. La dernière LED de la d rée
sélectionnée clignote.
Il est possible de faire fonctionner l’appareil de
manière permanente. Po r cela, app yez s r le
bo ton [+] pendant 4 secondes.
To tes les LED de d rée sont alors all mées et il
n’y a pas de clignotement.
La fonction cha ffage permanent pe t être
désactivée dans les réglages avancés.
App yez s r le bo ton MARCHE / ARRÊT po r
éteindre le cha ffage. L'appareil passera en mode
veille.
FR | 5
Dès la mise en marche de l'appareil, la résistance électriq e
cha ffe le fl ide q i se met progressivement et nat rellement à
circ ler dans votre appareil. Il fa t environ 30 min tes po r
atteindre la températ re optimale de l'appareil, selon le modèle et
la températ re ambiante. L'inertie élevée d fl ide ass re n
cha ffage contin même lorsq e l'élément cha ffant n'est pl s
alimenté.
RÉGULATION DE LA TEMPÉRATURE
La températ re maximale d corps d sèche-
serviettes est rég lée par ne sonde interne.
Par défa t, cette températ re est réglée à 65°C. Il
est possible de la modifier po r adapter la
p issance à la taille de la pièce. Po r modifier
cette températ re, passez l’appareil en mode
veille en app yant s r MARCHE / ARRÊT. P is
app yez s r le bo ton vierge pendant 4
secondes.
Utilisez les bo tons [+] et [−] po r sélectionner la
températ re maximale so haitée :
• 45°C (LED ble e),
• 55°C (LED verte),
• 65°C (2 LED ja nes) – par défa t,
• 75°C (2 LED ro ges).
Ve illez noter q e les vale rs indiq ées sont
approximatives et pe vent légèrement varier en
fonction de la pièce.
App yez ne fois (app i co rt) s r le bo ton
vierge po r enregistrer le réglage.
Un app i long de 4 secondes permet de valider la
sélection et d’accéder a x réglages avancés.
Po r ann ler le choix et revenir en mode veille,
app yez s r le bo ton MARCHE / ARRÊT o
attendez 20 secondes.

FR | 6
RÉGLAGES AVANCÉS
A partir d mode veille, app yer s r le bo ton
vierge pendant 4 secondes. Vo s accédez alors
a réglage de la températ re. App yez à no vea
s r le bo ton vierge pendant 4 secondes po r
entrer dans les réglages avancés.
Il y a 2 réglages avancés différents.
Réglage avancé 1 : CHAUFFAGE PERMANENT
Par défa t, la fonction cha ffage permanent est
activée. Po r la désactiver, app yez s r [−], les 2
LED de ga che (ble e et verte) s’all ment. Po r
la réactiver, app yez s r [+]. Un app i co rt s r le
bo ton vierge permet de valider la sélection. A la
validation, n bip sonore est émis et l’on accède à
la fonction avancée 2.
Réglage avancé 2 : CHAUFFAGE INSTANTANÉ
Cette fonction est destinée à des loca x à sage
ponct el où l’électricité n’est pas constamment
branchée. Si la fonction est activée, alors
l’appareil se met en cha ffe po r ne d rée de 60
mn dès le branchement de l’électricité sans avoir
à app yer s r le bo ton MARCHE / ARRÊT.
La fonction est désactivée par défa t. Po r
accéder à ce réglage, en partant d mode veille, il
fa t faire 2 app is longs (4 secondes) s r le
bo ton vierge. Le réglage est possible après
l’émission d’ n bip sonore. Po r activer la
fonction, app yez s r [+] p is validez en app yant
s r le bo ton vierge (app i co rt). Po r désactiver
la fonction, app yer s r [-]. App i co rt s r le
bo ton vierge po r valider. Un bip sonore est
émis et l’appareil revient en mode veille.
FR | 7
4) MAINTENANCE
Avant d'effect er to te opération de maintenance s r votre
appareil, ass rez-vo s q 'il est éteint et refroidi.
Po r l’entretien des parois extérie res de l’appareil, ne pas tiliser
de prod it abrasif o corrosif, tilisez de préférence de l’ea
savonne se tiède (hors parties électriq es).
Po r nettoyer le boîtier de commande, tilisez n chiffon do x et
sec sans solvant.
IMPORTANT : Cet appareil est rempli d' ne q antité précise de
sol tion de propylène glycol. Les réparations nécessitant
l'o vert re d réservoir de fl ide ne doivent être effect és q e par
le fabricant o son service après-vente, q i normalement doit être
contacté en cas de f ite de fl ide. La températ re minimale de
stockage de cet appareil est de -10°C. Après 5 ans à compter de la
date de prod ction, les propriétés antigel po rraient dimin er.
5) GARANTIE ET INFORMATIONS SUPPLÉMENTAIRES
La garantie sera prise en compte s r présentation d titre d’achat
daté. Les frais de transport, de dépose et de pose d radiate r sont
excl s de la garantie.
La garantie ne s’appliq e pas notamment en cas de mise en
œ vre, d’installation o d’entretien non conforme à la norme en
vig e r d pays, a x règles de l’art et à la notice d’ tilisation.

FR | 8
Les caractéristiq es techniq es de votre radiate r sont indiq ées
s r son étiq ette signalétiq e :
1)
tension et p issance nominale
L’appareil est conforme à la directive CEM 2014/30/CE relative à la
compatibilité électromagnétiq e des éq ipements, à la directive
Basse Tension 2014/35/CE relative a matériel électriq e destiné
à être employé dans certaines limites de tension.
Traitement des appareils électriq es et électroniq es en fin
de vie. Ce symbole indiq e q e ce prod it ne doit pas être
traité avec les déchets ménagers. Il doit être remis à n
point de collecte approprié q i se chargera de son
recyclage. En s’ass rant q e ce prod it est bien mis a reb t de
manière correcte, vo s aiderez à prévenir les conséq ences
négatives potentielles po r l’environnement et la santé h maine.
EN | 9
ENGLISH
1) IMPORTANT INFORMATION
Read caref lly and keep for f t re reference.
CAUTION: To avoid danger to very yo ng children, yo are advised
to install this appliance so that the lowest heating bar is at least 600
mm off the floor.
Children of less than 3 years sho ld be kept away nless
contin o sly s pervised.
Children aged from 3 years and less than 8 years shall only switch
on/off the appliance provided that it has been placed or installed in
its intended normal operating position and they have been given
s pervision or instr ction concerning se of the appliance in a safe
way and nderstand the hazards involved. Children aged from 3
years and less than 8 years shall not pl g in, reg late and clean the
appliance or perform ser maintenance.
This appliance can be sed by children aged from 8 years and
above and persons with red ced physical, sensory or mental
capabilities or lack of experience and knowledge if they have been
given s pervision or instr ction concerning se of the appliance in
a safe way and nderstand the hazards involved. Children shall not
play with the appliance. Cleaning and ser maintenance shall not
be made by children witho t s pervision.
WARNING: This heater is not eq ipped with a device to control the
room temperat re. Do not se this heater in small rooms when they
are occ pied by people not capable of leaving the room on their
own, nless constant s pervision is provided.

EN | 10
CHROMIUM-PLATED APPLIANCES: The chrome plated s rfaces
feels hottest to the to ch. To avoid risk of b rns, yo are advised
not to to ch the appliance, partic larly if chromi m plated, when it
is switched on.
A towel radiator m st be sed for the p rpose for which it is
intended and not as a chair, toy, ladder, etc.
This appliance sho ld be pl gged or connected, only by an
a thorized person, according to r les and standards in application.
IMPORTANT: If the power cable or electrical controller are
damaged, for safety reasons it m st be replaced by the
man fact rer, the man fact rer’s after-sales service department or
a similarly q alified person.
IMPORTANT: The heating appliance m st not be placed
nderneath a power o tlet.
IMPORTANT: This appliance is not intended for se at altit des
exceeding 2000 m.
2) INSTALLING OUR APPLIANCE
The flexible cable s pplied with yo r appliance is designed to be
connected to the mains via a j nction box that m st be placed
behind the appliance, with no need for a pl g (only in France).
Always t rn off the electricity s pply before making any
connections.
Appliance is protected from splashes of water, and can be installed
within vol me 2 of bathroom as long as the electrical controls are
o t of reach of anyone sing the bath or shower.
EN | 11
The electricity s pply m st be protected by a resid al c rrent
device with a maxim m of 30mA, especially when installed in a
room containing a batht b or shower.
In a kitchen or bathroom, the j nction box m st be positioned at
least 25 cm from the floor.
The appliance m st be installed in accordance with the applicable
E ropean standards, incl ding IEC 60364.7.701 and according to
the r les of good professional practice.
The appliance m st be installed in accordance with standards in
force and with r les of good professional practice in the co ntry of
se.
IMPORTANT: In case of permanent connection to mains (witho t
pl g), the system m st incorporate an omni-polar circ it-breaker
with a minim m contact opening of 3mm.
To ens re safe and efficient operation:
• keep at least 50 cm of free space between front of appliance
and any objects which might hinder air circ lation (f rnit re,
chairs, etc.),
• keep at least 10 cm of free space on sides and top of device
and at least 20 cm on bottom,
• do not place any objects closer than 10 cm from the radiator,
• se mo nting screws s itable for yo r wall,
• do not expose the radiator to intense or prolonged h midity.
This appliance sho ld never be installed with the electrical
controller positioned topside.

EN | 12
3) USAGE
Press the ON / OFF b tton to t rn on the
appliance.
The stat s light (bottom LED) is lit:
• green when the device is in standby mode,
• red when the device is heating p.
The device immediately starts to heat for 60
min tes.
To modify the c rrent setting of timer, se the [+]
and [−] b ttons. The timer can be set from 30 to
180 min tes in steps of 30 min tes. Each LED
represents 30 min tes.
The last LED blinks.
Press and hold the [+] b tton for 4 seconds to
activate constant heating. Towel dryer will heat
constantly nless it's t rned off man ally or by
power s pply shortage.
In this mode all LEDs are lit witho t blinking.
This f nction co ld be disabled in advanced
settings.
Press the ON / OFF b tton to t rn off the heating.
Appliance will go into stand-by mode.
EN | 13
As soon as the appliance is switched on, the electric heating
element heats the fl id, which grad ally and nat rally starts to
circ late inside the device. Depending on the model of device and
the room temperat re, it takes approximately 30 min tes to reach
the optimal operating temperat re. D e to the high inertia of the
fl id, the device remains warm for some time after being t rned off.
TEMPERATURE REGULATION
The maxim m operating temperat re of towel
dryer is reg lated by electronic controller.
To set the maxim m temperat re, first t rn the
device off (go into standby mode sing ON / OFF
b tton) and then press and hold the lower b tton
for 4 seconds.
Use [+] and [−] b ttons to change setting of
operating temperat re reg lation:
• 45°C (bl e LED),
• 55°C (green LED),
• 65°C (2 yellow LEDs) – defa lt setting,
• 75°C (2 red LEDs).
Please notice, that presented val es are
approximate and may slightly vary depending on
ambient circ mstances.
Press the lower b tton once to store the setting
and go back to stand-by mode.
Press and hold the lower b tton for 4 seconds to
store the setting and go to advanced settings.
To cancel the setting and go back to stand-by
mode, press ON / OFF b tton or wait for 20
seconds.

EN | 14
ADVANCED SETTINGS
T rn off the appliance. Then press and hold the
lower b tton for 4 seconds to enter temperat re
reg lation setting (see previo s section). Then
once again press and hold the lower b tton for 4
seconds to enter the advanced settings.
Meaning of lit LEDs:
Bl e and green → c rrent f nction is disabled
Two red → c rrent f nction is enabled
Advanced setting 1 – CONSTANT HEATING
Use [+] b tton to enable the f nction (defa lt
setting).
Use [−] b tton to disable the f nction. It will be not
possible to activate the constant heating. Heating
time will be limited to maxim m 180 min tes.
Accept and go to next advanced setting by
pressing the lower b tton (confirmed by "beep"
so nd).
Advanced setting 2 – INSTANT HEATING
Use [+] b tton to enable the f nction. The
appliance will start heating for 60 min tes every
time the power s pply is on.
Use [−] b tton to disable the f nction (defa lt
setting).
Accept and go back to stand-by mode by pressing
the lower b tton (confirmed by "beep" so nd).
4) MAINTENANCE
EN | 15
Before carrying o t any maintenance operation on yo r appliance,
ens re that it is switched off and cooled down.
Never se abrasive or corrosive prod cts on the o ter s rfaces of
the appliance. Use warm, soapy water (except the electrical parts).
To clean the control box, se a soft, dry cloth witho t any solvents.
IMPORTANT: This appliance is filled with a precise q antity of
propylene glycol sol tion. Any repair req iring the fl id tank to be
opened sho ld only be carried o t by the man fact rer or their after
sales service department, which sho ld also be contacted in the
event of an fl id leak. Minim m storage temperat re of this
appliance is -10°C. After 5 years from prod ction date anti-freeze
properties co ld decrease.
5) GUARANTEE AND ADDITIONAL INFORMATION
Dated proof of p rchase m st be presented to activate the
g arantee. The g arantee does not cover radiator transport,
removal and installation costs.
The g arantee shall not apply if the appliance is installed, sed or
maintained in a way that does not comply with standards in force in
the relevant co ntry, good professional practice, or the
man fact rer’s instr ctions.

EN | 16
The technical specifications of yo r towel dryer are shown on its
nameplate:
1)
nominal voltage and inp t power
Appliance complies with the EMC Directive: 2014/30/EU regarding
electromagnetic compatibility of eq ipment and with Low Voltage
directive: 2014/35/EU regarding electrical eq ipment designed for
se within certain voltage limits.
Disposal of end-of-life electrical and electronic
appliances. This symbol indicates that this prod ct sho ld
not be disposed of with ho sehold waste. It m st be taken
to a s itable collection point to be recycled. By disposing
of this prod ct correctly, yo will help prevent potential negative
conseq ences for the environment and h man health.
MONTAGE
Angora XS / 3052-0005
PBO 12.03.2021
Other manuals for ANGORA XS
1
This manual suits for next models
1
Table of contents
Languages:
Other Acova Heater manuals

Acova
Acova Z23010 User manual

Acova
Acova Z23290 User manual

Acova
Acova Z22940 User manual

Acova
Acova Z 23150 User manual

Acova
Acova Regatta twist air ec 594w coul User manual

Acova
Acova TAL2 Series User manual

Acova
Acova 874110 User manual

Acova
Acova 40005902 User manual

Acova
Acova TVXD150-150LF User manual

Acova
Acova ANGORA XS User manual