AddBike Carry'Box Kid Manual

Non-contractual Photographs
User's and Installation Guide of the
Carry’Box Kid Module
November 2019
Compatible with the AddBike and the AddBike+
This document indicates the correct practices to be respected during use and
assembly / disassembly of the Carry’Box Kid Module. It is imperative to read this document
entirely in order to keep your bike, your AddBike and your Carry’Box Kid in good working
conditions for as long as possible.
Please keep this document.
Your Bike
The AddBike
A reversible cargo bike
Child
Groceries
Loads
The AddBike is an innovative solution that transforms your bike into a practical, easy to
handle cargo bike. It consists of a two-wheeled base that allows the transportation of
loads and the installation of modules specifically designed for the AddBike. These
modules give your bike the capacity to carry bulkier loads, groceries or a child.
Welcome to the big family of AddBikers!!
There is no need to invest in expensive and large cargo bicycles. With the AddBike you
can quickly and easily turn your own bike into a compact cargo bike.
This document concerns only the module Carry’Box Kid and is complementary to the
“AddBike User's and Installation Guide”.
This module is compatible with the AddBike and the AddBike+
Maximum capacities
Carry’Box Kid
35 kg, one child, maximum
Dimensions (LxWxH in cm)
Carry’Box Kid useful volume
48*55*70
Size of the Addbike + Carry’Box Kid
68*78*92
Passenger’s minimum height
Carry’Box Kid
85 cm
Passenger’s maximum height
Carry’Box Kid
120 cm

VERSION V4.1 3
Table of Contents
1. General warning ......................................................................................................................................4
2. Lexicon of the Carry’Box Kid module............................................................................................. 5
3. Components of the Carry’Box Kid ................................................................................................... 8
4. Installing the Carry’Box Kid module on the AddBike..............................................................8
Step 1: Fixing the metal frame to the AddBike..........................................................................9
Step 2: Fix the hammock to the AddBike .................................................................................. 13
Step 3: Fixing the textile envelope on the AddBike.............................................................. 16
Step 4 : Finish installing the hammock....................................................................................... 21
Step 5: Complete the installation of the textile envelope.................................................. 24
5. Using the Carry'Box Kid module ....................................................................................................27
Opening and closing the transparent flap................................................................................ 29
6. Uninstalling the Carry ’Box Kid module ......................................................................................30
7. Cleaning....................................................................................................................................................30
8. Guarantee Charter................................................................................................................................31
9. Assistance in case of problem.........................................................................................................31
4VERSION V4.1
1. General warning
Symbols and warnings:
WARNING!
This symbol indicates a hazard that could result in serious injury if the
instructions are not followed.
CAUTIONING!
This symbol indicates a hazard that may result in minor injury if the
instructions are not followed.
ADVICE!
This symbol indicates advice for the use or maintenance of your
AddBike.
Before installing this module on your AddBike, make sure you have read and
understood the » AddBike User's and Installation Guide ».
Read and follow the instructions in this guide: Read the entire guide carefully and
follow the instructions to use the Carry’Box Kid module safely. If you do not understand
certain indications, please contact your AddBike dealer or contact AddBike directly at:
support@addbike.fr. Please keep this manual for future reference. It is also important to
take into account the directions for use of the AddBike and that of the bike receiving the
AddBike.
The AddBike Company disclaims all liability in case of non-compliance with the
instructions in this User's and Installation Guide of the Module Carry’Box Kid and in
case of modification of the product by the user.
Using the Carry’Box Kid module
The Carry’Box Kid module is designed to be used on the AddBike produced by our
company. Do not try to install or use this module on other cargo bikes or on a classic
bike.
The Carry’Box Kid module is not designed to be stored outdoors for prolonged periods.
It must be stored in a dry and temperate place away from corrosive products.

VERSION V4.1 5
2. Lexicon of the Carry’Box Kid module
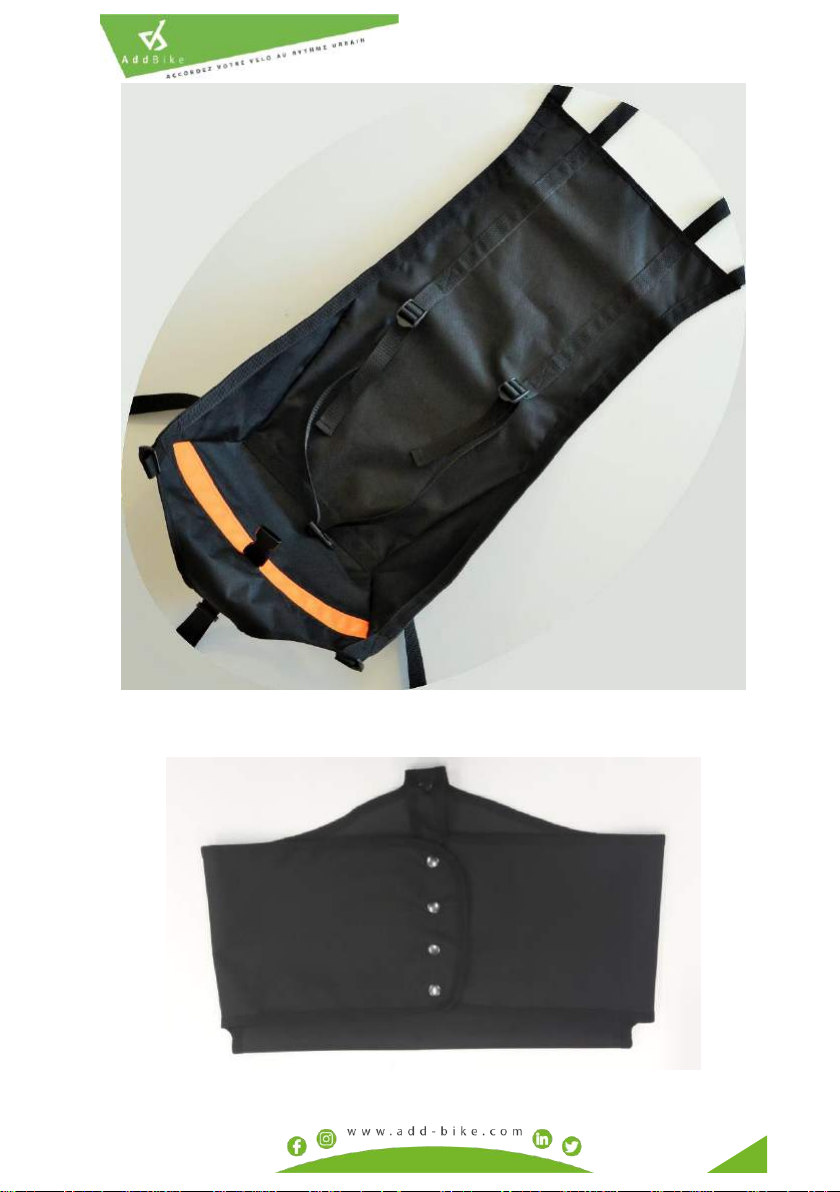
Figure 1 –Textile envelope
Transparent
lid
Window
Reflective
tape

6VERSION V4.1
Transerve bars
Do not remove the foam covering the 7 tubes! The foams not only
protect the tubes during transport but are also essential for mounting.
Figure 2 –Metal frame
Upper
tubes
Transerve
bars
Lower
tubes
Lower tubes
Upper tubes
VERSION V4.1 7
Figure 3 –Hammock
Figure 4 - Footrest

8VERSION V4.1
3. Components of the Carry’Box Kid
In your parcel, you will find:
•The textile envelope (Cf. Figure 1) ;
•2 upper tubes, 2 bottom tubes and 3 foam covered transverse bars (Cf. Figure 2) ;
•The hammock (Cf. Figure 3) ;
•The footrest (Cf. Figure 4) ;
•6 screws BHC M5x30 ;
•This manual for the Carry’Box Kid V4.1. module
4. Installing the Carry’Box Kid module on the AddBike
For the installation you will need an Allen wrench size 3, and an open-end wrench 8 (Cf.
Figure 5).
Open-end wrench (size 8)
Allen wrench (size 3)
Figure 5 –Tools needed
Before installing the Carry’Box Kid module on your bike, activate the parking brake of the
AddBike as well as your bike’s kickstand.
The Carry’Box Kid module must be installed and uninstalled as
explained. Improper installation can lead to accidents that could cause
serious injury.
Install the Carry’Box Kid module on your AddBike only when the latter
is properly installed on your bike and after you make sure that your
own bike is well maintained so as to ensure stability during installation.
VERSION V4.1 9
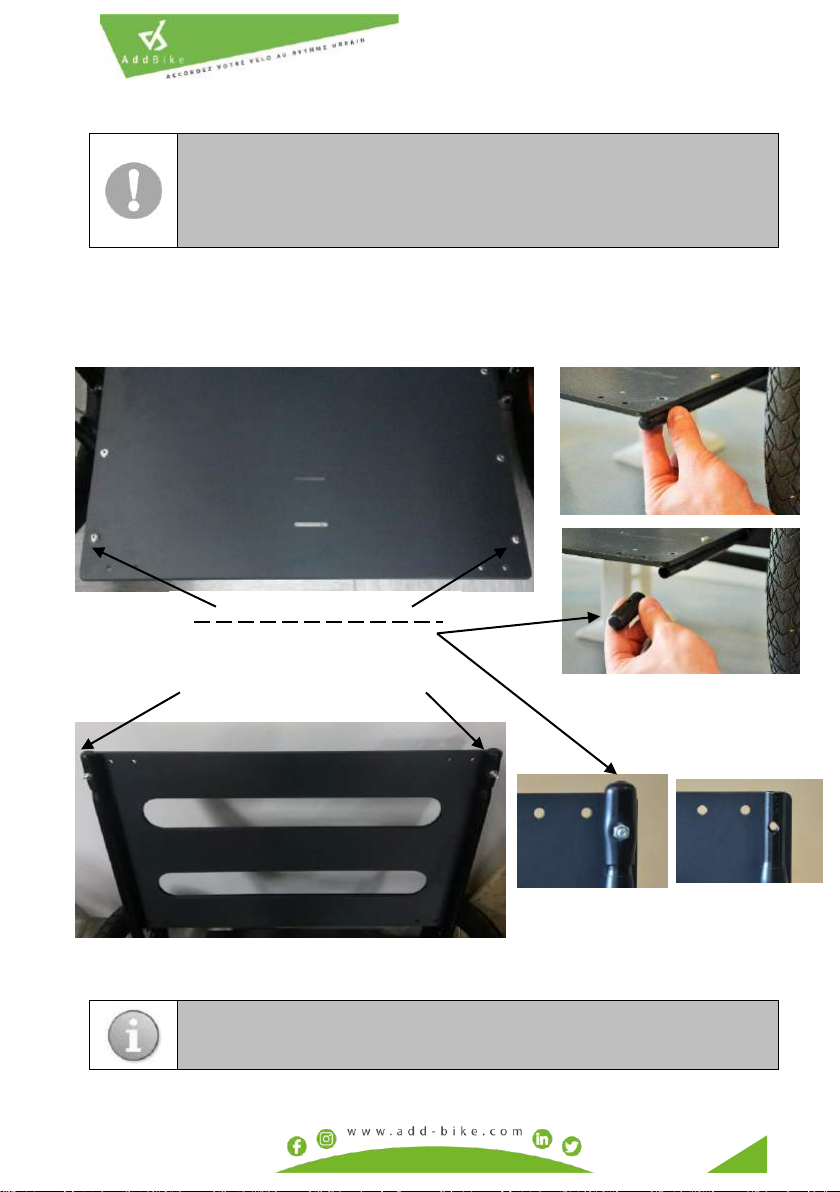
Step 1: Fixing the metal frame to the AddBike
•Remove screws, nuts and plastic caps from both sides of the compact seat plaque
of the AddBike. Do the same with the screws, nuts and plastic caps from both sides
of the upper compact plate of the backrest of the Addbike;
Figure 6 –Screws and plastic protectors to be removed
During this step, if your AddBike isn't equipped with 4 plastic caps at
the 4 bar ends of the backrest and base structure (at the level of the
connection sleeve), the only preparation to install the bars is to remove
the screws at each bar end (screw without nut). Once the bars are
inserted as shown below, tighten the screws (screw without nut).
Make sure to keep in a safe place the 4 plastic caps removed during the
previous step.
Screws and nuts to be removed
Plastic caps to be removed
Screws and nuts to be removed

10 VERSION V4.1
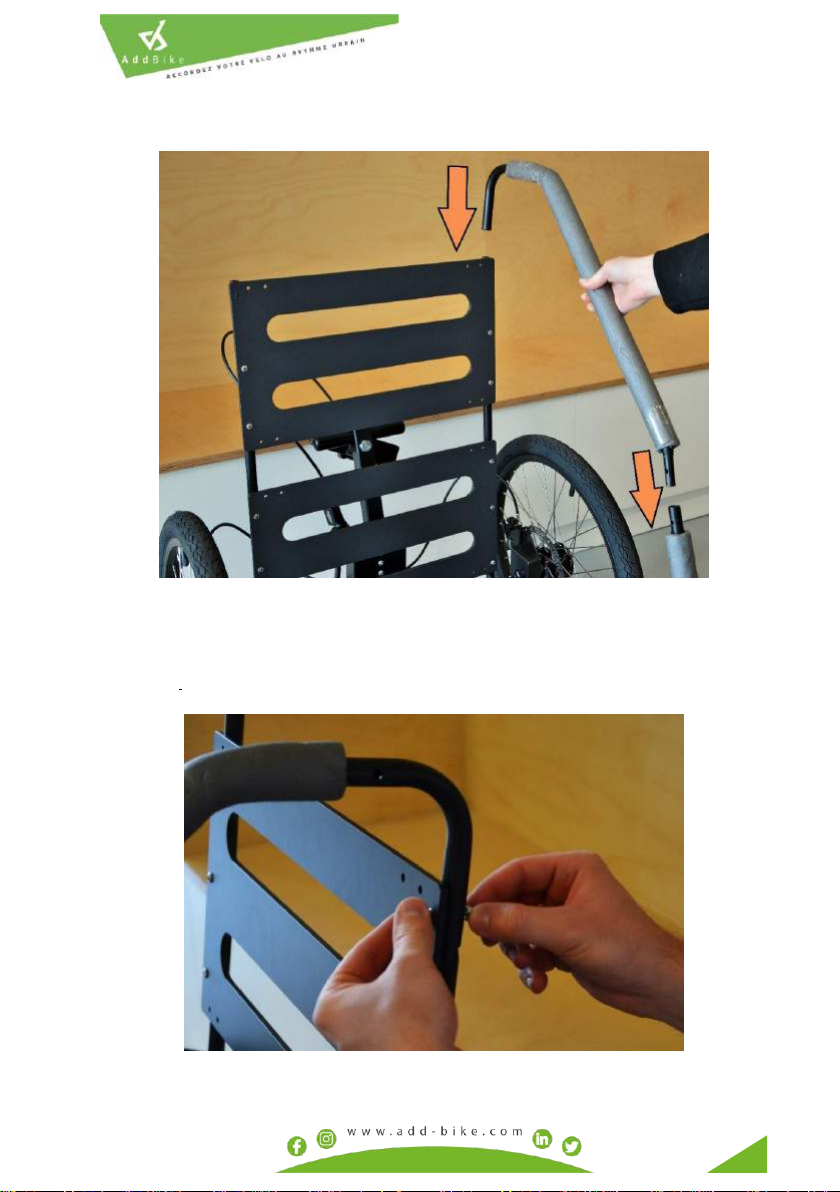
•Insert the bottom tubes into the holes of the base and line up the screw holes of
both tubes;
Figure 7 –Insertion of bottom tubes
•Put back the screws and nuts previously removed, but not the plastic caps (keep
these in a safe place);
Figure 8 –Screws to put back
VERSION V4.1 11
•Insert the upper tubes into the holes of the backrest and into those of the bottom
tubes and line up the screw holes of the different parts;
Figure 9 –Insertion of the upper tubes
•Put back the previously removed screws and nuts from the AddBike’s backrest (but
not the plastic caps) and fix in this way the upper tubes to the AddBike’s backrest
tubes;
Figure 10 –Screws to be put back
12 VERSION V4.1
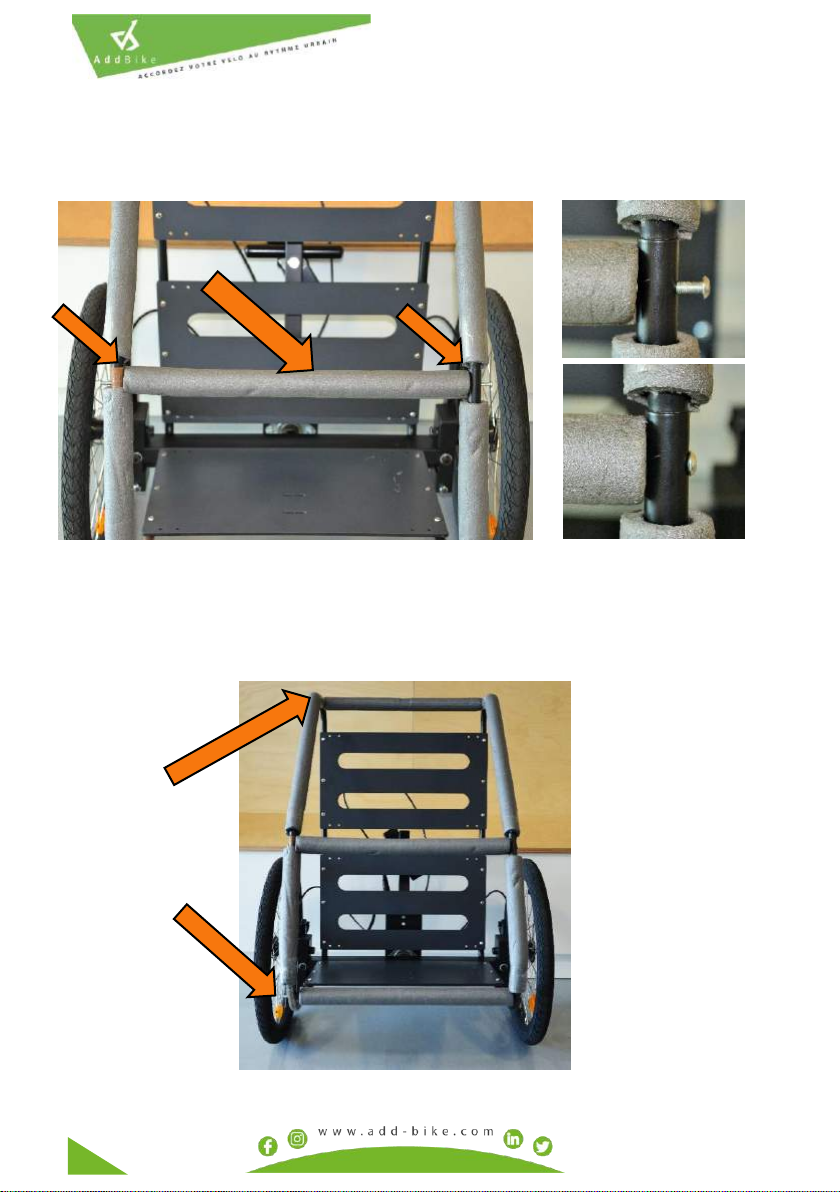
•Position one of the three transverse bars between the two holes in the front of the
structure between the upper and bottom tubes and fix it to the rest of the structure
using two M5x30 BHC screws provided;
Figure 11 –Positioning the medium transverse bar
•In the same way, fix the other two transverse bars to the structure. One of them
between the two holes at the top of the upper tubes, and the other between the
two holes down at the bottom tubes.
Figure 12 –Metal frame assembled on the AddBike
Upper transverse
bar
Low transverse
bar
VERSION V4.1 13
Step 2: Fix the hammock to the AddBike
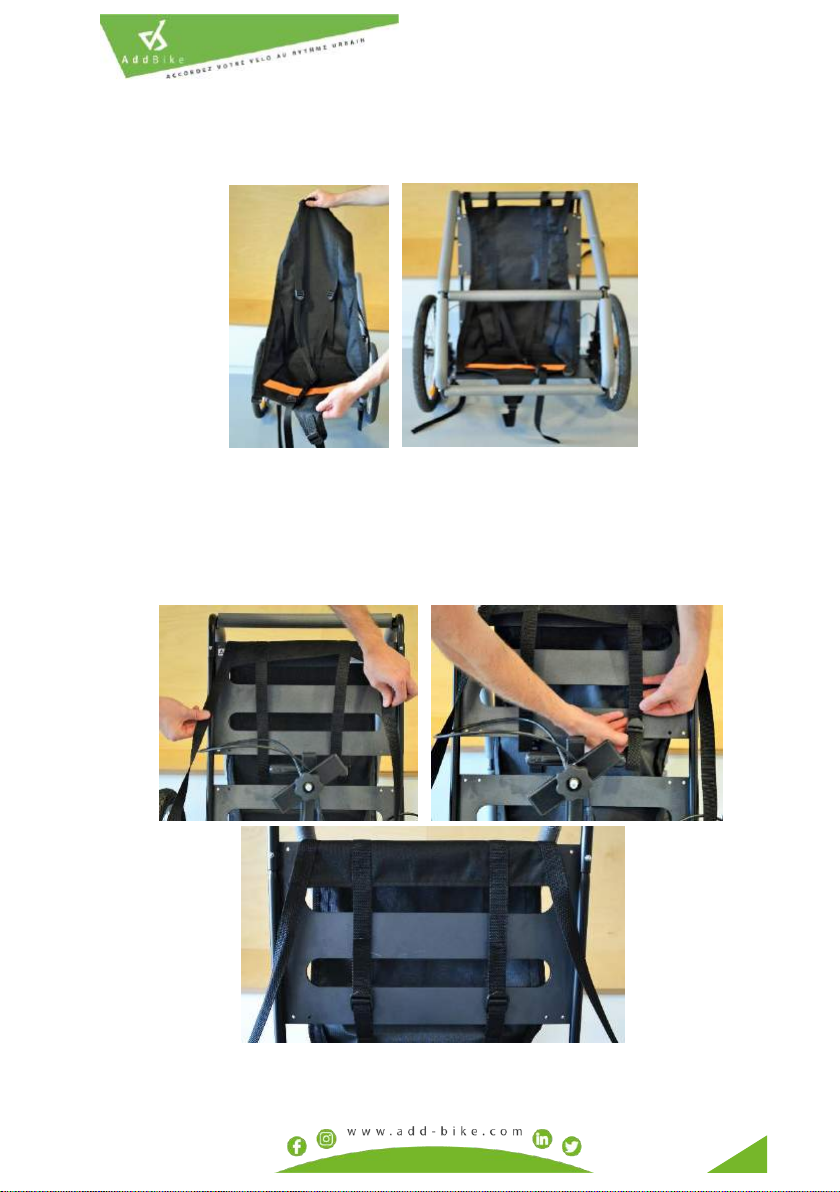
•Take the hammock and place it on the base of the AddBike according to the figure
below;
Figure 13 –Positioning the hammock
•Slip the top of the hammock on the backrest (below the upper transverse bar) and
fix it by means of the two available buckles (passing through the two compact
plaques of the backrest) and also by means of the two smaller straps (passing over
the backrest). For the moment, leave the two largest straps aside.
Figure 14 - Positioning the top of the hammock

14 VERSION V4.1
•Pass the strap of the back of the hammock behind the backrest of the AddBike
(bottom) and fix it using the buckle (without tightening too much for now, to be
able to adjust thereafter);
Figure 15 –Positioning the back straps
•Pass the front strap of the hammock over the middle transverse bar and secure it
with the buckle;
Figure 16 –Fixing the front strap of the hammock
Fit the back strap securely between the AddBike backrest and the back
plate. This strap should not interfere with the movements of the
AddBike.

VERSION V4.1 15
•Both the crotch strap of the harness and the adjustment buckle are already
positioned through one of the two holes of the hammock (below, against the
orange strip). You may remove this set and make it pass through the other hole if
your child is too big (or too small);
Figure 17 –Passing the crotch strap and the adjustment buckle through a
hammock’s hole.
The choice of the hammock’s hole through which you will pass the strap
depends on the size of your child. Test before using the AddBike with
the Carry'Box Kid module.
•Then, fix this strap on the seat of the AddBike using both the two slots provided for
this purpose, and the adjustment buckle;
Figure 18 –Fixing the crotch strap on the AddBike’s seat (bottom view of the
hammock)
2nd
hammock
hole
1st
hammock
hole

16 VERSION V4.1
Step 3: Fixing the textile envelope on the AddBike
•Place the footrest around the bottom tubes (between the Addbike’s seat and the
lower transverse bar) and close it, clipping together the snap fasteners (below the
AddBike).
•Pass the strip of the footrest in the slot of the AddBike’s seat and clip the snap
fastener
•Position the footrest textile around the transverse bar and secure using the Velcro
strips
Figure 19 –Positioning the footrest
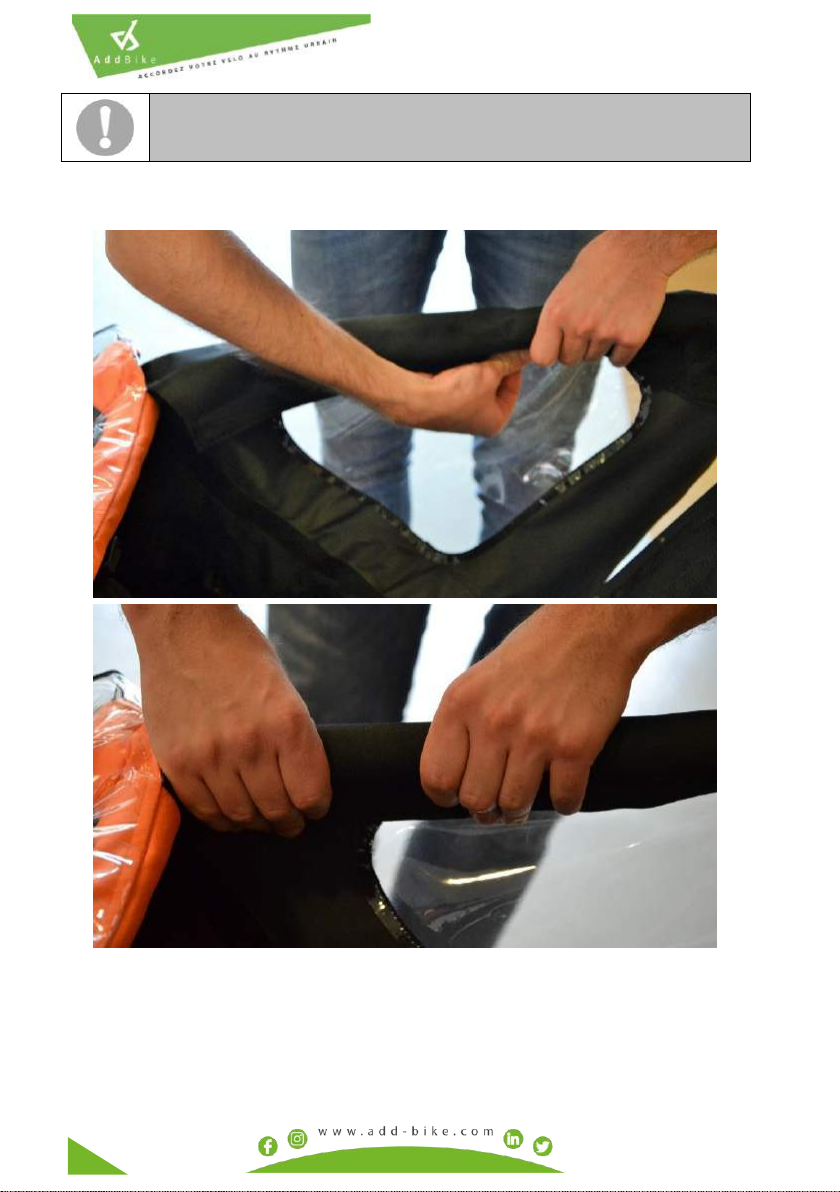
•Draw the textile near the metal frame, with the transparent flap open and directed
downwards. Pass the orange fabric cover (located under the transparent flap inside
the module) around the medium transverse bar and attach it using both U-shaped
Velcro strips;

VERSION V4.1 17
Figure 20 –Placing the fabric cover on the medium transverse bar
•Pull the assigned fabric cover to the right of the module;
Figure 21 –Placing the fabric cover to the right of the module
18 VERSION V4.1
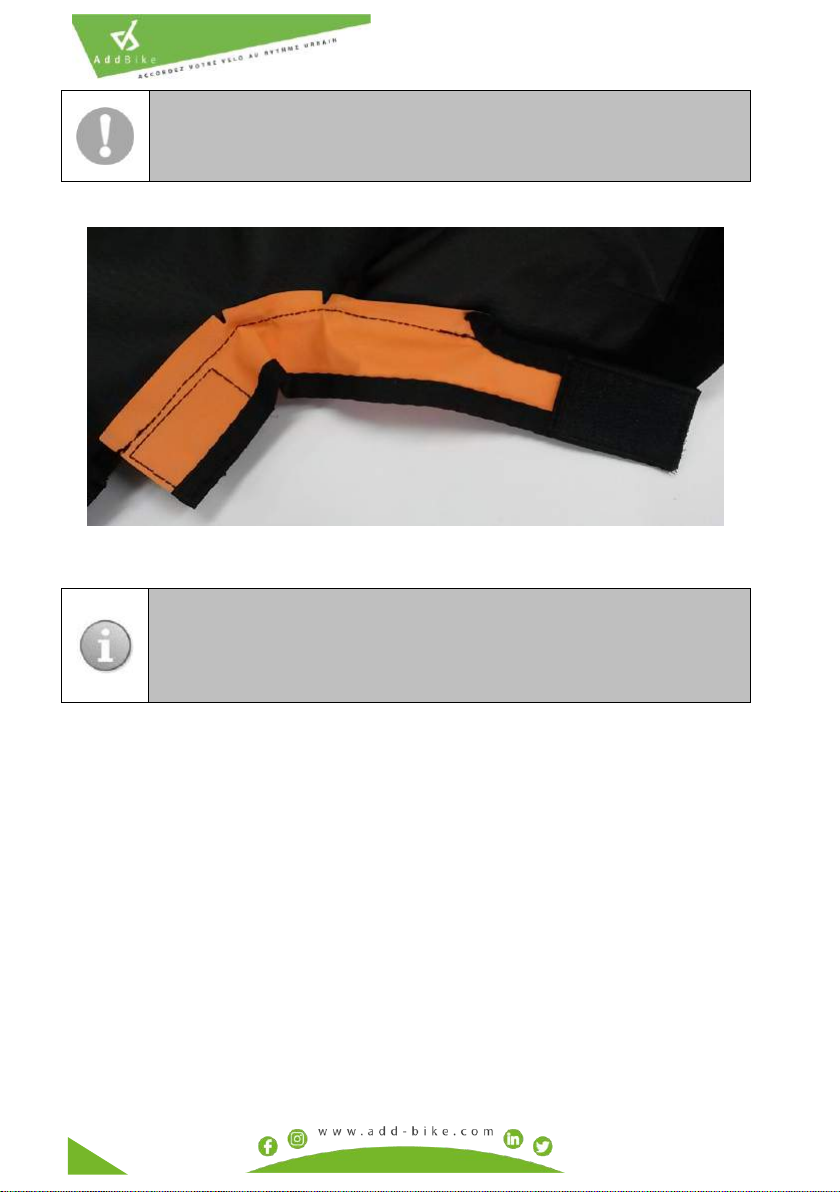
Figure 22 –Velcro strap to be left accessible
Be careful to keep the Velcro strap (circled in Figure 22 below) outside
the fabric during the passage of fabric cover through both sides of the
module. This strap is located on the fabric piece on each side, near the
wheel.
The Velcro strips shown above (each side of the textile) protect the
child’s fingers from potential pinch related damage.
It is important to tighten them accordingly around the structure and to
make sure they are properly positioned by attempting to go through
the textile envelope from inside.

VERSION V4.1 19
•Pull the assigned fabric cover to the left of the module;
Figure 23 - Positioning the fabric cover on the left of the module
20 VERSION V4.1
•Put the top of the fabric cover around the upper tubes and use the Velcro strips to
fix them;
Figure 24 - Placing fabric cover sections on the upper tubes
The fabric should perfectly match the shape of the metal frame at the
front of the module.
Other manuals for Carry'Box Kid
2
Table of contents
Other AddBike Bicycle Accessories manuals

AddBike
AddBike U-Cargo User manual

AddBike
AddBike AddBike+ User manual

AddBike
AddBike Carry'Dog User manual

AddBike
AddBike V4.1 Manual

AddBike
AddBike Carry'Box Module Manual

AddBike
AddBike AddBike+ User manual

AddBike
AddBike Carry'Box Kid User manual

AddBike
AddBike Carry'Box Module User manual

AddBike
AddBike AddBike+ Manual

AddBike
AddBike AddBike+ User manual


