AEG KKK994500 User manual

USER
MANUAL
KKK994500
KKE994500
EN User Manual
Automatic Built-In Cofee Machine

2www.aeg.com
CONTENTS
1.
2.
3.
4.
5.
6.
7.
8.
9.
10.
11.
12.
13.
14.
15.
16.
SAFETY INFORMATION ............................................................................................... 3
SAFETY INSTRUCTIONS.............................................................................................. 5
PRODUCT DESCRIPTION ............................................................................................ 6
CONTROL PANEL ......................................................................................................... 7
BEFORE FIRST USE ................................................................................................... 10
DAILY USE................................................................................................................... 11
MAKING COFFEE........................................................................................................ 12
MAKING CAPPUCCINO AND MILK-BASED COFFEES ............................................. 14
FAVOURITE ................................................................................................................. 14
CLEANING ................................................................................................................... 15
DESCALING................................................................................................................. 19
SETTING WATER HARDNESS................................................................................... 20
WATER SOFTENER FILTER....................................................................................... 21
TECHNICAL DATA....................................................................................................... 22
DISPLAYED MESSAGES ............................................................................................ 23
TROUBLESHOOTING ................................................................................................. 25
FOR PERFECT RESULTS
Thank you or choosing this AEG product. We have created it to give you impeccable
perormance or many years, with innovative technologies that help make lie simpler
eatures you might not find on ordinary appliances. Please spend a ew minutes read-
ing to get the very best rom it.
Visit our website to:
Get usage advice, brochures, trouble shooter, service inormation:
www.aeg.com/webselfservice
Register your product or better service:
www.registeraeg.com
Buy Accessories, Consumables and Original spare parts or your appliance:
www.aeg.com/shop
CUSTOMER CARE AND SERVICE
Always use original spare parts.
When contacting our Authorised Service Centre, ensure that you have the ollowing
close to hand: model, PNC, serial number.
The inormation can be ound on the rating plate.
Warning / Caution-Saety inormation
General inormation and tips
Environmental inormation

3ENGLISH
Beore the installation and use othe appliance, careully
read the supplied instructions. The manuacturer is not re-
sponsible ian incorrect installation and use causes injuries
and damages. Always keep the instructions with the appli-
ance or uture reerence.
1.1 Children and vulnerable people saety
The appliance is not intended or use by persons (including
children) with reduced physical, sensory or mental capabili-
ties, or lack oexperience and knowledge, unless they are
supervised or receive instructions concerning use othe ap-
plication by a person responsible or their saety.
Children should be supervised to ensure that they do not play
with the appliance.
For European markets only:
This appliance can be used by children aged rom 8 years
and above ithey have been given supervision or instruction
concerning use othe appliance in a sae way and ithey
understand the hazard involved. Cleaning and user mainte-
nance shall not be made by children unless they are older
than 8 and supervised. Keep the appliance and its cord out o
the reach ochildren aged less than 8 years.
Children shall not play with the appliance
1.2 General Saety
Designated use: this appliance is designed and made to
prepare coee and milk based beverages and hot water. Any
other use is considered improper and thus dangerous. The
manuacturer is not liable or damage deriving rom improper
use othe appliance.
The surace othe heating element remains hot ater use and
the outside othe appliance may retain the heat or several
minutes depending on use.
Clean all the components thoroughly, taking particular care
with parts in contact with the coee and milk.
1. SAFETY INFORMATION

4www.aeg.com
Cleaning and user maintenance shall not be made by chil-
dren without supervision.
Never submerge the appliance into water.
CAUTION: To prevent damage to the appliance do not use
alkaline cleaning agents when cleaning, use a sot cloth and
a mild detergent.
This is an household appliance only. It is not intended to be
used in: sta kitchen areas in shops, oices and other work-
ing environments; arm houses; by clients in hotels, motels
and other residential type environments; bed and breakast
type environments.
Ithe plug or power cable is damaged, it must be replaced by
customer services only to avoid all risk.
Appliances with removable cord: avoid splashes owater on
the power cord connector or socket at the back othe appli-
ance.
WARNING: Models with glass suraces: do not use the appli-
ance ithe surace is cracked.
For European markets only:
Appliances can be used by persons with reduced physi-
cal, sensory or mental capabilities or lack oexperience and
knowledge ithey have been given supervision or instruction
concerning use othe appliance in a sae way and under-
stand the hazards involved.
When not in use and beore cleaning, always unplug the ap-
pliance.
Suraces marked with this symbol become hot during
use (the symbol is present in certain models only).

5ENGLISH
2. SAFETY
INSTRUCTIONS
DANGER!
This is an electrical appliance, it is
thereore important to respect the ol-
lowing saety warnings:
• Never touch the appliance with damp
hands.
• Never touch the plug with damp hands.
• Make sure the socket used is reely acces-
sible at all times, enabling the appliance to
be unplugged when necessary.
• Unplug directly rom the plug only.
• Never pull the power cable as you could
damage it.
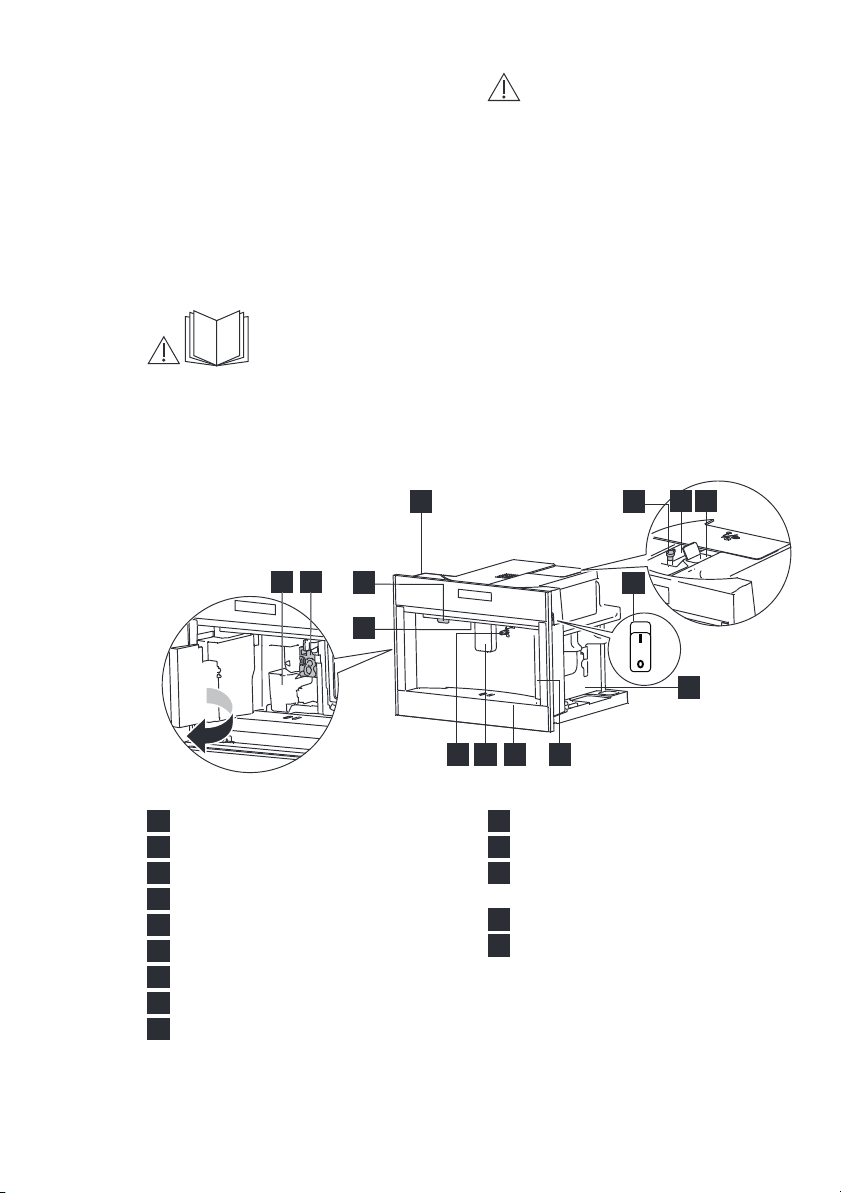
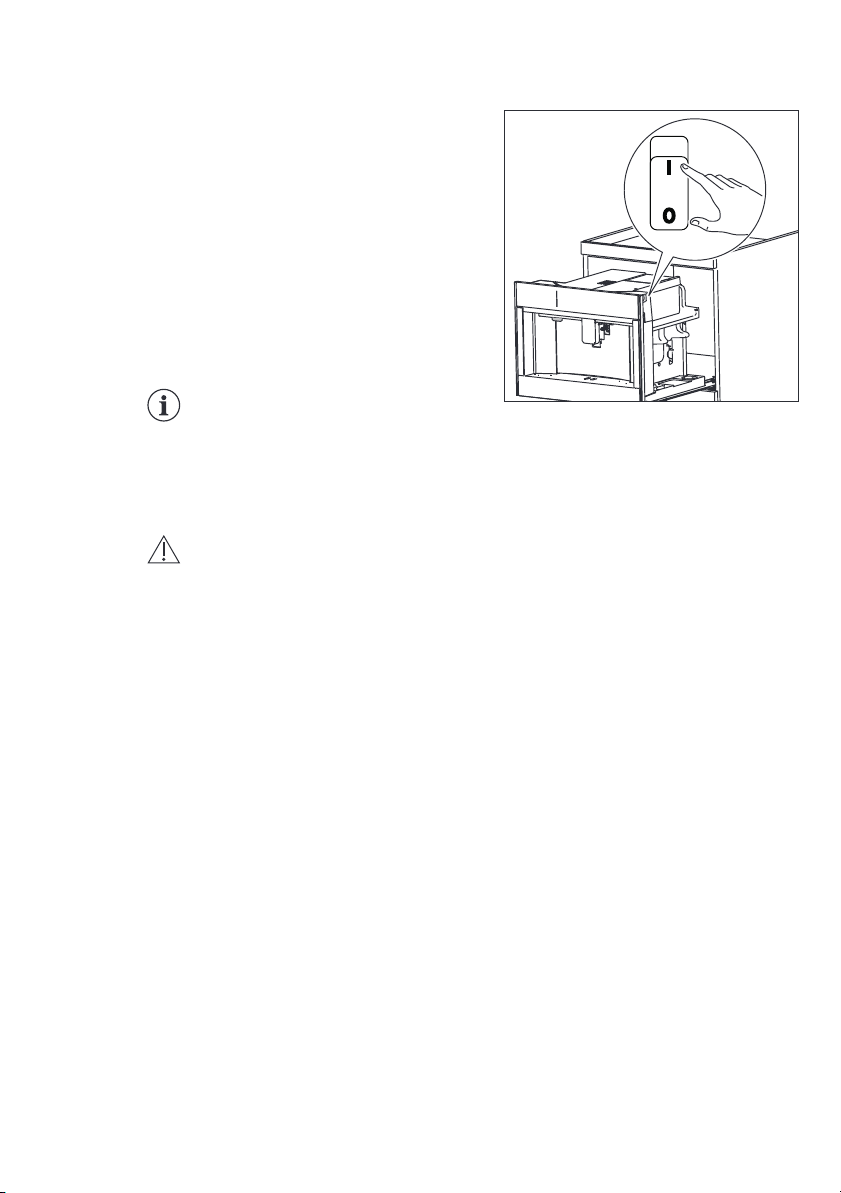
• To disconnect the appliance completely,
place the main switch (A10) on the side o
the appliance in the 0 position.
• Ithe appliance is aulty, do not attempt to
repair.
• Turn it o using the main switch (A10),
unplug rom the mains socket and contact
Customer Services.
IMPORTANT!
Keep all packaging (plastic bags,
polystyrene oam) away rom children.
DANGER OF BURNS!
This appliance produces hot water
and steam may orm while it is in
operation.
Avoid contact with splashes owater
or hot steam. Use knobs and han-
dles.
IMPORTANT!
Do not grasp the coee maker when it
is out othe cabinet.
Do not rest recipients containing liq-
uids or inlammable or corrosive ma-
terials on top othe appliance. Place
the accessories required to make the
coee (the measure or example) in
the special holder.
Do not rest large objects which could
obstruct movement or unstable ob-
jects on the appliance.
IMPORTANT!
Do not use the appliance when
extracted. Make sure the appliance is
inactive beore extracting it.
The only exception is adjusting the
coee mill which must be done with
the machine out (see the section
“Adjusting the coee mill”).
Use original or manuacturer recom-
mended accessories and spare parts
only.
2.1 Designated use
This appliance is designed and made to
prepare coee and heat drinks.
All other use is considered improper.
This appliance is not suitable or commercial
use.
The manuacturer is not liable or damage
deriving rom improper use othe appliance.
This appliance can be installed over a built-in
oven ithe latter is itted with a cooling an at
the rear (maximum microwave power: 3 kW).
2.2 Instructions
Read these instructions careully beore using
the appliance.
• Keep these instructions
• Failure to respect these instructions may
result in burns or damage to the appliance.
• The manuacturer is not liable or dam-
age deriving rom ailure to respect these
instructions.
The appliance has a cooling an.
This comes on whenever coee,
steam or hot water is delivered.
Ater several minutes, the an goes o
automatically.
2.3 Connecting the appliance
DANGER!
Check that the mains power supply
voltage corresponds to the value indi-
cated on the rating plate on the side o
the appliance.
Connect the appliance to an eiciently
earthed and correctly installed socket
with a minimum current rating o10A
only.
Ithe power socket does not match
the plug on the appliance, have the
socket replaced with a suitable type
by a qualiied proessional.

6www.aeg.com
3. PRODUCT DESCRIPTION
Please reer to the Quick
Guide lealet
3.1 Description of the
appliance
A10
A2 A4
A3
A8 A6A7
A5
A12
A1
A13
A11A14
A9
To comply with saety directives, an
omnipolar switch with a minimum
contact distance o3 mm must be
installed.
Do not use multiple sockets or exten-
sions.
IMPORTANT!
Saety cutout devices must be
included in the mains power supply
in compliance with the installation
regulations in the country concerned.
A1 Coee ground container
A2 Brewing unit
A3 Interior lighting
A4 ON/OFF/stand-by button
A5 Hot water/steam connection nozzle
A6 Water tank
A7 Coee spouts (adjustable height)
A8 Drip tray
A9 Grinding adjustment dial
A10
Main ON/OFF switch
A11
Ground coee unnel
A12
Cup storage compartment (average
temperature 35°C) (*)
A13
Accessories compartment (let/right)
A14
Beans container
(*) make sure the “energy saving”
mode is deactivated and that auto-
matic turning o is set to at least 1.5
hours

7ENGLISH
4. CONTROL PANEL
4.1 Control panel
1 2 3
C1
C3 C2 C4 C5
C1
Display
C2
Rotary
C3
Favourite icons
C4
START icon
C5
STOP icon
3.2 Accessories
B1 B3 B4
B5 B7
B6 B8
B2
B1
“Total Hardness Test” indicator paper
B2
Ground coee measure
B3
Descaler
B4
Water sotener ilter (certain models
only)
B5
Cleaning brush
B6
Hot water/steam spout
B7
Connection nozzle cover
B8
Milk container
Functions and settings
C1
Display
C2
Rotary
Turn the rotary to adjust the settings and browse the menu. Press to
conirm the selected unctions/settings.
The selected unction on the display, is underlined.
Select “Back” to go to the upper level menu, or “OK” to go back to the
main menu.
C3 Favourite
Save your avourite
C4
Start Start delivering the beverages
C5
Stop Stop delivering the beverages

8www.aeg.com
Functions and settings
C6
Demo Basic Settings
Service
Demo Mode
When Demo is activated the heating elements remain inac-
tive and the Coee Machine is kept saeor the showroom.
The predeined secret code 2468 needs to be inserted both
or activating and deactivating the demo mode.
C7
Number
of cups /
% milk
1 cup
2 cups
% milk
C8
Menu Cleaning
Basic Settings
Rinsing
Descaling
Time oDay
Auto Start
Auto O
Child Lock
Energy Saving
Cup warmer
Lights
Water
Setup
Service
Start
Start
00:00
On - O
Set Start time
From 15 minutes to 3 hours
On - O
On - O
On - O
On
Only when brew
O
Sotener
On - O
Hardness
From 1 to 4
Language
Key tones
Alarm/Error tones
Buzzer volume
Display brightness
Demo Mode
Show sotware version
Statistics
Reset avourite
Reset recipes
Factory settings
4.2 Description of the display
spresso
ormal
enu
30ml
Options
O
2 cups
C8
C11C12
C
6
C
7
C9
C10
C6
Demo
C7
Number ocups
C8
Menu
C9
Cup size
C10
Options/clock
C11
Aroma
C12
Recipes

9ENGLISH
Functions and settings
C9
Cup
size (*)
Small
Medium
Large
Extra Large
C10
Options
Coee temperature
Save as Favourite
Keep Changes
Low
Medium
High
Max
C11
Aroma
Pre-ground coee
Extra Mild
Mild
Normal
Strong
Extra Strong
C12
Recipes Coee
+ Milk
Specials
Ristretto
Espresso
Espresso lungo
Long Coee
Americano
Espresso Macchiato
Macchiato
Cappuccino
Cappuccino Plus
Latte Macchiato
Flat White
Cae Latte
Hot Milk
Hot Water
Steam
Jug
rom 40% to 60% milk
rom 20% to 80% milk
rom 20% to 80% milk
rom 20% to 80% milk
rom 20% to 80% milk
rom 40% to 90% milk
rom 40% to 90% milk
(*) The quantities shown on the display will vary depending on the calibration othe
coee grinder, the temperature and ambient humidity.

10 www.aeg.com
5.1 Controls after transport
Ater removing the packaging, check
that the appliance is intact and that all
accessories are included. Do not use the
appliance iit is visibly damaged. Contact
Customer Services.
5.2 Initial cleaning
Coffee has been used to factory-test the
appliance and it is therefore completely
normal for there to be traces of coffee in
the grinder.
Customise water hardness as
soon as possible ollowing the
instructions in the “Setting water
hardness” section.
5.3 Installing the appliance
IMPORTANT!
• Installation must be perormed by a
qualiied proessional in compliance
with legislation in orce in the country
oinstallation (see Built-in installation).
• The packing elements (plastic bags,
polystyrene oam, etc.) should be kept
out oreach ochildren.
• Do not install the appliance in rooms
where the temperature may drop to
0°C or lower.
• Customise the water hardness as soon
as possible ollowing the instructions in
the “Setting water hardness” section.
5.4 First connection
Connect the appliance to the mains
electricity supply and make sure the main
switch (A10) on the side othe appliance
is pressed down (ig. 1);
ig. 1
Turn the rotary (C2) (ig. 2 Quick Guide)
to select the required “Language”, then
press the rotary to conirm;
Turn the rotary again to select “Display
Brightness” and press it to conirm. Turn
the rotary to set rom 1 to 5 level.
Turn the rotary to select “Time oday”
and press it to conirm. Turn the rotary to
select “Minute othe day” and press it to
conirm. Turn the rotary to set the hours
and minutes until the current time is
displayed and press it to conirm.
Turn the rotary to select “demo mode” or
“First use”.
First use setup:
• FILL WATER TANK is displayed:
remove the water tank (A6), open the
lid, ill to the MAX line (marked on the
inside othe tank) with resh water (ig.
4 Quick Guide), close the lid and put
the tank back in the appliance;
•INSERT THE WATER SPOUT is
displayed: Check that the hot water/
steam spout (B6) is inserted on the
connection nozzle (A5) (ig. 5 Quick
Guide) and place a container holding a
minimum o100 ml underneath;
• PLACE A CUP (at least 100ml) UN-
DER THE WATER SPOUT PRESS
OK TO START DELIVERING HOT
WATER appears on the display;
• Select OK to conirm. The appliance
delivers water rom the spout then
5. BEFORE FIRST USE

11ENGLISH
goes o automatically.
The coee machine is now ready or
normal use.
The irst time you use the appli-
ance, you need to make 4-5 cap-
puccinos beore it starts to give
satisactory results.
The irst time you use the ma-
chine, the water circuit is empty
and the appliance could be very
noisy. The noise becomes less as
the circuit ills.
When making the irst 5-6 cap-
puccinos, it is normal to hear the
noise oboiling water. Ater this,
the noise becomes less.
To improve the perormance o
your appliance, we recommend
installing a water sotener ilter
(B4) as described in section “Wa-
ter sotener ilter”. Iyour model
is not provided with a ilter, you
can request one rom Customer
Services.
Each time the appliance is turned on,
it perorms an automatic preheat and
rinse cycle which cannot be interrupted.
The appliance is ready or use only ater
completion othis cycle.
DANGER OF BURNS
During rinsing, a little hot water
lows rom the coee spouts (A7).
Avoid contact with splashes o
water.
The machine turns o automatically ater
a preset Time (see Menu). In case you
want to turn o beore press the ON/OFF
stand-by button (A4) (Fig 7 Quick Guide)
The message “TURNING OFF” is
displayed, then (iapplicable) the appli-
ance perorms a rinse cycle and goes o
(standby).
Iyou will not be using the appli-
ance or some time, irst empty the
water circuit, then unplug rom the
mains socket as ollows:
irst turn the appliance o by
pressing the ON/OFF stand-by
button (A4);
release the main switch (A10) at
the side othe appliance.
IMPORTANT!
Never press the main switch (ig.
1) while the appliance is on.
6.1 Rinsing
Use this unction to clean the coee
spouts (A7), to clean and heat the appli-
ance’s internal circuit. Place a container
with a minimum capacity o100 ml under
the coee spouts.
DANGER OF BURNS!
Do not leave the appliance unat-
tended while hot water is being
delivered.
Ithe appliance is not used
or more than 3-4 days, when
switched on again, we strongly
recommend perorming 2/3 rinses
beore use;
Ater cleaning, it is normal or the
ground container (A1) to contain
water.
6.2 Auto Start
You can set the auto-start time in order
to have the appliance ready at a certain
time (or example in the morning) so you
can make coee immediately.
To enable this unction, the time
must already be set correctly.
When the appliance is turned o
using the main switch (A10), the
auto-start setting (ienabled) is
lost.
6. DAILY USE

12 www.aeg.com
7.1 Coffee beans
IMPORTANT!
Do not use green, caramelised
or candied coee beans as they
could stick to the coee mill and
make it unusable.
1. Fill the beans container (ig. 9 Quick
Guide) with coee beans;
2. Place a cup (or two cups) under the
coee spouts (A7);
3. Lower the spouts as near as possible
to the cup. This makes a creamier
coee;
4. Select the required coee by turning
the rotary.
Choose the desired coee:
• Ristretto
• Espresso
• Espresso lungo
• Long Coee
• Americano
spresso
pecialsilk
5. Customize Aroma, coee quantity
and number ocups.
6. Press START icon.
7. Preparation begins. An image othe
selected beverage appears on the
display (C1), together with a progress
bar which gradually ills as prepara-
tion proceeds.
While the machine is making co-
ee, delivery can be interrupted at
any moment by pressing STOP.
Once the coee has been made, the
appliance is ready to make the next
beverage.
Various alarm messages could
be displayed while using the ap-
pliance (ill tank, empty ground
container, etc.). Their meaning is
explained in section “Displayed
messages”.
• For hotter coee, see section “Tips or
a hotter coee”.
• Ithe coee is delivered a drop at a
time, too weak and not creamy enough
or too cold, read the tips in sections
“Adjusting the coee mill” and “Trou-
bleshooting”.
• Preparation oeach coee can be
customised.
• I“Energy Saving” mode is active, you
may have to wait a ew seconds beore
the irst coee is delivered.
7.2 Pre-ground coffee
IMPORTANT!
Never add pre-ground coee
when the machine is o or it could
spread through the inside othe
machine and dirty it. This could
damage the appliance.
7. MAKING COFFEE
6.3 Energy saving
Use this unction to enable or disable en-
ergy saving. When enabled, the unction
reduces energy consumption in compli-
ance with European regulations.
6.4 Coffee temperature
Use this unction to modiy the tem-
perature othe water used to make the
coee.

13ENGLISH
While the machine is making co-
ee, delivery can be interrupted at
any moment by pressing STOP
icon.
IMPORTANT!
Halway through preparation, the
message ADD PRE-GROUND
COFFEE is displayed. Add one
level measure opre-ground co-
ee and press START.
7.3 Adjusting the coffee mill
The coee mill is set by deault to
prepare coee correctly and should not
require regulating initially.
However, iater making the irst ew co-
ees you ind that the coee is either too
weak and not creamy enough or delivery
is too slow (a drop at a time), this can
be corrected by adjusting the grinding
adjustment dial.
IMPORTANT!
The grinding adjustment dial must
be turned only when the co-
ee mill is in operation (grinding
sound) during the initial phase o
coee preparation.
Ithe cofee is delivered too slowly or not
at all, and when the wording GROUND
TOO FINE appears in versions with dis-
play, turn the cofee grinding dial one or
two clicks in a clockwise direction.
To deliver more ull-bodied, creamier
coee, turn the dial in an anti-clockwise
direction by one click toward number 1
(not more than one click at a time, other-
wise the coee might start to drip)
These adjustments will only be evident
ater at least 2 cups ocoee have been
delivered. Ithis adjustment does not
obtain the desired result, turn the dial
another click.
7.4 Tips for a hotter coffee
For hotter coee, it is recommended to:
• increase the coee temperature in the
settings menu.
• warm the cups with hot water/steam
using the hot water/steam unction.

14 www.aeg.com
8.1 Using the hot water/steam
spout
8.2 Using the milk container
1. Remove the lid (ig. 16 Quick Guide);
2. Fill the milk container (B8) with a
suicient quantity omilk, not exceed-
ing the MAX level marked on the con-
tainer. Each mark on the side othe
container corresponds to about 100
ml omilk;
For a denser more even roth,
you must use skimmed or partially
skimmed milk at rerigerator tem-
perature (about 5°C).
I“Energy Saving” mode is ena-
bled, you may have to wait a ew
seconds beore the beverage is
delivered.
3. Make sure the milk intake tube is
correctly inserted in the bottom o
the milk container lid (ig. 16 Quick
Guide);
4. Place the lid back on the milk con-
tainer;
5. Remove the hot water/steam spout
(B6);
6. Attach the milk container (B8) to the
connection nozzle (A5) and push as
ar as it will go (ig. 17 Quick Guide).
7. Place a suiciently large cup under
the coee spouts (A7) and rothed
milk spout. Adjust the length othe
milk spout. To move it nearer the
cup, simply pull it downwards (ig. 18
Quick Guide).
8. Follow the instructions below or each
unction.
Turn the roth adjustment dial on the
milk container lid to adjust the amount o
roth on the milk delivered while making
milk-based coees. Follow the tips in the
table below:
Dial posi-
tion
Description
Recommended
or…
No
roth
CAFFE LATTE /
HOT MILK
Min. roth LATTE
MACCHIATO
Max. roth CAPPUCCINO /
MILK (FROTHED
MILK)
To avoid milk with poor roth or
large bubbles, always clean the
milk container lid and hot water
connection nozzle as described in
sections 10.10 / 10.11 / 10.12.
8. MAKING CAPPUCCINOS AND MILK-BASED COFFEES
The aroma, quantity and milk% othe
drinks can be saved according the pre-
erences.
The Favourite button on the panel allows
the user to prepare their avourite bever-
age with a single touch.
This eature allows the User to save the
current settings. (The recipe and any
9. FAVOURITE

15ENGLISH
Please reer to the Quick
Guide lealet
10.1 Cleaning the machine
The ollowing parts othe machine must
be cleaned regularly:
• the appliance’s internal circuit;
• coee ground container (A1);
• drip tray (A8);
• water tank (A6);
• coee spouts (A7);
• pre-ground coee unnel (A11);
• brewing unit (A2), accessible ater
opening the brewing unit door;
• milk container (B8);
• hot water/steam connection nozzle
(A5);
• control panel.
IMPORTANT!
Do not use solvents, abrasive
detergents or alcohol to clean the
coee machine. You need not use
chemical products to clean the
machine.
None othe components othe
appliance can be washed in a
dishwasher with the exception o
the milk container (B8).
Do not use metal objects to
remove encrustations or coee
deposits as they could scratch
metal or plastic suraces.
10.2 Cleaning the machine’s
internal circuit
Ithe appliance is not used or more
than 3/4 days, beore using it again, we
strongly recommend switching it on and:
1. perorming 2-3 rinse cycles by select-
ing the “Rinse” unction.
2. Delivering hot water oraew sec-
onds.
Ater cleaning, it is normal or the
ground container (A1) to contain
water.
10. CLEANING
user-preerred parameters)
Important: Note that, “Save as Favourite”
does not overwrite the current recipe,
use Options /Keep Changes to change
the current recipe deault values.
By selecting Save as Favourite on the
list:
1. The screen shows a popup with
instruction. It is possible to Cancel
by pressing the rotary and selecting
Cancel.
2. The control panel shows and blink
the 3 icons 1 2
3
.
3. Start icon is O.
By selecting one position:
1. The screens shows the saved recipe
renamed with the preix “My”.
2. The selected position icon turns
On. Any other avourites that have
already been saved also light up.
3. The Start icon turns On.
The user can overwrite a avourite by
selecting a point where a avourite is
already saved. In this case, a popup win-
dow will appear to conirm the action.
In this case:
• The selected avourite position will
start to lash
• The other 2 icons will turn o
By selecting “NO”, the screen backs to
the previous screen - see Options: Save
as Favourite - Saving
By selecting “YES”, the screen goes to
Quickset - see Options: Save as Favour-
ite - Saving
To cancel, select “Menu” /“Basic Set-
tings”, /“Service”/”Reset avourite”.

16 www.aeg.com
10.3 Cleaning the coffee
ground container
When “Empty ground container” appears
on the display (C1), the ground container
must be emptied and cleaned. The appli-
ance cannot be used to make coee until
the ground container has been cleaned.
Even inot ull, the empty ground con-
tainer message is displayed 72 hours
ater the irst coee has been prepared.
For the 72 hours to be calculated cor-
rectly, the machine must never be turned
o with the main switch (A10).
To clean (with the machine on):
1. Open the bottom door (ipresent) by
rotating it downwards (ig. 25 Quick
Guide).
2. Remove the drip tray (A8) (ig. 26
Quick Guide), empty and clean.
3. Empty the ground container (ig. 27
Quick Guide) and clean thoroughly to
remove all residue let on the bottom.
This can be done using the spatula
on the brush (B5) provided.
IMPORTANT!
When removing the drip tray,
the ground container must be
emptied, even iit contains only
ew grounds. Ithis is not done,
the ground container may overill
and clog the machine as the user
continues to prepare coees.
10.4 Cleaning the drip tray
IMPORTANT!
The drip tray (A8) is itted with a
level indicator (red) showing the
level owater it contains. Beore
the indicator protrudes rom the
cup tray, the drip tray must be
emptied and cleaned, otherwise
the water may overlow the edge
and damage the appliance, the
surace it rests on or the surround-
ing area.
To remove the drip tray, proceed as
ollows:
1. Remove the drip tray and coee
ground container (A1) (ig. 26 Quick
Guide);
2. Empty the drip tray (ig. 28 Quick
Guide) and ground container and
wash them.
10.5 Cleaning inside of the
coffee machine
DANGER!
Beore cleaning internal parts, the
machine must be turned o and
unplugged rom the mains power
supply. Never submerge the appli-
ance into water.
1. Check regularly (about once a
month) that the inside othe appli-
ance (accessible ater removing the
drip tray (A8) ) is not dirty.
2. Inecessary, remove coee deposits
with the brush (B5) supplied and a
sponge. Remove all the residues
with a vacuum cleaner (ig. 29 Quick
Guide).
10.6 Cleaning the water tank
1. Clean the water tank (A6) regularly
(about once a month) and whenever
you replace the water sotener ilter
(B4) (iprovided) with a damp cloth
and a little mild washing up liquid.
Rinse thoroughly beore illing the
tank and putting it back in the appli-
ance;
2. Remove the ilter (ipresent) and
rinse with running water;
3. Replace the ilter (iprovided), ill the
tank with resh water and replace the
tank;
4. (Models with water sotener ilter
only) Deliver about 100ml ohot
water to reactivate the ilter.
10.7 Cleaning the coffee
spouts
1. Clean the coee spouts (A7) regu-
larly with a sponge or cloth;
2. Check that the holes in the coee
spouts are not blocked. Inecessary,
remove coee deposits with a tooth-

17ENGLISH
pick.
10.8 Cleaning the pre-ground
coffee funnel
Check regularly (about once a month )
that the pre-ground coee unnel (A11) is
not blocked. Inecessary, remove coee
deposits with the brush (B5) supplied.
10.9 Cleaning the brewing unit
The brewing unit must be cleaned at
least once a month.
IMPORTANT!
The brewing unit (A2) must not be
removed when the appliance is
on. Do not use orce to remove the
brewing unit.
1. Make sure the machine is correctly
turned o.
2. Open the service door.
3. Remove the drip tray and waste co-
ee container (ig. 26 Quick Guide).
4. Press the two coloured release but-
tons inwards and at the same time
pull the brewing unit outwards (ig. 31
Quick Guide).
IMPORTANT!
Do not use washing up liquid to
clean the brewing unit. It would
remove the lubricant applied to the
inside othe piston.
5. Soak the brewing unit in water or
about 5 minutes, then rinse (ig. 32
Quick Guide).
6. Ater cleaning, replace the brewing
unit (A2) by sliding it onto the internal
support and pin at the bottom, then
push the PUSH symbol ully in until it
clicks into place.
Iyou encounter diiculty inserting
the brewing unit, beore inserting
it you must adapt it to the right
dimension by pressing it orceully
rom the bottom and top.
7. Once inserted, make sure the two
coloured release buttons have
snapped out.
8. Replace the drip tray and waste co-
ee container.
9. Close the service door.
10.10 Cleaning the milk con-
tainer (B8)
Each time the coee machine
perorms a milk based recipe, it

18 www.aeg.com
automatically asks to clean the
circuit othe jug at the end o
the recipe. Turn the rotary to the
CLEAN position.
Clean the milk container each time you
prepare milk as described below:
1. Lit and remove the lid;
2. Extract the milk container (B8) rom
the thermal casing, holding it by the
two side grips.
IMPORTANT!
The thermal casing must not be
illed with or immersed in water.
Clean with a damp cloth only.
3. Remove the milk spout and intake
tube (ig. 33 Quick Guide).
4. Turn the roth adjustment dial clock-
wise to the “INSERT” position and
pull o.
5. Wash all components othe rother
thoroughly with hot water and a mild
dish-washing detergent. All compo-
nents and the container are dish-
washer sae, placing them in the top
basket othe dishwasher.
Make sure there are no milk residues
on the hollow and groove under the
dial.
Inecessary, scrape the groove with
a toothpick.
6. Rinse inside the roth adjustment dial
seat and the milk rother connector
hole.
7. Check that the intake tube and spout
are not clogged with milk residues.
8. Replace the dial (lining up the arrow
with the word INSERT), spout and
milk intake tube.
9. Place the milk container in the ther-
mal casing.
10. Place the lid back on the milk con-
tainer.
10.11 Cleaning the hot water/
steam connection nozzle
Each time you prepare milk, clean the
connection nozzle (A5) with a sponge to
remove milk residues rom the gaskets.
10.12 Cleaning the hot water/
steam spout after use
Always clean the hot water/steam spout
(B6) ater use to avoid the build-up o
milk residues and prevent it rom clog-
ging.
1. Place a container under the hot
water/steam spout and deliver a little
water. Stop delivery ohot water by
pressing STOP.
2. Wait a ew minutes or the hot water/
steam spout to cool down, then
extract. Hold the spout with one hand
and with the other, turn the cappuc-
cino maker and pull it downwards.
3. Also remove the steam connection
nozzle by pulling it downwards.
4. Check the hole in the connection
nozzle is not blocked. Inecessary,
clean using a toothpick.
5. Wash all parts othe spout thorough-
ly with a sponge and warm water.
6. Insert the connection nozzle, then
the cappuccino maker on the spout
by pushing it upwards and turning it
clockwise until it is attached.

19ENGLISH
IMPORTANT!
Beore use, read the instructions
and the labelling on the descaler
pack.
You should use descaler author-
ised by the manuacturer only
(cod. 9029798718 M3BICD200)
WebShop AEG:
www.aeg.com/shop.
Using unsuitable descaler and/or
perorming descaling incorrectly
may result in aults not covered by
the manuacturer’s warranty.
Descale the appliance when PLEASE
DESCALE YOUR MACHINE appears
on the display. To descale immediately,
press DESCALE, and ollow the instruc-
tions rom point 4;
To access the descaling menu:
1. Turn the rotary (C2) to select “Menu”,
then press the dial to conirm.
2. Select “Cleaning” and conirm.
3. Set “Descaling” and conirm.
4. Select “Start” to start the descaling
cycle then ollow the instructions on
the display;
5. REMOVE SOFTENER FILTER (i
activated); extract the water tank
(A6), remove the sotener ilter (B4)
(iincluded), empty the water tank.
Press NEXT;
6. ADD DESCALER (UP TO LEVEL
A) AND WATER (UP TO LEVEL B);
Pour the descaler into the tank up to
the level A marked inside the tank
(equal to one 100 ml pack), then add
water (one litre) up to level B and put
the water tank back.
7. Press YES;
8. PLACE 2.5l CONTAINER UNDER
SPOUTS PRESS OK TO START
DESCALING:
Place an empty container with a
minimum capacity o2.5 litres under
the hot water/steam spout (B6) and
coee spouts (A7);
DANGER OF BURNS!
Hot water containing acid lows
out othe hot water/steam spout.
Take care to avoid contact with
splashes othis solution.
9. Press OK to conirm that you have
added the descaling solution. DES-
CALING UNDERWAY, appears on
the display. The descale programme
starts and the descaler liquid comes
out othe hot water/steam and coee
spouts. A series orinses and pauses
is perormed automatically to remove
all the scale residues inside the co-
ee machine;
Ater about 25 minutes, descaling stops:
10. RINSE AND FILL WATER TANK UP
TO MAX LEVEL: the appliance is
now ready to rinse with resh water.
Empty the container used to collect
the descaler solution. Extract the
water tank, empty, rinse under run-
ning water, ill with resh water up to
the MAX level and put back in the
appliance;
11. PLACE 2.5l CONTAINER UNDER
SPOUTS. PRESS OK TO START
RINSING: Place the container used
to collect the descaler solution empty
under the coee spouts and hot wa-
ter/steam spout (ig. 8 Quick Guide)
and press OK;
12. Hot water is delivered irst rom the
coee spouts, then rom the hot
water/steam spout and RINSING,
please wait is displayed;
13. When the water in the tank has run
out, empty the container used to col-
lect the rinsing water;
14. (Ithe ilter is installed) INSERT THE
FILTER IN ITS HOUSING Press
NEXT and extract the water tank.
Replace the water sotener ilter i
removed previously;
15. FILL WATER TANK UP TO MAX
LEVEL: Fill the tank up to the MAX
level with resh water;
16. INSERT WATER TANK: Put the
water tank back in the appliance;
17. PLACE 2.5l CONTAINER UNDER
SPOUTS. PRESS OK TO START
RINSING:
Place the container used to collect
11. DESCALING

20 www.aeg.com
PLEASE DESCALE YOUR MACHINE
message is displayed ater a period
otime established according to water
hardness.
The machine is set by deault or a hard-
ness level o4. The machine can also
be programmed according to the hard-
ness othe mains water in the various
regions so that the machine needs to be
descaled less oten.
12.1 Measuring water hard-
ness
1. Remove the “Total hardness test”
indicator paper (B1) rom its packag-
ing.
2. Immerse the paper completely in a
glass owater or one second.
3. Remove the paper rom the water
and shake lightly. Ater about a min-
ute, 1, 2, 3, or 4 red squares orm,
depending on the hardness othe
water. Each square corresponds to
one level.
12.2 Setting water hardness
1. Turn the rotary (C2) to select “Menu”,
then press the dial to conirm.
2. Select “Basic Settings”, press to
conirm, select “Water” and conirm.
3. Select “Hardness” and set the
required level rom 1 to 4 (Level 1
= sot water; Level 4 = very hard
water);
The machine is now reprogrammed with
the new water hardness setting.
12. SETTING WATER HARDNESS
the descaler solution empty under the
hot water/steam spout and press OK;
18. Hot water is delivered rom the hot
water/steam spout and RINSING is
displayed.
19. EMPTY DRIP TRAY: At the end o
rinsing, remove, empty and replace
the drip tray (A8) and ground con-
tainer (A1). Press OK;
20. DESCALE COMPLETE;
21. Press OK; Machine is turned o.
Descaling is complete.
Ithe descaling cycle is not com-
pleted correctly (e.g. no electric-
ity) we recommend repeating the
cycle;
Ater descaling, it is normal or the
ground container (A1) to contain
water.
Ithe water tank has not been
illed to the MAX level, at the
end odescaling, the appliance
requests a third rinse to guaran-
tee that the descaler solution has
been completely eliminated rom
the machine’s internal circuits.
Beore starting rinsing, remember
to empty the drip tray;
The appliance may request desca-
ling cycles at very short intervals.
This is normal and due to the
appliance’s advanced control
system.
Other manuals for KKK994500
1
This manual suits for next models
1
Table of contents
Other AEG Coffee Maker manuals
Popular Coffee Maker manuals by other brands

DeLonghi
DeLonghi ESAM 2000 Household appliances

FlyTek
FlyTek ZIP PRO 2 Operation and maintenance manual

POLTI
POLTI CREMA EXPRESS Usage instructions

Saeco
Saeco Cafissimo HD8603 operating instructions

Nuova Simonelli
Nuova Simonelli Oscar II User handbook

cecotec
cecotec POWER ESPRESSO 20 TRADIZIONALE instruction manual

LAVAZZA
LAVAZZA LB2300 SINGLE CUP operating instructions

Rheavendors
Rheavendors rhea Business Line eC Service book

Beanrush Beverages
Beanrush Beverages MyEspressino instruction manual

Jura
Jura Giga X3 Professional Instructions for use

Keurig
Keurig Vue quick start guide

Java
Java wsd18 operating instructions