AEG BHSL18 User manual


2
2
Important!
This appliance is not intended for use by persons (including
children) with reduced physical, sensory or mental capabilities, or
lack of experience and knowledge, unless they have been given
supervision or instruction concerning use of the appliance by a
person responsible for their safety. Children should be supervised
to ensure that they do not play with the appliance.
It is essential that you read the instructions in this manual before
assembling, operating, and maintaining the product.
Subject to technical modifications.

33
D
A
B
C
A - 12 Volt adaptor
B - Adjustable head
C - Switch trigger
D - Belt clip
Fig. 1
Fig. 2
Fig. 3
Fig. 4
Fig. 5
A - Screw hole
B - Belt hook
C - Screw
A - Battery pack
B - Depress latches to release battery pack
A - Adaptor port
B - Barrel plug
C - Cord retainer
A - 12 Volt adaptor
B - 12 Volt receptacle
A - Switch trigger
AB C
A
B
B
A
B
C
B
A
A

4
4
Fig. 6 Fig. 9
Fig. 7
Fig. 8
A - Adjustable head
A - Brightness knob
B - To decrease brightness
C - To increase brightness A - Tension screw
A
A - Fuse cap
B - Fuse (250 Volt, 8 Amp)
C - 12 Volt adaptor
BC
A
A
A
B
C

55
WARNING! Read all safety warnings and all instructions.
Failure to follow the warnings and instructions may result in
electric shock, re and/or serious injury. Save all warnings and
instructions for future reference.
SPOT LIGHT SAFETY WARNINGS
Know your product. Read operator’s manual carefully. Learn
its applications and limitations, as well as the specic potential
hazards related to this product. Following this rule will reduce the
risk of electric shock, re, or serious injury.
Do not permit children to use work light. It is not a toy.
The product is not designed to operate in wet or damp
conditions.
Carefully position the power cord during use. A power cord in
your walking path can be a tripping hazard.
If wrapped or in contact with fabrics, the work light lens can
produce sufcient heat to melt some fabrics. To avoid serious
personal injury, never allow the work light lens to come in contact
with anything.
Do not place hands or ngers between adjustable head and
frame when positioning work light to avoid possible pinching.
Battery tools do not have to be plugged into an electrical outlet;
therefore, they are always in operating condition. Be aware of
possible hazards when not using your battery tool or when changing
accessories. Following this rule will reduce the risk of electric shock,
re, or serious personal injury.
Do not place the product or their batteries near re or heat. This
will reduce the risk of explosion and possibly injury.
To reduce the risk of personal injury and electric shock, the
product should not be played with or placed where small
children can reach it.
To reduce the risk of electric shock, do not expose to water
or rain.
Save these instructions. Refer to them frequently and use them to
instruct others who may use this tool. If you loan someone this tool,
loan them these instructions also to prevent misuse of the product
and possible injury.
Do not direct the light beam at persons or animals and do not
stare into the light beam yourself (not even from a distance).
Staring into the light beam may result in serious injury or vision loss.
Use only with recommended battery pack and charger. Any
attempt to use another battery pack will cause damage to the
product and could possibly explode, cause a re, or personal
injury.
Do not disassemble the product.
Do not store the product in a damp or wet location, or in a
location where the temperature may reach or exceed 40°C
(104°F). For example, inside sheds, vehicles, or metal buildings in
the summer.
The product is non-dimmable; do not connect with any
dimmers.
Always power the product from a standard domestic supply.
Power from generators or inverters may cause the product to
malfunction.
Check damaged parts. Before further use of the product, a part
that is damaged should be carefully checked to determine that it will
operate properly and perform its intended function. Do not use the
product if it does not function properly.
Have the product repaired by a qualied person. The product
is in accordance with the relevant safety requirements. Repairs
should only be carried out by qualied person using original spare
parts, otherwise this may result in considerable danger to the user.
The light source of this luminaire is not replaceable; when the
light source reaches its end of life the whole luminaire shall
be replaced.
TECHNICAL DATA 18V / 12V SPOT LIGHT BHSL18
Rated voltage 18V / 12V adaptor
Power 35 watts
Light output 2100 lumens
Runtime (6.0 Ah at low setting)
High power 5 hours
Low power 36 hours
Colour rendering index (CRI) 70
Correlated colour temperature (CCT) 6200 K
Beam angle 10 degrees
BATTERY AND CHARGER
Compatible battery pack
(not included)
Compatible charger
(not included)
L1815R
L1820R
L1825R
L1830R
L1840R
L1850R
L1860R
AL1218G
BL1218
BLK1218
BL18DP-X5
Use AEG 18V battery and charger only

6
6
ASSEMBLY
WARNING
Do not use this product if it is not completely assembled or if any
parts appear to be missing or damaged. Use of a product that
is not properly and completely assembled or with damaged or
missing parts could result in serious personal injury.
WARNING
Do not attempt to modify this product or create accessories or
attachments not recommended for use with this product. Any
such alteration or modication is misuse and could result in a
hazardous condition leading to possible serious personal injury.
OPERATION
WARNING
Do not direct the light beam at persons or animals and do not
stare into the light beam yourself (not even from a distance).
Staring into the light beam may result in serious injury or vision
loss.
WARNING
Do not allow familiarity with products to make you careless.
Remember that a careless fraction of a second is sufcient to
inict serious injury.
WARNING
Do not use any attachments or accessories not recommended
by the manufacturer of this product. The use of attachments or
accessories not recommended can result in serious personal
injury.
Operate in a well ventilated area. Do not block vents. Keep them
clear to allow proper ventilation.
APPLICATIONS
You may use this product for the purpose listed below:
■To illuminate distant objects and areas requiring additional light
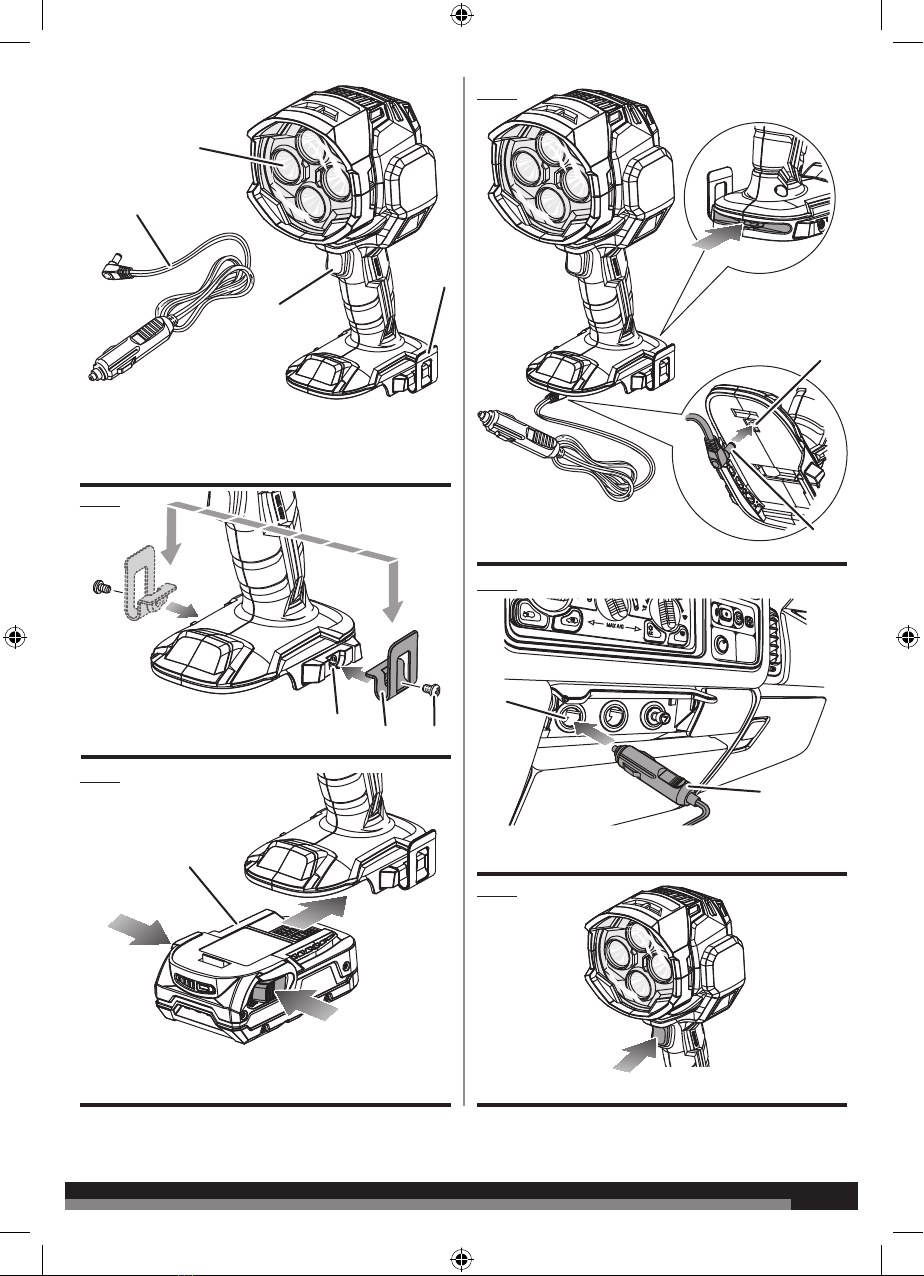
INSTALLING BELT HOOK
See Figure 1.
■Align belt hook with right or left side screw hole.
■Install screw to secure belt hook in place.
INSTALLING/REMOVING BATTERY PACK
See Figure 2.
■Align the raised rib on the battery pack with the groove inside
the spot light. Then slide the battery pack into the spot light.
■Make sure the latches on each side of the battery pack snap
into place and that battery pack is secured in the product before
beginning operation.
■Depress the latches to remove the battery pack.
NOTE: This product is designed to be powered by either a 18
Volt battery pack or 12 Volt power source as described in this
manual.
If the light ashes during operation, try recharging and reinstalling
the battery pack.
For complete charging instructions, see the operator’s manuals for
your battery pack and charger.
WARNING
Battery products are always in operating condition. Therefore,
remove the battery pack when the product is not in use or when
carrying at your side.
12 VOLT ADAPTOR
See Figures 3 and 4.
The light may be connected to a 12 Volt power source, such as
a cigarette lighter receptacle or automotive power port. Refer to
vehicle owner’s manual for location of cigarette lighter receptacle
or power port.
■Insert the barrel plug into the port on the base of the spot light.
■Secure the cord in the cord retainer.
■Route the cord to the 12 Volt power source.
■Hold the 12 Volt adaptor firmly and place connector into a
cigarette lighter receptacle or power port to energize light.
If the 12 V adapter does not t rmly into the cigarette lighter
receptacle or power port, the receptacle may not be suitable for use
with the light. A poor connection at the base of the 12 V adapter
could lead to electrical problems in the vehicle outside of the
protections offered by the vehicle or light’s fuse.
NOTE: Powering the unit using a vehicle’s 12 V receptacle when
the engine is not running will drain the vehicle’s battery.
TURNING THE SPOT LIGHT ON AND OFF
See Figure 5.
Squeeze and release the switch trigger to turn the spot light on and
off.
NOTE: It is not necessary to hold the switch trigger to operate the
spot light.
OVER TEMPERATURE PROTECTION
If overheating occurs, the light will attempt to cool itself by dimming.
If dimming does not cool the light sufciently, it will shut off. As soon
as the unit reaches normal operating temperature, it can be turned
on again. If it shuts off, allow approximately 10 minutes of cool-
down time before attempting to resume operation.
ADJUSTING THE BRIGHTNESS
See Figure 6.
The brightness knob, located on the back of the spot light, controls
the intensity of the LED. To increase brightness, turn the knob to the
right. To decrease brightness, turn the knob to the left.
ADJUSTABLE HEAD
See Figure 7.
CAUTION
Do not place hands or ngers between adjustable head and
handle when positioning spot light to avoid pinching your ngers
or hands.

77
The adjustable head can be rotated 185 degrees. Adjust light to
desired position for best illumination.
CHANGING THE FUSE
See Figure 8.
The 12 Volt adaptor contains a 250 Volt, 8 Amp, 5 x 20 mm fuse
to protect the adaptor and charger from unexpected power surges.
To replace the fuse:
■Unscrew the fuse cap on the end of the 12 Volt adaptor.
■Install the replacement fuse. If the spring comes out, be sure to
reinsert it before installing the new fuse.
■Thread the fuse cap back onto the adaptor. Tighten securely.
ADJUSTING TENSION
See Figure 9.
The adjustable head can become loose over time. Tension between
the head and the cradle can be increased by turning the adjustment
screw.
BATTERIES
Battery packs which have not been used for some time should be
recharged before use.
Temperatures in excess of 50°C (122°F) reduce the performance
of the battery pack. Avoid extended exposure to heat or sunshine
(risk of overheating).
The contacts of chargers and battery packs must be kept clean.
For an optimum life-time, the battery packs have to be fully charged,
after used.
To obtain the longest possible battery life remove the battery pack
from the charger once it is fully charged.
For battery pack storage longer than 30 days:
• Store the battery pack where the temperature is below 27°C
and away from moisture.
• Store the battery packs in a 30% - 50% charged condition.
• Every six months of storage, charge the pack as normal.
TRANSPORTING LITHIUM BATTERIES
Lithium-ion batteries are subject to the Dangerous Goods
Legislation requirements.
Transportation of those batteries has to be done in accordance with
local, national and international provisions and regulations.
■The user can transport the batteries by road without further
requirements.
■Commercial transport of Lithium-Ion batteries by third parties is
subject to Dangerous Goods regulations. Transport preparation
and transport are exclusively to be carried out by appropriately.
trained persons and the process has to be accompanied by
corresponding experts.
When transporting batteries:
■Ensure that battery contact terminals are protected and
insulated to prevent short circuit.
■Ensure that battery pack is secured against movement within
packaging.
■Do not transport batteries that are cracked or leak.
Check with forwarding company for further advice
BATTERY PACK PROTECTION
The battery pack has overload protection that protects it from being
overloaded and helps to ensure long life. Under extreme stress the
battery electronics switch off the machine automatically. To restart,
switch the machine off and then on again. If the machine does not
start up again, the battery pack may have discharged completely. In
this case it must be recharged in the battery charger.
MAINTENANCE
The ventilation slots of the machine must be kept clear at all times.
Use only AEG accessories and AEG spare parts. Should
components need to be replaced which have not been described,
please contact one of our AEG service agents (see our list of
guarantee/service addresses).
If needed, an exploded view of the tool can be ordered. Please state
the Article No. as well as the machine type printed on the label and
order the drawing at your local service agents or directly at:
Techtronic Industries (Australia) Pty. Ltd.
PO Box 1065
Mount Waverley VIC 3149
Tel. no. 1300 361 505
Australia
Techtronic Industries N.Z. Ltd.
PO Box 12-806
Penrose AUCKLAND 1642
Tel no. 0800 279 624
New Zealand
SYMBOLS
Safety alert
Regulatory Compliance Mark (RCM). Product
meets applicable regulatory requirements.
Please read the instructions carefully before
starting the machine.
Do not stare at light source.
Class III protection
Do not dispose of electric tools together with
household waste material. Electric tools and
electronic equipment that have reached the end of
their life must be collected separately and returned
to an environmentally compatible recycling facility.

Techtronic Industries GmbH
Max-Eyth-Straße 10
71364 Winnenden
Germany
Techtronic Industries (Australia) Pty. Ltd.
31 Gilby Road,
Mount Waverley VIC 3149,
Australia
Techtronic Industries N.Z. Limited
2 Landing Drive, Mangere,
Auckland, New Zealand 2022
Table of contents
Other AEG Lighting Equipment manuals
Popular Lighting Equipment manuals by other brands

MELINERA
MELINERA 288498 Operation and safety notes

ALUZ
ALUZ A1-ZYZY-SQR installation instructions

CUSHCRAFT
CUSHCRAFT MA6B manual

Light Emotion
Light Emotion DERBY3 User instruction manual

eldoLED
eldoLED LINEARdrive 720D quick start guide

Harbor Freight Tools
Harbor Freight Tools Roadshock LED Series Owner's manual & safety instructions