AGFA DuoScan HiD User manual

abc
DuoScan HiD
Owner’s Guide
Preface
This chapter gives you general information about DuoScan HiD.
Chapter 1 — Preparing the scanner
This chapter shows you how to prepare your DuoScan HiD for installation.
Chapter 2 — Installing the scanner
This chapter shows you how to set up your DuoScan HiD for the Apple
Macintosh and PC.
Appendix A — Troubleshooting
This appendix can be helpful when you come across problems that you are
unable to solve.
Appendix B — Technical information
This appendix provides specifications of your DuoScan HiD.
Appendix C — DuoScan HiD regulation compliance
This appendix gives you information on the safety regulations and on
electromagnetic interference.
All manuals and user guides at all-guides.com
all-guides.com

2 Trademark s
Trademarks
Agfa and the Agfa rhombus are trademarks of Agfa-Gevaert AG.
DuoScan HiD, ColorTune and FotoLook are trademarks of Agfa-Gevaert N.V .
Adaptec is a trademark of Adaptec.
Adobe Acrobat and the Acrobat logo are trademarks of Adobe Systems,
Incorporated.
Intel is a registered trademark of Intel Corporation
Power Macintosh and System 8 are trademarks and Apple and Macintosh are
registered trademarks of Apple Computer, Incorporated.
Windows, Windows NT and the Windows logo are trademarks or registered
trademarks of Microsoft Corporation.
Other products or company names are trademarks or registered trademarks o f
their respective holders.
Copyright © 1999 Agfa-Gevaert N.V.
All rights reserved.
All software and hardware described in this document is subject to change
without notice.
All manuals and user guides at all-guides.com

Cont ent s 3
Contents
Preface ................................................................................................................................5
Chapter 1 — Preparing the scanner ...........................................................................6
Unpacking the scanner......................................................................................................7
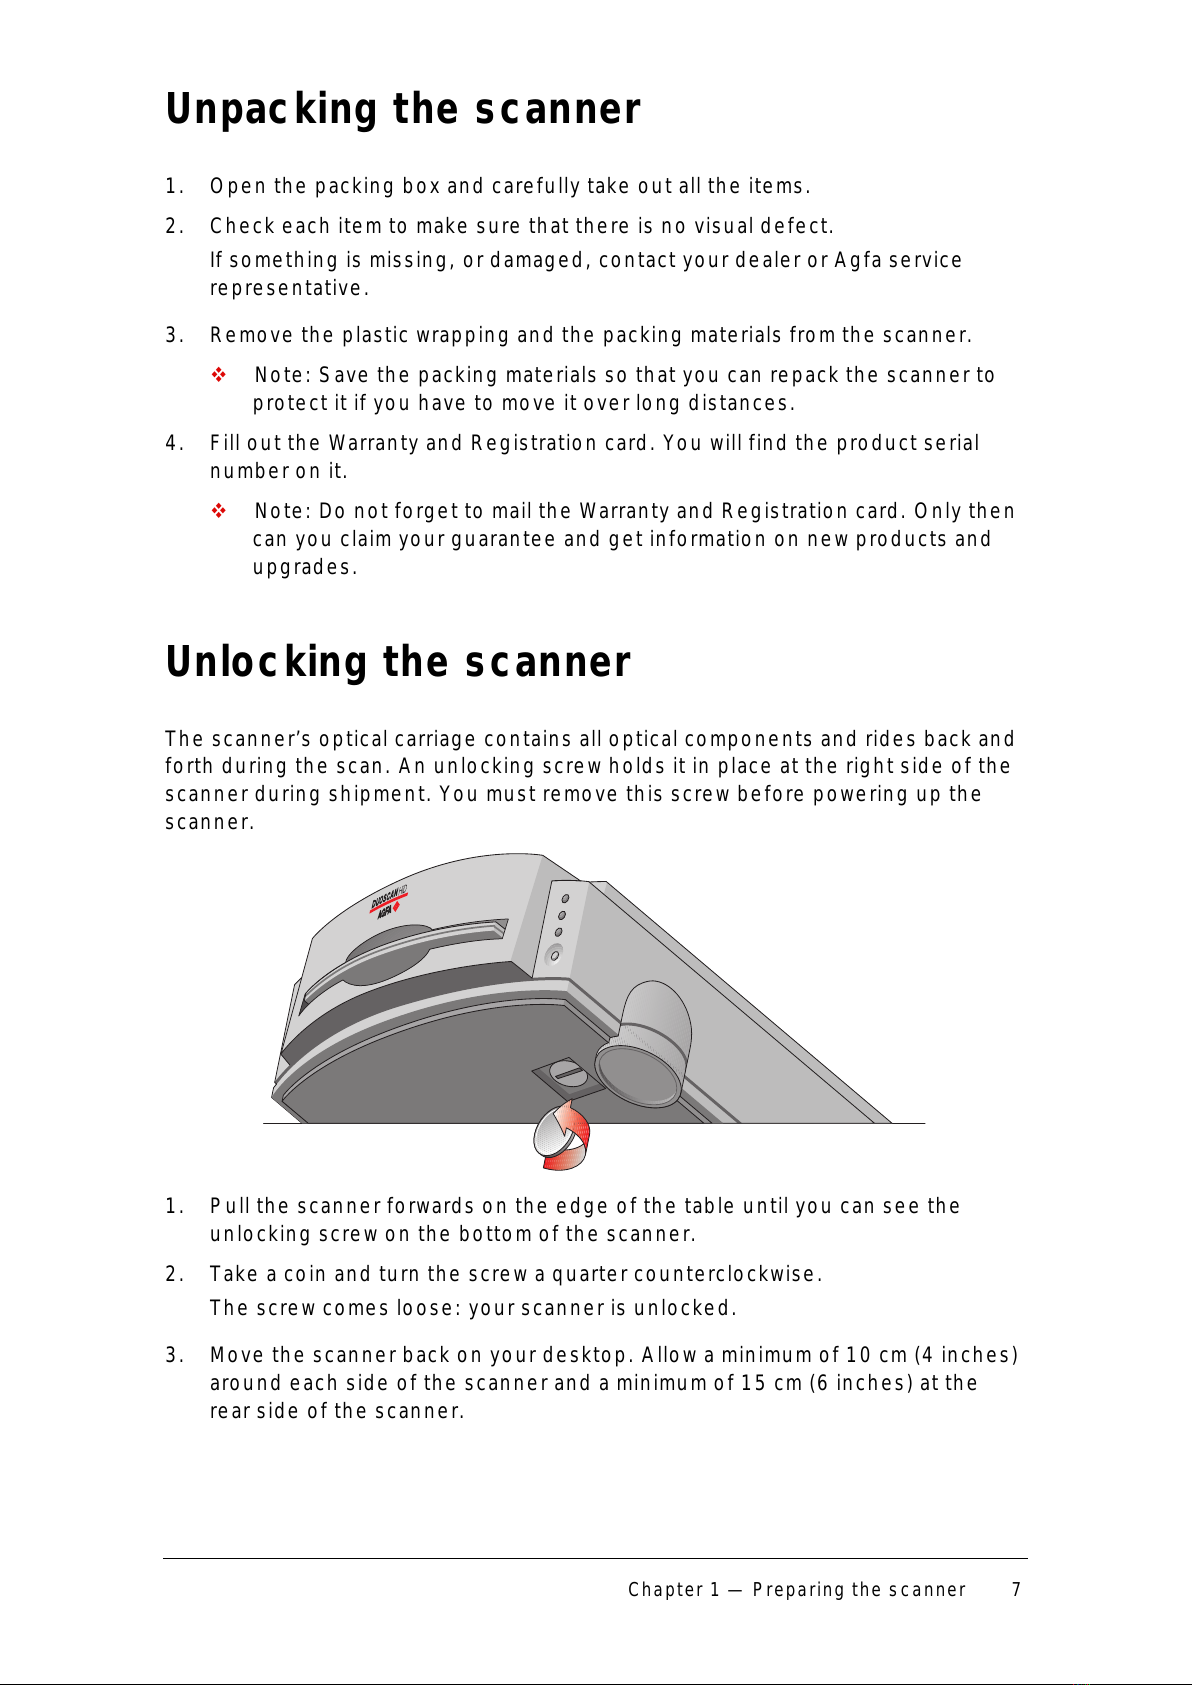
Unlocking the scanner.......................................................................................................7
Relocking the scanner.......................................................................................................8
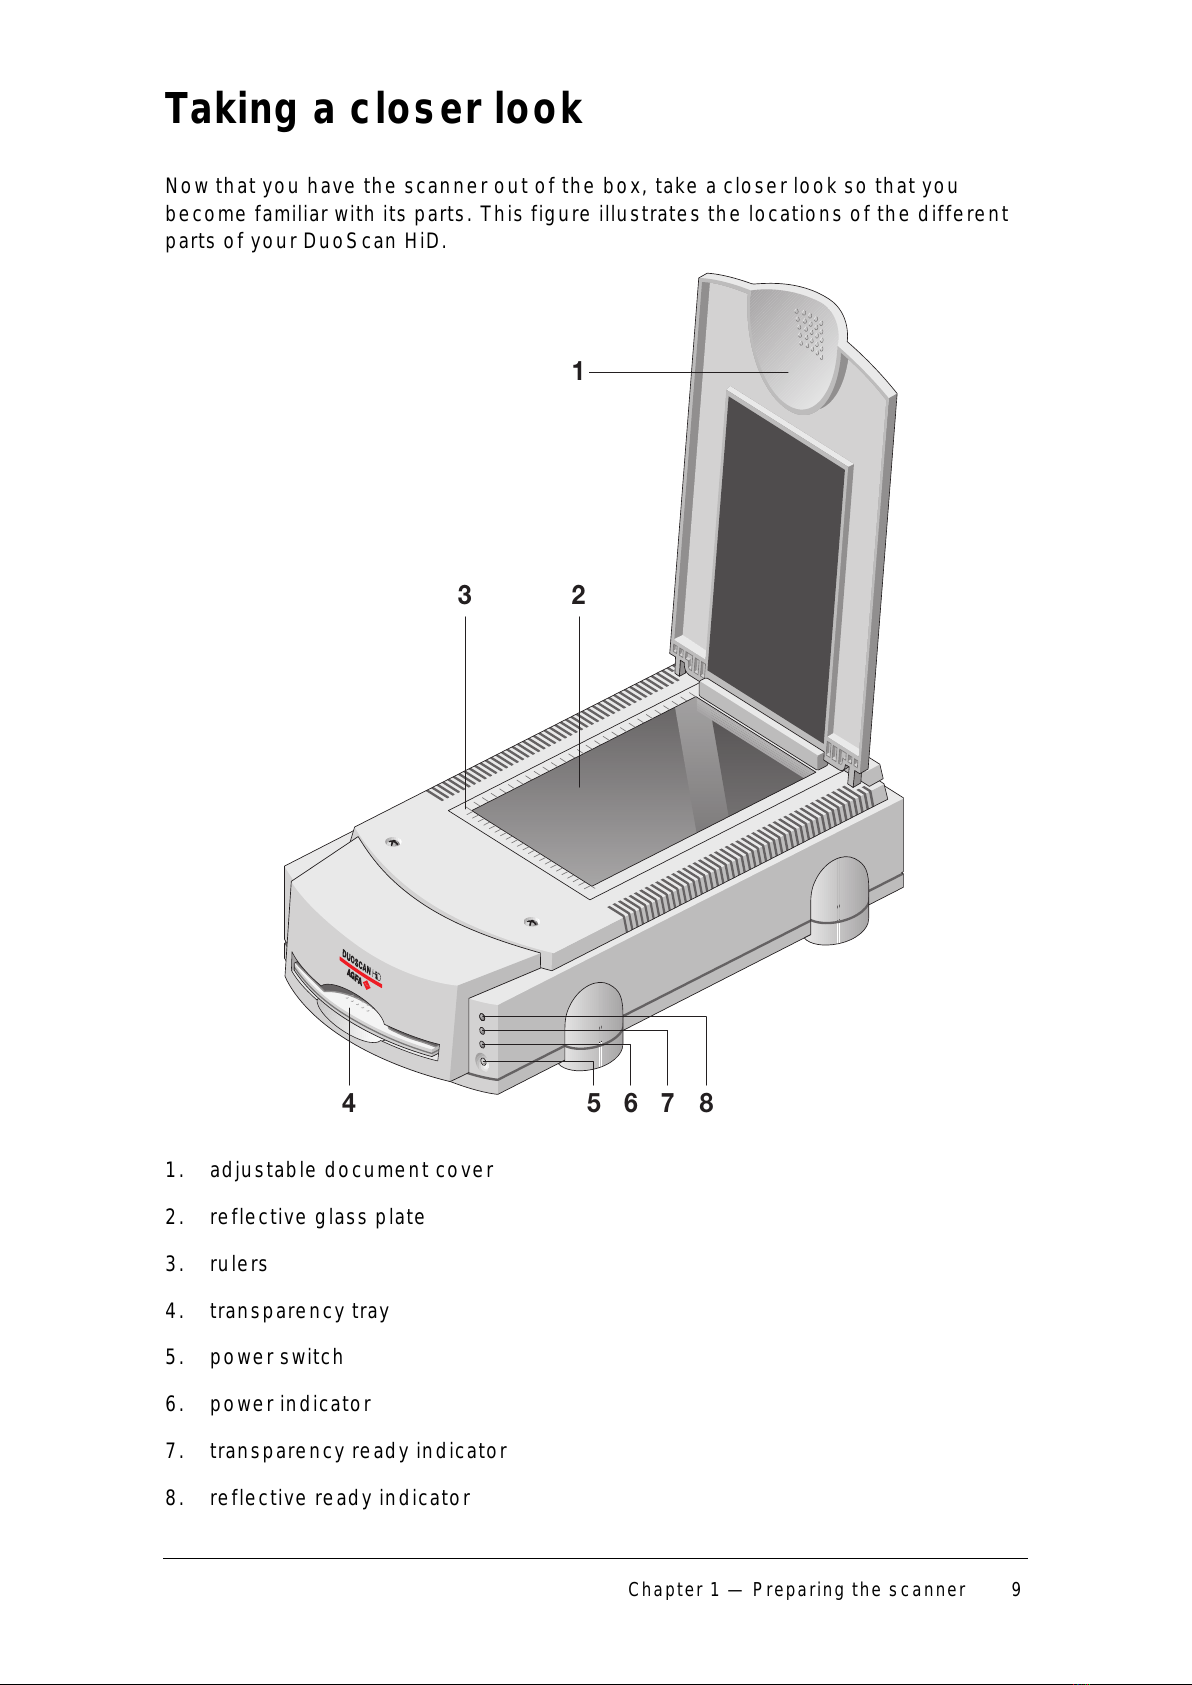
Taking a closer look............................................................................................................9
Placing reflective originals..............................................................................................12
Placing transparent originals..........................................................................................12
Using the universal glass frame..............................................................................13
Using the regular slide holders ..............................................................................13
Using batch slide holders................................................................................................15
35 mm framed batch slide holder ...........................................................................15
35 mm strip batch slide holder................................................................................16
6 x 9 cm batch slide holder / 4 x 5 inch batch slide holder................................17
Performing a power-on test ............................................................................................19
Chapter 2 — Installing the scanner..........................................................................20
Minimum hardware requirements and recommendations...........................................21
Environmental requirements ..........................................................................................22
Precautions........................................................................................................................22
Cleaning your scanner.....................................................................................................23
SCSI devices .....................................................................................................................23
Installation for the Apple Macintosh..............................................................................24
Which SCSI interface card .......................................................................................24
Choosing a SCSI ID number....................................................................................24
Connecting the scanner ..........................................................................................26
Testing the connection............................................................................................30
Installation for the PC ......................................................................................................31
Which SCSI interface card .......................................................................................31
Choosing a SCSI ID number....................................................................................31
Connecting the scanner ..........................................................................................33
Testing the connection............................................................................................37
All manuals and user guides at all-guides.com

4 Cont ent s
Appendix A — Troubleshooting..................................................................................38
Appendix B — Technical Information.......................................................................40
Appendix C — Regulation Compliance ....................................................................42
Safety regulations ............................................................................................................42
UL Safety Statement ................................................................................................42
FTZ: Bescheinigung des Herstellers/Importeurs................................................42
TÜV: Wichtige Sicherheitshinweise ......................................................................42
Electromagnetic interference.........................................................................................43
Federal Communications Commission Radio Frequency Interference
Statement...................................................................................................................43
Canadian department of Communications............................................................44
All manuals and user guides at all-guides.com

Pref ac e 5
Preface
DuoScan HiD is a high-resolution scanner that scans reflective and transparent
originals, each on an independent scan bed. The transparent scan area is a
revolutionary innovation because of the Twinplate™ scanning system. Th is
allows you to scan without glass plates distorting the optical path. Instead of
only switching the light source, the scanner switches mirrors and thereby uses
a different optical path to scan transparent originals. This allows the scanner to
optimize the optical path for both types of originals.
DuoScan HiD's image quality makes it perfectly suitable for pre-press graphical
applications. It is based on flatbed CCD (Charge Coupled Device) scanning
technology. DuoScan HiD is characterized by a large input size range and a
high scanning speed. Thanks to its 8,000 CCD pixels, an impressive output
size range can be achieved. This high-precision instrument features
exceptional sharpness and color fidelity.
The universal glass frame, the slide holder frame and the batch slide holders
allow you to scan transparent originals without using the reflective glass plate.
Three regular slide holders are supplied with DuoScan HiD, together wit h
several types of batch slide holders which are available as an option in order to
increase the productivity of the scanner. The document cover is adjustable for
reflective scanning: when you put a thicker original (like a book or a magazine)
on the reflective glass plate, the document cover adapts itself to its th ickn e ss.
The originals can be of any type. The FotoLook scanning software will optimize
the scan result. The features of ColorTune and FotoFlavor software mak e i t
possible to create an output in compliance with your personal wishes (re alis t ic
colors, special color effects,...). The bit depths can be either 3 x 14 bit for
color (packed into 3 x 16 bit or truncated to 3 x 8 bit), 14 bit for gray scale
originals, or 1 bit for line-art originals. The scanned data are transferred to the
workstation through SCSI-2. The workstation can be either an Apple®
Macintosh® or PC®.
All manuals and user guides at all-guides.com

6 Chapt er 1 — Preparing t he s c anner
Chapter 1 — Preparing the
scanner
This chapter assists you in preparing your DuoScan HiD for installatio n . Yo u will
find instructions for:
Unpacking the scanner
Unlocking the scanner
Relocking the scanner
Taking a closer look
Placing reflective originals
Placing transparent originals
Using the universal glass frame
Using the regular slide holders
Using batch slide holders
35 mm framed batch slide holder
35 mm strip batch slide holder
6x9cm or 4x5inch batch slide holder
Performing a power-on test
All manuals and user guides at all-guides.com
all-guides.com

Chapt er 1 — Preparing t he s c anner 7
Unpacking the scanner
1. Open the packing box and carefully take out all the items.
2. Check each item to make sure that there is no visual defect.
If something is missing, or damaged, contact your dealer or Agfa service
representative.
3. Remove the plastic wrapping and the packing materials from the scanner.
v Note: Save the packing materials so that you can repack the scanner to
protect it if you have to move it over long distances.
4. Fill out the Warranty and Registration card. You will find the produ ct se rial
number on it.
v Note: Do not forget to mail the Warranty and Registration card. Only then
can you claim your guarantee and get information on new products and
upgrades.
Unlocking the scanner
The scanner’s optical carriage contains all optical components and rides back and
forth during the scan. An unlocking screw holds it in place at the right side of the
scanner during shipment. You must remove this screw before powering up the
scanner.
1. Pull the scanner forwards on the edge of the table until you can see the
unlocking screw on the bottom of the scanner.
2. Take a coin and turn the screw a quarter counterclockwise.
The screw comes loose: your scanner is unlocked.
3. Move the scanner back on your desktop. Allow a minimum of 10 cm (4 inches)
around each side of the scanner and a minimum of 15 cm (6 inches) at the
rear side of the scanner.
All manuals and user guides at all-guides.com

8 Chapt er 1 — Preparing t he s c anner
Relocking the scanner
If you need to transport the scanner, you should relock your scanner. Th is will
protect the scanner's optical assembly from possible damage.
1. Switch your scanner on.
2. Pull the scanner forwards on the edge of the table until you can see the
unlocking screw on the bottom of the scanner.
3. Take a coin and turn the screw a quarter clockwise.
The screw is fastened: your scanner is locked.
4. Move the scanner back on your desktop.
5. Turn your scanner off.
All manuals and user guides at all-guides.com

Chapt er 1 — Preparing t he s c anner 9
Taking a closer look
Now that you have the scanner out of the box, take a closer look so that you
become familiar with its parts. This figure illustrates the locations of the different
parts of your DuoScan HiD.
1
23
56784
1. adjustable document cover
2. reflective glass plate
3. rulers
4. transparency tray
5. power switch
6. power indicator
7. transparency ready indicator
8. reflective ready indicator
All manuals and user guides at all-guides.com

10 Chapt er 1 — Preparing t he s c anner
1. power input
2. SCSI terminator switch
3 . S CS I ID swit ch
4. 25-pin connector
5. 50-pin connector
All manuals and user guides at all-guides.com

Chapt er 1 — Preparing t he s c anner 11
1. Universal glass frame
2. Slide holder frame
3. 6 x 9 cm batch slide holder
4. 35 mm framed batch slide holder
5. 35 mm strip batch slide holder
6. 4 x 5 inch batch slide holder.
All manuals and user guides at all-guides.com
all-guides.com

12 Chapt er 1 — Preparing t he s c anner
Placing reflective originals
You can place a reflective original directly on the scanner’s reflective glass plate.
A new feature of your DuoScan HiD is the adjustable document cover: when you
put a thicker original (like a book or a magazine) on the reflective glass plate, the
document cover adapts itself to its thickness.
1. Open the document cover of the scanner.
2. Place the original face down on the reflective glass plate, with its top side
against the middle of the front ruler.
The optical performance of a CCD scanner is always best near the middle of
the scan area. However, for the most common resolutions used for refle ct ive
originals, placing originals to the side will not decrease quality.
3. Close the document cover of the scanner.
Placing transparent originals
When you scan transparent originals, you use either a batch slide holder frame or
the universal glass frame.
1
2
3
1. universal glass frame
2 . calib rat io n slit
3. arrow indicating where to place transparent originals
v Note: You find this arrow only on the top-side of the frame.
Caution: You always have to attach your transparent originals to the slide holder
frame either with the clips of the universal slide holder, or by using a batch slide
holder, or with adhesive tape, even if your transparent originals are fixed in a
regular slide holder. Otherwise you might lose them in the scanner.
All manuals and user guides at all-guides.com

Chapt er 1 — Preparing t he s c anner 13
Using the universal glass frame
To scan a transparent original, carry out the following instructions:
1. Center the original on the universal slide holder so that its top side is
directed towards the calibration slit of the slide holder frame when you put
the universal slide holder on the slide holder frame of the scanner.
The arrow on the frame indicates the position that guarantees the best
quality.
2. Clip your original underneath the edge of the universal slide holder.
3. Put the slide holder frame into the transparency tray.
v Note: Make sure that the calibration slit of the slide holder frame is at the
front side (standing in front of the scanner) and that it is clean.
Using the regular slide holders
You can also put your originals in a regular slide holder to avoid blooming and
newton rings. There are three types of regular slide holders: 35 mm strip, 6 x 6
cm, and 4 x 5 inch. To scan a transparent original using a regular slide holder,
carry out the following instructions:
1. Put your original in a slide holder.
2. Center the original on the universal glass frame so that its top side is directed
towards the calibration slit of the slide holder frame. This position guarantees
the best quality.
3. Fix the slide holder on the universal glass frame by pushing it firmly down,
the rear of the holder having a glass adhesive, thereby securing it to the
glass. The holder can still be removed easily.
4. Put the universal glass frame into the transparency tray with the Agfa logo
facing upwards.
All manuals and user guides at all-guides.com

14 Chapt er 1 — Preparing t he s c anner
1. 35 mm regular slide holder
2. 6 x 6 cm regular slide holder
3. 4 x 5 inch regular slide holder
The specifications (resolution,...) of the scanner apply to the whole scan area.
However, image quality is always at its optimum in the middle of the sc an are a.
All manuals and user guides at all-guides.com

Chapt er 1 — Preparing t he s c anner 15
Using batch slide holders
There are three different kinds of batch slide holder that can be used in
conjunction with the batch slide holder frame to increase the productivity o f th e
scanner.
35 mm framed batch slide holder
This frame can hold a maximum of twelve premounted slides at any time, once
loaded it is mounted into the batch slide holder frame.
Mount a slide into the frame
1. Locate the edge of the slide into the indentation on the arm of the holder.
2. Push the slide down into the aperture.
3. Ensure that the slide is secured by the six fixing lugs on the inside of the
f rame .
The slide position might need slight adjustment after location.
4. When all the slides have been mounted locate the batch slide holder into the
batch slide holder frame.
Remove a slide from the frame
1. Remove the batch slide holder from the batch slide holder frame.
2. Push the slide gently from underneath, releasing the grip of the mounting
lugs.
3. Pull away from the indentation.
All manuals and user guides at all-guides.com

16 Chapt er 1 — Preparing t he s c anner
35 mm strip batch slide holder
Two strips of five slides can be mounted into the holder which is then mounted
into the batch slide holder frame.
Mount a slide into the frame
1. Unlock the strip slide frame by placing your thumb on the raised points on the
end of the holder and pushing the strip slide frame towards the hinge slot.
The frame will become loose.
2. Lift the strip slide frame.
3. Place the strip of slides into the centre of the frame.
4. Close the frame.
5. Lock the frame in position by sliding away from the hinge slot.
The position of the slides can be readjusted slightly by moving the slides
within the holder.
All manuals and user guides at all-guides.com
all-guides.com

Chapt er 1 — Preparing t he s c anner 17
Remove a slide from the frame
1. Unlock the strip slide frame.
2. Lift the strip slide frame.
3. Remove the slide strip.
6 x 9 cm batch slide holder / 4 x 5 inch batch slide
holder
These frame holders can hold several slides at a time, once loaded it is mounted
into the batch slide holder frame. To mount or remove slides for the 6 x 9 cm and
the 4 x 5 inch slide holders you have to apply the same principles.
Mount a slide into the frame
1. Unlock the frame by placing your thumb on the raised points on the end of
the holder and pushing the frame towards the hinge slot. The frame will
become loose.
2. L ift th e frame.
3. Locate the slide against the front edge of the holder.
4. Close the frame.
5. Lock the frame in position by sliding it away from the hinge slot.
All manuals and user guides at all-guides.com

18 Chapt er 1 — Preparing t he s c anner
Remove a slide from the frame
1. Unlock the frame by placing your thumb on the raised points on the end of
the holder and pushing the frame towards the hinge slot. The frame will
become loose.
2. L ift th e frame.
3. Remove the slide.
4. Close the frame.
All manuals and user guides at all-guides.com

Chapt er 1 — Preparing t he s c anner 19
Performing a power-on test
You are now ready to perform a power-on test to check if the scanner is operating
co rre ct ly .
1. Check whether you have unlocked the scanner.
2. Connect the power cable to the scanner.
Make sure that you are using the correct power cable for the voltage in your
area. Double-check whether the voltage indicated on the back panel of the
scanner corresponds with the voltage in your area. If not, call your dealer or
Agfa service representative.
3. Switch on the scanner.
The scanner performs a self-test during which the power indicator light
(green) switches on and the reflective ready indicator light (yellow) and the
transparency ready indicator light (yellow) remain blinking. This takes about
half a minute. After the self-test the power indicator and the reflective ready
indicator light up.
If a malfunction is detected during the self-test, that is, if the ready indicators
remain blinking or go off, refer to Appendix A, ‘Troubleshooting’.
4. Switch off the scanner.
All manuals and user guides at all-guides.com

20 Chapt er 2 — I ns t alling t he s c anner
Chapter 2 — Installing the
scanner
This chapter shows you how to set up your DuoScan HiD with your Apple
Macintosh or PC. You’ll find information about:
Minimum Hardware requirements and recommendations
Environmental requirements
Precautions
Cleaning your scanner
SCSI devices
Installation for the Apple Macintosh
Which SCSI interface card
Choosing a SCSI ID number
Connecting the scanner
Testing the connection
Installation for the PC
Which SCSI interface card
Choosing a SCSI ID number
Connecting the scanner
Testing the connection
All manuals and user guides at all-guides.com
Other manuals for DuoScan HiD
1
Table of contents
Other AGFA Scanner manuals

AGFA
AGFA DuoScan User manual

AGFA
AGFA SnapScan EZ User manual

AGFA
AGFA 1200 User manual

AGFA
AGFA SNAPSCAN E42 User manual

AGFA
AGFA SnapScan e20 User manual

AGFA
AGFA SnapScan e25 User manual

AGFA
AGFA 1200 User manual

AGFA
AGFA SnapScan e40 User manual

AGFA
AGFA Horizon Ultra Scanner User manual

AGFA
AGFA SNAPSCAN 300 User manual

AGFA
AGFA SnapScan 1212u User manual

AGFA
AGFA SLIDEWRITER User manual

AGFA
AGFA StudioScan II User manual

AGFA
AGFA DuoScan HiD User manual

AGFA
AGFA SNAPSCAN 1236S User manual

AGFA
AGFA SNAPSCAN E10 User manual

AGFA
AGFA DUOSCAN T2000 XL User manual

AGFA
AGFA Scanner User manual

AGFA
AGFA SR 24 iT User manual

AGFA
AGFA StudioStar User manual