AGFA DuoScan User manual

DuoScan
Owner’s guide
Preface
This chapter gives you general information about DuoScan.
Chapter 1 — Preparing the scanner
This chapter shows you how to prepare your DuoScan for installation.
Chapter 2 — Installing the scanner
This chapter shows you how to set up your DuoScan for the Apple Macintosh and PC.
Appendix A — Troubleshooting
This appendix can be helpful when you come across problems that you are unable to
solve.
Appendix B — Technical information
This appendix provides specifications of your DuoScan.
Appendix C — DuoScan regulation compliance
This appendix gives you information on the safety regulations and on electromagnetic
interference.
AB
The complete picture.

Trademarks 2
Trademarks
Agfa, DuoScan, FotoLook, FotoTune, FotoFlavor and Twinplate are trademarks of Agfa-Gevaert
N.V.
Apple and Macintosh are registered trademarks of Apple computer, Incorporated.
PC is a registered trademark of the International Business Machines Corporation.
Windows 95 is a trademark of Microsoft Corporation.
Other product or company names are trademarks or registered trademarks of their respective
holders.
Copyright © 1996 Agfa-Gevaert N.V.
All rights reserved.
All software and hardware described in this document is subject to change without notice.

Contents 3
Contents
Preface ................................................................................................ 4
About DuoScan.......................................................................................................................4
Conventions............................................................................................................................4
1Preparing the scanner............................................................................. 5
Unpacking the scanner.............................................................................................................5
Unlocking the scanner..............................................................................................................6
Relocking the scanner..............................................................................................................6
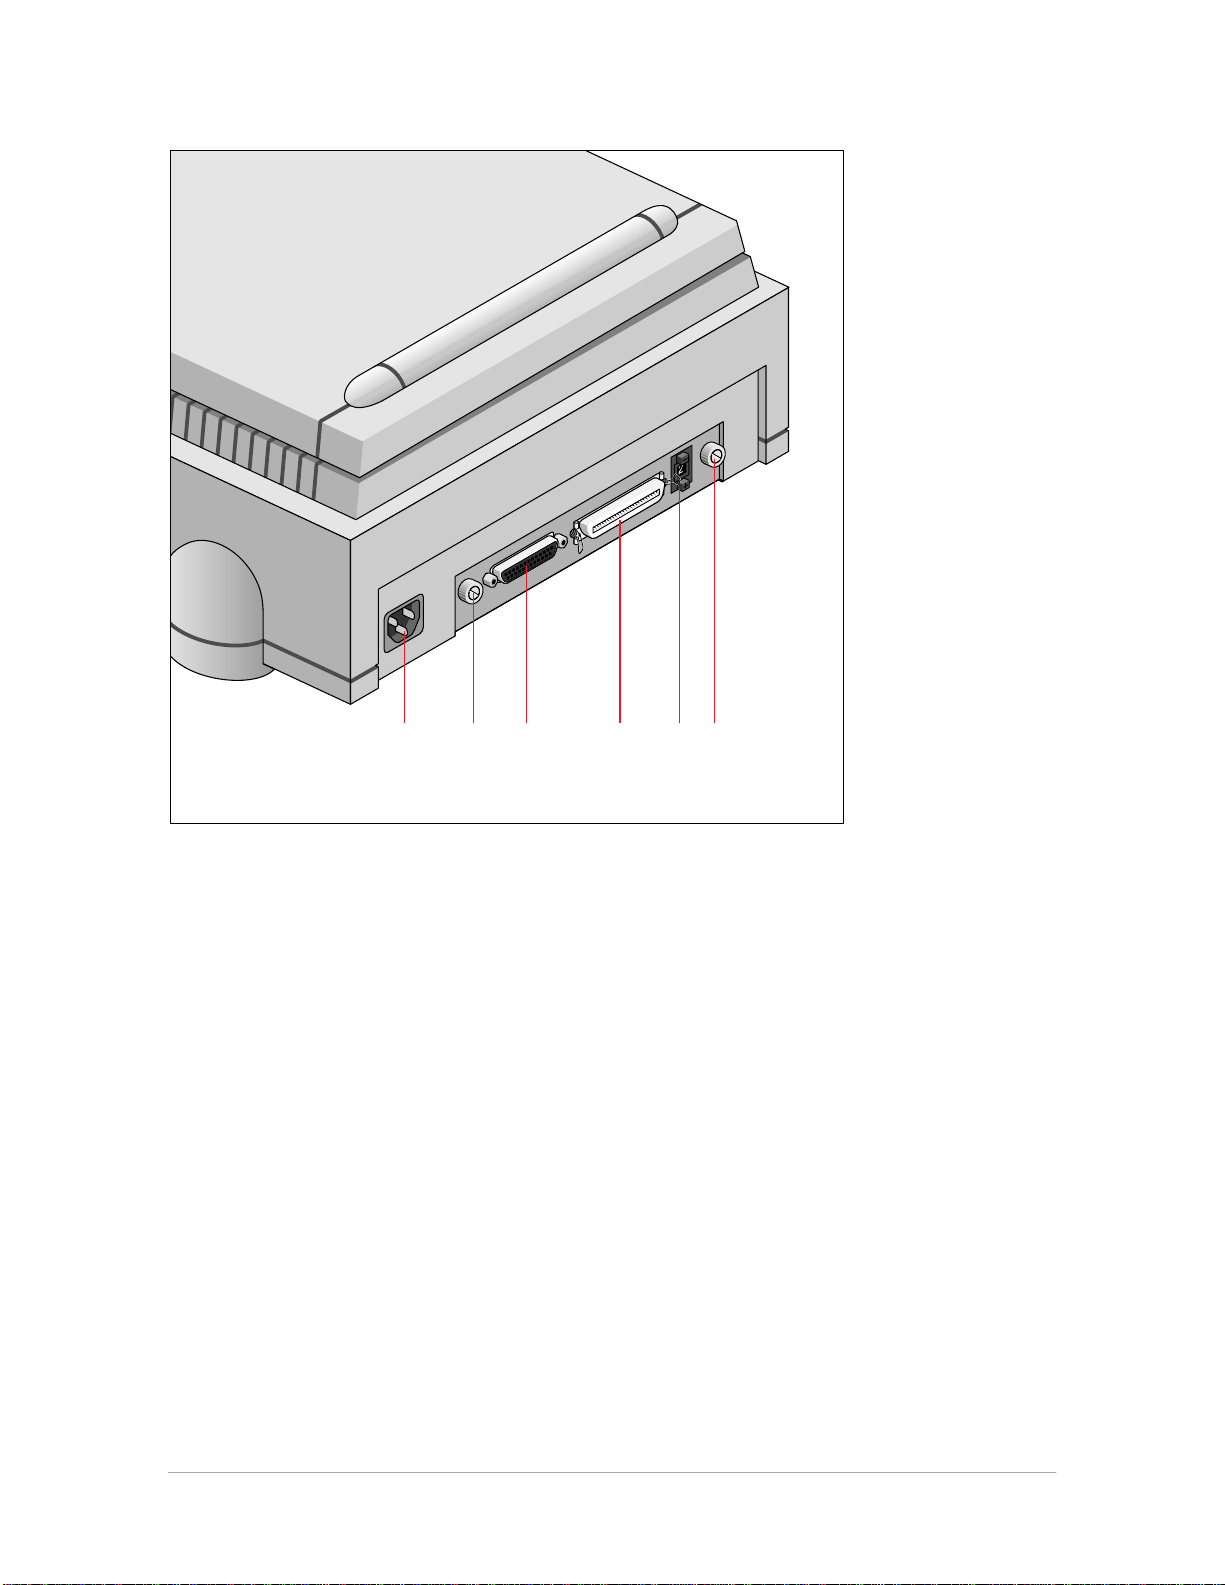
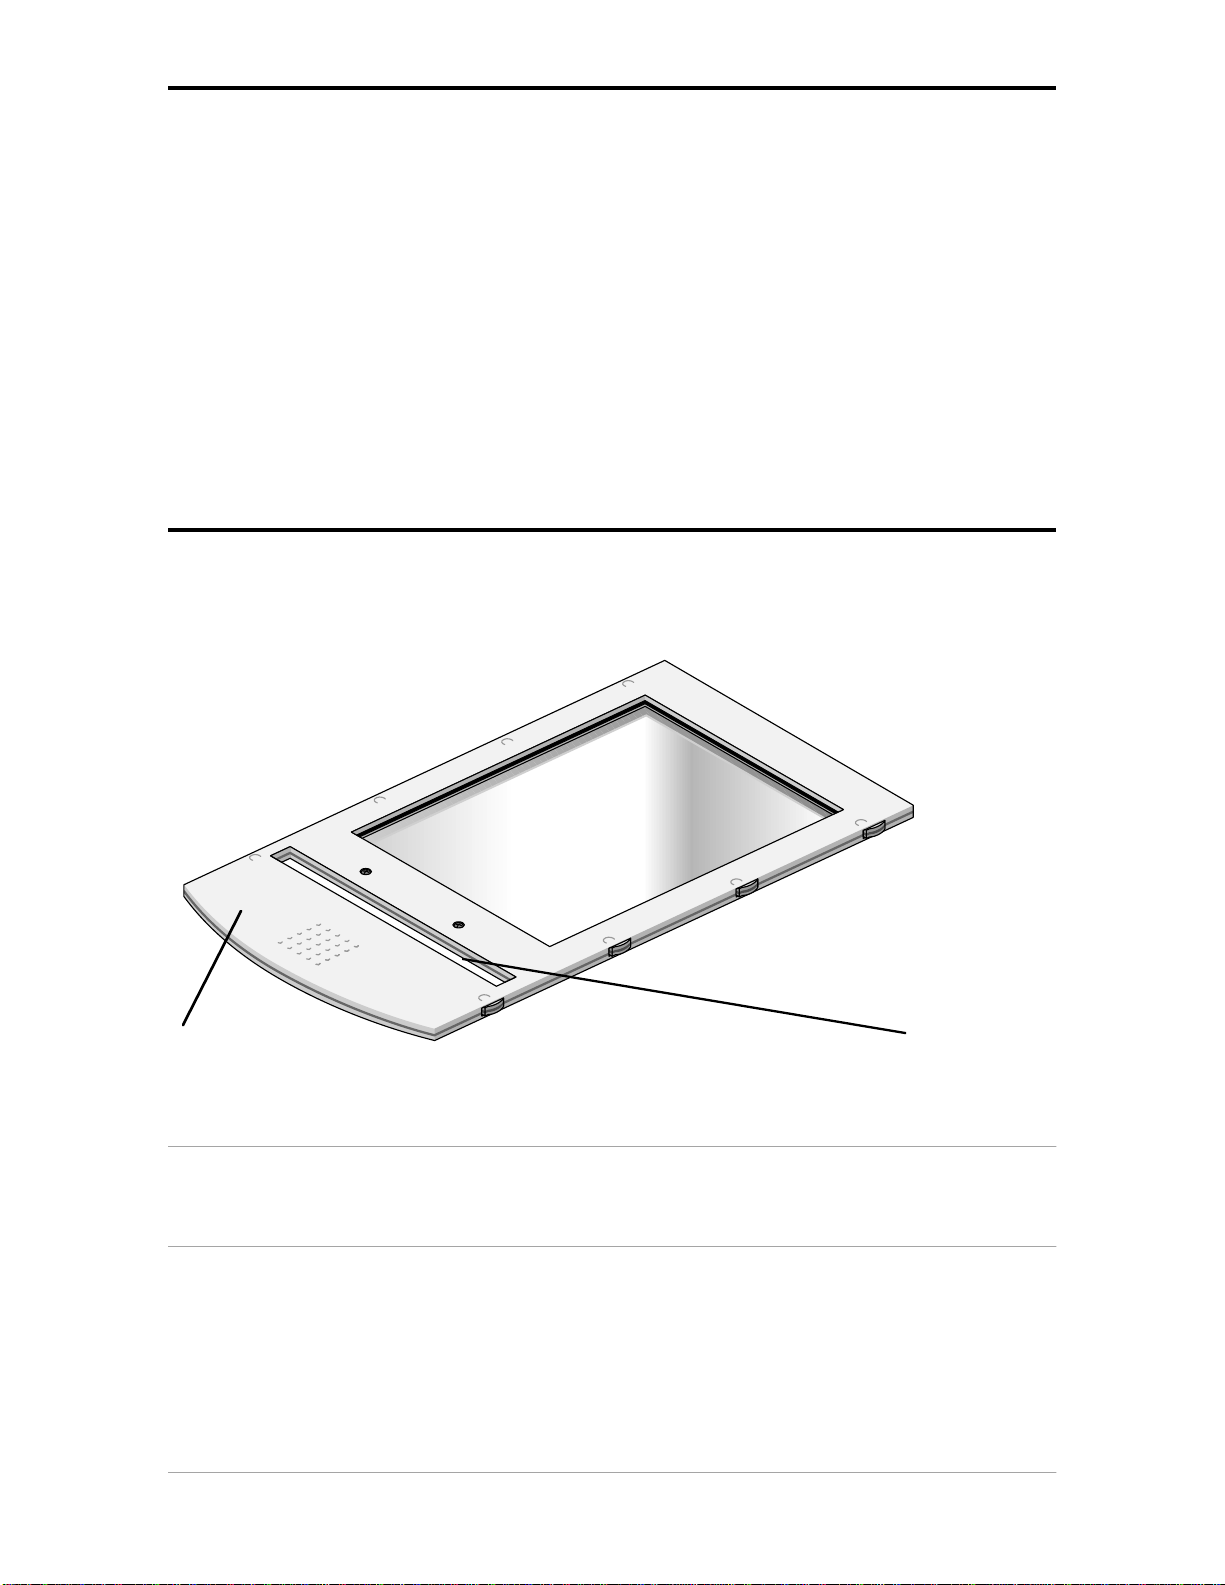
Taking a closer look..................................................................................................................7
Placing reflective originals.......................................................................................................10
Placing transparent originals....................................................................................................10
Using the universal glass frame......................................................................................11
Using the regular slide holders.......................................................................................12
Using batch slide holders........................................................................................................13
35 mm framed slide holder.............................................................................................13
35 mm strip slide holder.................................................................................................15
6 x 9 cm slide holder......................................................................................................17
Performing a power-on test.....................................................................................................19
2Installing the scanner.............................................................................20
Minimum hardware requirements and recommendations...........................................................20
Environmental requirements...................................................................................................21
Precautions...........................................................................................................................22
Cleaning your scanner............................................................................................................22
SCSI devices.........................................................................................................................23
Installation for the Apple Macintosh..........................................................................................23
Choosing a SCSI ID number...........................................................................................24
Connecting the scanner................................................................................................26
Testing the connection.................................................................................................29
Installation for the PC..............................................................................................................30
Which SCSI interface card..............................................................................................30
Choosing a SCSI ID number...........................................................................................30
Connecting the scanner................................................................................................32
Testing the connection.................................................................................................35
Appendix A — Troubleshooting ...............................................................36
Appendix B — Technical information.........................................................38
Appendix C — DuoScan regulation compliance...........................................40
Safety regulations..................................................................................................................40
Electromagnetic interference..................................................................................................41

Preface 4
Preface
In this Preface you will find general information about DuoScan.
About DuoScan
Conventions
About DuoScan
DuoScan is a high-resolution scanner that scans reflective and transparent originals, each on an
independent scan bed. The transparent scan area is a revolutionary innovation because of the
Twinplate™ scanning system. This allows you to scan without glass plates distorting the optical path.
Instead of only switching the light source, the scanner switches mirrors and thereby uses a different
optical path to scan transparent originals. This allows the scanner to optimize the optical path for
both types of originals.
DuoScan's image quality makes it perfectly suitable for pre-press graphical applications. It is based
on flatbed CCD (Charge Coupled Device) scanning technology. DuoScan is characterized by a large
input size range and a high scanning speed. Due to its 8,000 CCD pixels, an impressive output size
range can be achieved. This high-precision instrument features exceptional sharpness and color
fidelity.
A new feature to the world of scanner's is the use of the universal glass frame, the slide holder frame
and the batch slide holders. These allow you to scan transparent originals without using the
reflective glass plate. Three regular slide holders are supplied with DuoScan, together with several
types of batch slide holders which are available as an option in order to increase the productivity of
the scanner. Also new is the adjustable document cover for reflective scanning: when you put a
thicker original (like a book or a magazine) on the reflective glass plate, the document cover adapts
itself to its thickness.
The originals can be of any type. The FotoLook scanning software will optimize the scan result. The
features of FotoTune and FotoFlavor software make it possible to create an output in compliance
with your personal wishes (realistic colors, special color effects,...). The bit depths can be either 3 x
12 bit for color (packed into 3 x 16 bit or truncated to 3 x 8 bit), 12 bit for gray scale originals, or 1 bit
for line-art originals. The scanned data are transferred to the workstation through SCSI-2. The
workstation can be either an Apple®Macintosh® or PC®.
Conventions
The following conventions are used in this guide:
❖Note: a note of this type gives you additional information.
■Instructions are preceded by a small red square.
1. Numbered steps describe the actions you must take to perform a task.

Chapter 1 — Preparing the scanner 5
Chapter 1 — Preparing the scanner
This chapter assists you in preparing your DuoScan for installation. You will find instructions for:
Unpacking the scanner
Unlocking the scanner
Relocking the scanner
Taking a closer look
Placing reflective originals
Placing transparent originals
Using the universal slide holder
Using the optional batch slide holders
Using batch slide holders
35 mm frame slide holder
35 mm strip slide holder
6x9 cm slide holder
Performing a power-on test
Unpacking the scanner
1. Open the packing box and carefully take out all the items.
2. Check each item to make sure that there is no visual defect.
If something is missing, or damaged, contact your dealer or Agfa service representative.
3. Remove the plastic wrapping and the packing materials from the scanner.
❖Note: Save the packing materials so that you can repack the scanner to protect it if you
have to move it over long distances.
4. Fill out the Warranty and Registration card. You will find the product serial number on it.
❖Note: Do not forget to mail the Warranty and Registration card. Only then can you claim
your guarantee and get information on new products and upgrades.

Chapter 1 — Preparing the scanner 6
Unlocking the scanner
The scanner’s optical carriage contains all optical components and rides back and forth during the
scan. An unlocking screw holds it in place at the right side of the scanner during shipment. You must
remove this screw before powering up the scanner.
2. Take a coin and turn the screw a quarter counterclockwise.
The screw comes loose: your scanner is unlocked.
3. Move the scanner back on your desktop. Allow a minimum of 10 cm (4 inches) around each
side of the scanner and a minimum of 15 cm (6 inches) at the rear side of the scanner.
Relocking the scanner
If you need to transport the scanner, you should relock your it. This will protect the scanner's optical
assembly from possible damage.
1. Switch your scanner on.
2. Pull the scanner forwards on the edge of the table until you can see the unlocking screw on
the bottom of the scanner.
3. Take a coin and turn the screw a quarter clockwise.
The screw is fastened: your scanner is locked.
4. Move the scanner back on your desktop.
5. Turn your scanner off.
1. Pull the scanner forwards on the edge of the table until you can see the unlocking screw on
the bottom of the scanner.

Chapter 1 — Preparing the scanner 7
Taking a closer look
Now that you have the scanner out of the box, take a closer look so that you become familiar with its
parts. The figure “front view” illustrates the locations of the different parts of your DuoScan.
1
4576
8
3
2
1. reflective glass plate
2. adjustable document cover
3. transparency tray
4. power switch
5. reflective ready indicator
6. transparency ready indicator
7. power indicator
8. rulers

Chapter 1 — Preparing the scanner 8
The figure “rear view” illustrates the location of the different parts at the rear of your scanner.
51 23 4 2
1. power input
2. thumb wheel (to pull out the main board)
3. 25-pin connector
4. 50-pin connector
5. SCSI ID switch

Chapter 1 — Preparing the scanner 9
1. universal glass frame
2. batch slide holder frame
3. batch slide holders (3x)
1
2
3
1. power cable
2. terminator
3. SCSI cable
2
3
1

Chapter 1 — Preparing the scanner 10
Placing reflective originals
You can place a reflective original directly on the scanner’s reflective glass plate. A new feature of
your DuoScan is the adjustable document cover: when you put a thicker original (like a book or a
magazine) on the reflective glass plate, the document cover adapts itself to its thickness.
1. Open the document cover of the scanner.
2. Place the original face down on the reflective glass plate, with its top side against the middle of
the front ruler.
The optical performance of a CCD scanner is always best near the middle of the scan area.
However, for the most common resolutions used for reflective originals, placing originals to the
side will not decrease quality.
3. Close the document cover of the scanner.
Placing transparent originals
When you scan transparent originals, you use either a batch slide holder frame or the universal glass
frame.
1 2
1. universal glass frame
2. calibration slit
Caution: You always have to attach your transparent originals to the slide holder frame either with the clips of
the universal slide holder, or by using a batch slide holder, or with adhesive tape, even if your transparent
originals are fixed in a regular slide holder. Otherwise you might loose them in the scanner.

Chapter 1 — Preparing the scanner 11
Using the universal glass frame
To scan a transparent original, carry out the following instructions:
1. Center the original on the universal slide holder so that its top side is directed towards the
calibration slit of the slide holder frame when you put the universal slide holder on the slide
holder frame of the scanner. This position guarantees the best quality.
2. Clip your original underneath the edge of the universal slide holder.
3. Put the slide holder frame into the transparency tray with the Agfa logo at the upper side.
❖Note: Make sure that the calibration slit of the slide holder frame is at the front side (standing in
front of the scanner) and that it is clean.

Chapter 1 — Preparing the scanner 12
Using the regular slide holders
You can also put your originals in a regular slide holder to avoid blooming and newton rings. There
are three types of regular slide holders: 35 mm strip, 6 x 6 cm, and 4 x 5 inch. To scan a transparent
original using a regular slide holder, carry out the following instructions:
1. Put your original in a regular slide holder.
2. Center the original on the universal glass frame so that its top side is directed towards the
calibration slit of the slide holder frame. This position guarantees the best quality.
3. Fix the regular slide holder on the universal glass frame by pushing it firmly down, the rear of
the holder having a glass adhesive, thereby securing it to the glass. The holder can still be
removed easily,
4. Put the universal glass frame into the transparency tray with the Agfa logo facing upwards.
1. 35 mm regular slide holder
2. 6 x 6 cm regular slide holder
3. 4 x 5 inch regular slide holder
The specifications (resolution,...) of the scanner apply to the whole scan area. However, image
quality is always at its optimum in the middle of the scan area.
1
2
3

Chapter 1 — Preparing the scanner 13
Using batch slide holders
There are three different kinds of batch slide holder that can be used in conjunction with the batch
slide holder frame to increase the productivity of the scanner.
35 mm framed slide holder
This frame can hold a maximum of twelve premounted slides at any one time, once loaded it is
mounted into the batch slide holder frame.
Mount a slide into the frame
1. Locate the edge of the slide into the indented “v” on the arm of the holder
2. Push the slide down into the aperture
3. Ensure that the slide is secured by the six fixing lugs on the inside of the frame
The slide position might need slight adjustment after location
4. When all the slides have been mounted locate the batch slide holder into the batch slide holder
frame.
Remove a slide from the frame
1. Remove the batch slide holder from the batch slide holder frame
2. Push the slide gently from underneath, releasing the grip of the mounting lugs.
3. Pull away from the locating “v”.

Chapter 1 — Preparing the scanner 14

Chapter 1 — Preparing the scanner 15
35 mm strip slide holder
Two strips of five slides can be mounted into the holder which is then mounted into the batch slide
holder frame.
Mount a slide into the frame
1. Unlock the strip slide frame by placing your thumb on the raised points on the end of the holder
and pushing the strip slide frame towards the hinge slot. The frame will become loose.
2. Lift the strip slide frame
3. Place the strip of slides into the centre of the frame
4. Close the frame
5. Lock the frame in position by sliding away from the hinge slot
The position of the slides can be readjusted slightly by moving the slides within the holder
Remove a slide from the frame
1. Unlock the strip slide frame
2. Lift the strip slide frame
3. Remove the slide strip

Chapter 1 — Preparing the scanner 16

Chapter 1 — Preparing the scanner 17
6 x 9 cm slide holder
This frame holder can hold a maximum of four premounted slides at any one time, once loaded it is
mounted into the batch slide holder frame.
Mount a slide into the frame
1. Unlock the frame by placing your thumb on the raised points on the end of the holder and
pushing the frame towards the hinge slot. The frame will become loose.
2. Lift the frame
3. Locate the slide against the front edge of the holder
4. Close the frame
5. Lock the frame in position by sliding it away from the hinge slot
Remove a slide from the frame
1. Unlock the frame by placing your thumb on the raised points on the end of the holder and
pushing the frame towards the hinge slot. The frame will become loose.
2. Lift the frame
3. Remove the slide
4. Close the frame

Chapter 1 — Preparing the scanner 18

Chapter 1 — Preparing the scanner 19
Performing a power-on test
You are now ready to perform a power-on test to check if the scanner is operating correctly.
1. Check whether you have unlocked the scanner.
2. Connect the power cable to the scanner.
Make sure that you are using the correct power cable for the voltage in your area. Double-
check whether the voltage indicated on the back panel of the scanner corresponds with the
voltage in your area. If not, call your dealer or Agfa service representative.
3. Switch on the scanner.
The scanner performs a self-test during which the power indicator light (green) switches on and
the reflective ready indicator light (yellow) and the transparency ready indicator light (yellow)
remain blinking. This takes about half a minute. After the self-test, the three lights switch on.
If a malfunction is detected during the self-test, that is, if the ready indicators remain blinking or
go off, refer to
Appendix A, ‘Troubleshooting’.
4. Switch off the scanner.

Chapter 2 — Installing the scanner 20
Chapter 2 — Installing the scanner
This chapter shows you how to set up your DuoScan with your Apple Macintosh or PC. You’ll find
information about:
Minimum Hardware requirements and recommendations
Environmental requirements
Precautions
Cleaning your scanner
SCSI devices
Installation for the Apple Macintosh
Choosing a SCSI ID number
Connecting the scanner
Testing the connection
Installation for the PC
Which SCSI interface card
Choosing a SCSI ID number
Connecting the scanner
Testing the connection
Minimum hardware requirements and recommendations
■For the Apple Macintosh:
■A Power PC processor.
■A 13 inch color monitor (24 bit color display recommended).
■16 MB of RAM.
■A high-capacity disk drive.
■The amount of disk space available on your Macintosh determines the number and size of
the images you can scan. Make sure you have enough free storage space on your hard
disk. You need about two times the size of the image to scan, edit and save an image. You
need a minimum of 30 MB free hard disk space and 8 MB of RAM for color images.
■System 7.0 operating system or higher.
Table of contents
Other AGFA Scanner manuals

AGFA
AGFA SNAPSCAN 300 User manual

AGFA
AGFA SnapScan 1212u User manual

AGFA
AGFA SR 24 iT User manual

AGFA
AGFA SNAPSCAN 1236U User manual

AGFA
AGFA SnapScan User manual

AGFA
AGFA Scanner User manual

AGFA
AGFA SnapScan EZ User manual

AGFA
AGFA SNAPSCAN E42 User manual

AGFA
AGFA StudioScan II User manual

AGFA
AGFA SNAPSCAN E10 User manual

AGFA
AGFA DUOSCAN T2000 XL User manual

AGFA
AGFA DUOSCAN T2000 XL User manual

AGFA
AGFA SLIDEWRITER User manual

AGFA
AGFA 1200 User manual

AGFA
AGFA SnapScan e20 User manual

AGFA
AGFA SNAPSCAN 1236S User manual

AGFA
AGFA SnapScan 310 User manual

AGFA
AGFA DuoScan f40 User manual

AGFA
AGFA DuoScan HiD User manual

AGFA
AGFA SnapScan e40 User manual