AGPtek A19 User manual
A19 MUSIC PLAYER
User Manual

CONTENT
English 01-12
日本语 13-30

Manufacturer: Shenzhen RuiZu Digital Technology Co., Ltd.
Address: 6/F, Building D, KeShang Mei park, Chongqing Road,
Fuyong, Bao’an District, shenzhen,China.

Important Notice
Charge the Player
Thank you for purchasing AGPTEK Music Player. Please read the
manual carefully before using the product. Specifications are
subject to change without prior notice.
Connect to the PC & Download audio files
1. Open the Windows Explorer or "This PC".
2. Using the USB cable, connect the player to a USB port on your
PC.
3. Open the new "AGP-A19" folder under "This PC".
4. Copy files to the "AGP-A19" in which you want them to play.
5. In the left sidebar, right-click the "AGP-A19 " folder and select
"Eject" from the menu.
6. Wait until the computer confirms a safe ejection before you
unplug the USB cable.
7. Note: Please do not disconnect the USB plug during file
transferring. It may cause malfunction of the player and the files.
• Charge by computer USB port.
• Use 5V/500mA charger (Charger not included).
01

• Power On/Off. Hold button ① to turn on/off the player. Screen
lock. Hold down the button to lock screen and all the buttons
will be unavailable. Repeat the above steps to unlock.
• Screen display. Press ① to activate screen.
• Browse item. On home menu or list menu, press button
/ / / to browse item, press button to enter.
• Back. When on any interface, press to go back; hold down to
back to home menu directly.
• Volume +/-. On the non-list menu, press ③/④ to adjust volume.
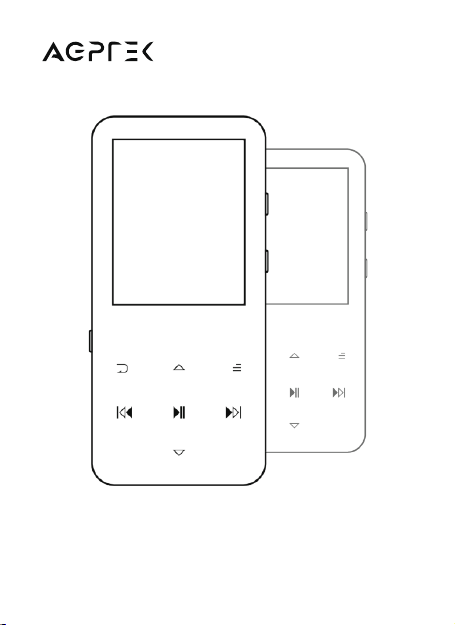
Product Overview
Basic Operation
Buttons and Controls
Power On/Off
TF Card Slot
Vol +
Vol -
Reset Hole
Return
Submenu
Scroll Up
Scroll Down
Previous/Fast Rewind
Next/Fast Forward
Play/Pause/Enter
Lanyard Hole
Speaker
Earphone Jack
Type-C Port
①
②
③
④
⑤
⑥
⑦
⑧
⑨
⑩
⑪
⑫
⑬
⑭
⑮
⑯
02

Music
Find “Music” on home menu with button to access to its function.
A related list will show:
Back to Home/Play Mode/Sound Settings/Bookmarks/Add
to Playlist/Remove from Playlist/ Delete.
1. Back to Home. Choose to go to home menu.
2. Play Mode.
A. Play music from. Choose to play from All Songs/This
Artist/Album/Genre.
• All songs.
• Resume/Now Playing.
• Artists/Albums/Genres.
• Playlists. There are 3 default playlists on the player: Playlist
[1]/[2]/[3].
• Update Playlist. Update music files.
• Local Folder/Card Folder. View music file in the local folder or
card folder.
Note: These functions only available when memory card inserted.
Play the music.
While it’s on music playing interface, hold down the button to
fast forward, and press it to skip to next track. Hold down the
button to fast rewind, and press it to play the previous track.
Press button to play/pause.
While it’s on music playing interface, tap button to access to the
submenu.
Main Functions
Home Menu
The home menu is the starting point of each application. There are
9 functions on the home menu: Music/FM Radio/Folder/Bluetooth/
Recorder/Video/E-book/Tools/Settings.
03
B. Repeat. Choose repeat mode: Repeat Off, Repeat 1, Repeat All.
C. Shuffle. Enable shuffle mode.
FM Radio
Find “FM Radio” on Home menu with the button to access to its
function. A related list will show:
• Presets. All the saved stations will be listed here.
• Manual tune/Auto tune. When choose “Auto tune”, the searched
stations will be saved in “Presets” automatically.
• FM Recordings. View the radio recording files. You will need to
choose from local folder or card folder if the memory card is
inserted. The radio recordings will also be saved in Recordings>
Recordings library.
3. Sound Settings. Choose to set Equalizer, Variable Speed
Playback and Volume Limit.
4. Bookmarks. Choose to add bookmark for the song that is playing
now, or go to/delete the bookmark you added.
5. Add to Playlist/Remove from Playlist. Choose to add to or
remove from the 3 existing playlist.
6. Delete. Choose to delete the song that is playing now.
b. Replay Times. Set the replay times from 1 to 10.
c. Replay Interval. Set the replay gap from 1 to 10 (seconds).
While it’s on radio playing interface, press button to switch
among preset stations, press the button / to find
tunestations. Press button to access to its submenu which
includes:
Start FM Recording/Save/Clear Station/Auto Tune/Tuner
Region/FM Recordings.
a. Repeat Mode.
- Enter. Press the button to enter.
- Set. Press button to confirm the starting time A when A
isflashing. Then press button to set the ending time B when
B is flashing. The passage from time A to B will be repeated
automatically. The icon for A-B indication will appear on the
screen. Press button again to back to normal playback.
D. Repeat Settings.
04
Folder
Find “Folder” on Home menu with the button to access to its
function. All of the files in the player will be listed. If the Micro SD
card is inserted, you can choose to go to Local folder or Card
folder.
Note:
1. When listen to radio by Bluetooth, wired headphones are needed
as radio antenna.
2. BT Upgrade function is only available for manufacturer, not for
user.
Find “Bluetooth” on Home menu with the button to access to its
function. A related list will show, including Bluetooth On/Off, Search
for Devices, Device List, BT Upgrade. Select the device you want to
connect/disconnect, and then press to connect/disconnect.
After successfully connected, this player is ready to play music or
FM radio via Bluetooth headphones, Bluetooth speaker, etc.
Bluetooth
1. Start FM Recording. Press button to pause/continue, press
and select “Yes” to save the recording file.
2. Save/Clear station/Auto tune.
3. Tuner Region. Choose from Common/European/Japan Band as
needed.
4. FM Recordings.
• Recordings Library. Find the saved recordings in
Recordings>Recordings library. You will need to choose from
local folder or card folder if the memory card is inserted. While
it’s on recording playing interface, press button and choose
“Delete” to delete.
Recorder
Find “Recorder” on home menu with button to access to the
recording interface. Press button to start voice recording, press
again to pause. Press the button and choose “Yes” to save the
recording file. Press button to access to its submenu which
includes:
05

3. Track AVR mode. Choose normal or track on.
1. Set rec bitrate. Set the recording bitrate as you need.
2. Record from. Choose the recording source from microphone or
Line in.
Note: There are 2 functions after choosing to record from Line
in.
Play. Play music after connecting the player and speaker via line
in cable.
Record. Through the line in cable, connect 2 players or connect
the player and other devices with output function to record the
audio.
• Storage. Choose to store your recordings in internal or external
memory. Confirm your selection with button . (Only available
when TF card inserted)
• Record Format. Choose the record format between MP3/WAV .
• Record Settings.
• Press button to access to its function. You will need to
choose from local folder or card folder if the memory card is
inserted.
• Press button to watch videos, press the button / to go
to previous/next video or hold to fast backward/forward.
• When it’s on video playing interface, press button to access
to its submenu, including: Brightness, Repeat, Delete Video,
Update Playlist. Set according to your preference.
Videos
Tools
• Photos.
Press to access its function. If the TF card is inserted, you
need to choose from a local folder or a card folder. Press to
view pictures, press the / to go to previous/next picture.
When it’s on picture viewing interface, press button to access
to its submenu, including: Brightness, Backlight Timer, Slideshow
Find “Tools” on Home menu with the button to access to its
function. A related list will show:
06

• Clock.
Press button to enter, a related list will show: Alarm On/off,
Alarm Time, Alarm Cycle (Once/Daily/Work day), Alarm Music,
Alarm Volume. Set according to your preference.
• Pedometer.
Find "Pedometer" on Tools with the button to access to its
function, a related list will show:
• Calendar.
Press the button to switch among year|month|day, press the
button / to choose specific year | month | day.
Settings,Delete Photos, Update Playlist. Set according to your
preference.
Press to access its function. If the TF card is inserted, you need
to choose from a local folder or a card folder. While it’s on text
playing interface, press button / to turn the pages. Press the
button to play automatically, press again to stop.
E-book
2. Personal Info. Set your height, weight, and step length with
button to confirm.
3. History. All your saved step record will be listed here, and you
can save up to 7 records.
4. Clear history. You can choose to clear the history record you
want or clear all the history record.
1. Start.
1) Press to start counting your daily steps. Press it again to stop
counting steps and then press the button to exit it.
2) Press button and choose “Yes” to save the record in “History”.
If the history record is full, it will automatically cover the previous
one.
• Stopwatch
Press to enter, press again to start the timer, then press again
to stop or press to resume. Press to start a new one. The
maximum Stopwatch list is 4.
07
Other manuals for A19
1
Table of contents
Languages:
Other AGPtek MP3 Player manuals


