Outdoor
Antenna
1
Power
lines
—
When
connecting
an
outdoor
antenna,
make
sure
it
is
located
away
from
power
lines.
2
Outdoor
antenna
grounding
—
Be
sure
the
antenna
system
is
properly
grounded
to
provide
protection
against
unexpected
voltage
surges
or
static
electricity
build-up.
Article
810
of
the
National
Electrical
Code,
ANSI/NFPA
70,
provides
information
on
proper
grounding
of
the
mast,
supporting
structure,
and
the
lead-in
wire
to
the
antenna
discharge
unit,
as
well
as
the
size
of
the
grounding
unit,
connection
to
grounding
terminals,
and
requirements
for
grounding
terminals
themselves.
Antenna
Grounding
According
to
the
National
Electrical
Cord
ANTENNA
LEAD
IN
WIRE
ANTENNA
DISCHARGE
UNIT
(NEC
SECTION
810-20)
GROUNDING
CONDUCTORS
(NEC
SECTION
810-21)
POWER
SERVICE
GROUNDING
|
~~
ELECTRODE
SYSTEM
(NEC
ART
250
PART
H)
NEC-NATIONAL
ELECTRICAL
CODE
Maintenance
Clean
the
unit
only
as
recommended
in
the
Operating
Instructions.
Dam
Requiring
Servi
Have
the
units
serviced
by
a
qualified
service
technician
if:
-
The
AC
power
cord
or
plug
has
been
damaged
-
Foreign
objects
or
liquid
have
got
inside
the
unit
-
The
unit
has
been
exposed
to
rain
or
water
-
The
unit
does
nat
seem
to
operate
normally
-
The
unit
exhibits
a
marked
change
in
performance
-
The
unit
has
been
dropped,
or
the
cabinet
has
been
damaged
DO
NOT
ATTEMPT
TO
SERVICE
THE
UNIT
YOURSELF.
PREPARATIONS
4
5
5
SOUND
AUDIO
ADJUSTMENTS.
..........ccsccsssssscessscsesnssesnevsseesenenes
7
GRAPHIC
EQUALIZER
7
RADIO
RECEPTION
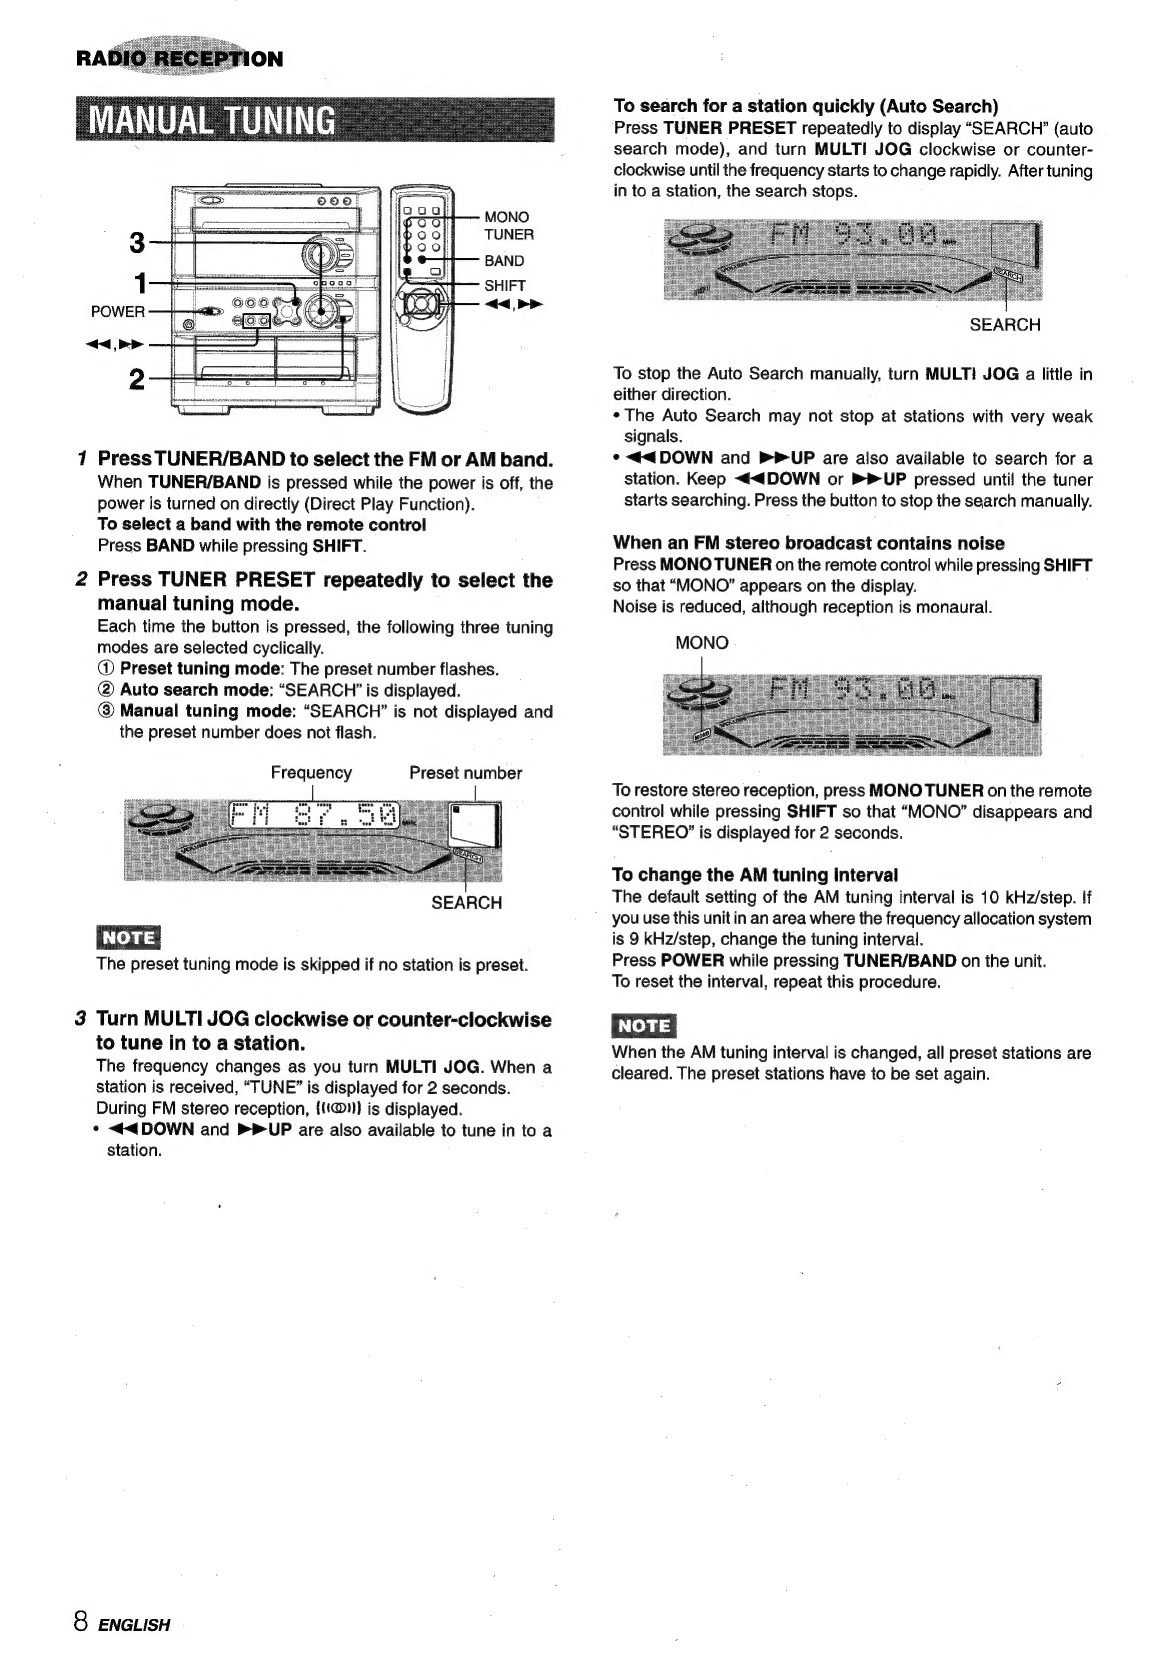
MANUAL
TUNING.
.......ccssccsssccssssesssscerssssesnseveneesecenseneneess
8
PRESETTING
STATIONS.
........csccsssessssessessereensensserreencens
9
TAPE
PLAYBACK
BASIC
OPERATIONS
...........:::::c:sscessenssrscensssessenscnsnasennense
9
CD
PLAYING
BASIC
OPERATIONS
..........::ccsscsssecsssscensereneusseenseveneenenes
10
PROGRAMMED
PLAY
.......ccscsssssesssssscsstersssnssenerecsenesseeess
11
RECORDING
BASIC
RECORDING.
........c:sccsscesssesseesssesseesseeneeesneensenseren
11
DUBBING
DUBBING
THE
WHOLE
TAPE
...........:sccscersseessenseerseesssenes
12
Al
EDIT
RECORDING.
......csssscsssessserssesnsenseseeesssenseesseensess
13
PROGRAMMED
EDIT
RECORDING.
..........:csscsscsssscnee
14
CLOCK
AND
TIMER
SETTING
THE
CLOCK.
......:ccsssssssssssssssssssnesorseensseonnsssasees
15
OTHER
CONNECTIONS
CONNECTING
OPTIONAL
EQUIPMENT
.........::::sceseees
17
LISTENING
TO
EXTERNAL
SOURCES.
........csscsceesereens
17
GENERAL
CARE
AND
MAINTENANCE
.......cscsssrssecerseeseseserensesseetere
TROUBLESHOOTING
GUIDE...
SPECIFICATIONS
........ssscssssnnenees
svesanenneenseeanenneenneennennes
PARTS
INDEX
......cccssssssssssssnensrecneeerersereeersnterers
Check
your
system
and
accessories
CX-ZL520
Compact
disc
stereo
cassette
receiver
SX-WZL520
Front
speakers
FM
antenna
Remote
Control
AM
antenna
Operating
Instructions,
etc.
ENGLISH
3