3
AC
power
cord
-
When
disconnecting
the
AC
power
cord,
pull
it
out
by
the
AC
power
plug.
Do
not
pull
the
cord
itself.
-
Never
handle
the
AC
power
plug
with
wet
hands,
as
this
could
result
in
fire
or
shock.
-
Power
cords
should
be
firmly
secured
to
avoid
being
severely
bent,
pinched,
or
walked
upon.
Pay
particular
attention
to
the
cord
from
the
unit
to
the
power
outlet.
-
Avoid
overloading
AC
power
plugs
and
extension
cords
beyond
their
capacity,
as
this
could
result
in
fire
or
shock.
4
Extension
cord
—
To
help
prevent
electric
shock,
do.not
use
a
polarized
AC
power
plug
with
an
extension
cord,
receptacle,
or
other
outlet
unless
the
polarized
plug
can
be
completely
inserted
to
prevent
exposure
of
the
blades
of
the
plug.
5
When
notin
use
—
Unplug
the
AC
power
cord
from
the
power
outlet
if
the
unit
will
not
be
used
for
several
months
or
more.
When
the
cord
is
plugged
in,
a
small
amount
of
current
continues
to
flow
to
the
unit,
even
when
the
power
is
turned
off.
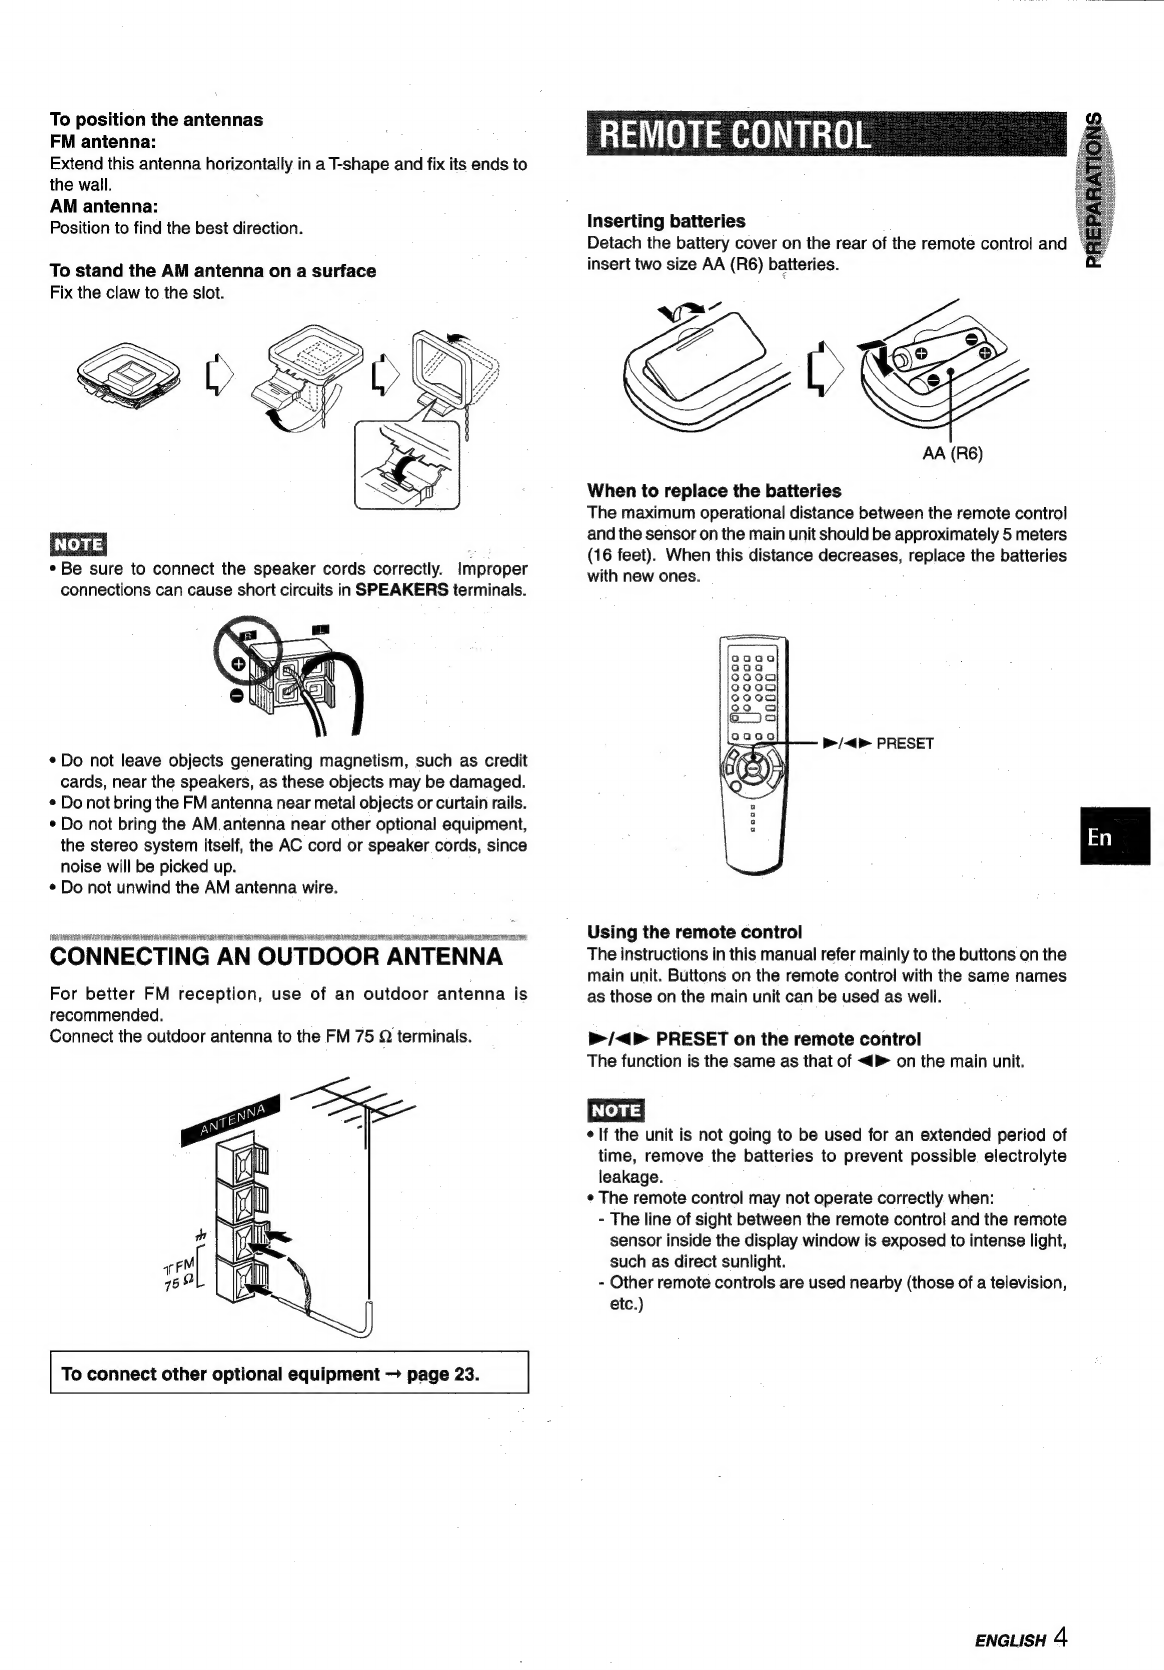
Outdoor
Antenna
1
Power
lines
—
When
connecting
an
outdoor
antenna,
make
sure
it
is
located
away
from
power
lines.
2
Outdoor
antenna
grounding
—
Be
sure
the
antenna
system
is
properly
grounded
to
provide
protection
against
unexpected
voltage
surges
or
static
electricity
build-up.
Article
810
of
the
National
Electrical
Code,
ANSI/NFPA
70,
provides
information
on
proper
grounding
of
the
mast,
supporting
structure,
and
the
lead-in
wire
to
the
antenna
discharge
unit,
as
well
as
the
size
of
the
grounding
unit,
connection
to
grounding
terminals,
and
requirements
for
grounding
terminals
themselves.
Antenna
Grounding
According
to
the
Nationa!
Electrical
Cord
ANTENNA
LEAD
IN
WIRE
ANTENNA
DISCHARGE
——_—SEj>EL
f
I
(NEC
SECTION
810-20)
GROUNDING
CONDUCTORS
(NEC
SECTION
810-21)
ELECTRIC
SERVICE
EQUIPMENT.
ip
GROUND
CLAMPS
“rs
a
xa
POWER
SERVICE
GROUNDING
¥
—_—
ELECTRODE
SYSTEM
(NEC
ART
250
PART
H)
NEC-NATIONAL
ELECTRICAL
CODE
Maintenance
Clean
the
unit
only
as
recommended
in
the
Operating
Instructions.
Damage
Requiring
Service
Have
the
units
serviced
by
a
qualified
service
technician
if:
-
The
AC
power
cord
or
plug
has
been
damaged
-
Foreign
objects
or
liquid
have
got
inside
the
unit
-
The
unit
has
been
exposed
to
rain
or
water
-
The
unit
does
not
seem
to
operate
normally
-
The
unit
exhibits
a
marked
change
in
performance
-
The
unit
has
been
dropped,
or
the
cabinet
has
been
damaged
DO
NOT
ATTEMPT
TO
SERVICE
THE
UNIT
YOURSELF
PRECAUTIONS
a.
on
cccscoccuscnceseaecsncresceetcnapteneticiddeanvesaveeneeaptee
1
PREPARATIONS
CONNECTIONS
.........
cnt
cust
gdssaLeuesnslisnapanatessuatecdvandeusasevente
3
REMOTE
CONTROL
......ssscssssssnsssssneusnsnussnasnaunnsansassevesverenees
4
BEFORE
OPERATION.
......ssssssssssssssscssnnscsmnsssssnsenersoesenneseeee
5
SOUND
AUDIO
ADJUSTMENTS.
......csscssssscnssessnsunseesneessanersavernenens
GRAPHIC
EQUALIZER
(GEQ)....
DSP
SURROUND
......ccsssssssssscsssesnesnssonsunnsoussusneausaenensnennneeas
CD
PLAYING
BASIC
OPERATIONS
......ssccssssssssssscennesnensesnsassnnsnnesssnnesasae
9
PROGRAMMED
PLAY
........cccssecrssenntssusaventenssseneessnnasennees
11
RADIO
RECEPTION
MANUAL
TUNING
.....cccsccsssscesessnsensnecuneeeessussucnssesenarvennenans
12
PRESETTING
STATIONS
......cscccsssssessssssssseesssesseseresenrennens
12
TAPE
PLAYBACK
BASIC
OPERATIONS.
.......csssscssssseeneresenteeusseneen
yacvuwdeaeaests
13
CONTINUOUS
PLAY
RECORDING
BASIC
RECORDING
.......sssssscenssscrssnenesnesesseusnssesersenersery
DUBBING
A
TAPE
MANUALLY...
DUBBING
THE
WHOLE
TAPE
........
Al
EDIT
RECORDING.
.......ccssssecssecesseceusssunsensensensenrees
PROGRAMMED
EDIT
RECORDING......cssscssssseersseersneons
18
KARAOKE
MICROPHONE
MIXING
........sccssssscssessuseesussenserenssnnennnetes
19
KARAOKE
PROGRAM
.......cccssssccssesesnsectnrnessensersensren
20
CLOCK
AND
TIMER
SETTING
THE
CLOCK.........:ccsssssscsssssnseseunseceusesessnnsensnesens
21
SETTING
THE
SLEEP
TIMER
.......sccssssssersseensssrscersnneeeenees
ai
SETTING
THE
TIMER
..........scssscssssssnsensenssscessseerseeeeeneenens
22
OTHER
CONNECTIONS
CONNECTING
OPTIONAL
EQUIPMENT
........seccsssecsees
23
LISTENING
TO
EXTERNAL
SOURCES.
.......cssccsseseeetnee
23
GENERAL
CARE
AND
MAINTENANCE.
..........scccssressessssensssessnsennnnees
24
TROUBLESHOOTING
GUIDE
.......ccscsssssecessessnnnseseesnees
24
SPECIFICATIONS
.........:cccsscecsssesssnssennnensnsessesassnnsnsnesnaonen
25
PARTS
INDEX
..........
eacustauaneacduaudceoucatavastecesvarsuuad
Back
cover
ENGLISH
2