AJAX KeyPad S Plus Jeweler User manual

KeyPad S Plus Jeweler Bedienungsanleitung
Veröffentlicht am29. Juni 2023
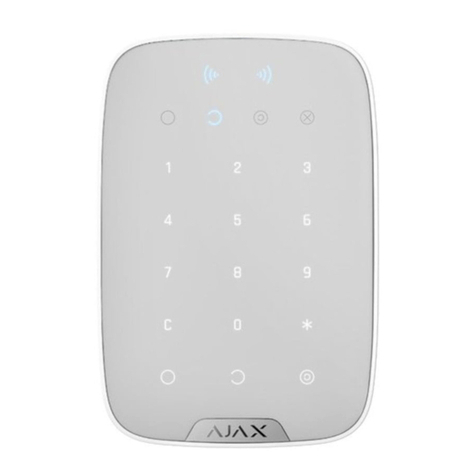
KeyPad S Plus Jeweler ist eine kabellose Touch-Tastatur. Damit können Sie das
Ajax-System mithilfe verschlüsselter kontaktloser Karten und
Schlüsselanhänger verwalten. Die Tastatur unterstützt auch eine „stille Alarm“-
Funktion, die durch Eingabe des aktiviert wird . Das LED-Licht
zeigt den aktuellen Sicherheitsmodus an.
KeyPad S Plus arbeitet im Ajax-System und ist über das geschützte
verbunden . Die Kommunikationsreichweite ohne
Hindernisse beträgt bis zu 1.700 Meter. Das KeyPad S Plus funktioniert mit
vorinstallierten Batterien bis zu 4,5 Jahre. Das Gerät ist nur für den Innenbereich
bestimmt.
Diese Produktlinie wird für Projekte entwickelt. Nur akkreditierte Ajax Systems-Partner
können Superior-Produkte installieren und verwalten.
Die Produktlinien Superior, Fibra und Baseline sind untereinander kompatibel. Dies
eröffnet zahlreiche Möglichkeiten für den Aufbau beliebig kongurierter Systeme.
Funktionselemente
Bedrohungscodes
Jeweler-
Protokoll mit dem Hub

1. Bewaffneter Indikator.
2. Unscharfanzeige .
3. -Anzeige.Nachtmodus
4. Störungsanzeige .
5. Pass-/Tag-Leser .
6. Numerisches Touch-Tastenfeld.
7. Funktionstaste .
8. Reset- Taste.
9. Armknopf _ .
10. Unscharf- Taste .
11. -Taste .Nachtmodus
12. SmartBracket-Montageplatte (um die Platte zu entfernen, schieben Sie sie
nach unten).
13. Für die Auslösung des Sabotagegeräts im Falle eines Versuchs, den Melder
zu demontieren, ist ein perforiertes Teil erforderlich.
14. Manipulationsknopf.
15. Power-Taste.
16. Tastatur-QR-Code.
17. Halteschraube.

KeyPad S Plus arms and disarms the security of the entire facility or separate
groups and allows activating the Night Mode. You can control the security
modes with KeyPad S Plus using the following:
KeyPad S Plus supports the following code types:
The number of personal codes and access codes depends on the hub model.
Before entering a code or using Tag/Pass, you should activate (“wake up”)
KeyPad S Plus by sliding a hand over the touch panel from top to bottom. The
button backlight is enabled when activated, and the keypad beeps.
KeyPad S Plus has LED indicators showing the current security mode and
keypad malfunctions (if any). The security status is displayed only when the
keypad is active (the device backlight is on).
1. Codes. The keypad supports general and personal codes and arming
without entering a code.
2. Cards or key fobs. You can connect and to the
system.
Tag key fobs Pass cards
Keypad code — general code set up for the keypad. When used, all events
are delivered to Ajax apps on behalf of the keypad.
User code — personal code set up for a user connected to the hub. When
used, all events are delivered to Ajax apps on behalf of the user.
Keypad access code — a code set up for a person who is not registered in
the system. When used, events are delivered to Ajax apps with a name
associated with this code.

KeyPad S Plus can be used in low-light conditions as it has a backlight. Pressing
the buttons is accompanied by a sound signal. The backlight brightness and
keypad volume are adjustable in the settings. If the keypad is not touched for 4
seconds, KeyPad S Plus reduces the backlight brightness. After 8 seconds of
inactivity, it enters power-saving mode and turns off the display.
If the batteries are discharged, the backlight turns on at the minimum level, regardless of
the settings.
Function button
KeyPad S Plus has a Function button that operates in 3 modes:
Off — the button is disabled, and nothing happens after it is pressed.
Alarm — after the Function button is pressed, the system sends an alarm to
the security company monitoring station and all users.
Mute interconnected re detectors alarm — after the Function button is
pressed, the system mutes the alarm of Ajax re detectors.Available only if
an is enabled (Hub → Settings →
Service → Firedetectors settings).
Interconnected Fire Detectors Alarm
Learn more

Duress code
KeyPad S Plus supports duress code. It allows you to simulate alarm
deactivation. In this case, the and the installed at the facility will
not give away your actions. Still, the security company and other security
system users will be alerted about the incident.
Unauthorized access auto-lock
If a wrong code is entered three times within 1 minute, the keypad will be locked
for the time specied in its . During this time, the hub will ignore all
codes while simultaneously informing the users of the security system about an
attempt to guess the code.
A user or PRO with administrator rights can unlock the keypad through the app.
Also, unlocking occurs automatically after the lock time specied in the settings
expires.
Mute interconnected re detectors alarms function
KeyPad S Plus can mute an interconnected re alarm by pressing the Function
button (if the required setting is enabled). The reaction of the system to pressing
a button depends on the settings and the state of the system:
Remember that the option is available only if Interconnected Fire Detectors
Alarm is enabled.
Ajax app sirens
Learn more
settings
Interconnected Fire Detectors Alarms have already propagated — by the
rst press of the button, all sirens of the re detectors are muted, except for
those that registered the alarm. Pressing the button again mutes the
remaining detectors.
Interconnected alarms delay time lasts — by pressing the Function button,
the siren of the triggered Ajax re detectors is muted.
Learn more

With the update, users can mute re alarms in their groups without
affecting detectors in the groups they do not have access to.
Two-stage arming
KeyPad S Plus can participate in two-stage arming but cannot be used as a
second-stage device. The two-stage arming process using Tag or Pass is similar
to using a personal or general code on the keypad.
Sending events to the monitoring station
The Ajax system can transmit alarms to the monitoring app as
well as the central monitoring station (CMS) in the formats of SurGard (Contact
ID), SIA (DC-09), ADEMCO 685, and .
KeyPad S Plus can transmit the following events:
When an alarm is received, the operator of the security company monitoring
station knows what happened and where to send the fast response team. The
addressability of each Ajax device allows you to send events and the type of the
device, the name assigned to it, and the room to the PRO Desktop or the CMS.
The list of transmitted parameters may differ depending on the type of CMS and
the selected communication protocol.
OS Malevich 2.12
Learn more
Learn more
PRO Desktop
other protocols
1. The duress code is entered.
2. The panic button is pressed (if the Function button works in the panic
button mode).
3. The keypad is locked due to an attempt to guess a code.
4. Tamper alarm/recovery.
5. Loss/recovery of connection between KeyPad S Plus and the hub.
6. Temporary activation/deactivation of KeyPad S Plus.
The ID and number of the device can be found in its in the Ajax app.
Adding to the system
KeyPad S Plus is incompatible with Hub and third-party security control panels.
To connect KeyPad S Plus to the hub, the device must be located at the same
secured facility as the system (within the range of the hub radio network). For
the detector to work via the or , you must
rst add the detector to the hub, then connect it to ReX or ReX 2 in the settings
of the range extender.
The hub and the device operating at different radio frequencies are incompatible. The
radio-frequency range of the device may vary by region. We recommend purchasing and
using Ajax devices in the same region. You can check the range of operating radio
frequencies with the .
Before adding a device
This product line is developed for projects. Only accredited Ajax Systems partners can
install and administer Superior products.
States
ReX ReX 2 radio signal range extender
technical support service
1. Install an .Ajax PRO app
2. Create if you don’t have one. Add a compatible hub to the app,
make the necessary settings, and create at least one .
an account
virtual room
3. Ensure the hub is switched on and has internet access via Ethernet, Wi-Fi
and/or mobile network.
4. Ensure the hub is disarmed and does not start updating by checking its
status in the Ajax app.

Connecting to the hub
KeyPad S Plus only works with one hub. When connected to a new hub, the device stops
sending commands to the old hub. Once added to a new hub, KeyPad S Plus is not
removed from the device list of the old hub. This must be done manually through the
Ajax app.
KeyPad S Plus turns off automatically 6 seconds after being turned on if the
keypad fails to connect to the hub. Therefore, you do not need to turn off the
device to retry the connection.
Updating the statuses of devices in the list depends on the Jeweller settings.
The default value is 36 seconds.
Icons
The icons display some KeyPad S Plus states. To access them:
1. Open an . Select the hub where you want to add the device.Ajax PRO app
2. Go to the Devices tab and click Add Device.
3. Name the keypad, scan, or type in the QR code (located on the package and
under the SmartBracket mount), and select a room and a group (if
is enabled).
Group
mode
4. Click Add; the countdown will begin.
5. Turn on the keypad by holding the power button for 3 seconds. Once
connected, KeyPad S Plus will appear in the hub device list in the app. To
connect, locate the keypad at the same protected facility as the system
(within the coverage area of the hub radio network range). If the connection
fails, try again in 10 seconds.
1. Sign in to the .Ajax app
2. Select the hub.
3. Go to the Devices tab.

Icon Meaning
Jeweller signal strength. Displays the signal strength between the hub and the
device. The recommended value is 2–3 bars.
The device battery charge level is OK, or it is charging.
The device has a malfunction. The list of malfunctions is available in the
detector states.
Displayed when the detector is operating via a
.
The device is permanently deactivated.
The device has been deactivated due to exceeding the preset number of
alarms.
The device has tamper triggering events permanently deactivated.
The device is deactivated until the rst disarm.
The device has tamper triggering events deactivated. Until the rst disarm.
Pass/Tag reading is enabled in KeyPad S Plus settings.
Learn more
Learn more
Learn more
radio signal range
extender
Learn more
Learn more
Learn more
Learn more
Learn more

Pass/Tag reading is disabled in KeyPad S Plus settings.
States
The States include information about the device and its operating parameters.
The states of KeyPad S Plus Jeweller can be found in Ajax apps:
Parameter Value
Malfunction
Clicking on opens the list of the detector’s
malfunctions.
The eld is displayed only if a malfunction is
detected.
Temperature
Keypad temperature. The acceptable error
between the value in the app and the room
temperature — 2 °C.
The value is updated as soon as the detector
identies a temperature change of at least 1 °C.
You can congure a scenario by temperature to
control automation devices.
Jeweller signal strength
Signal strength between the hub/range extender
and the keypad.
We recommend installing the detector in places
the signal strength is 2–3 bars.
Connection via Jeweller Connection status between the hub or range
extender and the keypad:
1. Go to the Devices tab.
2. Select KeyPad S Plus from the list.
Learn more
Online — the keypad is online.

ReX
Displays the status of using a
.
The eld is not displayed if the
keypad works directly with the
hub.
Battery Charge
The battery charge level of the device. Two
states are available:
When the batteries are discharged, the Ajax
apps and the security company will receive
appropriate notications.
After sending a low battery notication, the
keypad can work for up to 2 months.
Lid
Tamper is triggered if someone tries to detach
the device from the surface or damage the
enclosure. There are two states:
Pass/Tag Reading Displays if card and key fob reader is enabled.
Easy armed mode change/Assigned group easy
management
Displays whether the security mode can be
switched with Pass or Tag and without
conrmation by the control buttons.
Oine — no connection to the keypad.
radio signal
range extender
ОK.
Battery low.
How battery charge is displayed in
Ajax apps
Open.
Closed.
Learn more

Permanent Deactivation
Shows the status of the device permanent
deactivation setting:
One-Time Deactivation
Shows the status of the device one-time
deactivation setting:
Firmware Device rmware version.
Device ID Device ID. Also, available on the QR code on the
detector enclosure and its package box.
Device No. Number of the device loop (zone).
Settings
To change KeyPad S Plus settings in the Ajax apps:
No — the device operates in the normal
mode.
Lid only — the hub administrator has
disabled notications about triggering of the
device tamper.
Entirely — the detector is entirely excluded
from the operation of the system. The
device does not execute system commands
and does not report alarms or other events.
Learn more
No — the device operates in the normal
mode.
Entirely — the detector is entirely excluded
from the operation of the system for a time
the armed mode is active. The device does
not execute system commands and does
not report alarms or other events.
Lid only — notications on the tamper
triggering are disabled for a time the armed
mode is active.
Learn more

Parameter Value
Name
Name of the device. Displayed in the list of hub
devices, text of SMS and notications in the
events feed.
To change the name of the module, click on the
text eld.
The name can contain up to 12 Cyrillic
characters or up to 24 Latin characters.
Room
Selecting the virtual room to which KeyPad S
Plus is assigned. The name of the room is
displayed in the text of SMS and notications in
the event feed.
Group Management
Selecting the security group controlled by the
device. You can select all groups or just one.
The eld is displayed when the
is enabled.
Access Settings Selecting the method of arming/disarming:
To activate the Keypad Access
Codes set up for people who are
not registered in the system,
select the options on the keypad:
1. Go to the Devices tab.
2. Select KeyPad S Plus from the list.
3. Go to Settings by clicking on the gear icon .
4. Set the required parameters.
5. Click Back to save the new settings.
Group mode
Keypad codes only.
User codes only.
Keypad and user codes.

Keypad codes only or Keypad
and user codes.
Keypad Code Selection of a general code for security control.
Contains 4 to 6 digits.
Duress Code
Selecting a general duress code for silent alarm.
Contains 4 to 6 digits.
Function Button
Selecting the function of the * button (Function
button):
Arming without Code
The option allows you to arm the system
without entering a code. To do this, click on the
Arm or Night Mode button.
Unauthorized Access Auto-Lock
If enabled, the keypad will be locked for a pre-
set duration if an incorrect code is entered or
unveried passes/tags are used more than 3
times consecutively within a 1-minute
timeframe.
During this time, it is not possible to disarm the
system using the keypad. However, you can
unlock the keypad through the Ajax app.
Auto-lock Time, min Selecting the keypad lock period after wrong
code attempts:
Learn more
Off — the Function button is disabled and
does not execute any commands when
pressed.
Alarm — after the Function button is
pressed, the system sends an alarm to the
CMS and to all users.
Mute Interconnected Fire Detectors Alarm
— when pressed, mutes the alarm of Ajax
re detectors. Available only if an
Interconnected Fire Detectors Alarm is
enabled.
Learn more

Brightness
Adjusting the brightness of the keypad buttons
backlight. The backlight functions only when
the keypad is active.
This option does not affect the brightness level
of pass/tag reader and security modes
indicators.
Buttons Volume Selecting the keypad buttons volume level when
pressed.
Pass/Tag Reading When enabled, the security mode can be
controlled with Pass and Tag access devices.
Easy armed mode change / Assigned group
easy management
When enabled, changing the security mode with
Tag and Pass does not require conrmation by
pressing the arm, disarm, or Night Mode button.
The security mode is switched automatically.
The option is available if Pass/Tag Reading is
enabled in the keypad settings.
If the group mode is activated, the option is
available when the keypad is assigned to a
particular group — the Group Management eld
in the keypad settings.
Alert with a siren if the panic button is pressed The eld is displayed if the Alarm option is
selected for the Function button.
3 minutes
5 minutes
10 minutes
20 minutes
30 minutes
60 minutes
90 minutes
180 minutes
Learn more

When the option is enabled, the sirens
connected to the security system give an alert
when the * button (Function button) is pressed.
Jeweller Signal Strength Test
Switches the keypad to the Jeweller signal
strength test mode. The recommended value is
2–3 bars.
Signal Attenuation Test
Switches the keypad to the signal attenuation
test mode.
Pass/Tag Reset
Allows deleting all hubs associated with Tag or
Pass from device memory.
Permanent Deactivation
Allows the user to disable the device without
removing it from the system.
Three options are available:
The system can also automatically deactivate
devices when the preset number of alarms is
exceeded or when the recovery timer expires.
Learn more
Learn more
Learn more
No — the device operates normally and
transmits all events.
Entirely — the device will not execute
system commands or participate in
automation scenarios, and the system will
ignore device alarms and other notications.
Lid only — the system will only ignore
notications about the triggering of the
device tamper button.
Learn more
Learn more

One-Time Deactivation
Allows the user to disable events of the device
until the rst disarm.
Three options are available:
User Guide Opens KeyPad S Plus user manual in the Ajax
app.
Unpair Device Disconnects KeyPad S Plus from the hub and
deletes its settings.
Entry and exit delays are set in the corresponding detector settings, not in the keypad
settings.
Codes setting
Ajax system allows you to set up a keypad code, as well as personal codes for
users added to the hub. This is convenient, for example, to provide a cleaning
company with access to security management.
Keypad access code
To generate a keypad access code, in apps:
No — the device operates in the normal
mode.
Lid only — notications on the tamper
triggering are disabled for a time the armed
mode is active.
Entirely — the detector is entirely excluded
from the system’s operation when the armed
mode is active. The device does not execute
system commands or alarms or other
events.
Learn more
What is Delay When Entering/Leaving

User access code
Registered user access code
Each user registered in the system can set a personal access code. To do this in
the app:
Access code for a user without an account
To create an access code for a user without an account, in apps:
1. Go to the Devices menu.
2. Select the keypad for which you want to set up an access code.
3. Go to Settings by clicking on the gear icon .
4. Find the Keypad Code item and click it.
5. Set the keypad code. Contains from 4 to 6 digits.
6. Press Done to save the data.
1. Go to the Devices menu.
2. Select a hub.
3. Go to Settings by clicking on the gear icon .
4. Open the Users menu.
5. Find your account in the list and click on it.
6. Go to the Passcode Settings item.
7. Set the user code. Contains from 4 to 6 digits.
8. Click Save to save the changes.
1. Go to the Devices menu.
2. Select the hub in the list.
3. Go to Settings by clicking on the gear icon .

Duress code
Keypad duress code
To generate a keypad duress code, in apps:
Registered user duress code
Each user registered in the system can set a personal duress code. To do this in
the app:
4. Go to the Keypad Access Codes menu.
5. Press Add code. Set up Name and Access Code. Contains from 4 to 6
digits.
6. Click Add to save the data.
1. Go to the Devices menu.
2. Select the keypad for which you want to set up a duress code.
3. Go to Settings by clicking on the gear icon .
4. Find the Duress Code item and click on it.
5. Set the keypad duress code. Contains from 4 to 6 digits.
6. Click Done to save the data.
1. Go to the Devices menu.
2. Select a hub.
3. Go to Settings by clicking on the gear icon .
4. Open the Users menu.
5. Find your account in the list and click on it.
6. Go to the Passcode Settings item.
7. Set the user duress code. Contains from 4 to 6 digits.
Table of contents
Other AJAX Keypad manuals

AJAX
AJAX KeyPad Combi User manual

AJAX
AJAX KeyPad User manual

AJAX
AJAX Fibra User manual

AJAX
AJAX KeyPad Plus User manual

AJAX
AJAX KeyPad Jeweller User manual

AJAX
AJAX SpaceControl User manual

AJAX
AJAX KeyPad User manual

AJAX
AJAX KeyPad Fibra User manual

AJAX
AJAX KeyPad TouchScreen User manual

AJAX
AJAX KeyPad User manual
Popular Keypad manuals by other brands

ESP
ESP aperta EZTAG3 quick start guide

GS Access
GS Access CAGS-00017 user manual

Honeywell
Honeywell Lyric LKP500-ENC Installation and setup guide

Chamberlain
Chamberlain LiftMaster Professional 387LM manual

Mottura
Mottura Nucleo REPLAY MY KEY Code Setting Instructions

NAPCO
NAPCO Gemini GEM-K4RF installation instructions