Akai DV-P4410 User manual

DVD PLAYERDVD PLAYER
DV-P4410
Operator's manual
Operator's manual 1~20
LEVEL PHONES
DV-P4410
STOP
PLAY/PAUSE
ON/STANDBY
MENU
DVD/ MP3/ K ODAK P ICTURE C D/ CD/CD-R /CD-RW P LAYER
POWER
ENTER
MIN MAX

Dear customers:
May we take this opportunity to thank you for purchasing this DVD player. We strongly recommend that you carefully study the
operating instructions before operating the unit.
Before using the player, please ensure that the local AC voltage is suitable for this unit.Before using the player, please ensure that the local AC voltage is suitable for this unit.
Getting started
Skipping ahead and skipping back
Multi-speed slow motion playback
3-step zooming playback
3-way repeat playback
Numeric selection
Programmable playback
Time search
Main Features
Features of audio specifications
Playback features
-720 X 480 £¨30Hz£©
-720 X 576 £¨25Hz£©
PAL and NTSC
Features of playback specifications
This product complies the MPEG II standardization law.
DTS (Digital Theater System) digital audio output
Dolby Digital 2ch decoding output
MPEG-II Audio output
Linear PCM audio decoding output
MP3 audio decoding output
Fully compatible with DVD, MP3,CD, CD-R and CD-RW disc.
DTS-compatible digital audio output.
Compatible with full DVD playback functions: multi-angle, multi-language,
multi-story, parental control, etc..
Advanced 10-bit/27MHz video D/A converter with over 500 lines of horizontal
resolution.
Video output: Normal video output, S-video output, 21 pin scart,
24-bit/96kHz audio D/A converter.
3-step zoom/smooth scan.
NTSC/PAL TV system compatible.
Audio output: Dolby Digital 2ch output, MPEG-II Audio output,Coaxial
Linear PCM decoding output.
and optical
digital output

Audio & Video
Audio
Disc size 12cm
Single side, single layer /single side,
double layer
PAL and NTSC DVD disc
Playback time 135min/240min max.
Disc size 12cm/8cm
CD disc
Playback time 74min/20min max
P14
Getting started
Disc types
Disc maintenance
WrongRight
-Before playback, wipe the disc from the center hole toward the outer
edge with a clean cloth.
-Never use benzine, thinner, cleaning fluid, static electricity prevention
liquids or any other solvent.
Dirty disc may cause bad picture.
P1-P6
P1
P2
P3
P4
P5
P6
P7
P8
P7-P8
P9
P11
P13
Getting Started
Table of contents
Features
Safety precautions
System connection
Accessories and remote control unit
Front panel
Starting playback and function buttons
Searching buttons and other buttons
MP3 & JPEG operations
Playback mode
Troubleshooting tips
Definition of terms
Menu and program
Initial settings
Disc types & maintenance
Basic operation
P17
P18
Getting startedGetting started Basic operationBasic operation Playback
mode
Playback
mode
MP3/JPEG
operations
MP3/JPEG
operations
Menu &
program
Menu &
program TermsTerms
TroubleshootingTroubleshooting
Initial
settings
Initial
settings
2

Safety precautions
WARNING WARNING WARNING
WARNING
To avoid electrical shock, do not
open the cabinet, refer servicing
to qualified personnel only.
ATTENTION
ATTENTION ATTENTIONATTENTION
If smoke, malodor or noises are
emitted from the unit, turn off the
power and disconnect the AC
power cord.
Do not expose this equipment
to rain or moisture.
Keep the unit away from flower
vases, tubs, sinks, etc.. If liquids
are spilled into the unit, serious
damage could occur.
When left unused for a long period
of time, the unit should be unplugged
from the household AC outlet.
Do not block ventilation holes of
the unit so that air can circulate
freely.
Touching the unit is dangerous,
If thunder.
Be sure to turn the unit off and dis-
connect the AC power cord before
cleaning the unit surface .
If the surface is dirty, wipe clean with
a cloth which has been dipped in a
weak soap-and -water solution and
wrung out thoroughly, and then wipe
again with a dry cloth.
The above items are true of not only this unit but also most of the household electronic products.
Notes: This unit is a class 1 laser product and uses a visible laser beam which could cause hazardous radiation exposure if directed. Be
sure to operate it correctly as instructed.
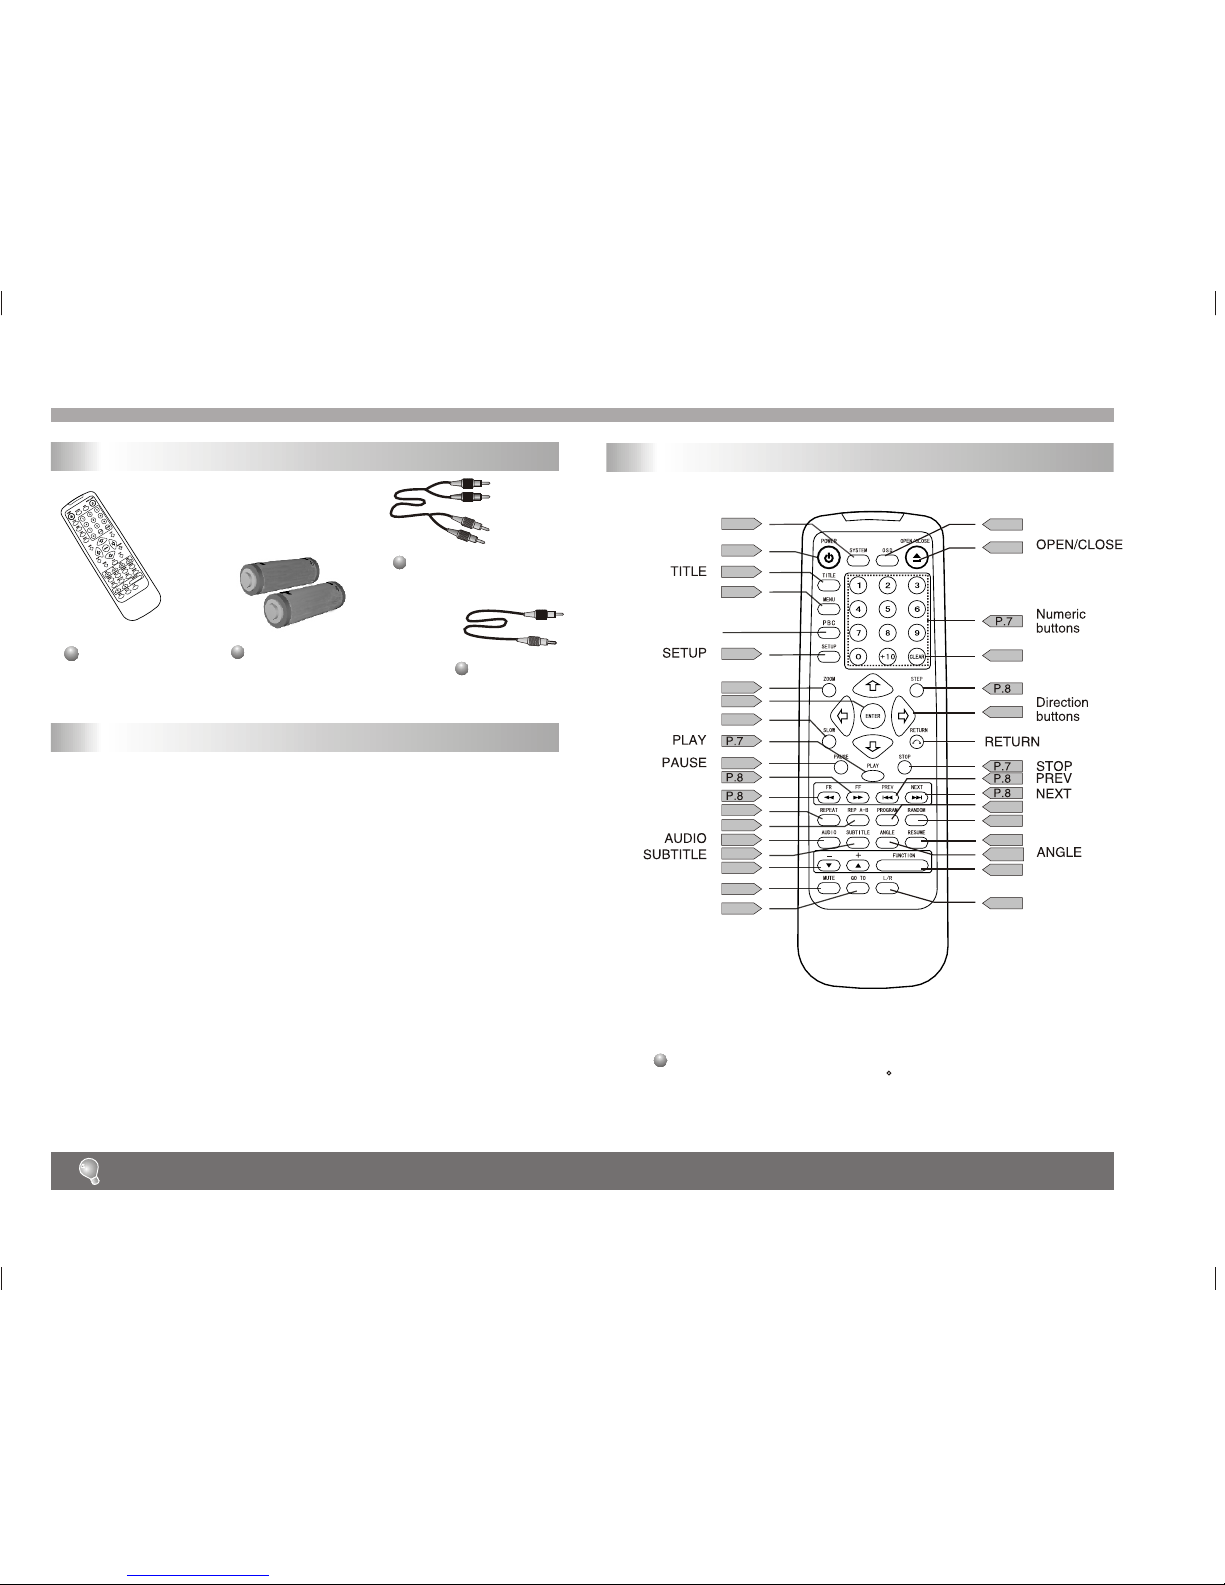
Getting started
3

Getting Started
Accessories
Remote
control unit
Audio cord
Video cord
Battery installation(remote control unit)
Remove the battery cover.
Insert two batteries(AAA, R03, UM-4 type)
making sure the polarity(+/-) matches the marks
inside the unit.
Replace the cover.
1.
2.
3.
Remote control unit
Weak batteries can leak and severely damage the remote control unit.
--Do not attempt to recharge, short-circuit, disassemble, heat or throw
the batteries into the fire.
--Do not mix old and new batteries.
4
Point remote control unit no more than 8m from the remote
sensor and within about 60 of the front of the unit.
Batteries
(size AAA, R03, UM-4)
+&-
SYSTEM
POWER
PBC
ZOOM
ENTER
SLOW
FAST BACKWARD
FAST FORWARD
REPEAT
REP A-B
MUTE
GO TO
MENU
L/R
OSD
CLEAR
STEP
PROGRAM
RANDOM
RESUME
FUNCTION
P.12
P.14
P.1 1
P.1 1
P.12
P.14
P.8
P.7
P.1 1
P.1 1
P.1 1
P.12
P.12
P.8
P.7
P.12
P.12
P.13
P.13
P.12
P.1 1
P.9
P.12
P.7
P.1 1
P.13

2CH AUDIO OUT2CH AUDIO OUT
RIGHTRIGHT
DIGITAL AUDIO OUT
()
PCM / BITSTREAM
DIGITAL AUDIO OUT
()
PCM / BITSTREAM
OPTICALOPTICAL COAXIALCOAXIAL
VIDEOVIDEOS-VIDEOS-VIDEO
LEFTLEFT
SCART
Getting Started
System connection
Turn off the power and keep AC cord pulled out from the outlet when connecting the system.
To coaxial digital audio
input connector
SCART connected cable
(optional)
To TV (Scart Input) connector
S-video cord
(optional)
Red White
Yellow
To stereo TV or other
audio equipments
Coaxial audio cable
(optional)
Red White
Red White
Audio cord
Video cord
AC outlet on the wall
Yellow
Optical digital cable
(optional)
To optical digital audio input connector

6
Most of the functions can be controlled by remote control unit.Most of the functions can be controlled by remote control unit.
Getting started
Front panel
Vacuum Fluorescent Display (VFD)
PLAYBACK TIME
PLAY MODE INDICATOR
DISC TYPE INDICATOR
PLAY/PAUSE INDICATOR
REPEAT INDICATOR TITLE/TRACK NUMBER
POWER BUTTON
REMOTE SENSOR
STOP BUTTON OPEN/CLOSE BUTTON
PLAY/PAUSE BUTTON
DISC TRAY
PREV BUTTON
NEXT BUTTON
ADJUST THE
HEADPHONE VOLUME
CONNECT HEADPHONE
LEVEL
MIN MAX
PHONES
STOP
PLAY/PAUSE
REMOTE
ON/STANDBY
MENU
POWER
ON/STANDBY
LED
MENU BUTTON
ENTER BUTTON

PLAY and PAUSE button: Press PLAY
button to start playback. Press PAUSE
button to pause playback.
Numeric buttons(0-9):
STOP button: When this button is pres-
sed once, the unit records the stopped
point, from where playback will resume
(resume function) if PLAY is pressed
afterwards. But if STOP button is pressed
again instead of PLAY button, there will
be no resume function.
You can select desired titles(DVD) by pressing
these buttons directly only if the title or track
number is less than 10.
If the title or track number is over 10. For instance,
if "28" is wanted, press "10+" twice, and then
press the 2-digit number "8".
Starting playback Function buttons
Basic operation
DVD discs possess super interactive function. Please normally use " " and " enter" keys in operation of OSD menu.
7
LEVEL
MIN MAX
PHONES
STOP
PLAY/PAUSE
REMOTE
ON/STANDBY
MENU
POWER LEVEL
MIN MAX
PHONES
STOP
PLAY/PAUSE
REMOTE
ON/STANDBY
MENU
POWER

Basic operation
Searching function buttons
8
1
2
Numeric buttons(0-9):
These buttons can function with GO TO
button .
When the above items are showed on TV screen,
you can input numbers to locate desired sector and
commence play.
GO TO button:
Press this button to go to desired posi-
tion. The player provides 2 search mode
of DVD disc, and it provides 3 search
mode of CD disc.
[DVD only] [DVD only]
The number you input is invalid if it is beyond
the track's capcity.
Other buttons
TITLE XX/XX CHAPTER [ ]/XXX
DISC GOTO SELECT TRACK
TRACK GOTO XX
[CD only]
22
11
PREV button and NEXT button:
Press these buttons to go to the previous/
next chapter(DVD) or track(CD).
2
3
4
SLOW button:
Press this button to select slow-motion
playback in forward and reverse direction
at 1/2, 1/4, 1/8,1/16 normal speed without
sound(DVD).
STEP button: You can enjoy picture
frame by frame by pressing this button.
FR and FF button:
These buttons allow
skipping ahead/back at 5-level speeds.
Press PLAY button to return to normal playback.
1
11
33
22
44
LEVEL
MIN MAX
PHONES
STOP
PLAY/PAUSE
REMOTE
ON/STANDBY
MENU
POWER

99
Press the OPEN/CLOSE button.
Put in MP3 disc on label side,
now system begins searching
information on disc. Completing
searching, the menu screen
appears, now you can use " "
and PLAY buttons to select song
to play, or you can select desired
song to play by pressing numeric
buttons directly.
Numeric buttons:
Pressing number buttons on
your remote controller, you
can directly select the song
which you want to enjoy to
be played. For example, if
you want to enjoy listening
to the eighteenth song,
please press "1" once,and
then press "8".
STOP button:
Pressing the button will stop
playback.
Prev & Next buttons:
Their functions is to choose the
previous or next song to be played.
Mp3 /JPEG operations
LEVEL
MIN MAX
PHONES
STOP
PLAY/PAUSE
REMOTE
ON/STANDBY
MENU
POWER

10
Press OPEN/CLOSE:
Put KODAK JPEG disc properly, the system will search automatically.
After sear-ching, the direction arrows and PLAY button can be used to
choose the option desired by the user. Also the numeric buttons can be
used to select directly. Press NEXT/PREV/STOP buttons to control.
Optional Play Modes:
mode 1: wipe top
mode 2: wipe botton
mode 3: wipe left
mode 4: wipe right
mode 5: diagonal wipe left top
Twelve slideshow transition modes are provided, use "RESUME" button
to select:
mode 6: diagonal wipe right top
mode 7: diagonal wipe left botton
mode 8: diagonal wipe right botton
mode 9: extend from center h
Image transformation
There are four modes of transformation: "Invert", "Mirror","Left" and
"Right". The arrow keys are used to select.
Up - Invert/Normal
Down - Mirror/Normal
Left - Turn left
Right - Turn right
Zoom
Press ZOOM button to enter ZOOM mode. Then press" "
button zoom in/out.
FR and FF
Note: during ZOOM function, slide show transition and image trans-
formation are disabled.
mode 10: extend from center v
Stop
The "Stop" key is used to enable KODAK JPEG digest mode when in stop
state. After it is enabled, up to 12 scaled down jpeg pictures will be
displayed on the screen. The " " keys can be used to
display the next/prev tweleve pictures. Bypressing a number key the
corresponding picture will be enlarged to fill screen, and the digest
mode will be can-celled.
Prev & Next
SINGLE - Play the selected song or JPEG picture once and
stop.
REP-ONE - Play the same song or JPEG picture over and over.
FOLDER R - Repeat Play the catalog.
SHUFFLE - Randomly play each song or JPEG picture in the
current directory.
FOLDER - Play the catalog.
mode 11: compress to center h
mode 12: compress to center v
mode 13: window h
mode 14: window v
mode 15: wipe from edge to center
mode 16: random
mode 17: no
Mp3 /JPEG operations
JPEG operations JPEG operations

When this unit is not used, please turn off the power and leave no disc inside.When this unit is not used, please turn off the power and leave no disc inside.
11
22
44
33
55
The repeat functions that you can enjoy are dependent on the disc types
played.
DVD: title repeat, chapter repeat and given portion repeat.
REPEAT button: To press this button:
You can repeatedly play a title (DVD) or all tracks
(CD) when "ALL " appears on VFD.
You can repeatedly play a chapter (DVD) or a single
track (CD) when " " appears on VFD.
You can cancel repeat functions when no " "
appears on VFD.
REP A-B button:
You can repeatedly play a given portion by operating
as following:
To press this button once to define the portion head .
To press this button again to define the portion toe.
And then the portion will be played repeatedly.
To press this button again to return to normal playback.
1
2
4
5
AUDIO button: To press this button, you can ch-
ange the audio language from the one selected at
the initial settings to a different language, if ava-
ilable.
SUBTITLE button: To press this button, you can
change the subtitle language from the one sele-
cted at the initial settings to a different language,
if available.
RESUME button:
When you press STOP button,
the player can memorize the stopped point from
which play will go on when you press RESUME
button.
3ANGLE button:
Some DVDs may contain scenes which have
been shot simultaneously from a number of
different angles. For these discs, the same
scene can be viewed from each of these
different angles by using the ANGLE button.
TITLE button:
The buttons mentioned in 1-3 can work only when the disc played supports
the corresponding functions.
Playback mode
Repeat playback mode buttons Interactive function buttons
DVD disc:
Press TITLE button, then the DVD menu or titles available
on the disc will be displayed. Then you can use " " and
SELECT button to select programs.
ZOOM button:
Press this button to magnify picture and at zoom
in mode use direction buttons " " to select desired .
part of the zoomed picture.
Press this button during normal, zoom in or zoom out
playback mode. This player can magnify a picture at 3
levels.
11

12
16
2
4
3
5
SYSTEM button:
Press this button to select PAL , NTSC or
MULTI .
OSD button:
Press this button once to show main playback
information on TV screen and press it again to
show playback time. Press this button at the fifth
time, and then the display will be canceled.
FUNCTION button:
Press to select volume, pitch. Then press
"+" or "-" button for adjustment.
MUTE button:
Press this button to turn on/off the sound.
L/R button:
Press this button consecutively and the
audio output will change as following:
MONO-LEFT MONO-RIGHT STEREO
Other functions
Other function buttons Display
RANDOM button:
Random mode allows you to play
tracks randomly by pressing this button,
pressing again will cancel random playback. Connecting headphones
1 Connect the headphones.
Headphones with a 6.3 mm stereo plug can be connected.
2Adjust the volume.
2
1
Avoid listening to sound as levels which may be harmful to your ears.
LEVEL
MIN MAX
PHONES
STOP
PLAY/PAUSE
REMOTE
ON/STANDBY
MENU
POWER

13
2
1
3
Menu and program
Menu function buttons
Press PROGRAM button. Then "
will appear on TV screen
"PROGRAM
Press the track number in the order you
want.
For example, if the track numbers you
want to play are 1, 3 and 8, just input in
the order of 1-3-8.
You can press CLEAR button to cancel and input again if you
mis-input track numbers.
When you want to play only partial tracks/chapters of a disc
(DVDs) or to arrange the tracks/chapters playback order, you need
program functions.
Do as following:
MENU button:
If playing some DVD discs, press this button
back to root menu screen.
If playing DVDs you can use the functions of MENU,
PROGRAM and RANDOM.
Press this button,disc menu available on
the disc will be displayed.
Program functions
4Now you can press " " and "ENTER" button to select
"START" option and enjoy the desired tracks.

Once the initial settings have been completed, the player can always be operated under the same conditions(especially with DVD discs). The settings will be retained
in the memory even after turning the power off untill the settings are changed.
Once the initial settings have been completed, the player can always be operated under the same conditions(especially with DVD discs). The settings will be retained
in the memory even after turning the power off untill the settings are changed.
The following menu items can changed:
GENERAL SETUP: selects the GENERAL PAGE menu.
SPEAKER SETUP: selects the SPEAKER PAGE menu.
SETUP:DOLBY DIGITAL selects the DOLBY DIGITAL SETUP menu.
VIDEO SETUP: selects the VIDEO SETUP PAGE menu.
PREFERENCES: selects the PREFERENCES PAGE menu.
EXIT SETUP: selects the item to leave the setup menu.
This page is for setup speaker output.
DOWN MIX
LT/RT: 2ch output, main channel with surround.
STEREO: 2ch output, main right channel with right surround;
main left channel with left surround.
ENTER
14
Speaker setup page
GENERAL SETUP
SPEAKER SETUP
SETUP
VIDEO SETUP
PREFERENCES
EXIT SETUP
DOLBY DIGITAL
SETUP MENU-MAIN PAGE
WIDE: widescreen display.
ANGLE MARK: viewing angles change option(if available). See chan-
ging the angles on page 11.
CLOSE CAPTI:This is turn ON/OFF captions.
SCR SAVER: this is to turn on/off screen saver.
AUDIO OUT:Select Audio Output:SPDIF OFF,SPDIF/RAW,SPIF/PCM.
MAIN PAGE: selects the menu setup MAIN PAGE.
16:9/
OSD LANG: selects a language for on screen display.
The following meun items can be changed:
TV DISPLAY: selects the aspect ratio of the playback picture.
/PS:pan & scan display.
/LB: letterbox display.
4:3
4:3
TV DISPLAY
ANGLE MARK
OSD LANG
CLOSE CAPTI
SCREEN SAVER
AUDIO OUT
MAIN PAGE
GENERAL SETUP PAGE
4 : 3/PS
4 : 3/LB
16 : 9/WIDE
ON
OFF
ENGLISH
SWEDISH
DANISH
SPDIF OFF
SPDIF/RAW
SPDIF/PCM
ON
OFF
ON
OFF
Table of contents
Other Akai DVD Player manuals

Akai
Akai AKDVD9DS User manual

Akai
Akai AKH-800XS User manual

Akai
Akai DV-P2340 User manual

Akai
Akai DV-P3470S User manual

Akai
Akai DV-R4035VSMC User manual

Akai
Akai DV-PX7830 User manual

Akai
Akai DVD-2280 User manual

Akai
Akai DVDP215 User manual

Akai
Akai DV-R4015VSS User manual

Akai
Akai DV-P4799KDMC User manual