manuals.online logo
Brands
  1. Home
  2. •
  3. Brands
  4. •
  5. Alcatel
  6. •
  7. Telephone
  8. •
  9. Alcatel T37 User manual

Alcatel T37 User manual

PILES
1. Si le cordon téléphonique est branché, débranchez-le de la base.
2. Tournez délicatement le téléphone, puis utilisez un crayon ou un
trombone pour déverrouiller le couvercle du compartiment des piles.
Ouvrez le couvercle du compartiment des en appuyant sur le
couvercle et en le faisant glisser.
3. Insérez 3 piles alcalines AA (non fournies) dans le compartiment
comme l’indique l’illustration.
4. Refermez le couvercle du
compartiment des piles.
5. Si le cordon téléphonique avait déjà
été branché, débranchezle, puis
rebranchezle et vérifiez les emplacements
de mémoire.
INSTALLATION DU TELEPHONE
1. Brancher le combiné.
2. Brancher la ligne téléphonique.
CHANGER LE TEMPS DE FLASHING (si nécessaire):
- Appui sur la touche MENU /

ou

sélectionner SET 6
FLASH / MENU /

ou

sélectionner le temps de flashing
110 / 300 / 600 ou 1000 / MENU / (300Ms pour une
utilisation en France)
UTILISATION DE VOTRE TÉLÉPHONE
RECEVOIR ET METTRE FIN À UN APPEL
- Appuyer sur pour émettre un appel, et sur pour mettre fin à
votre appel. OU
- / /
- /
- / / /
ÉMETTRE UN APPEL
- ou avant ou après la composition du numéro
- Depuis la liste Bis:
ou /
- Depuis le journal des appels*:

ou

sélectionner le correspondant à appeler / ou
- Depuis les mémoires directes:
1. M1~M10 ou + / ou
2. ou / M1~M10 ou +
RÉGLAGE DU CONTRASTE DE L'ÉCRAN LCD :
Alors que le combiné est raccroché, appuyez sur la touche
pour modifier le contraste de l'écran CD (un niveau entre 1 et 5).
CHOIX ENTRE 20 MÉLODIES DE SONNERIE :
Alors que le combiné est raccroché, appuyez sur la touche
, autant de fois que nécessaire pour sélectionner la
mélodie de sonnerie que vous désirez (entre 01 et 20).
MISE EN ATTENTE AVEC MUSIQUE :
Alors que le combiné est décroché, appuyez sur la touche
pendant. L'appel en cours est placé en attente et votre correspondant
entend une musique mais non votre conversation.
Réappuyez sur cette même touche pour reprendre l'appel.
EFFACER UN NUMÉRO DU JOURNAL DES APPELS:
- Effacer un numéro dans le journal des appels:

ou

pour
sélectionner le numéro / .
- Effacer tous les numéros dans le journal des appels:

ou

sélectionner un des numéros / Appuyez sur pendant trois
secondes pour supprimer tous les numéros composés.
ENREGISTRER UN NUMÉRO:
- Enregistrer un numéro: pour saisir le numéro / MENU /
pour sélectionner l'emplacement mémoire, ou sélectionner
M1~M10 .
- Enregistrer un numéro du journal des appels:

ou

pour
sélectionner le numéro / MENU / pour sélectionner
l'emplacement mémoire, ou sélectionner M1~M10 .
- Enregistrer un des derniers numéros composés: ... pour
sélectionner le numéro / MENU / pour sélectionner
l'emplacement mémoire, ou sélectionner M1~M10 .
PARCOURIR LA LISTE DES DERNIERS NUMÉROS COMPOSÉS
ET RAPPELER UN CORRESPONDANT:
- Parcourir la liste des derniers numéros composes: ...
- Rappeler un des derniers numéros composés: ... / ou .
EFFACER UN NUMÉRO COMPOSÉ:
- Effacer un des derniers numéros composés: ... / .
- Effacer tous les numéros composés: Appuyez sur la touche ...
/ Appuyez sur la touche pendant 3 secondes pour supprimer
les numéros de tous les appels sortants.
AUTRES RÉGLAGES
RÉGLAGE DE LA DATE ET DE L'HEURE:
- Appuyez sur la touche MENU/

ou

jusqu'à sélectionner
SET 1 DATE / MENU /

ou

pour accéder aux éléments
année, mois, jour, heure et minute / MENU / .
VEUILLEZ LIRE CE MODE D’EMPLOI AVANT
D’UTILISER VOTRE TÉLÉPHONE
TOUCHES DE LA STATION DE BASE :
FRANÇAIS
1: LCD Display
3: Vol Button
5: Out Button
7: Flash/Contrast Button
9: Handsfree Button
11: Up Button
13: Recall Button
15: Line Jack
17: IDD Lock Switch
- IDD lock GREEN = Numbers with leading 0 cannot be dialed out
- IDD lock YELLOW = All numbers cannot be dialed out
PLEASE READ THIS USER’S GUIDE BEFORE
USING YOUR PHONE
BASE STATION KEYS:
DELETE CALLER ID NUMBER:
- Delete a Caller ID number:

or

to select the number /
- Delete all Caller ID number:

or

to select the number /
Press key for 3 seconds to delete all Caller ID number
STORE NUMBER:
- Store a telephone number: to input number / MENU /
to select memory location, or M1~M10.
- Store an incoming call number:

or

to select the
number / MENU / to select memory location, or M1~M10.
- Store an outgoing number: Press ... to select the number /
MENU / to select memory location, or M1~M10.
REVIEW AND DIAL BACK AN OUTGOING NUMBER:
- Review an outgoing number: Press ... .
- Dial back an outgoing number: Press ... / or .
DELETE AN OUTGOING NUMBER:
- Delete an outgoing number: Press ... / .
- Delete all outgoing number: Press ... / Press key for 3
seconds to delete all outgoing number.
GENERAL SETTINGS
SETTING DATE AND TIME:
- Press MENU key /

or

select SET 1 DATE / MENU /

or

to enter Year, Month, Day, Hour and Minute / MENU / .
SETTING AREA CODE:
- Press MENU key /

or

select SET 2 CODE / MENU /

and

to select value / MENU / .
SETTING PABX CODE:
- Press MENU key /

or

select SET 3 PCODE / MENU / use

or

key to select value / MENU / .
( PCODE will be added if dialing number > 5 digits )
SETTING AUTO -IP:
- Press MENU key /

or

select SET 4 AUTO IP / MENU / use

or

key to select AUTO IP ON / MENU / to enter
the IP number / MENU / .
( IP code will be added for dialing numbers with leading 0 )
SETTING ALARM:
- Press MENU key /

or

select SET 5 ALERT / MENU / use

or

key to set time and select ON or OFF / MENU / .
SAFETY
Do not use your telephone to notify a gas leak or other potential
explosion hazard. Do not open your device to avoid risk of electrical
shock. Your telephone must be located in a dry place away from hot,
humide and direct sunlight condition.
ENVIRONMENT
This symbol means that your inoperative electronic
appliance must be collected separately and not mixed with
the household waste.
Help us to protect the environment in which we live!
CONFORMITY
The logo printed on the products indicates the conformity with all
essential requirements and all applicable directives. You can download
the Declaration of Conformity from our website www.alcatel-home.com
Alcatel Logo and Alcatel name are trademarks of Alcatel-Lucent and used
under license by Atlinks.
2: Down Button
4: Del Button
6: Ring/Hold Button
8: Rd/Back Button
10: Microphone
12: Set/store Button
14: M1~M10 Memory Buttons
16: Battery Cover
1: Écran LCD
3: Touche volume
5: Touche Sortie
7: Touche Flash/Contraste
9: Touche mains libres
11: Touche Haut
13: Touche Rappel
15: Connecteur Ligne
17: Interrupteur de verrouillage
IDD
- IDD verrouillage VERT = Les nombres débutant par 0 ne peuvent pas
être composés.
- IDD verrouillage JAUNE = Aucun numéro ne peut être composé.
2: Touche Bas
4: Touche Suppr.
6: Touche Sonnerie/Attente
8: Touche RD/Retour
10: Microphone.
12: Touche Définir/Enregistrer
14: M1~M10 Touche Mémoire
16: Cache du compartiment de
IDDpiles
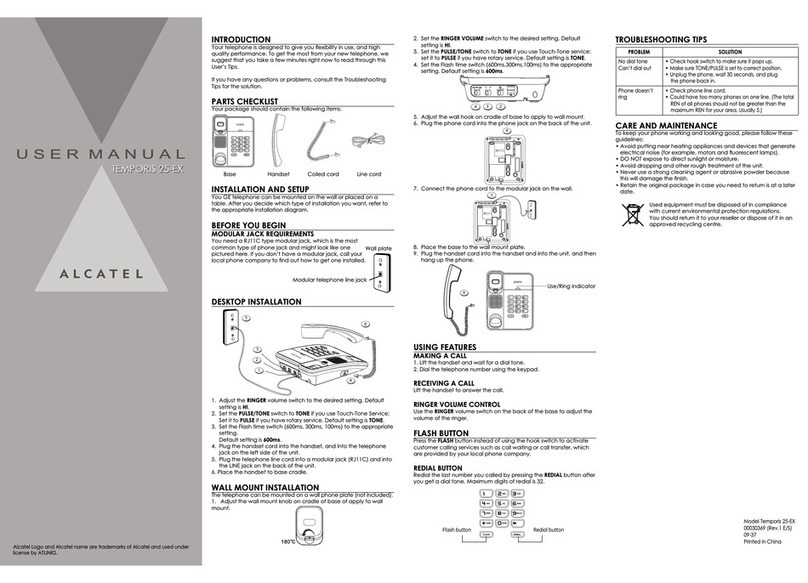
INSTALLATION ET CONFIGURATION
INSTALLATION ET REPLACEMENT DES PILES
Votre téléphone utilise 3 piles alcaliness AA qui lui permettent de
recevoir et de mémoriser le journal d’appels, ainsi que de mémoriser les
numéros que vous composez fréquemment.
* Sous réserve d’abonnement au service auprès l’opérateur de téléphonie fixe.
ICÔNES D’AFFICHAGE :
19: Jour
21: Minute
23: Appel entrant
25: Verrouiller
27: Écran d'affichage des
numéros de téléphone
18: Mois
20: Heure
22: Appel sortant
24: Numéro du journal des appels
26: Jour de la semaine
ENGLISH
IMPORTANT: Si vous prévoyez de ne pas utiliser le
téléphone pendant plus de 30 jours, retirez les piles pour
éviter toute fuite et tout dégât de l’appareil
USER'S GUIDE
GUIDE D'UTILISATION
GUÍA DEL USUARIO
www.alcatel-home.com
Please, read this user's guide before using your phone
Avand d'utiliser le téléphone, lire attentivement le manuel d'utilisation
Favor de leer este manual antes de utilizar su teléfono
Fig 3
Fig 1
18 19 20 21 22
24
23
26
25
27
INSTALLING AND REPLACING THE BATTERIES
Your Caller ID phone uses 3 AA-size alkaline batteries for receiving and
storing Caller ID record and for storing the numbers you use frequently.
BATTERY
1. If the telephone line cord is connected, disconnect it from the base unit.
2. Carefully turn over the phone, use a pen or paper clip to loose the
battery cover. Open the battery compartment by pushing on the
battery cover and sliding it away from the unit.
3. Insert 3 AA-size alkaline batteries
(not included) as shown on the
diagram in the battery compartment.
4. Snap the battery compartment door
back into place.
5. If the line cord was previously
connected, reattach it to the unit and
check your memory locations.
INSTALLATION AND SETUP
1. Connecting the handset.
2. Connecting the telephone line.
SET FLASH TIME TO OPERATE CORRECTLY ON YOUR
NETWORK:
- Press MENU key /

or

select SET 6 FLASH / MENU /

or

to select flash time 110 / 300 / 600 or 1000 / MENU/
USING THE PHONE
RECEIVE AND END A CALL
- /
- / /
- /
- / / /
MAKE A CALL
- or either before or after dialing your number
- From redial list:
or /
- From call log list*:

or

to select the caller number / or
- From direct memories:
1. M1~M10 or + / or
2. or / M1~M10 or +
LCD CONTRAST ADJUSTMENT:
In on-hook state, user can press the button to select the
LCD Contrast (1~5 choice).
20 SELECTABLE RING TONES:
In on-hook state, keep on pressing key, user can select
from RING 01 - 20 ring tone.
MUSIC ON HOLD:
In off-hook state, press key then the call will be put on
hold, the far end will only hear music but no conversation.
Press the key again to resume normal conversation.
* Subject to subscription and availability of the service from the fixed
line operator.
DISPLAY ICONS:
19: Day
21: Minute
23: Incoming Call
25:Lock
27:Phone Number Display
18: Month
20: Hour
22: Outgoing Call
24: Call-log Number
26:Day Of The Week
IMPORTANT: If you are not going to use the telephone
for more than 30 days, remove the batteries because
they may leak and damage the unit.
/
/
/
/
/
/
/
/
ALCATEL T37
1
14
6
11
2
4
13
12
9
3 7 8 10
5
16
ABC D EF
GHI JKL M NO
PQR S TUV WXYZ
M1 M2 M3 M 4 M5
M6 M 7 M8 M 9 M10
1
4
7
2
5
8
3
6
9
0
Fig 2
15 17
10
QC
PASSE D
SEGURIDAD
No use el teléfono para avisar de una fuga de gas si se
encuentra en las cercanías de dicha fuga. No intente abrir el
dispositivo para evitar el riesgo de una descargar eléctrica.
El teléfono debe mantenerse alejado de todas fuentes de
excesivo calor (radiadores, luz solar, etc…) y protegido
contra las vibraciones y el polvo.
MEDIO AMBIENTE
Este símbolo indica que el aparato eléctrico fuera de uso se debe desechar
de forma independiente y nunca junto a los residuos domésticos.
¡ Ayúdenos a conservar el medio ambiente en el que vivimos!
El logotipo y el nombre de ALCATEL son marcas registradas de
ALCATEL-LUCENT utilizadas bajo licencia por ATLINKS.
DECLARACION DE CONFORMIDAD
Este logo indica el cumplimiento con los requisitos esenciales y otras
disposiciones de las directivas aplicables. Pueden consultar la declaración
de conformidad en nuestra página web: www.alcatel-home.com
El logotipo y el nombre de ALCATEL son marcas registradas de
ALCATEL-LUCENT utilizadas bajo licencia por ATLINKS.
ESTABLECER TIEMPO DE FLASH PARA QUE EL TELÉFONO
FUNCIONE CORRECTAMENTE EN SU RED:
- Pulsa la tecla MENU /

o

seleccione SET 6 FLASH / MENU /

o

para seleccionar el tiempo de corte calibrado
(FLASH) 110 / 300 / 600 o 1000 / MENU /
LAS OPERACIONES DEL TELÉFONO
RECIBIR Y FINALIZAR UNA LLAMADA
- /
- / /
- /
- / / /
REALIZAR UNA LLAMADA
- o antes o después de marcar el número de teléfono
- Desde la lista de rellamadas:
o /
- Desde el registro de llamada*:

o

para seleccionar el número deseado / o
- Desde las teclas de memorias directas:
1. M1~M10 o + / o
2. o / M1~M10 o +
AJUSTE DEL CONTRASTE DE LA PANTALLA LCD:
En estado auricular colgado, el usuario puede pulsar el botón
para selección el contraste de la pantalla LCD (elección
entre 1~5).
20 TONOS DE LLAMADA SELECCIONABLES:
En estado auricular colgado, mantenga pulsada la tecla ;
el usuario puede seleccionar desde RING 01 - 20 tonos de llamada.
MÚSICA EN LLAMADAS EN ESPERA:
En estado auricular colgado, mantenga pulsada la tecla ;
la llamada será puesta en espera; el extremo que llama solo podrá oír
música pero no la conversación.
Vuelva a pulsar la tecla para volver a la conversación normal.
BORRAR UN NÚMERO DEL IDENTIFICADOR DE LLAMADAS:
- Borrar un número del Identificador de llamadas:

o

para seleccionar un número / .
- Borrar todos los números del Identificador de llamadas:

o

para seleccionar un número del Identificador de llamadas /
mantenga presionado para borrar todo.
GUARDAR UN NÚMERO DE TELÉFONO:
- Guardar un número de teléfono: para marcar el número /
MENU / para seleccionar la ubicación en la memoria o
M1~M10.
- Guardar un número del registro de llamadas entrantes:

o

para marcar el número / para seleccionar la ubicación
en la memoria o M1~M10 .
- Guardar un número del registro de llamadas salientes: ...
para marcar el número / MENU / para seleccionar la
ubicación en la memoria o M1~M10.
REVISAR Y MARCAR UN NÚMERO DESDE EL REGISTRO DE
LLAMADAS SALIENTES:
- Revisar un número del registro de llamadas salientes: ... .
- Marcar un número desde el registro de llamadas salientes: ...
/ o .
BORRAR UN NÚMERO DEL REGISTRO DE LLAMADAS
SALIENTES:
- Borrar un número del registro de llamadas salientes: ... / .
- Borrar todos los números del registro de llamadas salientes:
... / mantenga presionado para borrar todo.
CONFIGURACIÓN GENERAL
SECONFIGURAR LA FECHA Y LA HORA:
- Pulsa la tecla MENU /

o

y seleccione SET 1 DATE / MENU
/

o

para entrar en el año, mes, día, hora y minuto /
MENU / .
CONFIGURAR EL CÓDIGO DE ÁREA:
- Pulsa la tecla MENU /

o

y seleccione SET 2 CODE / MENU
/

o

para seleccionar el valor / MENU / .
CONFIGURAR EL CÓDIGO PABX:
- Pulsa la tecla MENU /

o

y seleccione SET 3 PCODE / MENU
/ use la tecla

o

para seleccionar el valor / MENU / .
(Si el número a marcar tiene más de 5 dígitos se añadirá el prefijo
PCODE automáticamente)
CONFIGURAR IP AUTOMÁTICA:
- Pulsa la tecla MENU /

o

y seleccione SET 4 AUTO IP /
MENU / use la tecla

o

para seleccionar AUTO IP ON /
MENU / para introducir el número de la IP / MENU / .
(Para los números que comiencen con 0 se añadirá el prefijo IP code)
CONFIGURAR LA ALARMA:
- Pulsa la tecla MENU /

o

y seleccione SET 5 ALERT / MENU
/ use la tecla

o

para configurar la hora y seleccione ON
o OFF /MENU / .
/ MENU /..... / MENU /

or

/ MENU / SET 2 CODE /

or

/ MENU
/ MENU / ..... / MENU /

or

/ MENU / SET 1 DATE /

or

/ MENU
/ MENU /

or

/ MENU / SET 6 FLASH /

or

/ MENU

or


or

/
or M1~M10 / MENU / / MENU /

or

/

or

/
/ MENU /
MENU
M1~M10 M1~M10
M1~M10
M1~M10
M1~M10 / MENU /
M1~M10 / MENU /
/ MENU /

or

/ MENU / SET 3 PCODE /

or

/ MENU
/ MENU / AUTO IP ON /

or

/ MENU / SET 4 AUTO IP /

or

/ MENU
/ MENU /
/ MENU / OFF or ON /..... / MENU /

or

/ MENU / SET 5 ALERT /

or

/ MENU
RÉGLAGE DE L'INDICATIF RÉGIONAL :
- Appuyez sur la touche MENU /

ou

jusqu'à sélectionner
SET 2 CODE / MENU /

et

pour sélectionner une valeur /
MENU / .
RÉGLAGE DU CODE D'AUTOCOMMUTATEUR PRIVÉ :
- Appuyez sur la touche MENU /

ou

jusqu'à sélectionner
SET 3 PCODE / MENU / utilisez les touches

et

pour
sélectionner une valeur / MENU / .
(le PCODE sera ajouté automatiquement pour chaque numéro de plus
de 5 chiffres)
RÉGLAGE DE L'IP AUTO :
- Appuyez sur la touche MENU /

ou

jusqu'à sélectionner
SET 4 AUTO IP / MENU / utilisez les touches

et

jusqu'à
sélectionner AUTO IP ON / MENU / pour spécifier le
numéro IP / MENU / .
(le code IP sera ajouté automatiquement pour chaque numéro
composé commençant par 0)
RÉGLAGE DE LA FONCTION RÉVEIL :
- Appuyez sur la touche MENU /

ou

jusqu'à sélectionner
SET 5 ALERT / MENU / utilisez les touches

et

pour régler
l'heure de réveil et sélectionner ON ou OFF / MENU / .
SECURITE
Votre poste téléphonique doit être installé dans un endroit sec, à l'abri de
la chaleur, de l'humidité et des rayons directs du soleil. Pour éviter les
interférences radio, éloignez le poste téléphonique d'au-moins 1 mètre de
tout appareil électrique et autre téléphone.
ENVIRONNEMENT
Ce symbole signifie que votre appareil électronique hors
d'usage doit être collecté séparément et non jeté avec les
déchets ménagers.
Aidez-nous à préserver l'environnement dans lequel
nous vivons !
Le logo et le nom Alcatel sont des marques enregistrées d'Alcatel-Lucent
et sont utilisées sous licence par Atlinks.
CONFORMITE
Le logo imprimé sur l'appareil atteste que ce dernier est conforme aux
exigences essentielles et à toutes les directives pertinentes. Vous pouvez
consulter cette déclaration de conformité sur notre site Web:
www.alcatel-home.com
Le logo et le nom Alcatel sont des marques enregistrées d'Alcatel-Lucent
et sont utilisées sous licence par Atlinks.
ASEGÚRESE DE LEER ESTA GUÍA DEL
USUARIO ANTES DE UTILIZAR SU TELÉFONO
TECLAS DE LA BASE DEL TELÉFONO:
ESPAÑOL
1: Pantalla LCD
3: Botón Volumen
5: Botón Salir
7: Botón Flash/Contraste
9: Botón Manos libres
11: Botón Arriba
13: Botón Recordar
15: Entrada de línea
17: Interruptor de bloqueo IDD
- IDD bloqueo VERDE = No se pueden marcar los números que comienzan
por 0
- IDD bloqueo AMARILLO = No se puede marcar ningún número
2: Botón Abajo
4: Botón Eliminar
6: Botón Llamada / En espera
8: Botón RD/Atrás
10: Micrófono.
12: Botón Configurar / Guardar
14: M1~M10 Botones Memoria
16: Cubierta de la batería
INSTALACIÓN Y CONFIGURACIÓN
INSTALAR Y REEMPLAZAR LAS PILAS
Su teléfono con Identificador de Llamadas utiliza 3 pilas alcalinas AA
para recibir y almacenar los registros del Identificador de Llamadas para
almacenar los números que utiliza frecuentemente.
PILAS
1. Si le cable de línea telefónica está conectado, desconéctelo de la
unidad base.
2. Voltee el teléfono, utilice un bolígrafo o un clip para abrir la tapa del
compartimiento de las pilas. Retire la tapa del compartimiento
pulsándola hacia abajo y deslizándola hacia fuera de la unidad.
3. Inserte 3 pilas alcalinas AA en el compartimiento según se muestra
en el diagrama.
4. Vuelva a colocar la tapa del
compartimiento de las pilas hasta que
trabe.
5. Si había desconectado previamente el
cable de línea, vuelva a conectarlo a
la unidad y verifique las ubicaciones
de la memoria.
INSTALACIÓN DE ESCRITORIO
1. Conecte el auricular.
2. Conecte la línea telefónica.
* Sujeto a la disponibilidad y contratación del servicio de puesta en espera
de llamada a través del proveedor de servicios de telefonía fija.
SÍMBOLOS E ICONOS MOSTRADOS EN LA PANTALLA:
19: Día
21: Minuto
23: Llamada entrante
25: Bloqueo
27: Pantalla de número de teléfono
18: Mes
20: Hora
22: Llamada saliente
24: Número de registro de llamadas
26: Día de la semana
IMPORTANTE: Si no utilizará el teléfono por más de 30
días. retire las pilas ya que podrídas y provocar daños en
la unidad.
ATLINKS
ATLINKS EUROPE
147 avenue Paul Doumer
92500 RUEIL-MALMAISON
France
www.alcatel-home.com
Model Alcatel T37-CE
A/W No.:10001552 Rev.0
(EN/FR/ES/AR)
Printed in China
/
/
/
/

Other Alcatel Telephone manuals

Alcatel E155 User manual

Alcatel

Alcatel E155 User manual

Alcatel Easy REFLEXES 4400 User manual

Alcatel

Alcatel Easy REFLEXES 4400 User manual

Alcatel Premium Reflexes User manual

Alcatel

Alcatel Premium Reflexes User manual

Alcatel QUICKFLIP User manual

Alcatel

Alcatel QUICKFLIP User manual

Alcatel Premium Reflexes User manual

Alcatel

Alcatel Premium Reflexes User manual

Alcatel T56 User manual

Alcatel

Alcatel T56 User manual

Alcatel 8039 User manual

Alcatel

Alcatel 8039 User manual

Alcatel temporis 500 User manual

Alcatel

Alcatel temporis 500 User manual

Alcatel TEMPORIS 700 User manual

Alcatel

Alcatel TEMPORIS 700 User manual

Alcatel XL785 Voice Combo User manual

Alcatel

Alcatel XL785 Voice Combo User manual

Alcatel 4028 User manual

Alcatel

Alcatel 4028 User manual

Alcatel Varsatus M250 Trio User manual

Alcatel

Alcatel Varsatus M250 Trio User manual

Alcatel T26 User manual

Alcatel

Alcatel T26 User manual

Alcatel Temporis 55-EX User manual

Alcatel

Alcatel Temporis 55-EX User manual

Alcatel OmniPCX Enterprise 4018 User manual

Alcatel

Alcatel OmniPCX Enterprise 4018 User manual

Alcatel MYFLIP BKLT-ALA405DL User manual

Alcatel

Alcatel MYFLIP BKLT-ALA405DL User manual

Alcatel OmniAccess 2.0 User manual

Alcatel

Alcatel OmniAccess 2.0 User manual

Alcatel OmniPCX 4400 User manual

Alcatel

Alcatel OmniPCX 4400 User manual

Alcatel Easy Reflexes User manual

Alcatel

Alcatel Easy Reflexes User manual

Alcatel 2000 User manual

Alcatel

Alcatel 2000 User manual

Alcatel Mirage User manual

Alcatel

Alcatel Mirage User manual

Alcatel 4035 User manual

Alcatel

Alcatel 4035 User manual

Alcatel OmniPCX 4400 User manual

Alcatel

Alcatel OmniPCX 4400 User manual

Alcatel Advanced Reflexes 4400 User manual

Alcatel

Alcatel Advanced Reflexes 4400 User manual

Popular Telephone manuals by other brands

NEC DT300 Series user guide

NEC

NEC DT300 Series user guide

Polycom SoundPoint IP 670 Quick reference guide

Polycom

Polycom SoundPoint IP 670 Quick reference guide

Videx 3311 Mounting instructions

Videx

Videx 3311 Mounting instructions

AT&T ML17939 user manual

AT&T

AT&T ML17939 user manual

AT&T ISDN 8510T Quick reference guide

AT&T

AT&T ISDN 8510T Quick reference guide

RCA ViSYS 25205 quick start guide

RCA

RCA ViSYS 25205 quick start guide

Sony Ericsson K660i Test instruction

Sony Ericsson

Sony Ericsson K660i Test instruction

Binatone Speakeasy 6 user guide

Binatone

Binatone Speakeasy 6 user guide

Videx 6788 quick guide

Videx

Videx 6788 quick guide

Bell System Practices 4A SPEAKERPHONE Identification, installation, operation and maintenance

Bell System Practices

Bell System Practices 4A SPEAKERPHONE Identification, installation, operation and maintenance

Poly VVX 101 Quick reference guide

Poly

Poly VVX 101 Quick reference guide

Nortel NORSTAR M7324 user manual

Nortel

Nortel NORSTAR M7324 user manual

Nortel Commander M7310N user guide

Nortel

Nortel Commander M7310N user guide

Depaepe Telecom PLATINE HD operating instructions

Depaepe Telecom

Depaepe Telecom PLATINE HD operating instructions

GE 15339430 user guide

GE

GE 15339430 user guide

Avantree BTCK-10B user guide

Avantree

Avantree BTCK-10B user guide

Commax TP-12RM user manual

Commax

Commax TP-12RM user manual

AGFEO ComfortTelephone T 15 user guide

AGFEO

AGFEO ComfortTelephone T 15 user guide

manuals.online logo
manuals.online logoBrands
  • About & Mission
  • Contact us
  • Privacy Policy
  • Terms and Conditions

Copyright 2025 Manuals.Online. All Rights Reserved.