AlkaViva The ionpia H2 User manual

Only from AlkaViva
Hydrogen Enhanced Living
The ionpia H2
Owner’s Manual
Warning: Incorrect installation and/or operation could void your valuable warranty.
Please protect your investment! READ THIS MANUAL CAREFULLY.

HYDROGEN GENERATOR
H2
Page 2
TABLE OF CONTENTS
Safety Precautions................................................................................................
Quick Tour of the ionpia H
2
...............................................................................
Installation...............................................................................................................
Operation.................................................................................................................
Replacing your Filters..........................................................................................
Product Specications........................................................................................
03
04
06
10
10
12

HYDROGEN GENERATOR
H2
Page 3
1
• This product is designed for household use only. Use in a commercial application will void your valuable warranty.
• NEVER attempt to repair or service your ionpia H2yourself. Attempting to do so will void your valuable warranty.
Contact AlkaViva Technical Support to arrange service or repair.
• If your ionpia H2becomes submerged in water, unplug the power cord from the wall before removing. Failure to do so
could result in shock!
• Filters should be replaced per manufacturer suggestion at the end of the lter life. It is important that the
replacement lters are installed in the correct position with every lter change.
• The ionpia H2must be grounded! In the event of malfunction or breakdown the grounding conductor will prevent risk of
electric shock/spark. The electrical plug must be plugged into an appropriate outlet that is installed and grounded in
compliance with all local codes and ordinances.
• When installing your ionpia H2use only manufacturer provided parts and equipment. Using third-party or after-market
parts can void your valuable warranty.
• Always install on a solid and level surface. Do not move your ionpia H2while in use.
• DO NOT install or use your ionpia H2near open heat sources or open ames such as stoves, ranges, heater vents or
candles.
• The ionpia H2can be used on 110v~240v. Always be sure to use the appropriate factory electrical plug. Always make
sure that the plug is rmly inserted into the outlet. Never try to make any modications to manufacturers original
equipment, and never use a damaged power cord.
• Be sure that the power adapter is placed where it will not come into contact with water.
• Protect your ionpia H2from freezing temperatures and direct sunlight.
• Only operate your ionpia H2with cold water. Hot water will damage your lters.
• If The ionpia H2makes strange or unusual noises or odors, unplug the power cord immediately and contact AlkaViva Technical
Support.
• Unplug The ionpia H2if you plan on not using it for an extended period (2 weeks). Store your lters in a plastic bag in
the refrigerator to prevent bacterial growth. In cases of extended periods of non-use (4+ weeks), lter replacements may
be necessary.
• Do not use your ionpia H2with well water, water with extreme hardness, high sediment or TDS without rst contacting
AlkaViva Technical Support.
• Your ionpia H2is not under warranty for any damages caused by hard water or environmental conditions.
• Only clean the exterior with warm water, detergent and a soft rag or paper towel. Do not use chemical or abrasive
cleaners – they can damage the surface. Do not spray or pour water over your ionpia H2. Never submerge your
ionpia H2.
• Do not close, bend, pinch, press or otherwise obstruct inlet supply lines, or equipment.
Safety, Installation and Operating Precautions
Precautions and Safeguards

HYDROGEN GENERATOR
H2
Page 4
2
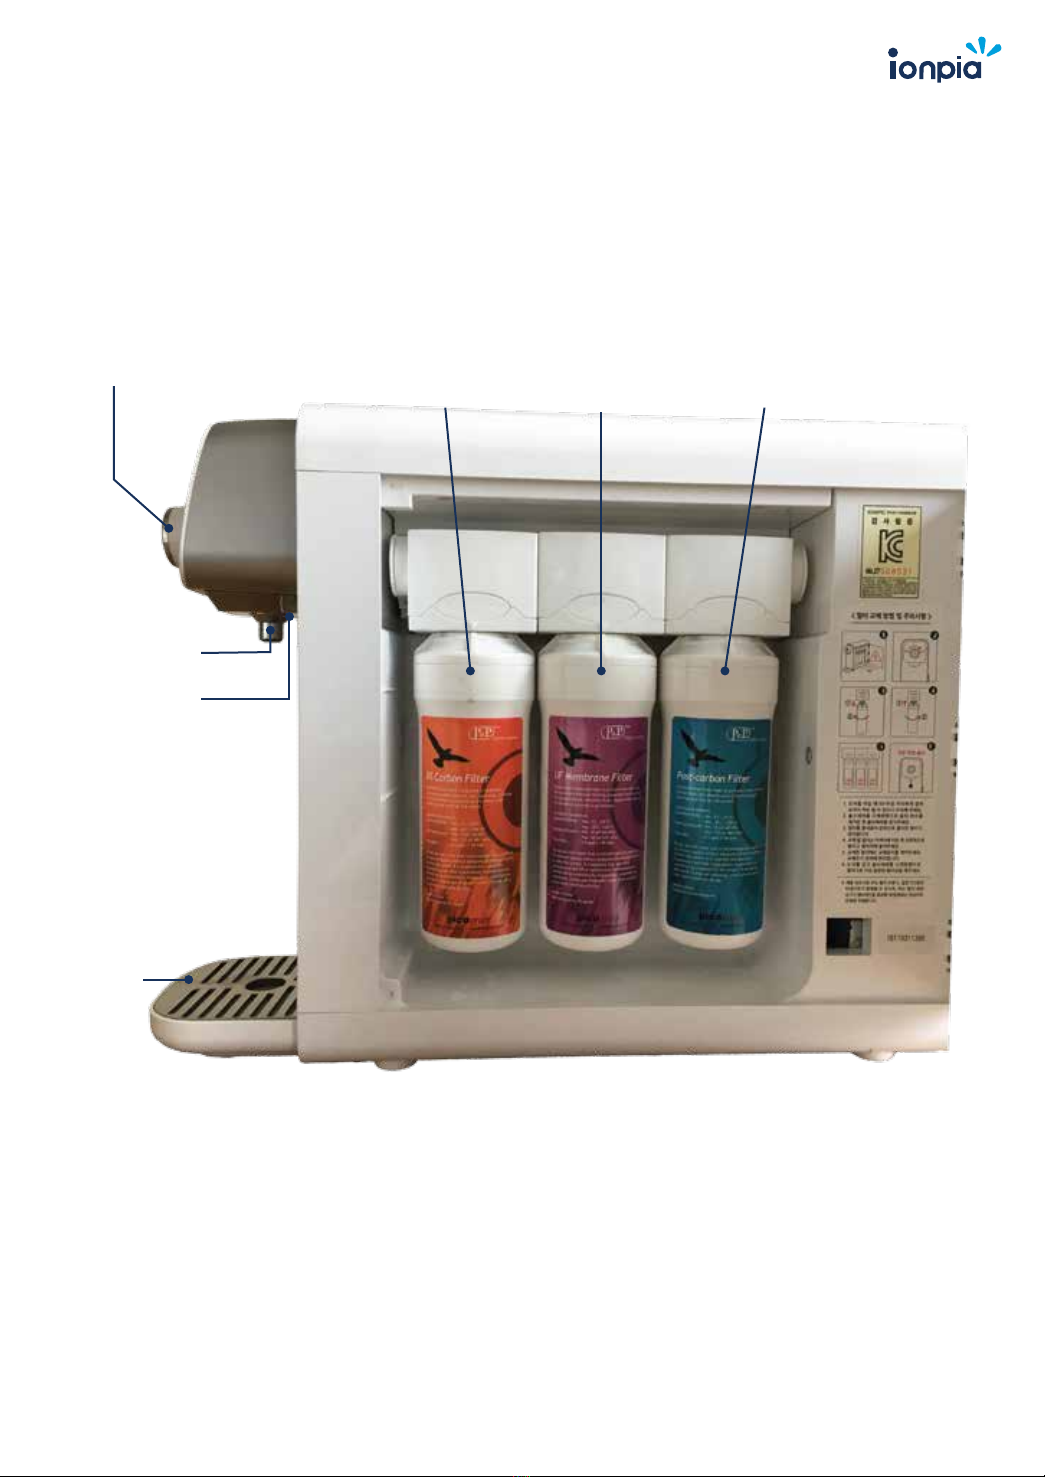
Water Dispensing Knob
Water Outlet
Water Trap Grill
Filter Cover
Faucet Port
for Filtered Water
Only - No H Production
Water Source
Inlet for H
Production
Quick Tour of The ionpia H2
Back of The ionpia H2
Power Inlet
HYDROGEN GENERATOR
H2
Page 5
Overview of The ionpia H
LED Light
Carbon
Filter
Overow
Tray
Water Outlet
Flow Control
Knob
UF Membrane
Filter
Post Carbon
Filter

HYDROGEN GENERATOR
H2
Page 6
Protect your ionpia H
2
from freezing temperatures.
Protect your ionpia H
2
from direct sunlight.
Do not put anything heavy on top of your
ionpia H
2
.
Do not install your ionpia H
2
on an unstable or
soft surface.
Install only on a hard and level surface.
Installation Precautions
Installation Procedure
3
Do not install close to a stove.
Install close to a properly grounded
electrical outlet.
Do not close, bend, pinch, press or otherwise
obstruct hoses.
If you have installation questions, please contact AlkaViva Technical Support.
Install Method 1: At your sink attached to your faucet with the diverter.
Install Method 2: At your sink but plumbed directly to your cold water line (no diverter).
It is recommended that Method 2 be completed by a licensed plumber.
Installation Options
Make Sure You Have All the Accessories
12
34
1 - Faucet Diverter
2 - 1/4”White Tubing
3 - Adapter and power cord for
power connection
(AC 100-240V, DC 12V 5A)
4 - Instruction Manual
5 - Angle Stop Adaptor
6 - DigiFlow Meter
Before installation, please check to ensure you have the accessories pictured below.
Please note that the diverter and adapters accommodate the majority of standard faucets. If you
have a non-standard or a custom faucet or plumbing, you may need to locate and purchase
additional parts. If you need help, please contact AlkaViva Technical Support. Save the box your
ionpia H
2
generator came packed in. This will help if your ionpia H needs to be transported at a
later date.
Instruction
Manual
5
6
700
Digiow8800T
HYDROGEN GENERATOR
H2
Page 7
• This product is designed for household use only. Use in a commercial application will void your valuable warranty.
• NEVER attempt to repair or service your ionpia H2yourself. Attempting to do so will void your valuable warranty.
Contact AlkaViva Technical Support to arrange service or repair.
• If your ionpia H2becomes submerged in water, unplug the power cord from the wall before removing. Failure to do so
could result in shock!
• Filters should be replaced per manufacturer suggestion at the end of the lter life. It is important that the
replacement lters are installed in the correct position with every lter change.
• The ionpia H2must be grounded! In the event of malfunction or breakdown the grounding conductor will prevent risk of
electric shock/spark. The electrical plug must be plugged into an appropriate outlet that is installed and grounded in
compliance with all local codes and ordinances.
• When installing your ionpia H2use only manufacturer provided parts and equipment. Using third-party or after-market
parts can void your valuable warranty.
• Always install on a solid and level surface. Do not move your ionpia H2while in use.
• DO NOT install or use your ionpia H2near open heat sources or open ames such as stoves, ranges, heater vents or
candles.
• The ionpia H2can be used on 110v~240v. Always be sure to use the appropriate factory electrical plug. Always make
sure that the plug is rmly inserted into the outlet. Never try to make any modications to manufacturers original
equipment, and never use a damaged power cord.
• Be sure that the power adapter is placed where it will not come into contact with water.
• Protect your ionpia H2from freezing temperatures and direct sunlight.
• Only operate your ionpia H2with cold water. Hot water will damage your lters.
• If The ionpia H2makes strange or unusual noises or odors, unplug the power cord immediately and contact AlkaViva Technical
Support.
• Unplug The ionpia H2if you plan on not using it for an extended period (2 weeks). Store your lters in a plastic bag in
the refrigerator to prevent bacterial growth. In cases of extended periods of non-use (4+ weeks), lter replacements may
be necessary.
• Do not use your ionpia H2with well water, water with extreme hardness, high sediment or TDS without rst contacting
AlkaViva Technical Support.
• Your ionpia H2is not under warranty for any damages caused by hard water or environmental conditions.
• Only clean the exterior with warm water, detergent and a soft rag or paper towel. Do not use chemical or abrasive
cleaners – they can damage the surface. Do not spray or pour water over your ionpia H2. Never submerge your
ionpia H2.
• Do not close, bend, pinch, press or otherwise obstruct inlet supply lines, or equipment.
Install Method 1: At the sink with a diverter (easiest)
1/4" White Hose to Tap Water Inlet Port Fig. 1
Tools You May Need:
• Standard pliers or channel locks
• A sharp knife or a good pair of kitchen scissors
https://vimeo.com/147759112
Watch video for diverter installation
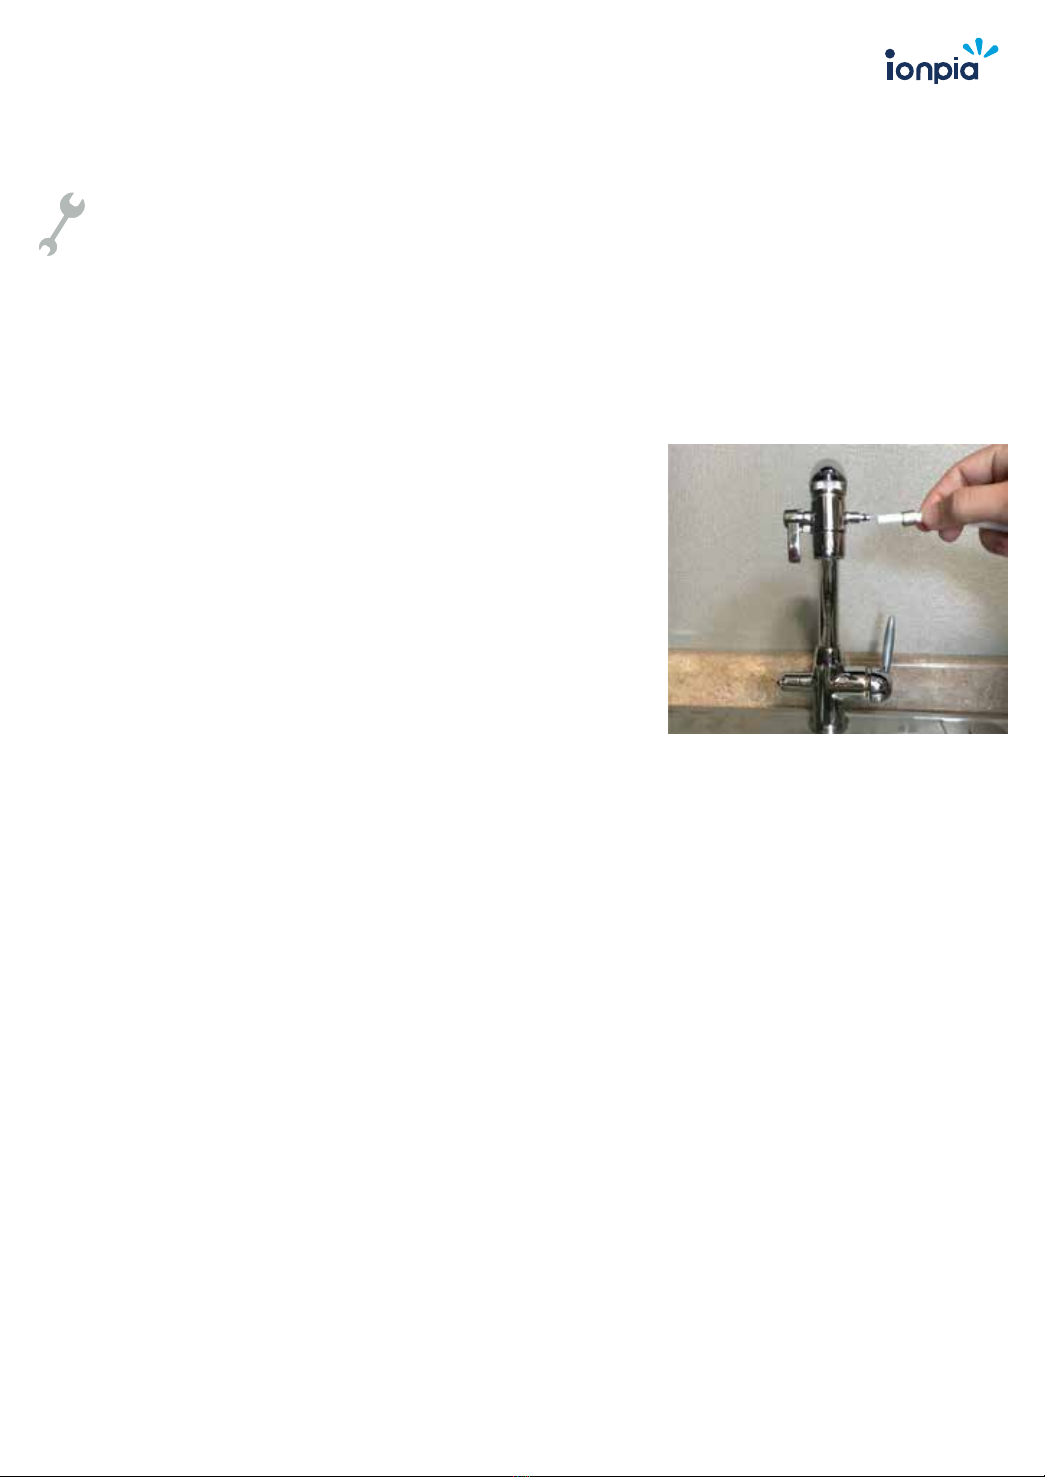
1. Start by removing the aerator from your faucet. (It will
unscrew counter clockwise.)
2. Thread your new water supply diverter valve into the
place where you removed the aerator. If it does not fit,
please use the appropriate size adapter from your
installation kit.
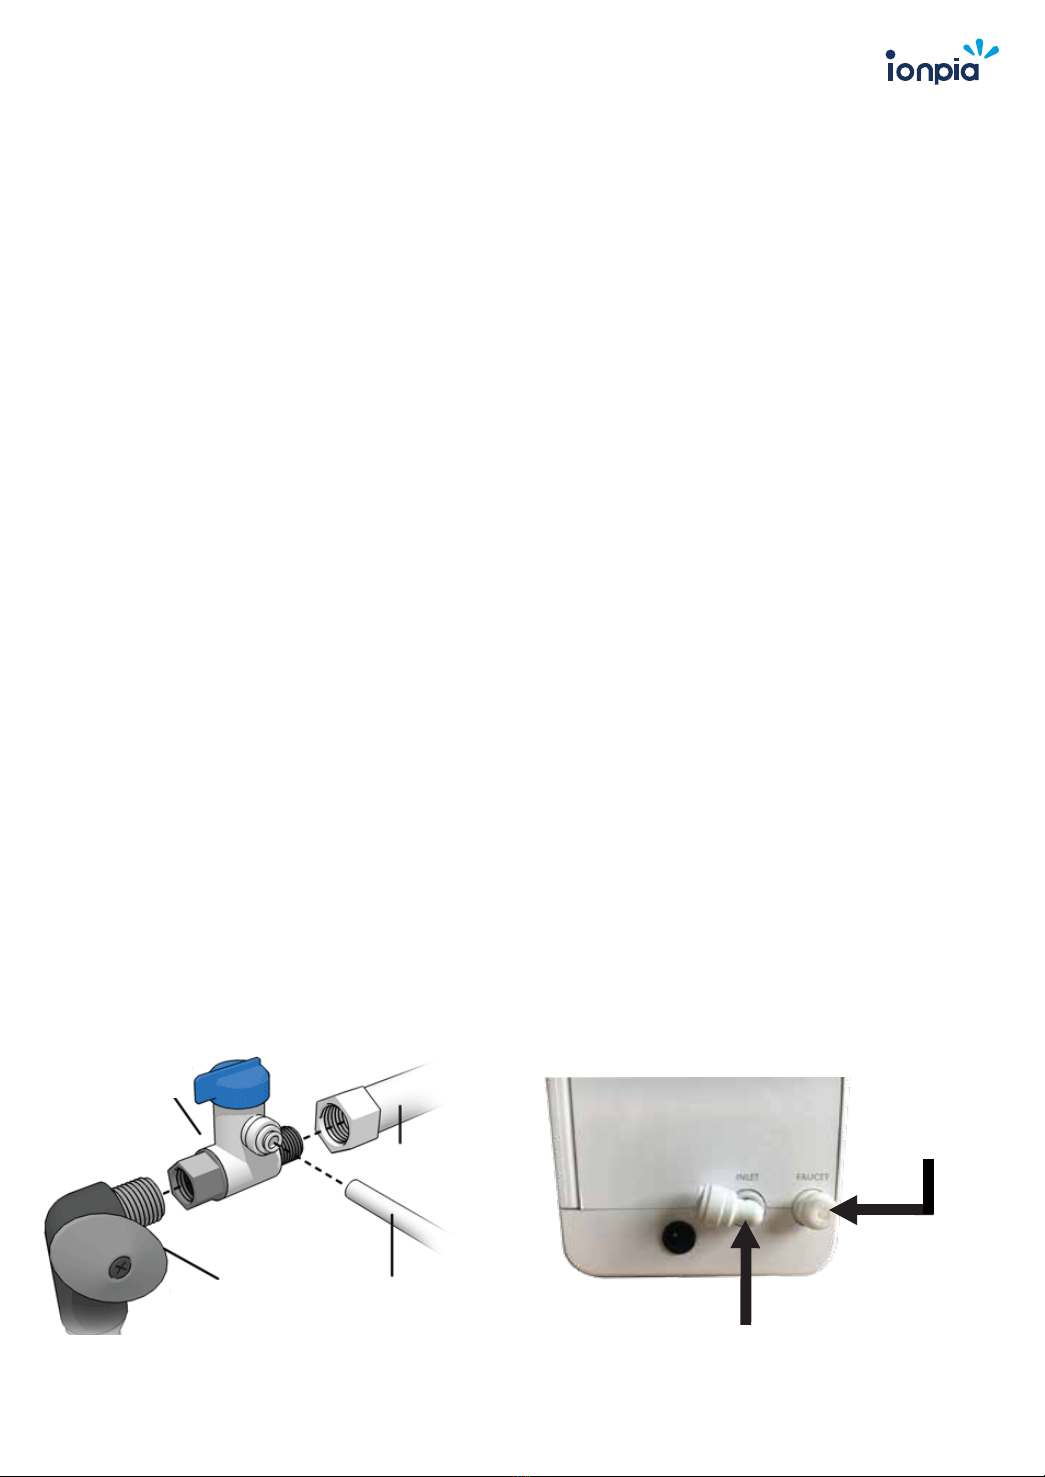
3. Unthread the compression nut from the side of the
diverter to expose the tubing connector for the white 1/4”
tubing.
4. Slide the compression nut down the supply tubing about 2 inches. Be sure the threads face
the tubing connector on the diverter - you will screw the nut back onto the diverter.
5. Push the white 1/4” tubing over the tubing connector. Be sure to push it onto the connector
as far as it will go. This may require a firm push. Failure to seat it all the way may cause a leak.
6. Slide the compression nut back over the supply line to the diverter valve and thread into
place. Ensure the nut is screwed firmly in place, but do not overtighten.
Part 1
Part 2
1. Connect the white 1/4” tubing into the Water Source Inlet on the back of
The ionpia H2. To do this, simply push the white 1/4” tubing into the fitting as far as it will go,
then give it a slight pull. If it is seated properly into the fitting, it will not leak.
NOTE: Use of faucet port is NOT recommended as it will NOT produce Hydrogen-rich water,
only filtered water.
2. Connect the power supply and adapter to The ionpia H2and to the power outlet.
3. Turn the Flow Control knob clockwise or to the right to start the flow of water.
You are now ready to start drinking great tasting, healthy hydrogen-rich water.
Please note that your diverter style may vary, but the installation is the same. Using a pair of
pliers may help to make the installation easier.
HYDROGEN GENERATOR
H2
Page 8
Install Method 2: Direct connect to your water supply
1. Install Angle Stop Adapter (included) to COLD WATER SUPPLY LINE. Locate the cold water line.
Shut off the cold water supply. Unscrew the flexible supply line from the angle stop. Attach the
adapter. (Fits standard 1/2” and 3/8” plumbing.)
2. ATTACH THE WHITE 1/4” TUBING TO THE ANGLE STOP ADAPTER
(Fig. 1) Attach the white 1/4” tubing to the adapter by simply pushing firmly into the white port.
Give a gentle tug to ensure proper connection. It should not come out. You will need a way to
route the white tubing from the adapter to your ionpia H. Most newer sinks have cutouts that
will work for this. If not, drill a 1/4” hole.
3. ATTACH THE WHITE 1/4” TUBING TO YOUR ionpia H2. (Fig. 2) Attach opposite end (free end) of
the 1/4” tubing to the white
Water Source Inlet
port on the back of the ionpia H2. To attach the
white tubing, simply push it firmly into the
Water Source Inlet
port. Give it a gentle tug to ensure
proper connection. It should not come out. To remove tubing, press the collet towards the fitting
and pull the tubing out at the same time.
NOTE: Use of faucet port is NOT recommended as it will NOT produce Hydrogen-rich water,
only filtered water.
4. POSITION YOUR ionpia H2- Ensure it is on a hard and level surface. See installation precautions.
5. CONNECT THE POWER CORD - Use an appropriate grounded outlet.
6. TURN THE COLD WATER SUPPLY ON. Open the valve on the Angle Stop Adapter. The valve is
open when the blue handle on the Angle Stop Adapter is parallel with the 1/4” white tubing.
Check all connections for leaks.
Fig. 1
Angle Stop Adaptor
Fig. 2
Tap Water Inlet Connection
https://vimeo.com/144697017
Watch video for how to direct plumb The ionpia H2
1/4” tubing
going to
The ionpia H
Cold Water
Shut Off Valve
Angel Stop
Valve
To Existing
Faucet
Connect 1/4” tubing coming from Angle
Stop Valve to
Water Source Inlet Port for
Hydrogen-rich Water.
Faucet Port -
Filtered Water Only.
No H Production

HYDROGEN GENERATOR
H2
Page 9
Installing Digital Flow Meter
1. Slide open the battery case cover and put in 2 AAA batteries. Replace the cover.
2. Make sure the water is SHUT OFF. Decide where in your white ¼” tubing you would like to
place the DigiFlow Meter. Using a sharp knife or sharp pair of kitchen scissors, make a straight cut
through the tubing.
3. Push the inlet tubing into the quick connect fittings on each side. Push until they are fully
seated, then give a light pull to be sure that they are seated properly.
Operating the Digital Flow Meter
The DigiFlow 8800T will automatically turn on when water is flowing through and show remaining
filter life capacity. It will automatically shut off 10 seconds after the water flow stops. When no
water is being ran through it you can view the remaining filter life by pressing CHECK/RESET
button.
*The DigiFlow meter counts down, meaning it will show you how many gallons are left, not how
many have been used.
When the meter reaches zero(0), indicating your filters have expired, the DigiFlow meter will start
making a series of short beeping noises and blink zero(0) to notify you that it is time to replace
your filters. To reset the meter press and hold the CHECK/RESET button for 5 seconds until the
capacity is reset to 700 gallons. When the battery gets low the meter will beep as though the
filter is expired, however it will not show zero(0) and a picture of a battery will show in the corner
of the screen.

HYDROGEN GENERATOR
H2
Page 10
4Operation
5Replacing your lters
Replacing your filters in a timely manner as recommended by the manufacturer is very important
for optimum hydrogen production as well as producing the healthiest, contaminant-free water.
• DO NOT disconnect any of the fittings or plumbing inside of The ionpia H
2
.
This is not
necessary and will void your valuable warranty.
• Be sure to change the filters one at a time as they need to be installed in the correct
position.
The filters ARE NOT INTERCHANGEABLE.
1. Turn off source water either at your tap or at the Angle Stop Adapter.
2. Place a container under the water dispenser and turn flow control knob to the right to start
the flow of water and remove any residual water inside your ionpia H.
3. Open Filter Cover.
Note: If your ionpia H is connected directly to your cold water
line, skip step 1 and start at step 2.
1. Turn your tap water onto cold, then turn the lever on your
diverter valve. This will divert the water from the tap to The ionpia
H2. At this point, check all connections for leaks,
tighten or re-seat if needed. If the diverter is leaking at the
faucet, use Teflon tape.
2. Place your glass under The ionpia H2water outlet and turn the
flow control knob to the right to start water flow.
3. It is important to flush the filters before you start drinking the
water, after initial installation or filter replacement.
Do this by running water through the unit for several
minutes (or just until it is clear) and discard the water.
* Some discoloration can be expected but may not always be
present when flushing the filters.
HYDROGEN GENERATOR
H2
Page 11
Replacing your lters
• DO NOT disconnect any of the fittings or plumbing inside of The ionpia H
2
.
This is not
necessary and will void your valuable warranty.
• Be sure to change the filters one at a time as they need to be installed in the correct
position.
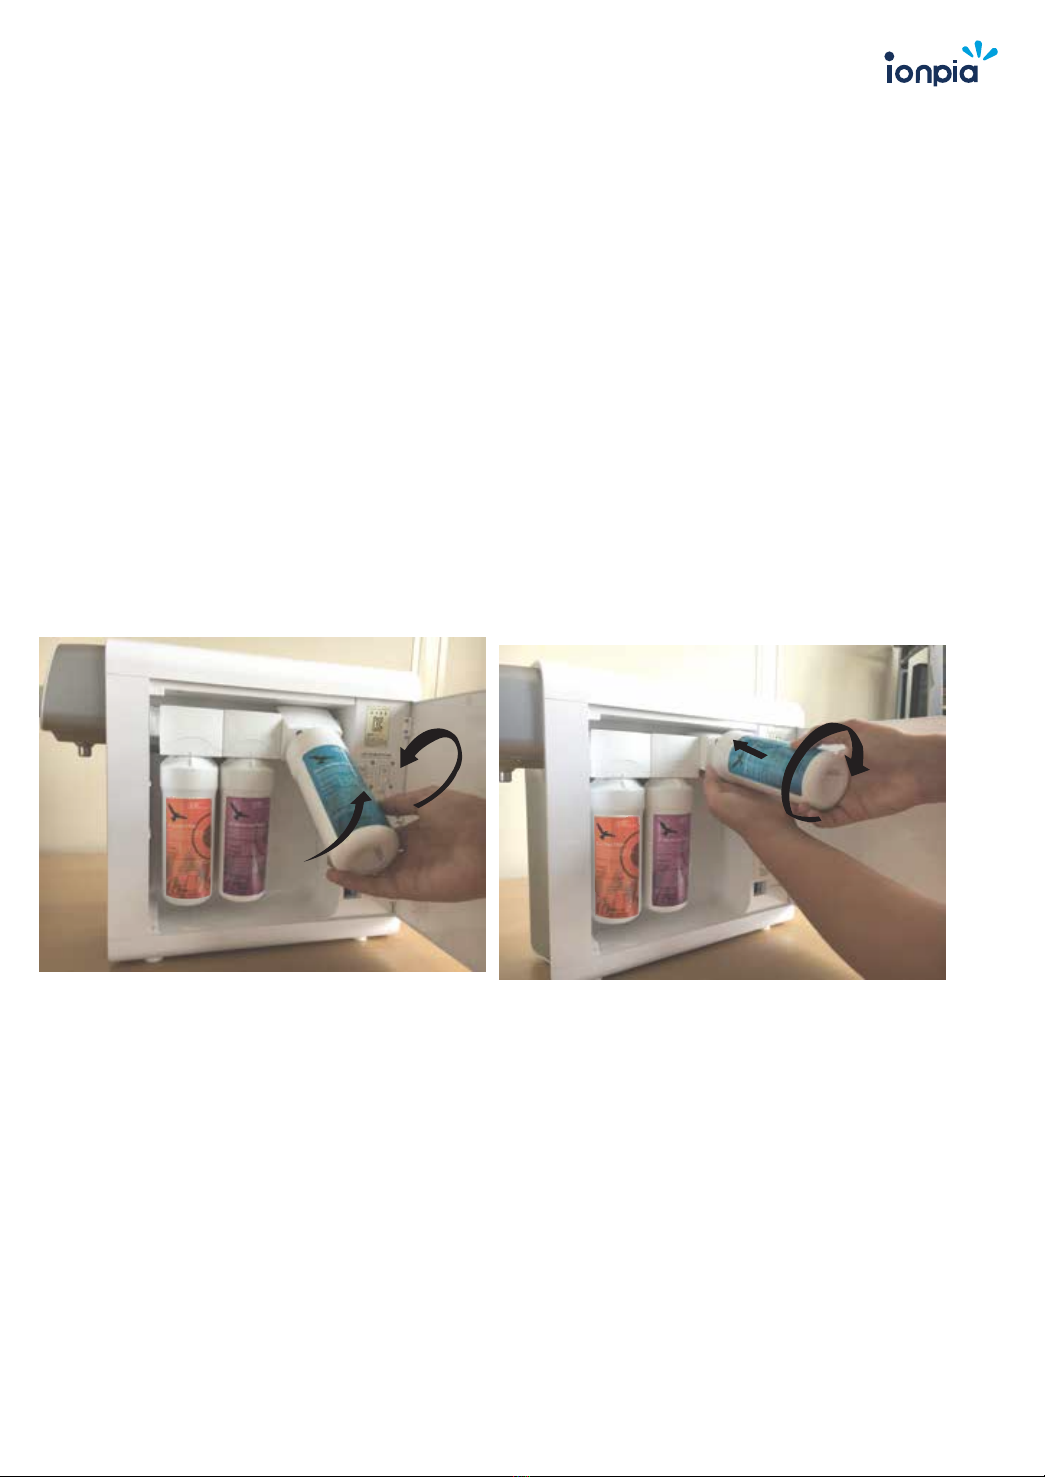
4. Swing the filter outwards at a 90-degree angle and turn counter clockwise a quarter
turn to release. Then remove by pulling straight out of the filter saddle. See Figure 1.
5. Hold the new filter at a 90-degree angle and place into the filter saddle by aligning the
grooves. Press it in and turn clockwise a quarter turn to lock it into place. See Figure 2.
6. After installing your new filters, close the Filter Cover.
7. Turn on source water to the ionpia using either the diverter or the Cold Water Supply.
8. It is important to flush the filters before you start drinking the water. Do this by running
water through the unit for several minutes (or until clear) and discard the water.
Fig. 1
Removing Filter
Fig. 2
Installing Filter

HYDROGEN GENERATOR
H2
Page 12
Product Size and Specications
Model Name:
Product Name:
Power:
Power Consumption:
Operation Method
Usage
Water Pressure Allowance
Water Temperature
External Dimension
Weight
Filter Rating
The ionpia H
2
Neutral-Water Hydrogen Generator
100-240V, DC12V (50/60Hz)
65W
Mechanical
Household drinking water
29 psi - 58 psi
40°F - 80°F DO NOT USE HOT WATER
5”(W) x 17.5”(D) x 13.5”(H)
9.75 lbs
Rated at 700 gallons or 1 year, whichever comes first.
5” 17.5”
13.5”
6

Hydrogen Enhanced Living
Revision Version Date: 7.24.2017
Dealer Information
Other AlkaViva Water Filtration System manuals


Popular Water Filtration System manuals by other brands


Kinetico
Kinetico PRO CP 213f OD Carbon owner's manual

Berkey Filters
Berkey Filters Berkey Water Filter user manual

Emco Tech
Emco Tech Delphi owner's manual

Fass
Fass Titanium Series installation manual

Clean Water Systems
Clean Water Systems Pro-OX 5700-E Installation & start?up guide

hurlcon
hurlcon Filtrite CF50 Installation and operating instructions

Hydro International
Hydro International Up-Flo Operation and maintenance manual

Sicce
Sicce Tidal 55 owner's manual

Intex
Intex CS3110 owner's manual

Sun Water Systems
Sun Water Systems Aquasana RHINO EQ-300 quick start guide

FSI
FSI PASS-1600ISO Operation and maintenance manual

ACO
ACO LipuJet-P Instructions for use