All Pond Solutions 800-HO+ User manual

To ensure your new hang on filter is set up and running correctly, and to prevent
any accidental damage or injury, please read and follow the below instructions
carefully before using your product.
SAFETY
Important! Disconnect the mains electricity supply before attempting any
installation / maintenance of any kind. Do not attempt to modify this unit in
any way and only use the recommended parts for replacement.
· The hang on filter should never be run dry as this will cause the unit to
overheat and cause permanent damage.
· All connections must be earthed.
· The power cord of this appliance cannot be replaced; if the cord is
damaged, the appliance should be discarded. Never cut the cord.
· Do not connect to any voltage other than that stated.
· This filter is suitable for indoor household aquariums only (do not use in
exterior locations, swimming pools, ponds, bathrooms etc). Do not place in
liquids other than water.
· Do not use with water above 90F or 30C.
· Do not carry or pull the unit by its electrical cable.
· Do not use this unit if it has a damaged cord or plug, if it is malfunctioning
or it is dropped or damaged in any manner
· Do not yank cord to pull plug from outlet. Grasp the plug and pull to
disconnect. Always unplug an appliance from an outlet when not in use.
· Do not attempt to modify this unit in any way and only use the
recommended parts for replacement.
· Before installing, maintaining or handling your equipment, or before placing
your hands in your aquarium, ensure that the unit is disconnected from the
electricity supply.
· Always unplug any electrical devices when not in use.
· Carefully examine your filter after installation. Do not plug in the unit to the
mains if there is water on any parts not intended to be wet.
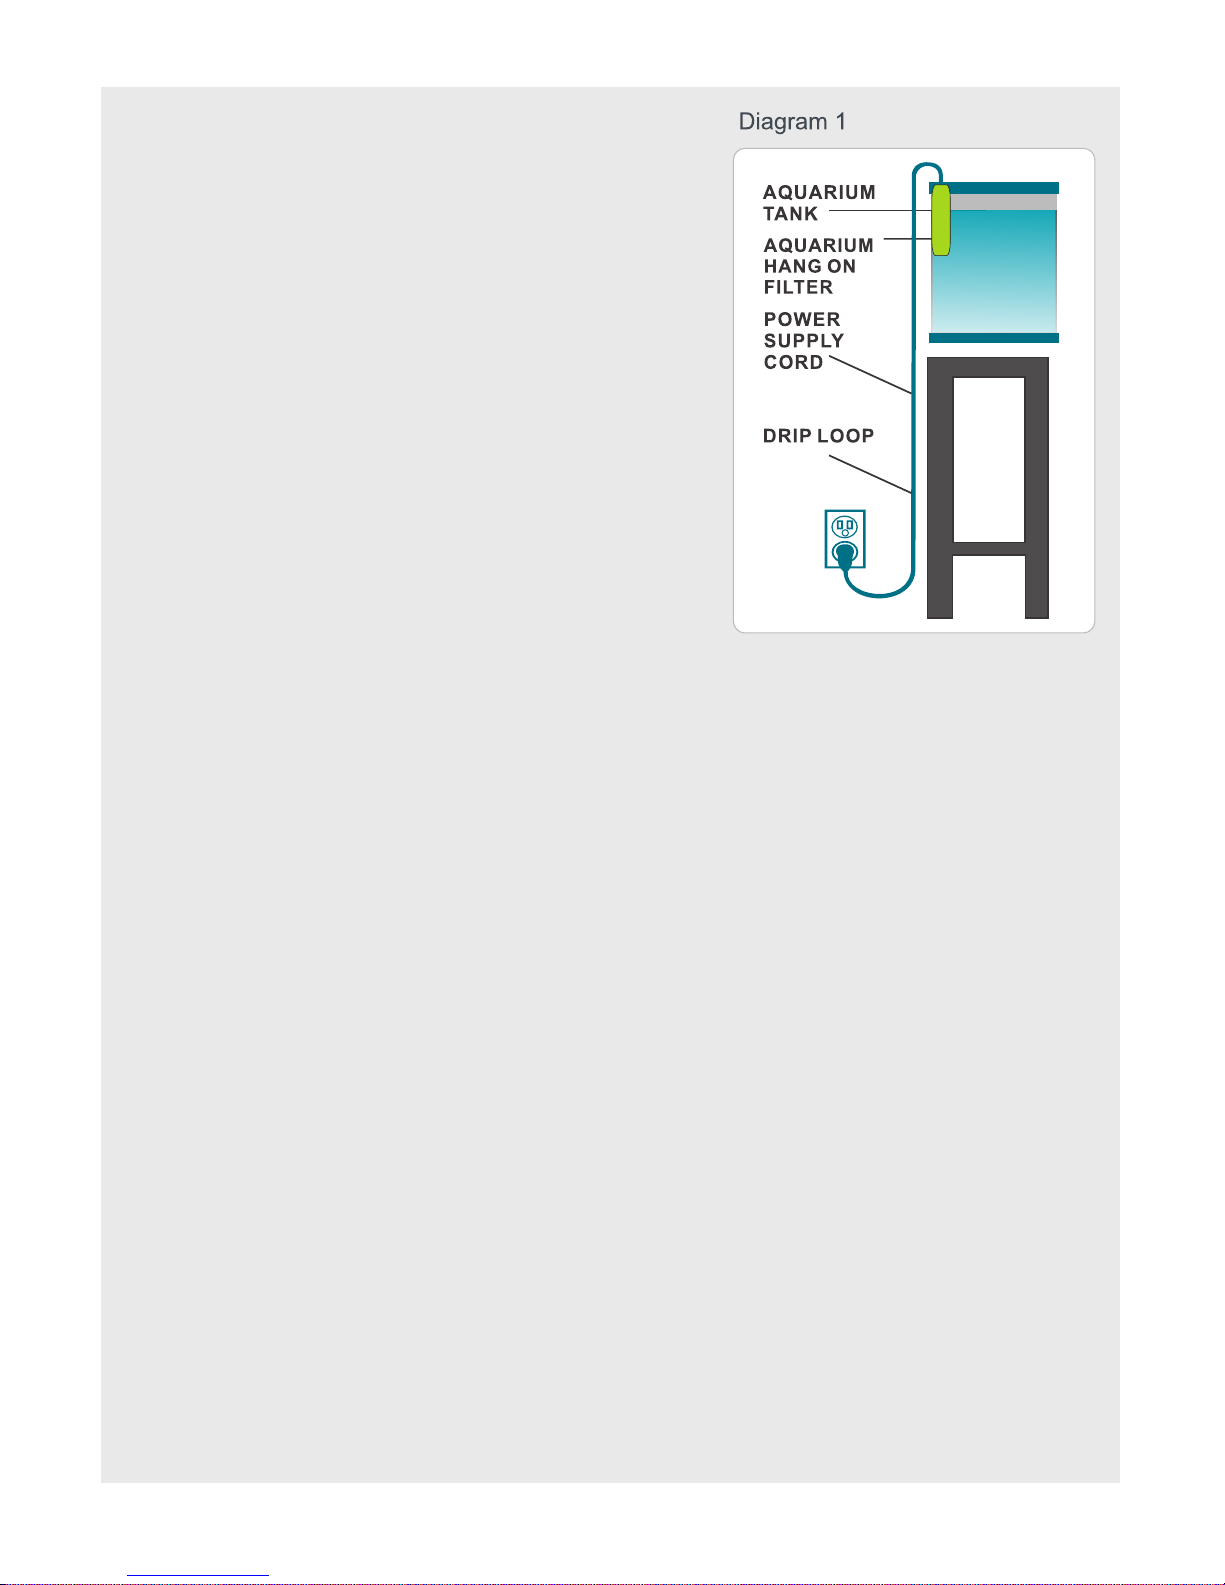
· The power cable must have a drop loop to
avoid any condensation build up reaching
the mains (see diagram 1). If the plug does
get wet, DO NOT unplug the cord.
Disconnect the fuse or circuit breaker that
supplies power to the appliance. Then
unplug and examine for presence of water in
receptacle.
· When positioning your hang on filter, make
sure the unit is securely attached to the tank
before switching it on.
· If the plug or unit does get wet, DON'T
unplug the cord. First, disconnect the circuit
breaker or fuse that supplies power to the
appliance. Next, unplug and inspect for
water presence in the receptacle.
· Carefully examine your filter after installation. Do not plug in the unit to the
mains if there is water on any parts not intended to be wet.
· If the unit shows any signs of water leakage, disconnect the power supply
cord from the wall socket and consult All Pond Solutions or the retailer you
purchased this unit from for further advice.
· If the plug or unit does get wet, DON'T unplug the cord. First, disconnect
the circuit breaker or fuse that supplies power to the appliance. Next,
unplug and inspect for water presence in the receptacle.
· To avoid injury, do not touch hot or moving parts such as, but not limited to,
heaters, reflectors, UV bulbs or impellers.
Please note – this appliance can be used by children aged from 8 years and
above and persons with reduced physical, sensory or mental capabilities or lack
of experience and knowledge, provided they are given supervision and
instruction concerning use of the appliance and understand the hazards
involved. Children must not play with the appliance. Any maintenance must not
be made by children without supervision.

ELECTRIC
This unit comes complete with a generous supply of 3 core cable, however
should any additional cable be required, the use of an approved waterproof
cable connector with a proper rating is essential. A cord rated for less amperes
or watts than the appliance rating may overheat.
Please Ensure:
· The power supply must be earthed and fused at 3amps.
· You regularly inspect the cable for damage and deterioration.
· Do not connect to any voltage other than that stated.
· You consult a qualified electrician if in doubt about any aspects of
wiring.
Important: The power supply must be earthed and fused at 3amps. Regularly
inspect the cable for damage and deterioration. Consult a qualified electrician if
in doubt about any aspects of wiring.
INSTALLATION & USE
Please read the below instructions carefully before beginning to set up your
filter. DO NOT CONNECT THE UNIT TO THE MAINS UNTIL SET UP IS
COMPLETE AND UNIT IS FILLED WITH WATER.
Important installation information:
· When installing your filter, the minimum water level in the tank should be
no more than 6 cm (2.25 inches) below the aquarium rim.
· The inlet pipe should NOT be positioned too close to an air stone, aeration
device or the output valve to avoid reducing the effectiveness of the filter.
Firstly, unpack the unit and identify all parts using the parts diagram in this
instruction manual.

Remove the filter from the box. Wash the floss filter pad and filter foam with
water from your tank. Important - do not use mains water or any cleaning
products to clean your filter media.
Additional filter media to add into the media baskets not included.
Insert the telescopic pipe and inlet tube into the filter body. Ensure that all
connections are clicked into place as far as they will go. (image 1, 2)
Position the filter in your aquarium, ensuring that the water level is high
enough to submerge all inlet points and piping connections. Ensure that the
surface skimmer is positioned below the water level, allowing it to collect
surface debris and avoid air intake into the unit. (image 3)
Place the floss filter pad, filter foam and your filter media baskets into your
media holder and insert into the filter body. (image 4)
Adjust the balance plate so that your filter is level in your aquarium, sitting in
a vertical position. (image 5)
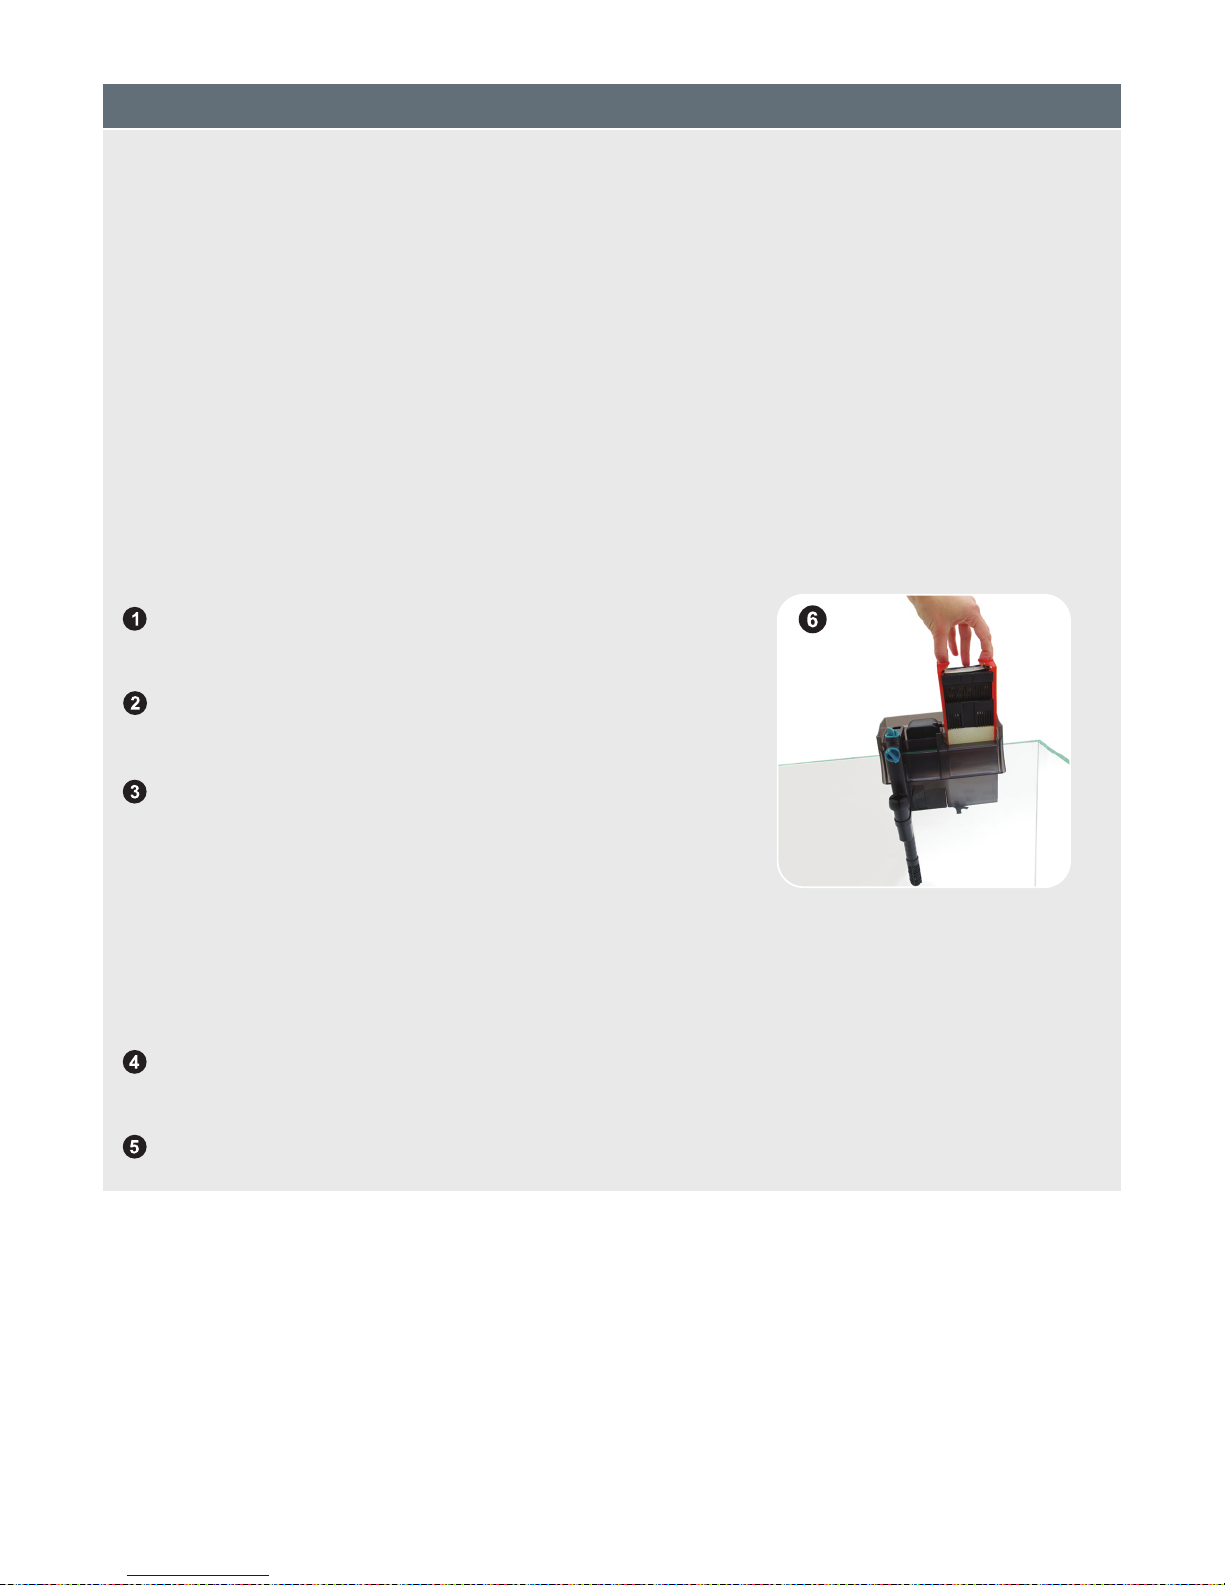
Fill the filter body with tank water to allow the unit to prime efficiently. To
avoid priming problems, ensure water level is high enough to submerge ALL
inlet points and piping connections. Switch on the unit. (image 6)
Rotate the top flow rate adjuster to increase or decrease the water intake
from the filter body. For the initial start-up and to prime the filter more
quickly, rotate the flow rate adjuster to maximum. Once priming has been
completed, you can re-adjust the water flow rate to your desired output
level. (image 7)
Rotate the side flow rate adjuster to increase or decrease the water intake
from the surface skimmer. (image 8)
Switch on the UV steriliser at the back of the filter body. (image 9)
Once switched on, the UV indicator light on the top of the filter body will be
lit. (image 10)
Once operating, the water will enter the unit via the inlet tube until the
system is fully primed and exit via the waterfall outlet. (image 11)
6
7
8
9
10

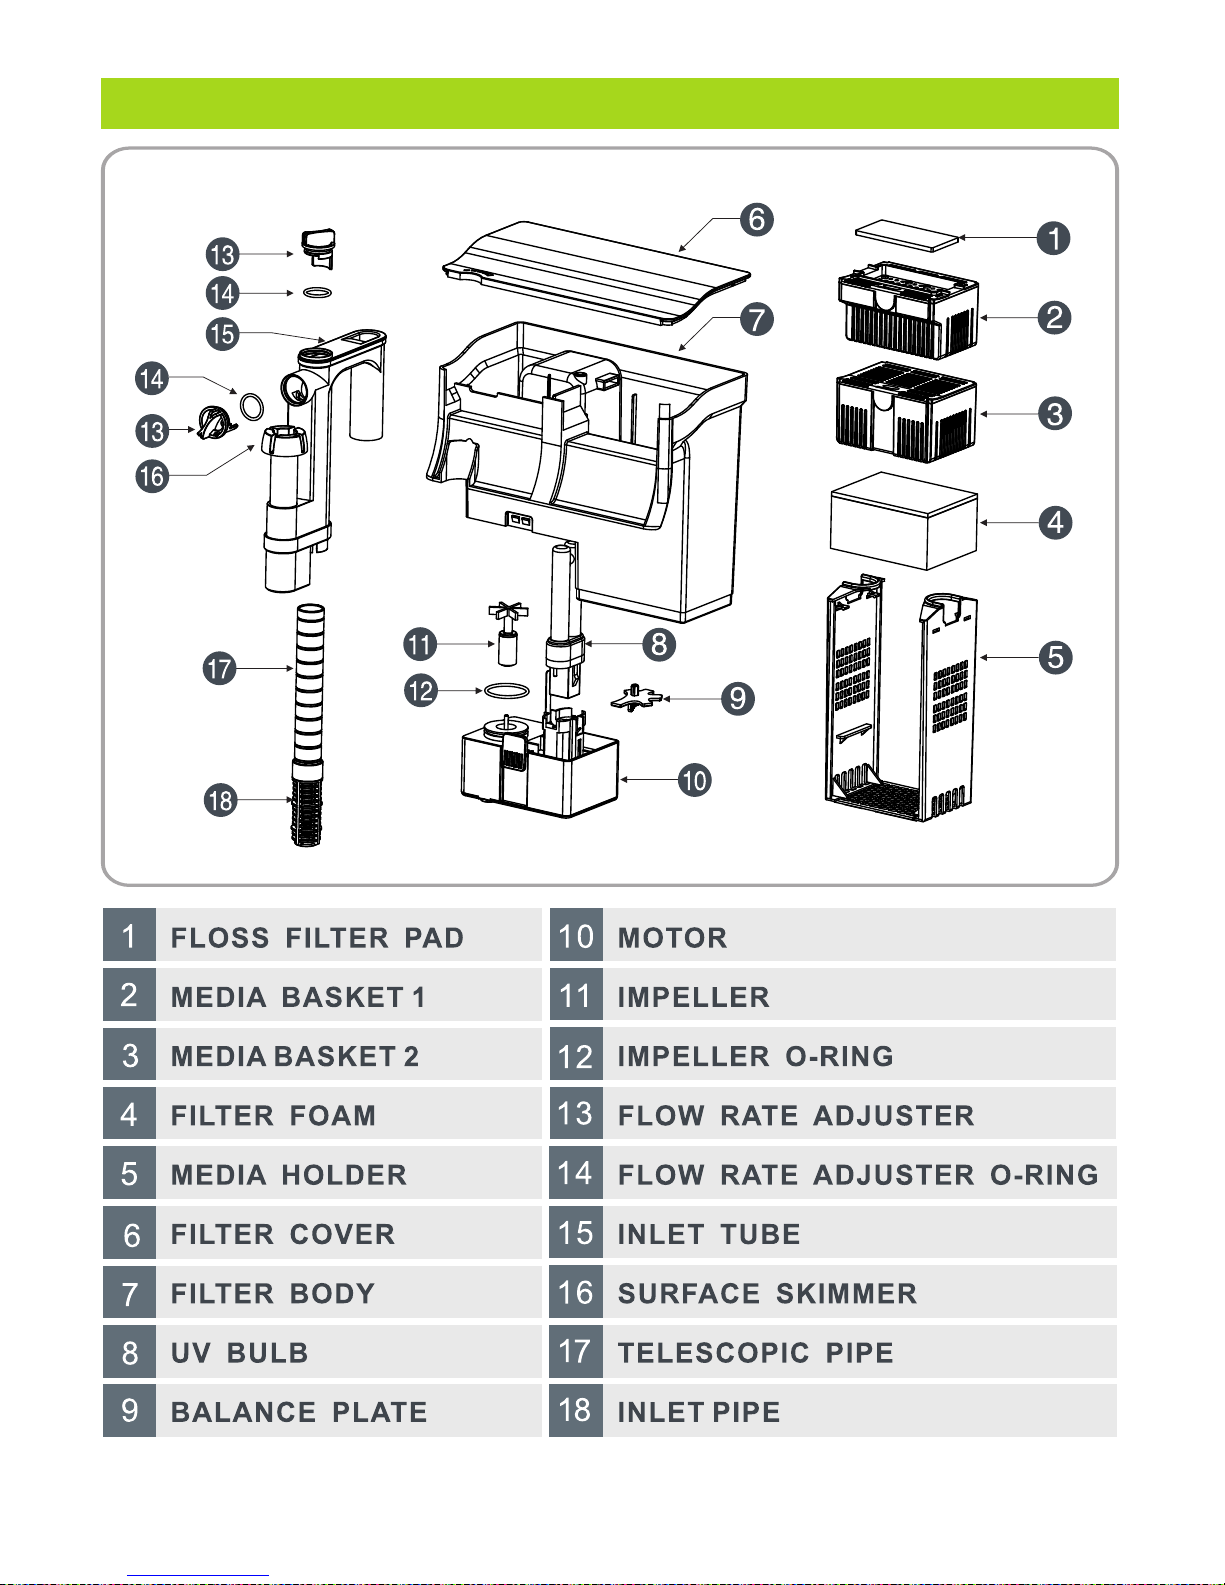
PARTS DIAGRAM

MAINTENANCE
To ensure optimal performance and that your unit functions correctly, regular
maintenance is essential. Failure to do so may result in damage to your unit and
may invalidate your warranty.
We recommend that a regular cleaning and maintenance schedule is followed to
ensure responsible fishkeeping. Depending on water volume and stocking levels,
regular cleaning of the filter media, foams, impeller, inlet/outlet pipework during a
10-25% water change will help ensure that the product works efficiently and the
aquarium remains healthy.
For further maintenance guidance, please see the table and additional information
below:
1 MONTH
3 MONTHS
6 MONTHS
ANNUALLY
Impeller
Clean & Inspect
Replace
Ceramic Shaft
Clean & Inspect
Replace
All Pipework
Clean & Inspect
Green Hose
Clean & Inspect
Priming Button
Lubricate &
Clean
O-Rings
Clean & Inspect
Lubricate &
Clean
Replace
Filter Foams &
Other Media
Clean & Inspect
Replace
UV Bulb
Replace
Quartz Sleeve
Clean & Inspect
Replace after 2
years
It is vital that o-rings are regularly inspected and replaced as the rubber
watertight seal will perish over time, which may cause your canister to leak.
Before replacing your o-rings, ensure they are well lubricated.
O-rings

A clogged impeller is often the primary cause of all filter faults, so it is extremely
important to clean and inspect your impeller every month to ensure it is
functioning correctly and remove any debris. Keeping the impeller clean will
improve the performance of your filter and lengthen the life of the motor. The
impeller itself is a perishable part and will be subject to wear and tear overtime.
As a result, it is also very important to replace your impeller and ceramic shaft
annually.
Switch off your filter at the mains and unplug the unit. Pour out water from
inside the HO+ filter.
Remove your HO+ filter from your aquarium.
Detach the motor from the filter unit by gently squeezing both pressure
points on either side of the motor, pulling the motor downwards at the same
time . (image 1).
Lay the motor on a flat surface with bulb facing upwards. (image 2)
To clean the impeller, remove the base of the motor and clear any debris or
residue. The impeller ‘fan’ piece should rotate half way and stop. If it can
rotate completely 360 degrees then the impeller is damaged and will need
replacing. (image 3)
Reattach the motor to the filter unit, taking care to guide the metal pin back
into the hole for the UV bulb. You should hear the motor click into place.
(image 4)
Return your filter into your aquarium and switch back on.
Note: Handle the ceramic shaft with care as this can break very easily during
the cleaning process.
Impeller and Shaft
Filter Maintenance
In general, it is recommended to disconnect your filter and clean the pipes,
impeller and filter media monthly. Pipework will become blocked with waste
and protein slime over time, so regular cleaning is using a filter stem brush
important for optimal performance.
The frequency of how often you will need to clean and inspect your unit of
course will depend on a lot of factors like how dirty the water is when you first
start using your filter, the volume of your water and also how many fish you have.
How often you feed your fish and how long your lighting is on for will also affect
how quickly your aquarium water gets dirty and will need to be taken into
consideration when planning how often to clean your filter.
To clean the outside of the filter, you can periodically wipe with a damp cloth
(use a cloth dampened with water from your aquarium, never use any chemical
products or detergents). Lemon juice can also be used to removing any
limescale build-up. Rinse thoroughly afterwards to remove any acidic residue.
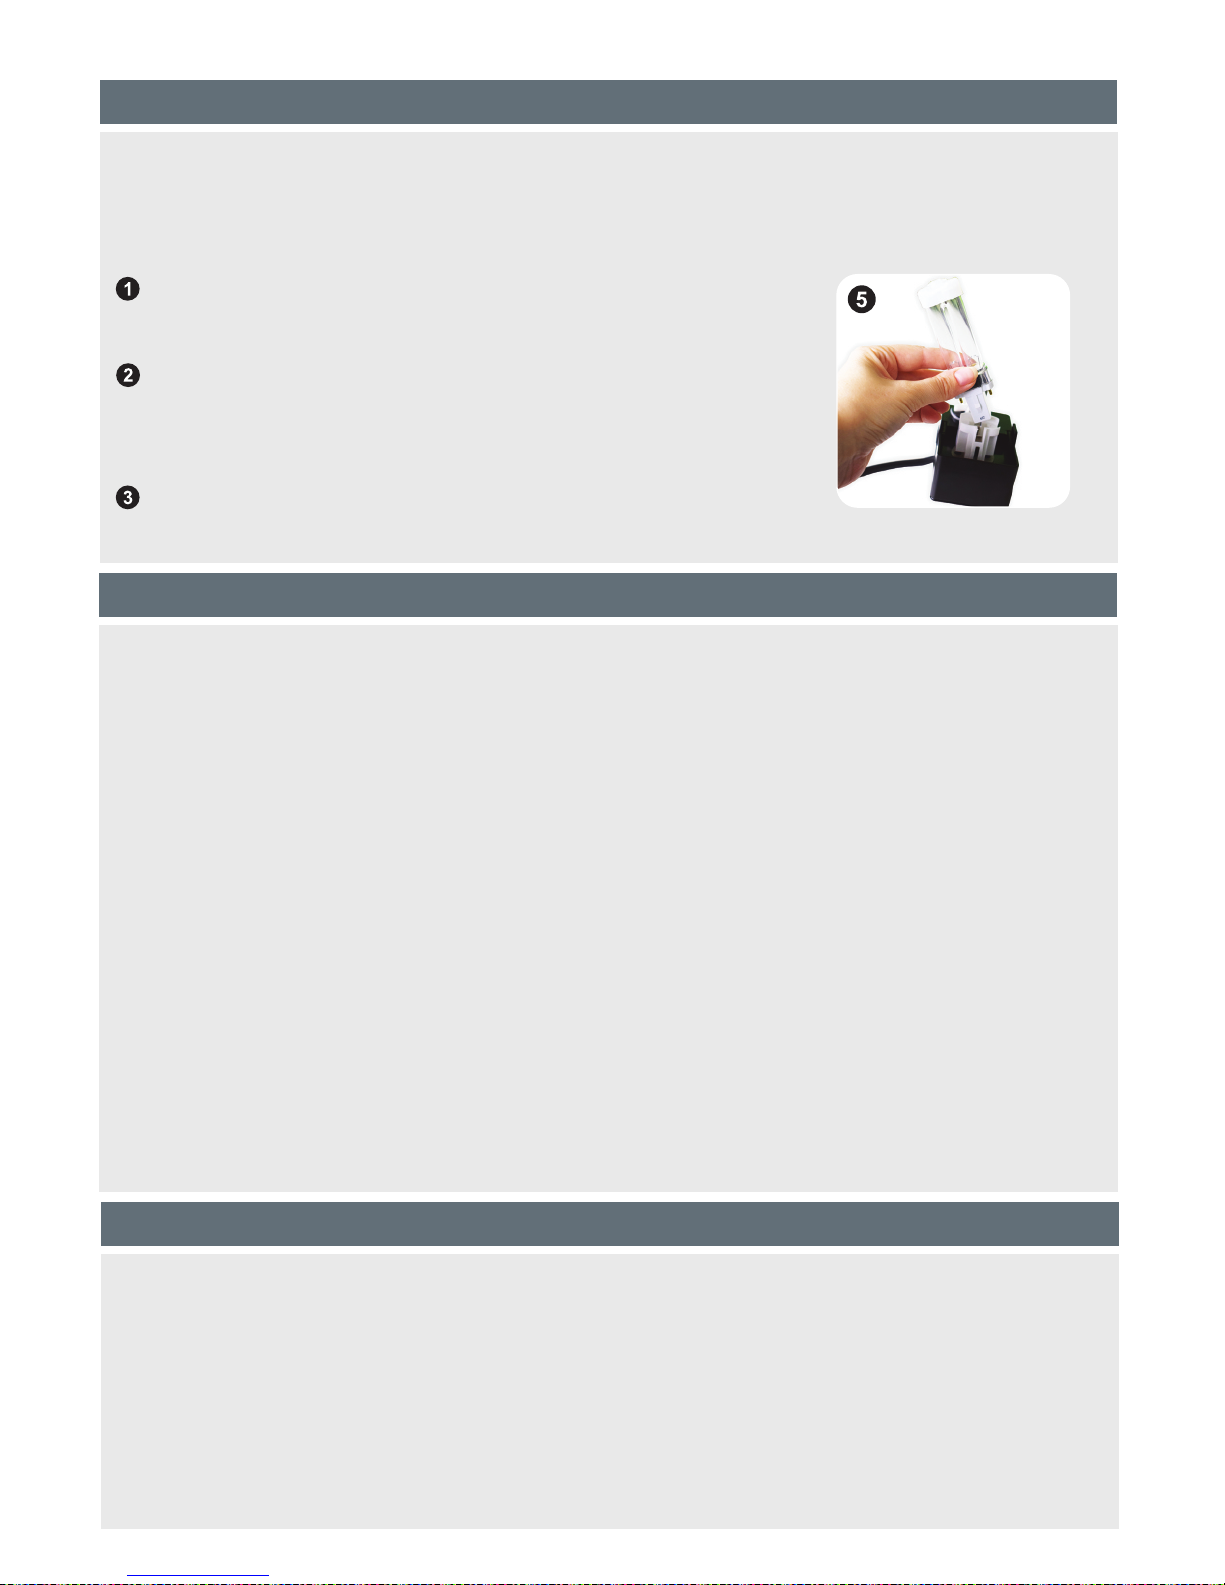
Maintaining & Replacing the UV Bulb
Important! Never look directly at the UV light - the filter’s safety switch will
turn the bulb off when you remove the motor, but alway unplug your filter
before removing it as a precaution.
Follow steps 1-4 from Impeller and Shaft maintenance
section.
To remove the UV bulb, hold the base of the bulb and
firmly pull upwards to remove from the socket.
(image 5)
Add your replacement bulb and follow step 6 and 7 of
Impeller and Shaft maintenance section.
Sometimes delicate fish and plants require a gentler water flow. The filter's
flow rate adjuster allows you to slow the flow of water whilst maintaining
filtration efficiency. When the flow rate is decreased, up to 50% of water within
the filter chamber is re-filtered several times, purifying the water further and
creating a clean and clear aquarium.
It is also recommended to reduce the water flow rate during feeding. This
results in greater food consumption and less waste.
Flow Rate Adjuster
Filter Media
Important! Always use water from your fish tank to clean your filter media.
When cleaning mechanical or biological media, NEVER rinse with tap water or
use any soap or detergent, only your aquarium water. The best time to rinse your
filter media h is when doing a 10 / 20% water change as you can use this water
to wash the media through.
When replacing media in your filter, do not replace more than 50% of your
media at once. This is to ensure that the nitrifying bacteria present in the old
media are able to repopulate in the newly added filter media.
Important - Always use water from your fish tank to clean your filter media - do
not use mains water or any cleaning products to clean your media.
Switch off your filter at the mains and unplug the
unit. Pour out water from inside the HO+ filter.
Lift the filter cover and remove the red media
holder from the filter. (image 6)
Wash the floss filter pad, filter foam and any
additional basket media with water from your
tank in a bowl. Gently squeeze the floss filter
pad and filter foam to remoce any build up - this
will not remove all of the beneficial bacteria that is on the sponge, which is
what is protecting your fish from ammonia in the water, so you can wash the
sponge until the water moving through it runs clear.
Replace your media into the holder and return it into your filter. Put the filter
cover back onto the top of your filter.
Switch your filter back on.

The Water in my Aquarium is Dirty
TROUBLESHOOTING
Causes:
ŸThe beneficial bacteria have not yet established in your new filter.
ŸYour filter is not the correct size for your aquarium set up.
ŸYou have too many fish for your size filter.
ŸYour filter media may be dirty.
Solutions:
ŸYour fish tank can take up to 3 weeks to successfully cycle. You may also
want to add a bacteria start treatment to your tank to speed up this process.
ŸYou may need to upgrade to a larger filter.
ŸFor reference, you should allow 1 gallon of water per 1 inch of fish in your
aquarium.
ŸFollow the instructions in the Filter Media Maintenance section above.
ŸIf you have not yet done so, you may also need to carry out more regular
water changes in your tank.
My UV Light is not on
Causes:
ŸYour filter UV has not been switched on.
ŸThe UV bulb may be burnt out.
ŸYour UV steriliser switch may be set to the off position.
Solutions:
ŸCheck your filter is plugged into the mains and is switched on.
ŸReplace your 5w UB bulb (see maintenance section above).
ŸCheck that the UV steriliser switch at the back of the filter is set to ON.
No Water is Coming Out of my Filter
Causes:
ŸThe impeller is blocked - please refer to the impeller maintenance section
above.
ŸThere is no water in the filter body.
ŸThe filter is not switched on.
ŸThe inlet pipe is clogged.

Solutions:
ŸUse a small jug and scoop some water from the surface of your tank and
pour into the filter body.
ŸCheck your filter is plugged into the mains and is switched on.
ŸRemove the filter from your tank and clean the inlet pipe.
If none of the troubleshooting advice above resolves your issue, or you
required spare parts for your HO+, please contact the supplier of your HO+
system.
WARRANTY
The All Pond Solutions hang on filter range is guaranteed against defects in
material or workmanship under normal aquarium usage and comes with 12
months warranty for all electrical parts. The warranty period commences from
the date of purchase.
If you require support on how to use your unit, replacement parts or if your filter
develops a fault during the warranty period, please contact the supplier of your
unit.
Non-replaceable, non-perishable and non-serviceable parts will be repaired or
replaced free of charge, once the unit is returned with all components along
with a valid proof of purchase and postage paid. We reserve the right to replace
or repair the unit at our discretion.
Please be aware that perishable parts that are subject to normal wear and tear,
such as impellers, impeller covers, motor seals and UV bulbs, are not covered
by your warranty and a charge may be required for replacements of these.
This warranty does not apply to any unit that has been subjected to misuse,
accidental damage, negligence, tampering or customisation. It does not apply
to units which have been assembled incorrectly, improperly maintained, or
where the instructions and safety information in this manual has not been
followed correctly.
No liability is assumed with respect to loss or damage to livestock or personal
property irrespective of the cause thereof.
Please ensure that only genuine All Pond Solutions components are used when
completing a replacement or repair. Spare parts are available at our official
website or from your local supplier.
Before returning your unit under warranty terms, check that all setup and
maintenance instructions have been correctly followed. If you are in doubt,
please contact your local aquatic retailer for further advice before returning the
product.
This does not affect your statutory rights.
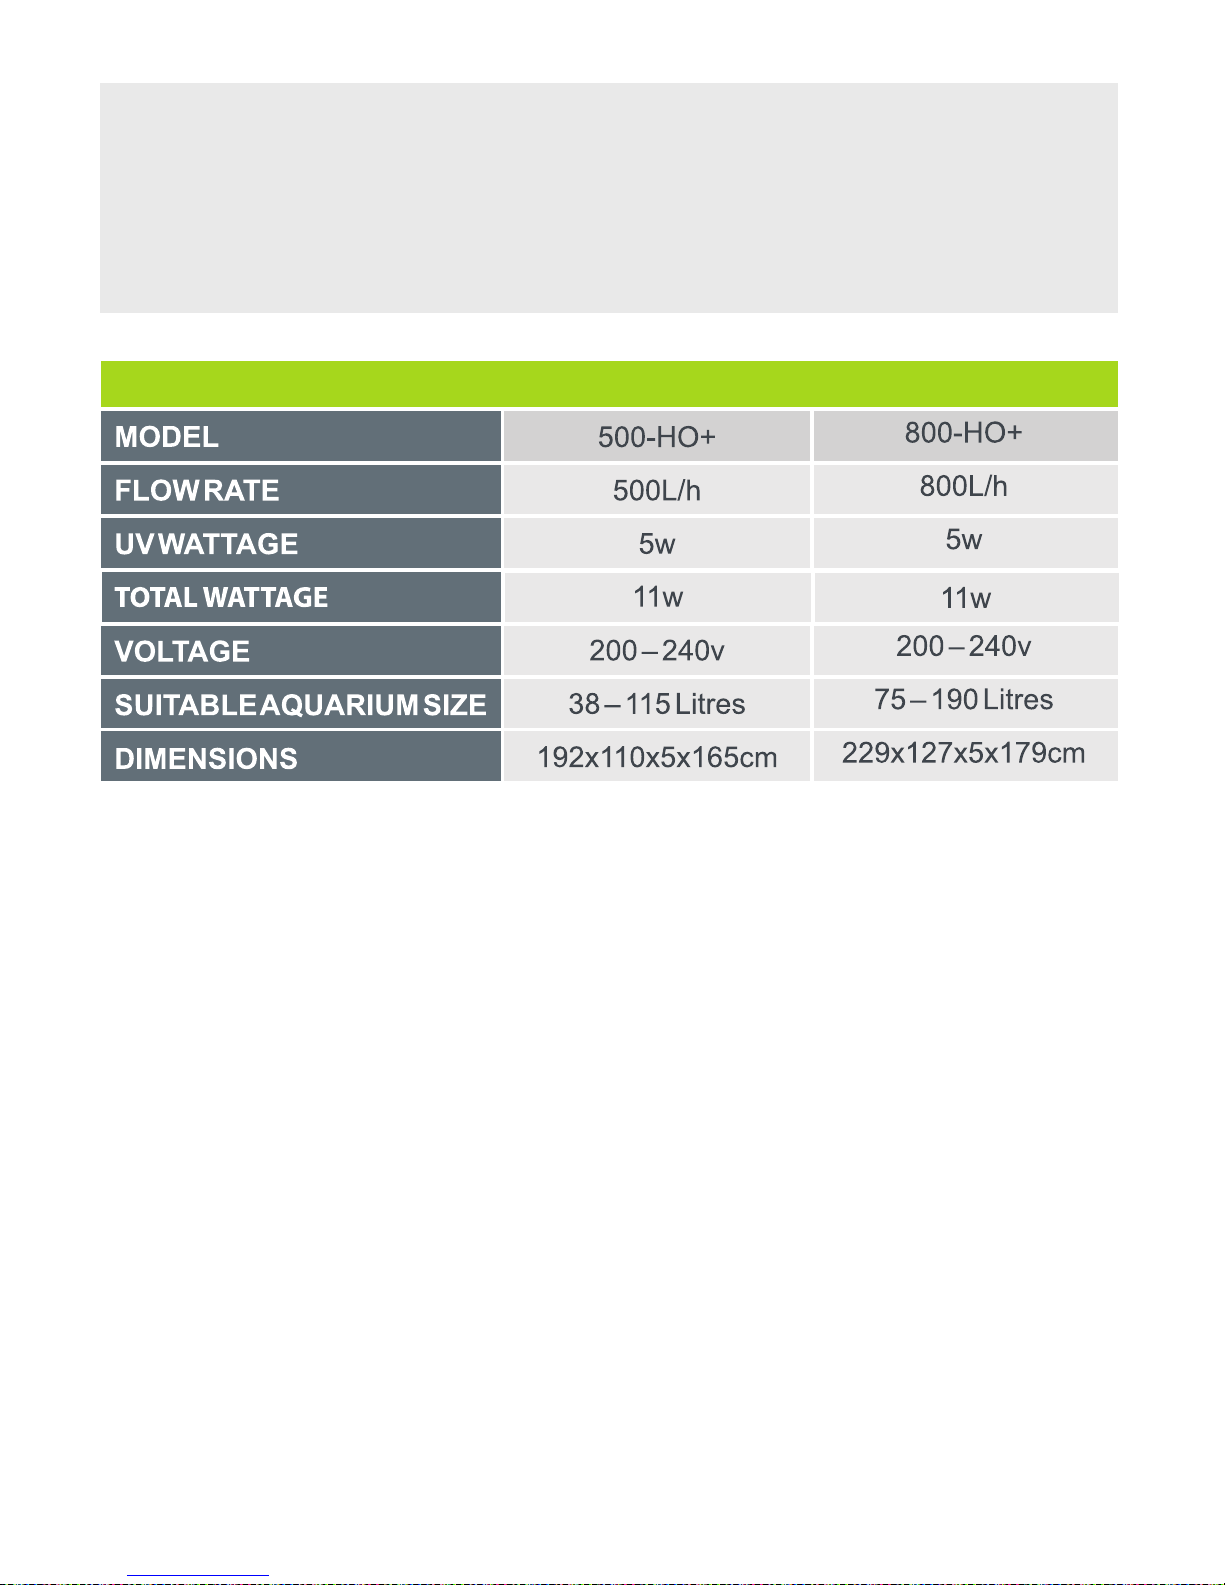
SPECIFICATIONS

This manual suits for next models
1
Table of contents
Other All Pond Solutions Water Filtration System manuals

All Pond Solutions
All Pond Solutions CUP-7000 User manual

All Pond Solutions
All Pond Solutions 1000EF User manual

All Pond Solutions
All Pond Solutions PFC-5000 User manual

All Pond Solutions
All Pond Solutions CUP-305 User manual

All Pond Solutions
All Pond Solutions 700IF+ User manual

All Pond Solutions
All Pond Solutions 1400EF User manual

All Pond Solutions
All Pond Solutions PF-8000 User manual

All Pond Solutions
All Pond Solutions CUP-311 User manual

All Pond Solutions
All Pond Solutions 200IF User manual

All Pond Solutions
All Pond Solutions CUP-311 User manual


