Alpine KTX-100EQ - IMPRINT Sound Tuning User manual

KTX-100EQ
/I\UDYSSEY]
MULTEQ
XT
ALPINE ELECTRONICS FRANCE S.A.R.L.
(RCS PONTOISE B
338101280)
98, Rue de la Belle Etoile,
Z.1.
Paris Nord
II,
B.P.
50016, 95945 Roissy Charles
de
Gaulle Cedex, France
Phone 01-48638989 I
I
I
I
I
I
I
ALPINE
ITALIA S.p,A,
Viale
C.
Colombo
8,
20090 Trezzano
Sui Naviglio (MI), Italy
Phone 02-484781
ALPINE
ELECTRONICS (BENELUX)
GmbH
Leuvensesteenweg 510·B6,
1930 Zaventem, Belgium
Phone 02-725-13 15
J%JH:J
Y-"7D~:7'f*i':~tl
T
141-0031
*9:WBiSJlll6:iffiE&EBl-1-8
~~5i¥~
03-5496-8231
ALPINE ELECTRONtCS
DE
ESPANA, S.A.
Portal de Gamarra 36, Pabell6n, 32
01013 Vitoria (Alava)-APDO 133, Spain
Phone 945-283588
MANAGER
•
I&t&~SF.l~
c~mO)MI;:J:
<
<l3~7'GJJ
<r.:~l,'o
•
ANV
ANDARHANDLEDNING
Innan
du
an
vander utrustningen bar du
lasa igenom denna
anvandarhandledning.
•ISTRUZIONI PER
~USO
Si
prega
di
leggere prima
di
utilizzare
il
attrezzatura.
SOUND
ALPINE ELECTRONICS
OF
U.K.
LTD.
Alpine House
Fletchamstead Highway, Coventry
CV4
9TW,
UK
Phone 0870-33 33 763
ALPINE ELECTRONICS
GmbH
Frankfurter Ring
117,80807
Munchen,
Germany
Phone 089-32 42 640
IMPRINT
ALPINE
ELECTRONICS
OF AMERICA, INC.
19145 Gramercy Place, Torrance,
California 90501, U.S.A.
Phone 1-800-ALPINE-1
(1-800-257-4631 )
ALPINE
ELECTRONICS
OF
CANADA,
INC.
777 Supertest Road, Toronto,
Ontario M3J 2M9, Canada
Phone 1-800-ALPINE-1
(1-800-257-4631)
ALPINE ELECTRONICS OF AUSTRALIA
PTY,
LTD.
161-165 Princes Highway, Hallam
Victoria 3803, Australia
Phone 03-8787-1200
•
•
MODE
D'EMPLOI
Veuillez lire avant d'utiliser cet
appareil.
•
MANUAL
DE
OPERACION
Lealo antes de utilizar
este
equipo.
•BEDIENUNGSANLEITUNG
Lesen Sie diese Bedienungsanleitung
bitte vor Gebrauch des Gerates.
•OWNER'S
MANUAL
Please read before using this
equipment.
SUZHOU CRESTEC PRINTING CO
..
LTD China
596-598 Chang jiang road, Suzhou, Jiangsu, P.R.China Printed
in
China (V)
68-08564Z99-B

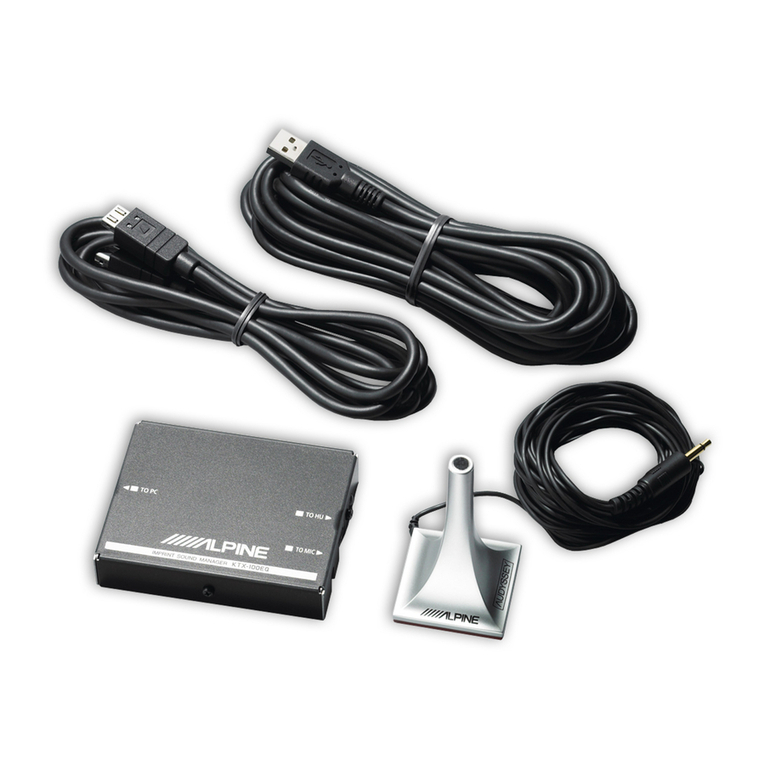
Accessories
I
CD-ROM Interface Box USB Cable (5m)
Connection Cable for
Head Unit (2m)
Installation
Sound Characteristics
Measurement Microphone (3m)
Caution before Installing
Install the IMPRINT SOUND MANAGER program before connecting the KTX-IOOEQ
to
yourpersonal
computer.
If
the program is installed when the KTX-IOOEQ connected
to
the
PC,
the program may
malfunction.
Operating System
The Program is available only on the Microsoft® Windows® XP Service Pack-2 system. Make sure that this
program is available
by
referring to "System Properties" on your
Pc.
To
use this program, Microsoft.NET Framework
1.1
(or later)
is
required.
If
this application is not installed on your
PC, the application is automatically installed with the program.
Installing.
1Insert the supplied CD-ROM into the CD-ROM drive, and activate the setup.exe
in
the
IMPRINT folder. Follow the installation instructions on the screen.
•Before installing, close all activatedprograms.
2Activate the USB_setup.exe
in
the DRIVER folder, and then install according to the
instructions on the screen.
3After completing the installation, restart your PC.
i-EN

Connections
Before setting MultEQ, connect all other devices.
1Install the CDA-9887/CDA-9887R into the vehicle.
2After Installing the unit, make sure that sound is output from each speaker.
3Press the
OPEN
button to open the front panel, then slide it
in
the left direction G), and
pull out towards you @to remove.
4Connect the Head Unit Connection Cable, USB Cable and Microphone to the Interface
Box.
5Connect the USB Cable to aUSB port of your PC.
6Connect the Head Unit Connection Cable to the connector of the CDA-9887/CDA-9887R
with the front panel removed.
Head Unit Connection Cable
CDA-9887/
CDA-9887R
I
II
~/1LPINE
iiiili'
Interface Box
Sound Characteristics Measurement Microphone
•Be
SlIre
10
cOllllectlhe cable
10
the CDA-9887/CDA-9887R laslly. Failllre
10
do
so
may
reslIlt ill communicatioll
error alld measuremel/ll/lay Ilot
be
possible.
7Check all connections, start the MultEQ setting.
2-EN

Before
Setting
MultEQ
I.&.
WARNING
While
driving,
do
not
set
up
MultEQ.
To prevent accidents, do not set up MultEQ while driving. The setting
of
the MultEQ
function
is
required to mount the microphone
in
the vehicle
in
order to measure sound
characteristics. Also, during measurement, loud measurement tone (signal) from the
speakers may be output. Making such settings may distract you from driving and result
in
an
accident.
Read
following
provisions
before
setting
MultEQ.
The MultEQ setting should be made
in
as quiet aplace
as
possible after turning off the engine, air-
conditioner and heater. If you have acar phone or cellular phone
in
the vehicle, remove them from the
vehicle
or
turn its power off.
If
sound other than measurement tone to be measured (engine or receiving
sound
of
car phone, etc.) occur, sound measurement
in
the vehicle may not be accurate.
When setting MuItEQ, be sure to use the microphone supplied with this unit.
If
amicrophone other than
the supplied one
is
used, measurement may not be possible or sound measurement
in
the vehicle may not
be accurate.
If apower amplifier
or
apowered subwoofer with an input level control
is
connected and this level is
lowered, measurement may not be possible. However, the input level should set lowered than normal
level to adequately perform measurement.
If apower amplifier with alow-pass filter is connected, measure MultEQ when the low-pass filter
of
the
power amplifier is turned off. Ifalow-pass filter
is
built into the powered subwoofer
or
power amplifier
for subwoofer, set the cut-off frequency to the highest value.
If
MultEQ
is
set and the function
is
turned on, MX, X-OVER, Time Correction, User's EQ, Parametric
EQ and Graphic EQ are automatically adjusted. Therefore, they cannot be individually adjusted.
After you have stored the result
of
MultEQ you adjusted
in
the CDA-9887/CDA-9887R, if you store the
results
of
MultEQ again
in
the CDA-9887/CDA-9887R, the previously stored MultEQ will be
completely cleared and replaced by the new one.
Setting
MultEQ
1Prepare for MultEQ setting.
•Park the vehicle
in
aquiet location.
•Close doors, windows, sunroof, etc.
•
Turn
off the engine of the vehicle.
•Set the air-conditioner and heater to
OFF.
2Set the key position of the vehicle to ACC or turn it on.
•
If
an air-conditioner
or
heater
is
turned on, turn it off. Measurement should not be performed
if
air-conditioner
or
heaternoise
is
present.
3Activate IMPRINT SOUND MANAGER installed
on
the PC.
•Strictly observe the Warnings and Cautions written by the manufacturers
of
your PC and peripheral equipment.
We
do
1I0t
accept responsibility
for
data lost due
to
the incorrect operatioll
of
the IMPRINT SOUND
MANAGER.
We
recommend you
to
back-up your important dma regularly.
4Set the Measurement Microphone
in
the vehicle, and start measurement according to
the indications on the IMPRINT SOUND MANAGER screen.
Perform PC operation outside the vehicle.
•
If
error occurs during measurement. resolve the problem by referring
to
tlte "Message List" table described in
tlte last pages. Then. close the dialog box by double-clicking tlte OK
bUIIOII,
and exit the program. Afier
disconnecting tlte Itead unit cable and bringing the front panel back
to
tlte original position. and start the
MultEQ selling operation.
5Choose
by
double-clicking one of the Area Selection items to be measured from the
IMPRINT SOUND MANAGER screen.
6Place the measurement microphone
in
the location according to the indication of the
IMPRINT SOUND MANAGER screen.
Place the microphone
in
avertical position, at ear level (a camera tripod is useful for
this purpose).
4-EN

7When microphone placement is complete, get out of the vehicle, and close all doors,
windows and sunroof. Then, start measurement by double-clicking the
Measure
button on the IMPRINT SOUND MANAGER screen. Do not open the doors until
"Complete" is displayed on the screen and signal sound is output from the speakers
and sound characteristics are measured
in
the vehicle. If noise enters from outside
during measurement, "Error" will be displayed on the screen. If displayed, measure
again by double-clicking the
Measure
button.
•Perform
PC
operation outside the vehicle.
•
As
measurement error may cause. never remove the microphone during measurement.
8When the first measurement
is
complete, move the microphone to the next
measurement location according to the indications on the screen and set it up.
Repeat the procedure
in
step 7according to the indications on the screen.
Preforming measurementfrom two locatiolls
in
the car should be sufficient.
If
you want
to
finish after two
measurement locations, double-clicking the Result button, alld move to the Target Curve settillg.
For more precise measurement, 6measurement locations are available; however,
it
will take approx.
40
minutes
until all MultEQ measurements have been completed.
III
this case, be sure to perform MultEQ measurement
with the vehicle collnected to acar battery charger.
9When measurement
is
complete, double-clicking the
Result
button, and make the
Target Curve setting for sound characteristics adjustment. Select the
Target
Curve
Select
button on the screen for the target curve setting.
•The measurement data call/lOt be stored an the PC hard disc. but can be memorized in the CDA-9887/CDA-
9887R.

10
When the selection of Target curve
is
complete, double-clicking the
Send
Filter
button to move to the setting of the CDA-9887/CDA-9887R. Select
Curve
Memory
1or
Curve
Memory
2to store
in
the CDA-9887/CDA-9887R.
•
You
can store two curve settingsfor one measurement result.
11
If you are not satisfied with the measurement result,
you
can start from the procedure
in
step 7
by
double-clicking the
Re-Measure
button.
•
If
you
pel/onn
the measurement again using the Re-Measure button, note that the previously stored seltings in
the CDA-9887/CDA-9887R will be cleared and replaced by the new one.
12
When the memory setting
is
complete, click xon the right side of the screen and
double-clicking
OK
on the EXIT screen to close the IMPRINT SOUND MANAGER
program.
13
After
you
have finished the MultEQ setting, disconnect the head unit connection cable
from the CDA-9887/CDA-9887R, and then bring the front panel back to the original
position.
When you bring the front panel back to the original position. do /lot
tum
power
off
and on with the ignition key
or battelY.
14
Enjoy the CDA-9887/CDA·9887R by turning on the MultEQ mode.
For details on operation, refer to the Owner's Manual supplied with the CDA-9887/CDA-9887R.
About
Trademark
•This device
is
manufactured under license from Audyssey Laboratories. U.S. and Foreign patents
pending. Audyssey MultEQ
XT
is
trademark
of
Audyssey Laboratories.
•Microsoft and Windows are trademarks,
or
registered trademarks
of
MicrosoftCorporation
in
the United
States and/or other countries.
6-EN

Message
List
Message
10
Error Message
,':
Error Code:
EOO1
"MultEQ Error: The channel has been marked as undetected, and will be
skipped."
Error Code:
EOO2
"MultEQ Error: The bass management configuration selected
is
not
supported by the device. Please consult the manufacturer's manual
to
determine avalid configuration."
Error Code:
EOO3
"MultEQ Error: The speaker configuration specified is not valid. Please
consult the manufacturer's manual to determine avalid configuration."
Error Code:
EOO4
"MultEQ Error: Communication with the device failed. Please check the
connection and try again."
Error Code:
EOOS
"MultEQ Error: The device is not properly licensed."
Error Code:
EOO6
"MultEQ Error: Device
in
use, try again
in
afew moments."
Error Code:
EOO?
"MultEQ Error: The Maximum level was reached, without achieving
an
adequate signal. Please decrease the ambient noise and try again."
Error Code:
EOO8
"MultEQ Error: The hardware sample format or bit depth is not supported."
Error Code:
EOO9
"MultEQ Error: The action was cancelled by the user."
Error Code: E010 "MultEQ Error: The system was unable to calculate afilter for this response.
Please try your measurements again.
If
this problem persists, contact
technical support."
Error Code:
E011
"MultEQ Error: The system was unable to determine the delay (speaker
to
microphone distance). Measure this value manually."
Error Code: E012 "MultEQ Error: The system may have been unable
to
determine the delay
(speaker distance). Numbers given for this value should be checked
manually."
Error Code: E013 "MultEQ Error: The input signal is too low. Check that the microphone
is
connected
to
the selected input, and check that the gain
on
the preamp
or
audio hardware input channel
is
properly set."
Error Code: E014 "MultEQ Error: The measured signal was too
low,
even though output was
raised to the maximum available amplitude. Decrease ambient noise, and
start over."
Error Code: E015 "MultEQ Error: The measured background noise exceeded allowable
tolerances."
Error Code: E016 "MultEQ Error:
An
unspecified error has occurred."
Error Code:
-1
MEASURE CANCEL
Error Code: -2 MEASURE COMMAND
ERROR
Error Code: -3
FL
SPEAKER NO DETECT
Error Code:
-4
H.U NOISE MEASURE
START
ERROR
Error Code:
-5
HU
MEASURE
START
ERROR
Error Msg:
MOO1
"The MultEQ
Pro
appliation failed
to
communicate with the device. Please
check the ALPINE Device configuration and try again."
Error Msg:
MOO2
"The device is not properly licensed."
I
lEN

Message
10
Error Message
Error Msg:
MOO3
"This action will reset the measurement system. Are you sure you want to
continue?"
Error Msg:
MOO4
"The license could not be verified."
Error Msg:
MOO5
"No Speakers were detected. Please correct the system configuration."
Warning Msg:
MOO6
"Do you wish to cancel measurement for this position
so
that you can correct
these errors?"
Warning Msg:
MOO?
"Do you wish to cancel measurement for this position
so
that you can correct
this error?"
Error Msg:
MOOB
"In order to continue with the calibration, you must correct any missing
speakers or correct the zone configuration."
Error Msg:
MOOg
"The attached device
is
not properly licensed. Filters will not be
transferred."
Error Msg: M010 "The following error occured while trying to save the calibration results file."
8-EN


Note/Hinweis/Remarque/Nota/
Nota/Obs/~5.ti\
<English>
•To
customers
using
the
KTX-100EQ
•
If
the screen of IMPRINT SOUND MANAGER
is
not correctly displayed, set "Display
Properties"-
"Settings" -"Advanced" on the personal computer side as follows.
<Deutsch>
•
Fur
Kunden,
die
das
KTX-100EQ verwenden
•Wenn der Bildschirm des IMPRINT SOUND MANAGER nicht richtig angezeigt wird, stellen
Sie
"Display Properties" -"Settings" -"Advanced" auf Seiten des Computers wie folgt ein.
<Fran9ais>
• A I'attention des
utilisateurs
du
KTX-100EQ
•
Si
I'ecran de IMPRINT SOUND MANAGER
ne
s'affiche pas correctement, reglez comme suit
"Display Properties» - " Settings» - "
Advanced»
sur I'ordinateur.
<Italiano>
•Per iclienti che utilizzano iI
modello
KTX-100EQ
•
Se
la
schermata di IMPRINT SOUND MANAGER non evisualizzata correttamente, impostare
"Display Properties" -"Settings" -"Advanced"
sui
lato del computer come indicato di seguito.
<Espanol>
•Para
los
clientes
que
utilizan el KTX-100EQ
•
Si
la
pantalla IMPRINT SOUND MANAGER no se muestra correctamente, ajuste "Display
Properties" -"Settings" -"Advanced" en
el
ordenador del modo siguiente.
<Svenska>
•
Till
kunder
som
anvander KTX-100EQ
•Om skarmbilden for IMPRINT SOUND MANAGER inte visas pa ratt satt, staller du
in
"Display
Properties" -"Settings" -"Advanced" pa datorsidan pa foljande satt.
<B*39>
•KTX-l
OOEQ
~asfY!l,
\O)as~m"
•IMPRINT SOUND MANAGER
o)imif~1J\.iE
LJ
<~m~n1d:l"
)~i3'Icl:,
J\~
=:J
:/1l!IJO)
iimilliiO)"7O
}\5-{
J -
i~jilEJ
-
i~¥*lE~jiIEJ
~T~co)~fJ~jiIELJZ'</':~l,,)o
11yoo..o
«reeo',e,oUioom.>ke,
,aeen
Ie"",
100
,moll
10
"""'"
corriCJII~.l""UC""rICIM,eIheDPIIOCOl'l~n"lle
1oc"""",",
lonl",e.llriy.c1lc~C""",~ar-.:looror""Appe.!<.....-.:elob
CobManogemerJl •
IroI;"AJGraphc'~eOaAcc"""'orO"_
G
__
01
A~erl.
Me««
Tr<dJlelhool
II
\I. htel{R)GraphCiiMedlllAccele<btc.o.;"'e,
i:H: 7'11')
-t.:.IJ
~77)~,)~
-j.(,/}
~~II
M
e1~~~;~~~~1~~~;~&~&I~[~~~~)%
~;)~6t~
ID=~~(93DPD
II
11~:..~rl20DPll
S""""P'09_rroghIroolopeoolepropeo,crlenjCIUr
...
I",llhe
c~
..
o/l:
..
ch~di,pla;>.ellng.
AIIorlch.>ngedi'Pl"l'_ing.
ORell!llllhec~
..
belore~lhene
..
d1,plajo<eIIni;l'
GAr>fJl:,olhe
...... dispIoy'oIlngswilhoul,MI
..
tng
OA,k
...beI",eawlyinglhe.-diwlaji,oIIirq<
Someg.orne,«Il!otherproor~,"""lbe,..,
...
256-<:oIoomode
Le...nmole~~~~
r;;lt~!~~~~l.:flL:r-'~J
-?t"'utJJv,,(
It,
10~5lJl1:iE'*raJ)j,!,
~:;:;C)IJl::;[\fi1,l::11l0)9!IIUflv~<~cl'
OIlilJ.,~;r.:C)1~tJllfl1~"j(~.
::J:""~J
-?t;ilj.&tlJ'1~(B>
(~jljutlJV"l
''r,
1lilJ.
'~:;:;o)U:iE''tit.lftH:,(!::!)
OfJilJ.
\.ft:;:;C)U:i'EtilNll1~$'i(~,
li!2.(1);I.~t:-:Jt.ftffi"~(K)
G~&\"6&'t?~ffi~57~S'~lrl,~f'cTt'JH.
na~J
L.....-DPI setting: 96DPI
KTX-100EQ
DPI~IE
:
96DPI
-68-12118Z19-A

To
customers/Hinweis
an
Kunden/A
I'attention
de
utilisateur/informazioni
per
clienti/lnformaci6n
~
ALPINE
para
los
clienteslTill
kunderl
~~m"
®
<English>
•
To
customers using aseparate amplifier for the subwoofer or powered subwoofer.
To
set
MultEQ
more
effectively,
note
the
following point.
•Prior
to
MultEO calibration, the gain levels of the amplifier
for
subwoofer
or
powered subwoofer
is
recommended to be set to center (12 o'clock).
<Deutsch>
•Hinweis
fOr
Kunden, die einen separaten Subwoofer-Verstarker oder einen Subwoofer
mit eigener Stromversorgung verwenden.
Um
die
Wirkung
von
MultEQ
zu
verstarken,
beachten
Sie bitte Foigendes,
•
Vor
der MultEO-Kalibrierung empfiehlt
es
sich, den Eingangspegel des Subwoofer-Verstarkers
oder des Subwoofer mit eigener Stromversorgung auf die Mitte (12 Uhr) einzustellen.
<Fran(:ais>
•AI'attention des clients qui utilisent un amplificateur distinct pour Ie subwoofer ou
Ie subwoofer
amplifh~.
Pour regler Ie
systeme
MultEQ
afin
que
celui-ci
so
it
plus
performant,
notez
Ie
point
suivant.
•Avant I'initialisation du systeme MultEO, nous vous recommandons de regler
les
niveaux de gain
de I'amplificateur pour subwoofer
ou
pour subwoofer amplifie
au
centre (12 heures).
<Italiano>
•Per iclienti che utilizzano
un
amplificatore separato per
iI
subwoofer 0
iI
subwoofer
alimentato.
Per regolare
MultEQ
in
modo
piuefficace,
tenere
presente
quanto
segue,
•Prima della calibrazione di MultEO,
si
consiglia di impostare
al
centro (ore 12) ilivelli di guadagno
dell'amplificatore per
il
subwoofer 0
il
subwoofer amplificato.
<Espana!>
•Informacion para clientes usando un amplificador independiente para el subwoofer
osubwoofer conectado.
Para
ajustar
MultEQ
y
que
sea
mas
efectivo,
tenga
en
cuenta
10
siguiente,
•Antes de calibrar MultEO,
se
recomienda establecer
el
nivel de ganancia del amplificador
en
el
centro (las 12
en
punto) para
el
subwoofer 0subwoofer conectado.
<Svenska>
•Till kunder som anvander en separat forstarkare for subwoofern eller en aktiv
subwoofer.
For
att
stalla
in
MultEQ
mer
effektivt,
se
f61jande information,
•Innan du kalibrerar MultEO rekommenderas det att du staller
in
forstarkningsnivaerna for
subwooferforstarkaren eller den aktiva subwoofern pa mittlaget (klockan 12).
<B*88>
•
'tt'7'9-)\-m7::;7t->Hr:J-
~
.
'tt'7'9-)\-~m~L,
Ll,'~~~m"
MultEQ
~~
b~1J~~I;:~~9
~t.:5I)1;:,
C
..
rF(1),~I;:
25~1\<
t.:<!l,
'0
•
MultEQ
o)~\i:~;1:l:JlJ6b:@WJI~.
ij-:J'rj-J
\-,E§?::;7'f->J \'::7-
I-'
'
ij-:J'rj-J
\-O)AtJ
l./I'ZJ!.J1,E
~::;9-(12~~~)~~~V:@~~1,E~.6b~*Vo
68-10872Z40-A
Other manuals for KTX-100EQ - IMPRINT Sound Tuning
1
Table of contents
Other Alpine Automobile Electronic manuals

Alpine
Alpine CXA-B200NK User manual

Alpine
Alpine KCE-G7QI User manual

Alpine
Alpine SIRIUS KCA-SC100 User manual

Alpine
Alpine KTX-100EQ - IMPRINT Sound Tuning User manual

Alpine
Alpine KCA-620M User manual

Alpine
Alpine SIRIUS KCA-SC100 User manual

Alpine
Alpine VPX-B104R User manual

Alpine
Alpine KCE-300BT User manual

Alpine
Alpine KCE-300BT User manual

Alpine
Alpine DPR-RDS1 User manual