manuals.online logo
Brands
  1. Home
  2. •
  3. Brands
  4. •
  5. Altinex
  6. •
  7. Accessories
  8. •
  9. Altinex TNP358 User manual

Altinex TNP358 User manual

TNP358 Tilt ‘N Plug®INTERCONNECT BOX User’s Guide
400-0614-001
1
elcome!
We greatly appreciate your purchase of your TNP358 Series Tilt
'N Plug. You will find the TNP358 to be reliable and simple to use.
We are committed to providing the best Signal Management
Solutions® to our customers.
We are committed to providing our customers with
Signal Management Solutions®to the most demanding
audiovisual installations at competitive pricing and we welcome
you to join the ranks of our many satisfied customers throughout
the world.
1. Precautions and Safety Warnings
Please read this manual carefully before using your TNP358 Tilt
'N Plug interconnect box. Keep this manual handy for future
reference. These safety instructions are to ensure the long life of
your Tilt 'N Plug and to prevent fire and shock hazards.
1.1 General
Unauthorized personnel shall not open the unit or cable
assembly as there are high-voltage components inside. Only
qualified Altinex service personnel or their authorized
representatives must perform all service.
1.2 Installation Precautions
For best results, place the Tilt 'N Plug in a dry area away
from dust and moisture. To prevent fire or shock, do not
expose this unit to water or moisture. Do not place the unit in
direct sunlight, near heaters or heat-radiating appliances, or
near any liquid.
Handle carefully; dropping or jarring can damage the bezel.
Never place fingers inside the opening on either side of the
unit. This action could cause injury due to sharp edges
inside.
Do not place heavy objects on top of the Tilt 'N Plug. Do not
use excessive force to push down on the top of the unit.
Disconnect the power cord to turn power off.
Install all cables according to the instructions found in this
user guide. Do not force or pull any cable that is attached to
the Tilt 'N Plug.
1.3 Cleaning
Surfaces should be cleaned with a damp cloth. Due to the
chrome finish, do not use any abrasive solutions.
2. Installation Procedures
Note: Download and read the entire online manual to become familiar with the TNP358 and for detailed installation instructions.
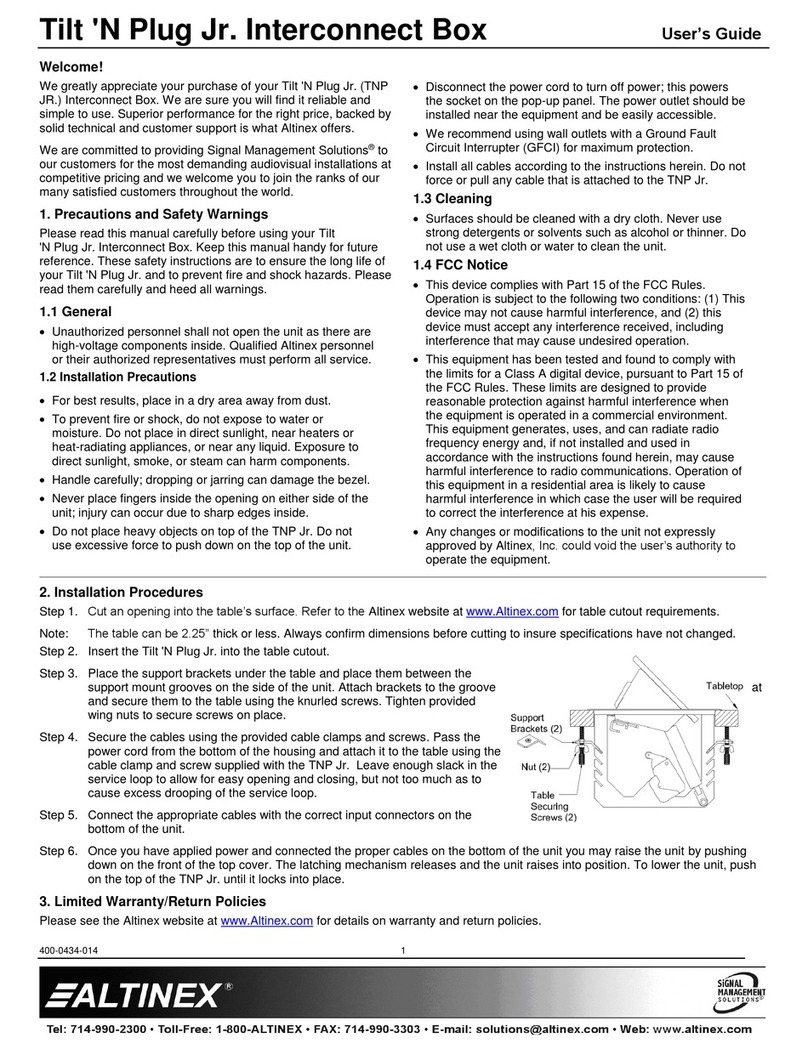
Step 1. Cut an opening into the table’s surface. Refer to the Altinex website at
http://www.altinex.com/ for table cutout requirements. This operation should be
performed by experienced professionals in order to insure accuracy and to be
aesthetically pleasing.
NOTE:The table should be 2.25 in (57 mm) or less in thickness. Always confirm
dimensions before cutting to insure that specifications have not changed.
Step 2. Insert the TNP358 into the table cutout.
Step 3. Place the support brackets under the table between the support mount grooves on the
side of the unit. Attach the brackets to the groove at the desired height and secure them
to the bottom of the table using the knurled table securing screws. Tighten wing nuts to
secure the screw in place.
Step 4. To lower the unit, push on the top cover until it locks into place.
Step 5. Secure the power cable to the underside of the table using the cable clamps and screws included. Feed the power cord from
the bottom of the TNP through the cable clamps, but leave enough slack in the service loop for easy opening and closing. Too
much slack can cause excess drooping of the service loop. Secure the power cord separate from other cables.
Step 6. To raise the unit into position, push down on the front of the top cover to release the latching mechanism, allowing the TNP to
raise it into position.
NOTE: It may be necessary to adjust the power cable service loop for optimal performance.
3. Limited Warranty/Return Policies
Please see the Altinex website at www.altinex.com for details on warranty and return policies.
TNP358 User’s Guide
400-0614-001
2
4. Technical Specification
Specifications are subject to change. Please visit http://www.altinex.com for up-to-date specification
Features/Description
TNP358*
General
Outputs
USB Charging
USB 2.0 Type A F (2)
Pass-Through Video
6 ft. (2 m)
Video (HDMI)
HDMI F-M (1)
Computer Audio
3.5mm F-M (1)
Pass-Through AC Power
9ft. (3.0 m)
120 VAC,60 Hz, 12A
NEMA Socket-Plug (2)
GFCI Plug Type
2-Pole, 3 Wire Grounded
Agency Approvals
UL Listed
File E254082
Accessories Included
Hardware
-Mounting screws/wing nuts
-Brackets
-Cable clamps/screws
Table 1 TNP358* General Specifications
Mechanical
TNP358**
Max. Table Thickness
2.25 in (57 mm)
Height, opened
5.88 in (149 mm)
Height, closed
3.80 in (97 mm)
Width
5.7 in (145 mm)
Depth
5.2 in (132 mm)
Finish
Polished Chrome
Weight (approx.)
2.75 lb. (1.25 kg)
Shipping Weight
5.5 lb. (2.5 kg)
T Operating
10 C - 35 C
T Maximum
40 C
Humidity
90 non-condensing
Table 2 TNP358** Mechanical Specifications
Electrical
TNP358**
Power Rating
(pass-through AC power)
120VAC,60Hz,
12A
Power Rating
(USB 2.0 charging port)
5VDC, 3A total
Ground Fault Trip Current
6mA max
Table 3 TNP358** Electrical Specifications
HDMI, the HDMI Logo, and High Definition Multimedia
Interface are trademarks or registered trademarks of HDMI
Licensing LLC in the United States and other countries.
** Dimensions and ratings include models ending in C and S.
* Includes models ending in S.
Models ending with C are customizable.
TNP358 User’s Guide
400-0614-001
3
5. The TNP358 Interconnect Box
Safety covered dual 12 amp AC sockets
Dual charging USB ports (3 Amps max)
Ultra flat surface installation
Standard high quality black or brushed aluminum finish:
TNP530: Matte Black
TNP530S : Brushed Aluminum (Stain Proof Coating)
Simple, cut and drop-in installation
GFCI plug for added safety
The TNP358 is a compact interconnect solution designed for mounting into tables, podiums, or other furniture. HDMI, audio, power and
USB connections are accessed by pushing down on the top cover allowing the unit to tilt open.
The connectors are hidden by pressing down on the top cover until the latching mechanism engages. In the closed position, the top
cover lays virtually flush with the tabletop. This tabletop solution offers HDMI, audio and dual AC sockets along with 2 USB ports that
can deliver up to 3A of charging power. The USB charger has a green LED to indicate power availability.
The TNP358 was specifically designed for devices requiring a charging USB port. A single input power cable delivers power to both
outlets and features a GFCI plug for added safety. The TNP358 is one of many solutions available in the TNP Jr. product line that can
be customized with additional connectivity options.
The quality and features of the TNP358 include 12 amp power outlet, 3 amps combined USB charger, UL listing, a GFCI plug and a
smooth precision lifting design and easy installation.
Tabletop solutions purchased from Altinex assure rock solid performance, the highest level of quality, and the most compact design on
the market. We were the first in the world to introduce tabletop solutions to the Audio Visual industry 14 years ago and today our
products are still in the field performing like new.
The next time you need to spruce up your customer's boardroom or university classroom, look no further than Altinex. So give us a call.
We design, build, and support our products from the beautiful city of Brea in Southern California.
TNP358 User’s Guide
400-0614-001
4
6. Application Diagrams
Diagram 1: Application diagram for TNP358
TNP358 User’s Guide
400-0614-001
5
Diagram 2: Front View
TNP358 User’s Guide
400-0614-001
6
Diagram 3: Mounting
TNP358 User’s Guide
400-0614-001
7
Diagram 4: Side Dimensions
TNP358 User’s Guide
400-0614-001
8
Diagram 5: Side Dimensions
TNP358 User’s Guide
400-0614-001
9
7. Operation
7.1 Opening and Closing the Tilt 'N Plug
The Tilt 'N Plug is opened by pressing down on the bezel and then releasing it.
When the Tilt 'N Plug is not in use, simply press the top down until it is latched in place and then release. The unit will remain hidden
until needed again.
7.2 Power/Signal Connections
Connect external devices to the appropriate connector on the Tilt 'N Plug.
8. Troubleshooting Guide
The Tilt 'N Plug supplied was carefully tested before shipping. Please use tables below to rectify any potential difficulties:
TNP
Symptom
Resolution
USB ports are not
charging
1. Make sure that the power cord is connected.
2. Make sure the USB green indicator LED is on
3. Re-set GFI circuit on the power cord
Damaged power cord
1. Make sure that power cord is not damaged or pinched.
2. If there has been damage, do not use the Tilt 'N Plug. Please call the Altinex Customer Service
Department at (714) 990-2300 to have the unit returned for repair.
Testing the AC Plug
Type 1: (not resettable)
1. Plug power cord into wall receptacle.
2. Press RESET button (Indicator should be ON).
3. Press TEST button (Indicator should be OFF).
4. Press RESET button for use.
DO NOT USE TNP358 IF THIS TEST FAILS
Type 2 (resettable)
1. Plug power cord into wall receptacle.
2. (Indicator should be ON) Press the TEST button.
3. (Indicator should turn OFF) Press the RESET button.
4. (Indicator should turn ON) unit is ready for use
DO NOT USE TNP358 IF THIS TEST FAILS
Unit raises too slowly
1. If the unit does not rise into position correctly, check the service loop for the power cord on the
bottom of the unit. If the service loop is too small the cables will counteract the spring trying to
raise the unit into position.
Unit tilts up too fast
1. If the unit rises into position too fast, check the service loops for the power cord on the bottom
of the unit. If the service loop is too large and the cables are putting upward pressure on the
unit, the unit will tilt up faster than expected.
Unit does not close all
the way
1. If the unit does not close flush with the bezel, check the service loop for the power cord on the
bottom of the unit. If the service loop is putting upward pressure in the unit, the unit will not be
able to seat all the way down.

This manual suits for next models

2

Other Altinex Accessories manuals

Altinex CNK212 User manual

Altinex

Altinex CNK212 User manual

Altinex Tilt `N Plug Interconnect Box TNP100UK User manual

Altinex

Altinex Tilt `N Plug Interconnect Box TNP100UK User manual

Altinex TILT `N PLUG TNP121 User manual

Altinex

Altinex TILT `N PLUG TNP121 User manual

Altinex Pop 'N Plug Interconnect Box PNP200 User manual

Altinex

Altinex Pop 'N Plug Interconnect Box PNP200 User manual

Altinex Pop 'N Plug Tower PNP400 User manual

Altinex

Altinex Pop 'N Plug Tower PNP400 User manual

Altinex Tilt 'N Plug Interconnect Box TNP100AU User manual

Altinex

Altinex Tilt 'N Plug Interconnect Box TNP100AU User manual

Altinex PNP202 User manual

Altinex

Altinex PNP202 User manual

Altinex Tilt 'N Plug JR. TNP121 User manual

Altinex

Altinex Tilt 'N Plug JR. TNP121 User manual

Altinex SIGNAL MANAGEMENT SOLUTIONS Tilt ‘N Plug... User manual

Altinex

Altinex SIGNAL MANAGEMENT SOLUTIONS Tilt ‘N Plug... User manual

Altinex TNP130 User manual

Altinex

Altinex TNP130 User manual

Altinex TNP328 Series User manual

Altinex

Altinex TNP328 Series User manual

Altinex TNP461 User manual

Altinex

Altinex TNP461 User manual

Altinex Pop `N Plug PNP300 User manual

Altinex

Altinex Pop `N Plug PNP300 User manual

Altinex PNP400/Pop 'N Plug Tower User manual

Altinex

Altinex PNP400/Pop 'N Plug Tower User manual

Altinex TILT `N PLUG TNP121 User manual

Altinex

Altinex TILT `N PLUG TNP121 User manual

Altinex Tilt 'N Plug 100 Series User manual

Altinex

Altinex Tilt 'N Plug 100 Series User manual

Altinex Tilt 'N Plug JR. TNP121C User manual

Altinex

Altinex Tilt 'N Plug JR. TNP121C User manual

Altinex PNP415 User manual

Altinex

Altinex PNP415 User manual

Popular Accessories manuals by other brands

Carefree Compass installation manual

Carefree

Carefree Compass installation manual

Tumbl Trak Hurdle Helper user guide

Tumbl Trak

Tumbl Trak Hurdle Helper user guide

PCB Piezotronics ICP 102 Series Installation and operating manual

PCB Piezotronics

PCB Piezotronics ICP 102 Series Installation and operating manual

Datexx Sentina Outback LED-98 user manual

Datexx

Datexx Sentina Outback LED-98 user manual

Baumer R600V.DAH5-11205779 manual

Baumer

Baumer R600V.DAH5-11205779 manual

Baltimore Aircoil Company VFL Series Operating and maintenance instructions

Baltimore Aircoil Company

Baltimore Aircoil Company VFL Series Operating and maintenance instructions

Sencor SWS 2 TS user manual

Sencor

Sencor SWS 2 TS user manual

SmartDHOME 01335-1904-00 user manual

SmartDHOME

SmartDHOME 01335-1904-00 user manual

Wenglor OPT2022 operating instructions

Wenglor

Wenglor OPT2022 operating instructions

Summit SCR314LCSS user manual

Summit

Summit SCR314LCSS user manual

fontastic Eris 6 user manual

fontastic

fontastic Eris 6 user manual

SOLIDMATION HPA-2411 installation manual

SOLIDMATION

SOLIDMATION HPA-2411 installation manual

TRENDnet TEG-S24M11GF supplementary guide

TRENDnet

TRENDnet TEG-S24M11GF supplementary guide

Steelcase Workplace Advisor installation instructions

Steelcase

Steelcase Workplace Advisor installation instructions

Furuno DRS6A X-Class installation manual

Furuno

Furuno DRS6A X-Class installation manual

Detection Systems DS720i installation instructions

Detection Systems

Detection Systems DS720i installation instructions

Stahl 9496/32 Series operating instructions

Stahl

Stahl 9496/32 Series operating instructions

Leviton Decora ODS0D-TDx installation instructions

Leviton

Leviton Decora ODS0D-TDx installation instructions

manuals.online logo
manuals.online logoBrands
  • About & Mission
  • Contact us
  • Privacy Policy
  • Terms and Conditions

Copyright 2025 Manuals.Online. All Rights Reserved.