Altrex MiTower Quick setup guide

MiTOWER
Safety and Instruction manual - EN - 760296-B-1119
SAFETY AND ASSEMBLY
INSTRUCTIONS
MiTOWER
MiTOWER+
Read these instructions carefully before
using this product. Keep this manual
available at all times.

www.altrex.com
3
Index
1. Introduction
2. Type of scaffold
3. Safety instructions
4. Parts
5. Mounting instructions
6. Check before use
7. Assembling the MiTOWER / MiTOWER+
8. Assembling the MiTOWER STAIRS
9. Ballast
10. Moving the scaffold
11. Disassembly of the scaffold
12. Inspection, Care and Maintenance
13. Warranty conditions
14. Abbreviations and logos
Annex
T1. Parts
T2. Mounting instructions
T3. Assembly steps even working heights MiTOWER / MiTOWER+
T4. Assembly steps odd working heights MiTOWER / MiTOWER+
T5. Configurations MiTOWER
T6. Configurations MiTOWER+
T7. Assembly steps MiTOWER STAIRS
T8. Configuration MiTOWER STAIRS
1. Introduction
This manual applies exclusively to MiTOWER scaffold configurations (hereinafter: ‘the scaffold’) as described in this assembly
& user manual (hereinafter: ‘the manual’). Prior to starting to assemble the scaffold, you should carefully read this manual. The
required scaffold should be assembled and used in accordance with this manual. All instructions in this manual have to be
followed strictly. Not following the instructions contained in this manual can easily result in serious accidents, serious injury or
death. Altrex cannot be held liable for any loss resulting from the assembly or use of an Altrex scaffold that is not in compliance
with the manual. The employer, supervisor and user are responsible for the correct use of the scaffold in accordance with this
manual and they must ensure that this manual is available at all times when work is being carried out using the scaffold.
Additional copies of the manual can be ordered from your Altrex dealer.
Local legislation and regulations might encompass measures in addition to those stated in this manual.
Altrex BV –Mindenstraat 7 –8028PK Zwolle –The Netherlands - Tel.: +31 (0)38 455 7777 –Email: [email protected] –
Internet: www.altrex.com
2. Type of scaffold
MiTOWER
MiTOWER+
Standards
ANSI A10.8
OSHA 1926
UL1322
EN1004
ANSI A10.8
OSHA 1926
UL1322
EN1004
Category
Light Duty, 25 lbs./sq.ft.
Maximum platform height outdoors
13’9”
20’4”
Maximum platform height indoors
13’9”
20’4”
Maximum platform load
325 lbs.
500 lbs.
Maximum load on rolling tower
325 lbs.
500 lbs.
Maximum wind load
18 miles per hour
18 miles per hour
Minimum number of assembly persons
1
1
EN

4
www.altrex.com
3. Safety instructions
1. Before use, read and understand the manual and all the instructions and warnings on the scaffold.
2. Always use this scaffold in conformity with local, state or national legislation.
3. Do not use this scaffold if you are in poor health, taking medications, drugs or have been consuming alcohol, all of which
may impair your ability to work safely on this product.
4. Before and after using, check all parts for proper function and damage. Check for missing parts.
5. Do not use damaged or improperly functioning scaffold parts. Do not paint scaffold parts.
6. Only use components supplied by Altrex with this scaffold.
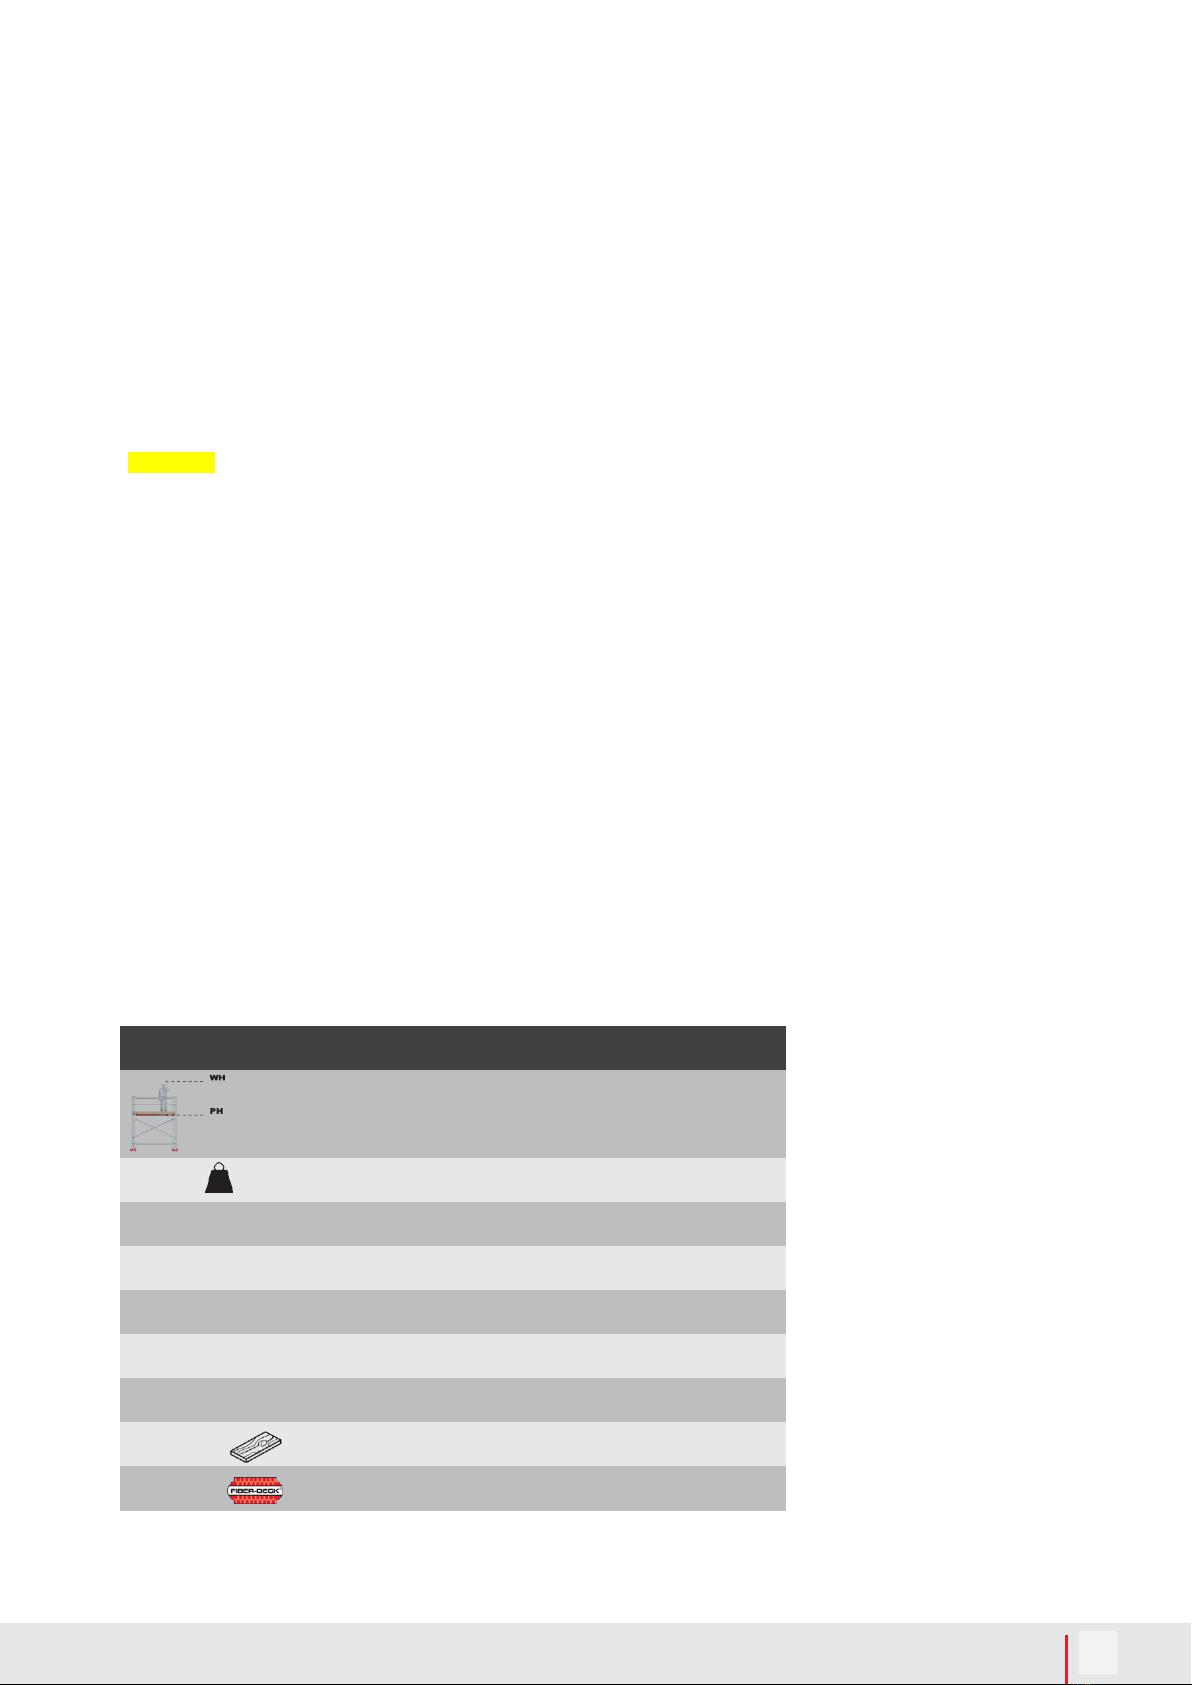
7. The total combined weight of each worker and all materials should not exceed the rated working load. Do not overload.
Do not apply impact loads to any parts.
8. Do not use the scaffold during high winds (maximum wind speed 18 miles per hour).
9. Do not use in areas that are sensitive to wind e.g., in open structures and at corners of buildings.
10. Horizontal loads exceeding 50 pounds resulting from working activities on the scaffold, are not permitted.
11. This scaffold must be used on a solid and flat surface. Check that environmental factors do not lead to dangerous
situations.
12. Check that the scaffold is horizontal (check using a spirit level).
13. Examine an erected scaffold thoroughly to make sure it is set up properly, in accordance with the manual.
14. Check that all castors are locked when the scaffold is in use.
15. Never access the scaffold on the outside. Only access through the trapdoor of the platform. Persons climbing or
descending scaffolds shall have both hands free for climbing and shall remove foreign substances, such as, but not
limited to, mud or grease, from their shoes and hands. Double guardrail braces shall not be used as a means of access
or egress.
16. Always keep body centered inside structure of scaffold.
17. Do not permit oil, grease, or slippery material on climbing, gripping or platform surfaces.
18. Do not allow unstable objects, such as barrels, boxes, loose brick, tools, and debris to accumulate on the work surface.
19. Do not use a ladder or any other device to gain greater heights.
20. When the scaffold is moved, persons and/or materials may not remain on the scaffold.
21. Scaffolds and tools shall not be allowed to contact unprotected, energized electrical lines or equipment. Maintain a
minimum safe distance of at least 10 ft. (<50 kV). DANGER! - To avoid contact and shock hazard, scaffolds and tools
shall not be used in the vicinity of energized power lines or electrical lines.
22. Any parts that have been exposed to excessive heat, as in the case of fire, should be immediately removed from service
and destroyed due to loss of structural strength.
23. Do not use this product for cantilever applications.
24. Check that the scaffold can be used safely and that it is suitable for the intended purpose.
25. The use of hoisting gear on or attached to the scaffold is not permitted; this can seriously affect the stability of the tower.
Scaffold parts, tools and materials may only be brought up and down (to and from the work floor) manually using a rope,
for example.
26. The configurations in this manual are not suitable for the use of tarpaulins and/or advertising boards.
27. Never leave the rolling tower unsupervised. If the rolling tower must be left unsupervised, you have to make sure that
unauthorized individuals cannot access it.
28. Triangle stabilizers must always be attached according to the configuration table.
29. Hoisting or suspending the tower is not permitted.
30. When an overhead hazard exists, overhead protection shall be provided and shall be positioned not more than 9 feet
above the working platform.
31. Do not work on scaffolds that are covered with ice, snow or other slippery materials until such conditions are eliminated,
except as necessary to eliminate the slippery conditions.
32. Scaffolds and their components shall not be used with acids or other corrosive substances, or in corrosive atmospheres.
33. Special precautions shall be taken to protect scaffold members, when a heat-producing process is in use.
34. Where moving vehicles are present, the scaffold area shall be marked with warnings such as, but not limited to, flags,
roped-off areas or barricades, or both roped-off areas and barricades.
35. Employers shall instruct and supervise their employees in the safe use of scaffold equipment provided. All employees
using scaffolds to perform a job task shall be instructed by a qualified person in the proper construction, use, placement,
care, and recognition of hazards for the scaffolds they are using.
36. Scaffolds shall be erected, moved, dismantled, or altered only under the supervision and direction of a competent person
qualified in scaffold erection, moving, dismantling or alteration. Such activities shall be performed only by experienced
and trained employees selected for such work by the competent person.
37. Do not leave the scaffold unattended without taking precautions to prevent access to the scaffold.
38. Only one platform shall be a working platform. A toe board shall be erected on that working platform. It is not permitted to
pile tools, material or equipment higher than the top edge of the toe board.

www.altrex.com
3
4. Parts
See Annex T1 for an overview of the parts and their mass.
5. Mounting instructions
See Annex T2 for an overview of the mounting instructions.
6. Check before use
1. Check that the scaffold is horizontal (check using a spirit level)
2. Check that the scaffold is assembled in accordance with this manual and in conformity with the configuration and ballast
3. Check that the environmental factors,such asswinging doors,awnings that operateautomatically,aboveground electrical
cables, traffic and/or passers-by, etc., do not lead to dangerous situations.
4. Check that the scaffold can be used safely and that it is suitable for the intended purpose.
7. Assembling the MiTOWER / MiTOWER+
Assemble the components on the basis of the steps that are shown in appendices T3 and T4. Make all connections as
indicated in appendix T2. See the table below for reference to the appendix with the configuration table and composition per
type of rolling tower.
Building even working heights
- MiTOWER: 13’9” - 20’4” -
- MiTOWER+: 13’9” - 20’4” - 26’11”
Building odd working heights
- MiTOWER: 10’6” -17’1”
- MiTOWER+: 10’6” -17’1” - 23’7”
Step 1 (T3:1)
1. Start with two frames (T1: A). Install the wheels (T1: B) inthe
frames and apply the brake [T2: F1-F2].
2. Install a double guardrail brace (T1: C) with the upper claw on top
of the 4th rung [T2: F3].
3. Level out the base section using a spirit level. If necessary, adjust the
wheel legs by screwing the wheel leg nut up or down.
Step 1 (T4:1)
1. Start with two frames (T1: A). Install the wheels (T1: B) inthe
frames and apply the brake [T2: F1-F2].
2. Install a double guardrail brace (T1: C) with the upper claw below
the 4th rung [T2: F3].
3. Place a frame on both frames of the base section (T1: A)and
secure [T2: F4-F6]
4. Level out the base section using a spirit level. If necessary, adjust the
wheel legs by screwing the wheel leg nut up or down.
Step 2 (T3:2)
1. Place two frames (T1: A) on top of one another and secure
[T2: F4-F6]. Repeat this step. Place these linked frames on the
base section and secure [T2: F5-F6].
2. Install a double guardrail brace (T1: C) with the upper claw below
the 8th rung [T2: F3].
3. Place a platform (T1: D) on the 8th rung [T2: F7-F9].
4. Install the triangular stabilizers (T1: E); [T2: F11-F15]. Check if all
stabilizers make good contact with the ground. Adjust the stabilizers if
necessary.
5. Slide out the platform’s hanging mechanisms [T2: F10] and hang2x
a double guardrail brace here.
6. Climb through the hatch and sit on the platform with your legs
through the hatch.
7. Mount 2x a double guardrail brace (T1: C) with the upper claw on
top of the 4th rung of the frames [T2: F3].
Step 2 (T4:2)
1. Place a platform (T1: D) on the 4th rung [T2: F7-F9].
2. Install 2x a double guardrail brace (T1: C) with the upper claw on
top of the 8th rung [T2: F3].
3. Install the triangular stabilizers (T1: E); [T2: F11-F15]. Check if all
stabilizers make good contact with the ground. Adjust the stabilizers if
necessary.
4. Slide out the platform’s hanging mechanisms [T2: F10].
Step 3 (T3:3 / T4:3)
1. Climb down and on the platform’s hanging mechanisms hang: 2x a linked frame (T1:A), [T2:F4], a platform (T1:D) and a double
guardrail brace (T1:C).
2. Access the platform, install the linked frames and secure them (F2: F5-F6]
3. Install a double guardrail brace with the upper claws under the 4th rung of the frames that have just been installed [T2:F3]
4. Place a platform on the 4th rung of the frames you have just installed [T2: F7-F9]
Step 4 (T3:4 / T4:3)
1. Climb down and on the platform’s hanging mechanisms hang: 2x a double guardrail brace (T1:C) and (only if the required working height
has been reached) a toe board set (T1:F).
2. Climb through the hatch and sit on the platform with your legs through the hatch.
3. Mount 2x a double guardrail brace (T1: C) with the upper claw on top of the 4th rung of the frames [T2: F3].
4. Only once the required working height has been reached: install the toe board set (T1:F).
5. For higher working heights, repeat steps 3 and 4. Always respect the maximum platform height as mentioned in chapter 2 of this manual.
table.
MiTOWER / MiTOWER+
Annex
Assembly steps even working heights
T3
Assembly steps odd working heights
T4
MiTOWER / MiTOWER+ Annex
Configurations MiTOWER T5
Configurations MiTOWER+ T6
5

6
www.altrex.com
8 . Assembling the MiTOWER STAIRS
8.1 Additional safety instructions MiTOWER STAIRS
The safety instructions in chapter 3 also apply for the MiTOWER Stairs. The safety instructions in this chapter (8.1) are
additional.
1. WARNING: It is not allowed to assemble the MiTOWER Stairs with wheels. Follow the instructions in the next chapter
to install the wheel leg with rubber foot.
2. CAUTION: Not every stair / staircase is suitable to use the MiTOWER Stairs. It is very important that all four feet can
be positioned at least 4 inch from the edge of the steps. [T2: F19-F-20]. Do not use the MiTOWER Stairs if that is not
possible.
3. CAUTION: Not everystair / staircase is suitable to assemble the 4 stabilizers (T1: E); [T2: F22-F26]. In these situations
it is necessary to anchor the MiTOWER to a solid wall with anchorage tubes (T1: L).
4. For extra The lashing bands / straps (T1: M) can be used around a step for extra stability. It is not allowed to use only
lashing bands / straps for stabilization, without the use of stabilizers and anchorage tubes.
8.2 Assembly steps MiTOWER STAIRS
MiTower Stairs will be assembled with the parts of the MiTower (T5) / MiTower+ (T6) and the MiTower Stairs set (T8).
Assemble the components on the basis of the steps that are shown in appendix T7. Make all connections as indicated
in appendix T2. See the table below for reference to the appendix with the configuration table and composition per type
of rolling tower.
MiTOWER STAIRS
Annex
Assembly steps MiTOWER STAIRS
T7
Configuration MiTOWER STAIRS
T8 (+T5/T6)
Assembly steps
- MiTOWER STAIRS
Step 1 (T7:1)
1. Start with a walkthrough frame with gate (T1: G) and a walkthrough frame* (T1: H).
(*it is also possible to use two walkthrough frames with gate (T1:G)).
2. Install wheel legs with feet (T1: J) in the frames [T2: F16-F18].
3. Place a 4-rung frame (T1: A) on the (topmost) walkthrough frame with gate (T1: G) and secure it [T2: F4-F6]
4. Install 2x double guardrail braces (T1: C) between the 2 walkthrough frames [T2: F3] with the lower claws above the 1st rung of the topmost
walkthrough frame.
5. Place two frames (T1: A) on top of one another and secure [T2: F4-F6]. Place these linked frames on the lower part of the tower and
secure it [T2: F5-F6]. Best position for this: standing on the staircase, between de walkthrough frames.
6. Install a double guardrail brace between walkthrough frame with door and the 4-rung frame, with the upper claw just below the top rung of the
walkthrough frame with door.
7. Level out the base section using a spirit level. If necessary, adjust the wheel legs by screwing the wheel leg nut up or down.
8. If the top of both frames cannot be levelled out with the adjustable wheel legs, a 2-rung frame (T1: I) can be used to accommodate the
difference.
9. Check the position of the four feet on the staircase.[T2: F19-F20].
WARNING: do not continue the assembly if the base section is not level and/or the four feet cannot be positioned correctly on the staircase.
Step 2 (T7:2)
1. Install the triangular stabilizers (T1: E); [T2: F11 –F15]. Check if all stabilizers make good contact with the ground. Adjust the stabilizers if
necessary.
2. If it is not possible to install the stabilizers in the correct angle [F2: F22-F26], install 2 anchoring tubes (T1:L) while still standing on the
ground:
- On the walk-through frame side: install an anchoring tube on the upper rung and anchor it to the wall [T2: F27]
- Other side of tower: install an anchoring tube on the 7th rung and anchor it to the wall [T2: F27]
3. If possible, install 2x lashing straps (T1: M) in the lower part of the scaffold [T2: F20]. Only install lashing straps to a sturdy construction such
as a step of an open staircase.
4. Place a platform (T1: D) on the top rung of the walkthrough frame with door [T2: F7 –F9].
5. Slide out the platform’s hanging mechanisms [T2: F10] and hang 2x a double guardrail brace here (T1: C).
6. Climb through the hatch and sit on the platform with your legs through the hatch.
7. Mount 2x a double guardrail brace with the upper claw on top of the 4th rung of the frames [T2: F3].
Step 3 (T7:3)
1. Climb down and on the platform’s hanging mechanisms hang: 2x a linked frame (T1:A), [T2:F4], a platform (T1:D) and a double guardrail
brace (T1:C).
2. Access the platform, install the linked frames and secure them [F2: F5-F6].
3. Install a double guardrail brace with the upper claws under the 4th rung of the frames that have just been installed [T2: F3].
4. Place a platform on the 4th rung of the frames you have just installed [T2: F7-F9]. Slide out the platform’s hanging mechanisms [T2: F10].
Step 4 (T7:4)
1. Climb down and on the platform’s hanging mechanisms hang: 2x a double guardrail brace (T1:C) and a toe board set (T1:F).
2. Stand on the first platform and move the parts to the hanging mechanisms of the second platform.
3. Climb through the hatch of the second platform and sit on the platform with your legs through the hatch.
4. Mount 2x a double guardrail brace (T1: C) with the upper claw on top of the 4th rung of the frames [T2: F3].
5. Stand on the platform and install the toe board set (T1:F).

www.altrex.com
3
9. Ballast
Ballast is not required for indoor and outdoor usage up to a maximum wind speed of 18 miles per hour. Please
contact your Altrex dealer with regard to use in higher wind speeds.
10. Moving the scaffold
The scaffold may only be moved while observing the following conditions:
1. When the scaffold is moved, persons and/or materials may not remain on the mobile unit.
2. Beforehand, checks should be made that the environmental factors, such as swinging doors, canopies, pits,
automatically functioning awnings, aboveground electrical cables, traffic and/or passers-by, etc. do not lead to dangerous
situations while the scaffold is moved.
3. In order to move the scaffold, the stabilizers can only be raised to a maximum of 0.5 inch.
4. Only move the scaffold manually in a lengthwise direction, over a flat, horizontal and sufficiently load-bearing surface.
5. Manual force used to move the scaffold shall be applied as close to the base as practicable, but not more than 5 feet
above the supporting surface.
6. After moving the scaffold has to be realigned horizontally using a spirit level.
7. Check that the environmental factors, such as swinging doors ,awnings that operate automatically, aboveground
electrical cables, traffic and/or passers-by, etc., do not lead to dangerous situations.
8. Check that the scaffold can be used safely and that it is suitable for the intended purpose.
9. WARNING: moving the scaffold as described in this chapter does not apply for the MiTOWER STAIRS. To move these
scaffolds, they have to be disassembled first.
11. Disassembly of the scaffold
The scaffold should be disassembled following the instructions for assembly but in reverse order.
12. Inspection, Care and Maintenance
1. Scaffold parts must be handled and transported with care in order to avoid damage.
2. Storage should be organized in such a way that only undamaged parts, in the correct amounts, are available for assembly of the
scaffold.
3. Check all moving parts for correct functioning and check that these are not filthy.
4. Check all parts for damage. Damaged, worn-out orincorrect parts may notbeused. Replace these parts only with original Altrex
parts.
5. Any scaffold components damaged or weakened from any cause shall be immediately removed from service and shall not be
used until repairs have been completed and approved by a qualified person.
6. Toprevent accidents, these parts must be mounted in the same way as the part that is replaced. Mounting (fastening) and/or
repair are at your own expense and risk.Altrexshall not be liable for damage resulting from erroneous mounting and/or repair.
7. Scaffolds must be inspected periodically by an expert.
13. Warranty conditions
Please visit www.altrex.com/warranty to view the clauses of the Altrex warranty.
14. Abbreviations and logos
All rights reserved. No part of this publication may be duplicated, stored in an automated database, or disclosed in any way
or manner, whether electronically, mechanically by photocopying, recording, or in any other way, without prior permission of
Altrex BV Zwolle. This publication may only be used for Altrex products. Misprints and printing errorsreserved.
Fiber-Deck® light-weight platforms (Optional)
Fiber-Deck®
Wood
Wood
Outdoor use
Outdoor use
Indoor use
Indoor use
Optional use
Optional
Width
W
Length
L
Pounds
lb. / lbs.
Platform height
Working height
Meaning
Abbreviation / logo
lb.
7

44 www.altrex.com
www.altrex.com
Annex
T1. Parts
T2. Mounting instructions
T3. Assembly steps even working heights MiTOWER / MiTOWER+
T4. Assembly steps odd working heights MiTOWER / MiTOWER+
T5. Configurations MiTOWER
T6. Configurations MiTOWER+
T7. Assembly steps MiTOWER STAIRS
T8. Configuration MiTOWER STAIRS
9

44 www.altrex.com
www.altrex.com
T1. Parts
A
(SX)301206
7.9
W= 2’6”
EN
Frame 4 rungs
B
324515
7.5
Ø 5 inch
EN
Wheel / Caster
C
301215
7.3
L= 3’8”
EN
Double guardrail brace
301216
9.3
L= 5’2”
D
Wood
EN
Platform with trapdoor
305044
19.9
L= 3’8”
305045
26.7
L= 5’2”
Fiber-Deck®
-
15.2
L= 3’8” (optional)
-
19.9
L= 5‘2“ (optional)
E
513021
9.7
L= 4‘4“
EN
Stabilizer
513031
11.3
L= 4‘11“
F
305581
11.9
W x L= 2’6” x 3’8”
EN
Toe board set
305582
15.2
W x L= 2’6” x 5’2”
lb.
10
Other manuals for MiTower
4
This manual suits for next models
1
Table of contents
Other Altrex Construction Equipment manuals
Popular Construction Equipment manuals by other brands

Pioneer Athletics
Pioneer Athletics STARLINER V6 Instruction manual & parts list

Dynapac
Dynapac CC950 instruction manual

Manitowoc
Manitowoc NATIONAL CRANE 900A manual

Terex
Terex RT700 Operator's manual

Fayat Group
Fayat Group DYNAPAC F1250CS operation & maintenance

Terex
Terex TA9P Tier 4 Final Operation manual

Manitowoc
Manitowoc 16000 Series 2 quick start guide

Rockler
Rockler 42826 manual

Broderson
Broderson IC-280-A ACCOMPANIMENT TO THE INSTALLATION, OPERATION AND MAINTENANCE MANUAL

Auto Crane
Auto Crane HC-12 owner's manual

Hilti
Hilti Hit-hY 70 manual

BN Products
BN Products SIGMA DSX 25 operating & maintenance manual