Alva GHP31 User manual

THIS IS A LOW PRESSURE APPLIANCE TO BE USED
ONLY WITH A 2.8kPa SANS 1237 APPROVED REGULATOR
(REGULAT
YOUR OWN Y, PLEASE READ THIS MANUAL
LY AND ALWAYS OPERATE THIS PRODUCT
ACCORDING TO THE INSTRUCTIONS
IT IS ILLEGAL AND DANGEROUS TO CHANGE OR
ANY PART THIS APPLIANCE
APPROVED FOR USE IN
SOUTH AFRICA
/alvagas
Manufactured for
and distributed by:
TOLL FREE NUMBER: 086 100 ALVA (2582)
|+27 21 442 1540 info@stingray.co.za | www.alva.co.za
A division of Stingray Accessory Manufacturers (Pty) Ltd |.O. Box 30014, Tokai, 7966P
PATIO HEATER
SHORT STAND
GHP31-Cement Grey • GHP32-Black • GHP33-Stainless Steel
Life’s a Gas
C
M
Y
CM
MY
CY
CMY
K
GHP35 Instruction Manual.pdf 1 2019/10/17 3:27 PM
& HOSE
SAN1156 HOSE

IMPORTANT SAFETY INFORMATION
As with all gas appliances, misuse of this appliance or failure
Please read all the instructions before using your gas heater.
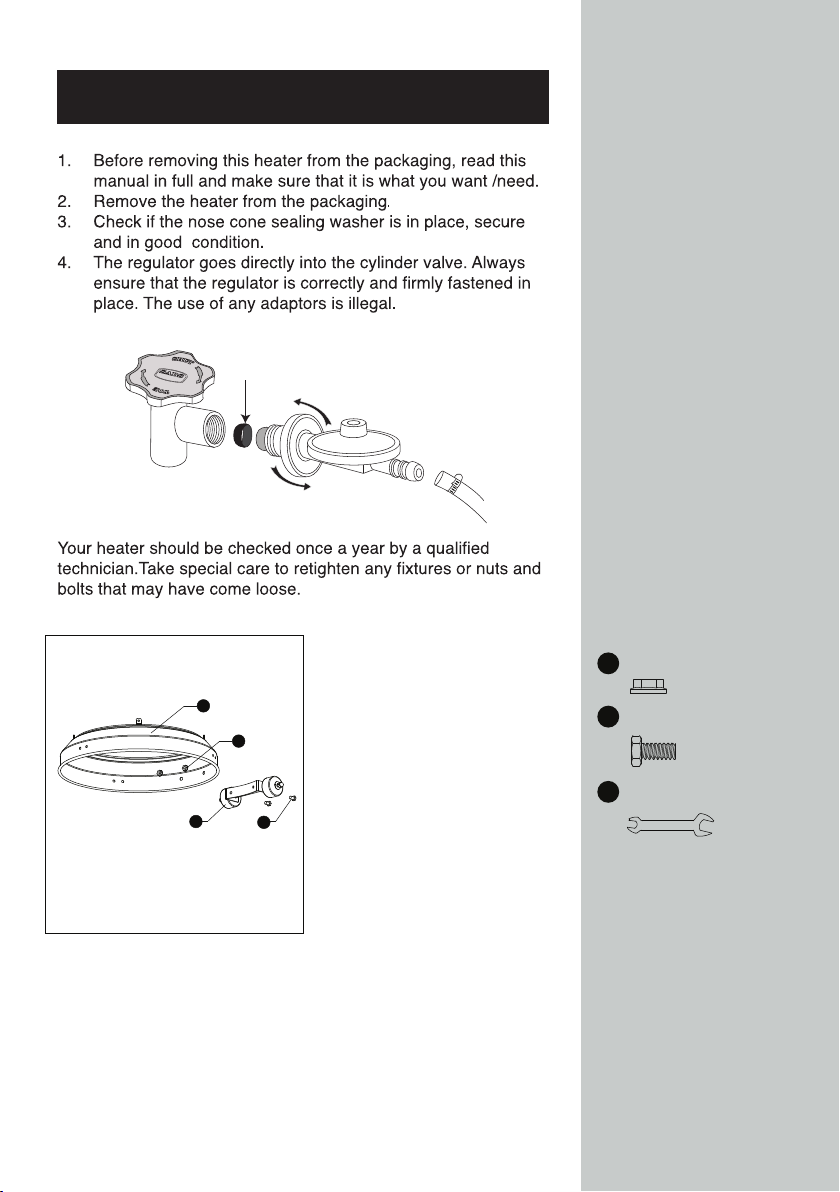
THIS UNIT MUST BE THOROUGHLY CHECKED BEFORE
USE.
before every use.
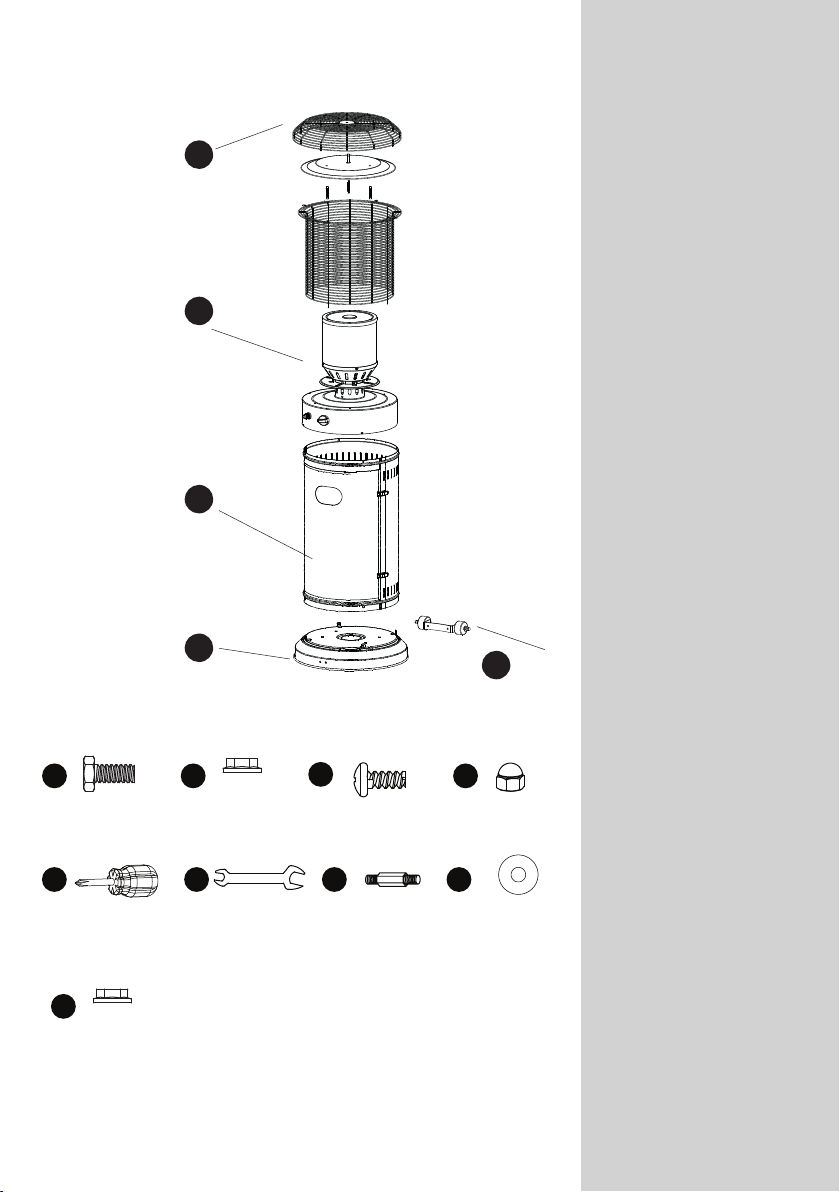
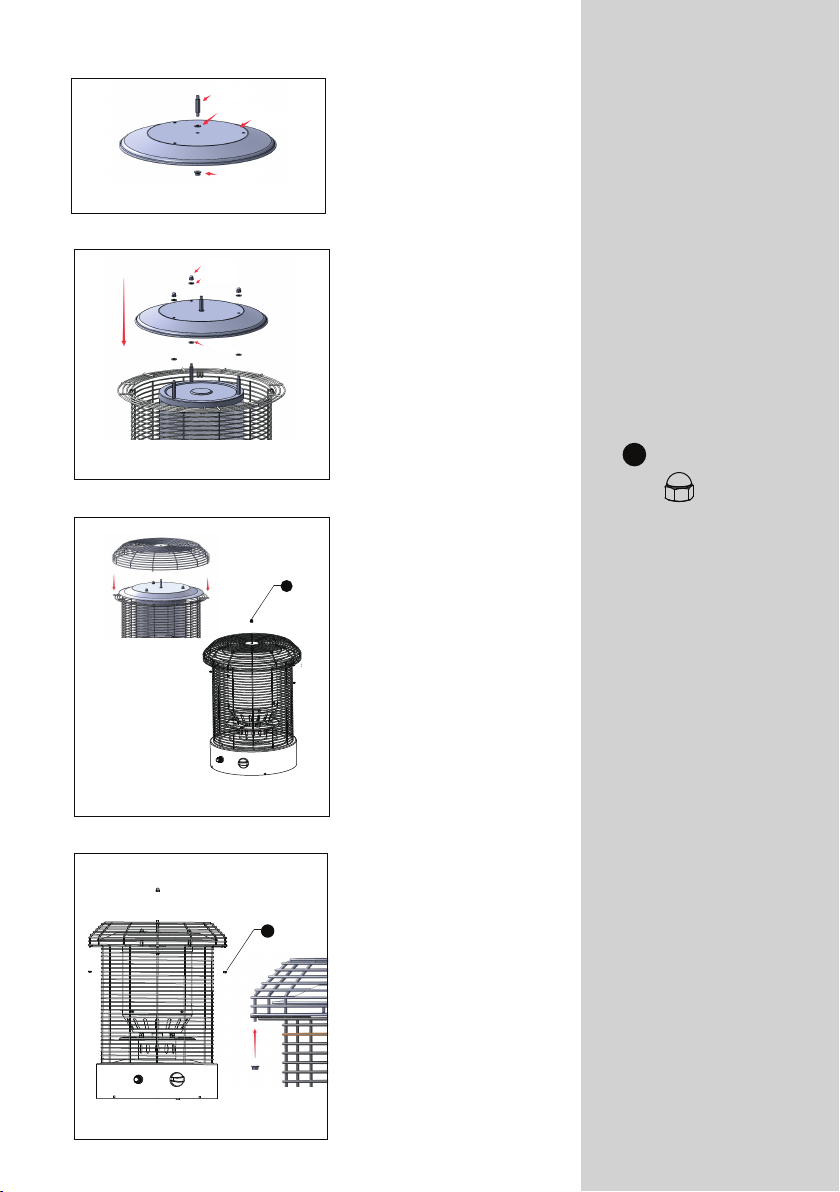
Remove all packaging materials before assembling.
For OUTDOOR USE ONLY. Not for commercial use.
.
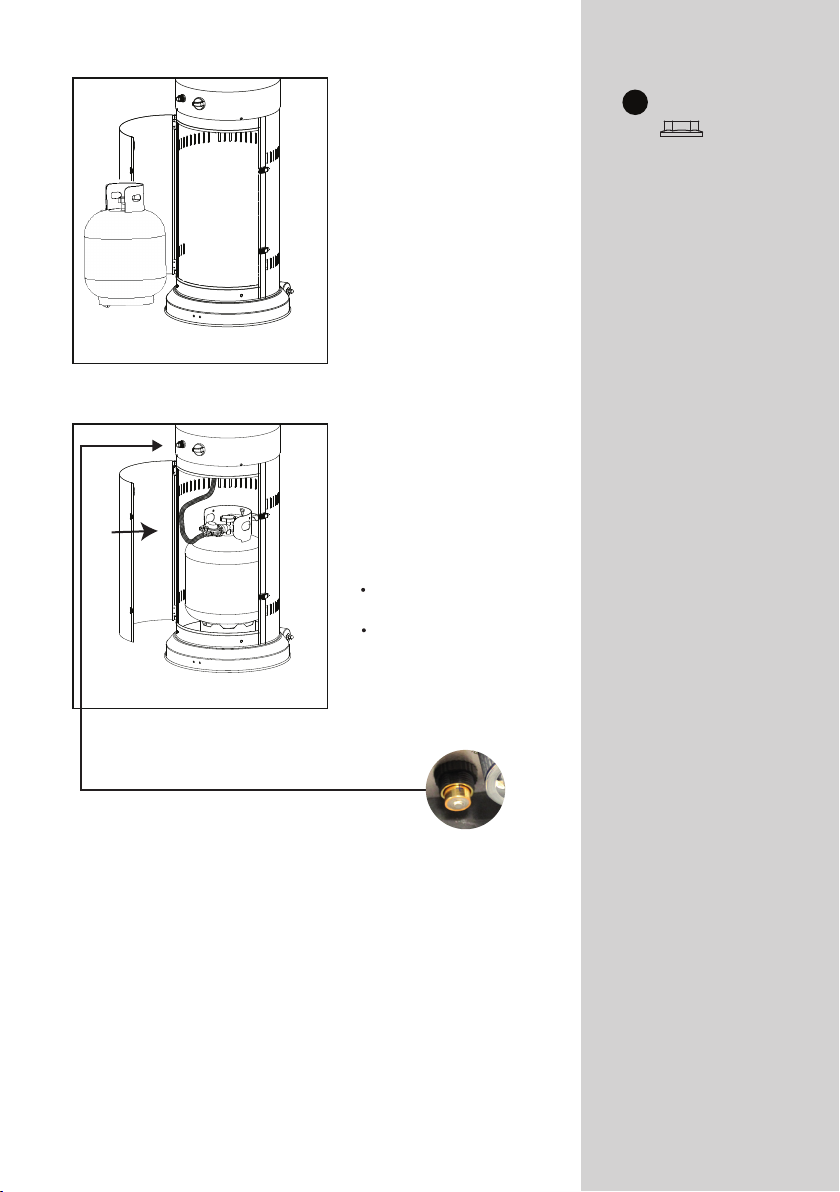
For use with LP gas only.
DO NOT use this patio heater if you do not clearly understand
the instructions and/or how to operate the controls.
Phone the customer care line at 086 100 ALVA (2582) or email
info@stingray.co.za for assistance.
patio heater.
DO NOT leave the heater unattended while in use.
Ensure that the gas supply is turned OFF at the cylinder after
use and while the heater is unattended.
DO NOT move the heater while in use.
DO NOT place objects on or against the heater.
T
Leak test the patio heater every year or if you ever smell gas
NEVER use this heater with a cylinder other than the size
recommended.
DO NOT unscrew the regulator while the patio heater is on or if
the cylinder valve is open.
DO NOT use a patio heater you suspect is faulty.
maintenance and repairs.
The warranty for the patio heater will be rendered void if the
patio heater is serviced or repaired by anyone other than an
Alva appointed technician.
technician, to make sure the unit is safe and fault free.
The operator is responsible for the safety of all third parties
while the heater is in use.
DO NOT use in windy or gusty conditions.
Accessible parts may get very hot during operation. Keep young
children at a safe distance.
Clean with warm soapy water only after the heater has cooled
down.
Keep the burner unit clear of spider webs or other obstructions.
Close the gas cylinder valve after use.
prohibited.
If you smell gas, close the cylinder valve immediately and check
for leaks.
Please read the
instructions carefully
before use.
Retain this manual for
future reference.

INDEX
INDEX
WARRANTY
GENERAL INFORMATION
ASSEMBLY
ASSEMBLY PARTS
HEATER SET UP
SAFE APPLIANCE LOCATIONS
LEAK TEST
USING YOUR HEATER
FLASHBACK
CHANGING YOUR CYLINDER
MAINTENANCE
FREQUENTLY ASKED QUESTIONS
SPECIFICATIONS
TROUBLE SHOOTING GUIDE
AFTER SALES SERVICE
2
2
3
3
5
9
10
10
11
12
12
13
14
15
16
KEY
Important information
Cautions and
warnings.
Danger
Contact an approved
ALVA technician.
Do It Yourself
Instructional
video available

WARRANTY
GENERAL INFORMATION
Thank you for your
purchase of this
Patio heater.
Please read these
instructions carefully
before use and keep
them in a safe place,
for future reference.
Not using gas and/
or gas appliances
according to the
instructions is
extremely dangerous
and can lead to
property damage,
injury or death.
For outdoor use only.
For use with LPG only.
DO NOT use within
surfaces.
Always turn OFF the
gas supply at the
cylinder after use.
DO NOT store
another cylinder near
the heater.
2
’
Your Life Is Better With Alva

3
ASSEMBLY
Remove all packaging materials before assembling the patio
heater.
Before Assembly:
Please read all instructions thoroughly before proceeding
with the appliance assembly.
Find a large clean area in which to assemble the patio
heater.
Please refer to the parts list and diagrams. (see page 3 to 8)
Assembly of the heater involves large components and it
is advisable to have two people assemble the unit.
This patio heater makes use of an industrial cylinder (9kg ALVA
cylinder recommended) with a 5/8” BSP thread; horizontal exit
valve.
The Bullnose regulator supplied with the heater tightens to the
left hand side (anti-clockwise). (Figure A).
If you have bought a new gas cylinder, the cylinder needs to be
air, the heater will not work properly. This should happen at the
this with your gas supplier.
Burner assembly
NOITPIRCSEDTRAP QUANTITY
A
Flame screen guard
1
B 1
Cylinder Housing
C 1
D
Base
E
Wheel
1
1
ASSEMBLY PARTS

4
Flame screen guard A
Burner assembly B
Cylinder Housing C
Base D
Wheel
E
AA BB DD
CC
Screw M5 X 8
Qty. 8
M6 Dome Nut
Qty. 4
Philips
screwdriver
Qty. 1
EE
Wrench
Qty. 1
FF GG
Bolt M8 X 16
Qty. 2
M8
Flange
nut
Qty. 2
Washer Φ6
Qty. 7
Stud
Qty. 4
II M6
Flange
nut
Qty. 4
HH

HEATER SET UP
(Figure B)
Fig.B
Nose cone
sealing washer
5.
D
AA
EBB
Fig C
Use 2pcs M8x16mm bolts
and M8 nuts to connect
bracket with wheels to
the base.
AA
BB
x 2
M8 x 16 mm Bolts
M8 Flange Nut
x 2
FF Wrench
x 1
5

C
CC
6
Fig D
Fig E
Fig F
6. Use 4pcs M5x8 screw to
join the tank housing base
and stand.
CC
EE
x 4
x 1
Philips
screwdriver
Screw M5 x 8
CC
EE
x 4
x 1
Philips
screwdriver
Screw M5 x 8
7.
Use 4pcs M5x8 screw to
join the burner head and
tank housing body.
B
CC
GG
8. After the lower safety guard
is installed to burner head,
screw the 3pcs M6 studs on
the flame screen and tighten.
GG
x 3
Stud

7
Fig G
Fig H
Fig I
Fig J
11.
9.
10.
Insert the upper safety
guard 4pcs feet into
the lower guard 4pcs
holes shown in (Figure I),
the upper safety guard
middle hole on the
reflector stud.
12. Use the M6 Dome nut
connect the upper safety
guard , use 4pcs M4
Flange nut to connect
with upper safety guard
4pcs feet and tighten as
shown in (Figure J).
Install the double-ended
stud on the aluminum
reflector as shown in the
figure, and tighten the
nut.
Install the aluminum
reflector on the three
double-end studs as
shown in the figure.
DD
DD
x 1
M6 Dome Nut
II

8
Fig K
Fig L
13. Position the cylinder
inside the housing
(Figure K) and secure by
cliping belt around
cylinder.
14. Attach the hose and
regulator and leak test
both connections using a
soapy water solution, see
page 10 for leak test.
(Figure L)
performing this leak test.
DO NOT light the heater when
After passing the leak test,
insert AAA battery into battery
compartment for the auto
ignition to operate. Battery
not supplied with patio heater.
x 4
II M6 flange nut

SAFE A
Minimum Clearance from Combustible Surfaces:
The heater is primarily for outdoor use only. Always ensure
that adequate fresh air ventilation is provided.
Always maintain proper clearance from combustible
materials, Side 1000mm, Rear 1000mm, Ceiling 1000mm
minimum.
Never operate heater in an explosive atmosphere for example
in areas where gasoline or other flammable liquids or vapours
are stored.
To protect heater from strong wind, anchor the base
securely to the ground.
9
1000mm 1000mm
Flame screen guard
Burner assembly
Base of control housing
Tank housing
Base

LEAK TEST
Brush the connections (heater
Fig.M)
If you are unsure or if you
cannot tighten the connection,
086 100 ALVA
(2582)
USING YOUR HEATER
Fig.M
Foamy
bubbles
indicate a
leak
Connection
in assembly
Connections to be leak tested
Regulator into cylinder
Hose to regulator
Hose to appliance
10
FOR YOUR SAFETY
IF YOU SMELL GAS
Turn off the gas
supply at the
Cylinder.
Extinguish all
DO NOT operate
any electrical
appliances.
Ventilate the
area.
Check for leaks
(see LEAK TEST)
If odour persists,
contact your
dealer or local
gas supplier
immediately.
Before proceeding to
ignite the heater, make
sure you understand
the “IMPORTANT
SAFETY
INFORMATION”
section of this manual.
http://www.
youtube.com
/watch?v=8L
pZ1B0m23Y
&feature=plcp
How to do
a leak test
Fig.N
Ignition
Button
Control Knob
OFF
PILOT
HIGH
LOW

Smoke and odour
caused by the heating
of oils used during
manufacturing will
occur when lighting
time. This is normal
and there is no
reason for alarm.
Avoid inhaling the
fumes!
The smoke and odour
should dissipate within
3 - 4 minutes.
Failure to follow this
lighting procedure may
beyond the emitter
grid.
11
pilot ame position and press ignition button.
Keeping the control knob depressed, the pilot ame will
ignite next to the burner. Keep the knob depressed for
another 10 seconds to allow the ame failure safety system
device to activate, then you can select your desired heat
setting which will ignited the burner.
pilot ame
which will ignite the burner.
,

12
Fig.O
CHANGING YOUR CYLINDER
Make sure your cylinder valve is
closed (by turning it clockwise).
Allow the heater to fully cool before
replacing the cylinder. Open the
heater to expose the cylinder,
allowing you to access and replace
the cylinder.(Figure O)
Remove and replace the cylinder.
ALWAYS check that the regulator
sealing washer (nose cone) is intact
and in place before reattaching the
regulator to a cylinder. (Figure B -
Page 5)
DO NOT attempt to remove the regulator while the heater is on
or if the cylinder valve is not closed.
MAINTENANCE
Always make sure the heater is OFF and cool, with the
cylinder valve closed, before conducting any maintenance.
technician.
If faults are suspected or detected, stop using the heater
and contact ALVA.
Clean the exterior and storage area of your heater when
required to remove dust.
DO NOT use abrasive products to clean the heater; these
may damage the paint work.
Check the burner and remove any debris, dirt, spider webs
or wasp nests from the burner ports by using compressed
air or a pipe cleaner. DO NOT clean the burner with water
or tamper with the jets. If a jet is blocked it must be replaced
with an original manufacturer marked jet.
Replace parts and allow the heater to dry properly before
storing.
If the gas control or ignitor is exposed to water or gets wet,
dry it properly before attempting to light the heater. You
might have to replace the parts if the heater does not ignite.
burner passage clean.

13
Clean with a soft brush or blow clean with compressed air.
If any part of the heater is in need of replacing, use only original
Alva parts. Using any other spare parts is dangerous and will
void the warranty.
When the heater is not in use for extended periods, always
keep the burner head covered.
bolts that have come loose.
Signs of a blockage:
1.
2. Heater does not reach the desired temperature.
3. Heater glow is excessively uneven.
4. Heater making popping sounds.
5. in burner tube.
Storage
Store the heater in a cool dry place. If in a coastal area extra
care must be taken in selecting the storage area as rust will
occur if exposed to the elements.Disconnect the cylinder and
store seperately in a protected dry and cool place.
Remove battery from under igniter button due to possible
battery leakage.
Cleaning and care
Wipe off all surfaces with a soft, damp cloth. DO NOT clean
the heater with combustible or corrosive cleaners.
Remove debris from the burner to keep it clean and safe for
use.
In order to prolong the life of your heater we recommend
especially important near the coast.
FREQUENTLY ASKED QUESTIONS
Q: Why is there an odour when I use a gas heater?
A: All gas appliances give off an odour. This could be
harmful if inhaled for extended periods of time. This
“smell” is normal, and it does not mean that you have
a gas leak. The smell of raw gas (just before you ignite
the appliance) differs to the smell coming from the
heater when it is in use. The odour is added to allow
easy gas detection.

Q: Why must there be ventilation when using a gas
heater?
A: Whenever fuel (LP Gas in this case) is burned,
the smoke to exit the house. Even though a gas heater
does not generate smoke, it still generates carbon
monoxide and carbon dioxide, which can be dangerous
if not diluted by fresh air. Always ensure adequate
ventilation by leaving a door or window open in the
same room.
Q: How long will the gas in my cylinder last?
A: This depends on how you use your heater. It is easy to
calculate your gas consumption. Take the capacity of
the gas cylinder in grams (i.e. 9000g for a 9kg
cylinder) and divide it by the gas consumption of the
heater, on your desired setting). The answer to
the calculation is the approximate number of hours that
your heater will burn for.
Q: What do I do if I have an cylinder?
A: The best method to determine if your cylinder is over-
cylinder weight – this gives you the weight of your gas.
If this gas weight exceeds your cylinder design weight
(9kg) then return the cylinder to your gas supplier.
SPECIFICATIONS
14
http://www.
youtube.com/
watch?v=Ya
vsYE8nzCw
&feature=plcp
How to test if
your cylinder
is overfilled
Model ALVA GHP31
Type of gas LPG
Operating pressure 2.8kPa
Injector size
Heat Output 11kW
Gas Consumption 800gr/hr at MAX
1.75mm

15
Model ALVA GHP32
Type of gas LPG
Operating pressure 2.8kPa
Injector size
Heat Output 11kW
Gas Consumption 800gr/hr at MAX
1.75mm
Model ALVA GHP33
Type of gas LPG
Operating pressure 2.8kPa
Injector size
Heat Output 11kW
Gas Consumption 800gr/hr at MAX
1.75mm
Note:
If the appliance cannot
be adjusted to perform
correctly it should not
be used until serviced
or repaired.
Warning:
Improper installation,
adjustment, alteration,
service or maintenance
can cause injury or
property damage.
adjustments made
to the product without
prior authority from the
manufacturer will void
any warranty claims.
TROUBLE SHOOTING GUIDE
TROUBLE CAUSE REMEDY
Pilot will not light Gas valve may be
OFF
Cylinder empty
Opening blocked
Air in supply system
Loose connections
Turn the gas valve
ON
Refill LPG cylinder
Clean or replace
opening
Purge air from lines
Check all fittings
No ignition spark Dead Battery Replace with a new
AAA battery

16
AFTER SALES SERVICE
MANUFACTURED FOR AND DISTRIBUTED BY
Alva, a division of Stingray Accessory Manufacturers (Pty) Ltd.
P.O. Box 30014
Tokai, 7966
Tel: 021 442 1540
E-mail: info@stingray.co.za
www.alva.co.za
/alvagas
www.facebook.com/AlvaGas
TOLL FREE NUMBER 086 100 ALVA (2582)
Burner will not
light
Pressure is low
Opening blocked
Control not on HI
Thermocouple faulty
Pilot light assembly
bent
Cylinder near empty.
Remove burner and
clean it
Turn Control Valve
to HI
Replace
Thermocouple
Place pilot properly
In poor location Position properly
and retry
TROUBLE CAUSE REMEDY
Pilot will not stay
on
Debris around pilot
Loose connections
Thermocouple bad
Gas leak in line
Lack of fuel pressure
Clean dirty area
Tighten connections
Replace
thermocouple
Check connections
Cylinder nearly empty,
Refill LPG cylinder
This manual suits for next models
2
Table of contents
Other Alva Patio Heater manuals