ALVEO3D 900 Series User manual

ALVEO3D
INSTRUCTION
MANUAL
v1.0 EN
PRINTERCASE - SERIES : 900 - 800 - 600
Safety enclosure for 3D printer
Find the support page
www.alveo3d.com/en/assembly-printercase/
and the contents to download
www.alveo3d.com/en/download-printercase/

01
SUMMARY
ELEMENTS LIST p. 3
STEP 6 . GASKET AND PANEL ASSEMBLY p. 9
STEP 7 . ILLUSTRATION OF MOUNTED STRUCTURE BOX p. 10
STEP 8 . ASSEMBLY OF THE FILTRATION SYSTEM p. 11
NOTES p. 26
STEP 2 . LOW MAGNETIC SYSTEM ASSEMBLY p. 5
STEP 9 . PANEL FILTRATION SYSTEM ASSEMBLY p. 12
STEP 3 . MOUNTING THE BOTTOM PANEL p. 6
STEP 10 . CLOSING THE FILTRATION SYSTEM p. 13
STEP 4 . ASSEMBLY OF AIR INLET GRILLES p. 7
STEP 5 . ASSEMBLY OF CABLE PASSAGE p. 8
STEP 1. PREPARING THE BOTTOM PANEL p. 4
SUMMARY p. 1
SAFETY p. 2
STEP 11 . V2 BOARD ASSEMBLY p. 14
STEP 12 . CONNECTING THE V2 SENSOR p. 15
STEP 13 . PREPARING THE TOP PANEL p. 16
STEP 14 . MOUNTING THE TOP PANEL p. 17
STEP 15 . MOUNTING THE LED HEADBAND p. 18
STEP 16 . ILLUSTRATION OF MOUNTED STRUCTURE 2 p. 19
STEP 17 . ORIENTATION OF THE DOORS p. 20
STEP 18 . MOUNTING ACCESSORIES ON DOORS 1/2 p. 21
STEP 18 . MOUNTING ACCESSORIES ON DOORS 1/2 p. 22
STEP 19 . MOUNTING ACCESSORIES ON 2/2 DOORS p. 23
STEP 20 . MOUNTING THE DOORS ON THE PROFILES p. 24
STEP 21 . MOUNTING ACCESSORIES p. 25

02
SAFETY
Read the instructions before use
The use of an enclosure helps to contain the pollutant emissions
associated with the use of 3D printers. It is recommended to
always use ventilation during the printing process.
The filtration system uses a powerful fan. You should only turn it
on after the device is completely assembled with the protective
screw-on cover and filter. Failure to do so may result in injury.
Please use the electrical voltages recommended during the
assembly instructions to power the unit to avoid damage to the
electronic components.
Avoid contact with the electronic board during operation.
Operating range of the filter 0-60°C max

03
1x main box Model 900 / Model 800 / Model 600
ELEMENTS LIST
1x PMMA panel case
1x set of 5 panels 3mm thick
1x case Aluminium plates
1x bottom plate 4mm
1x top plate 2mm
1x carton tube
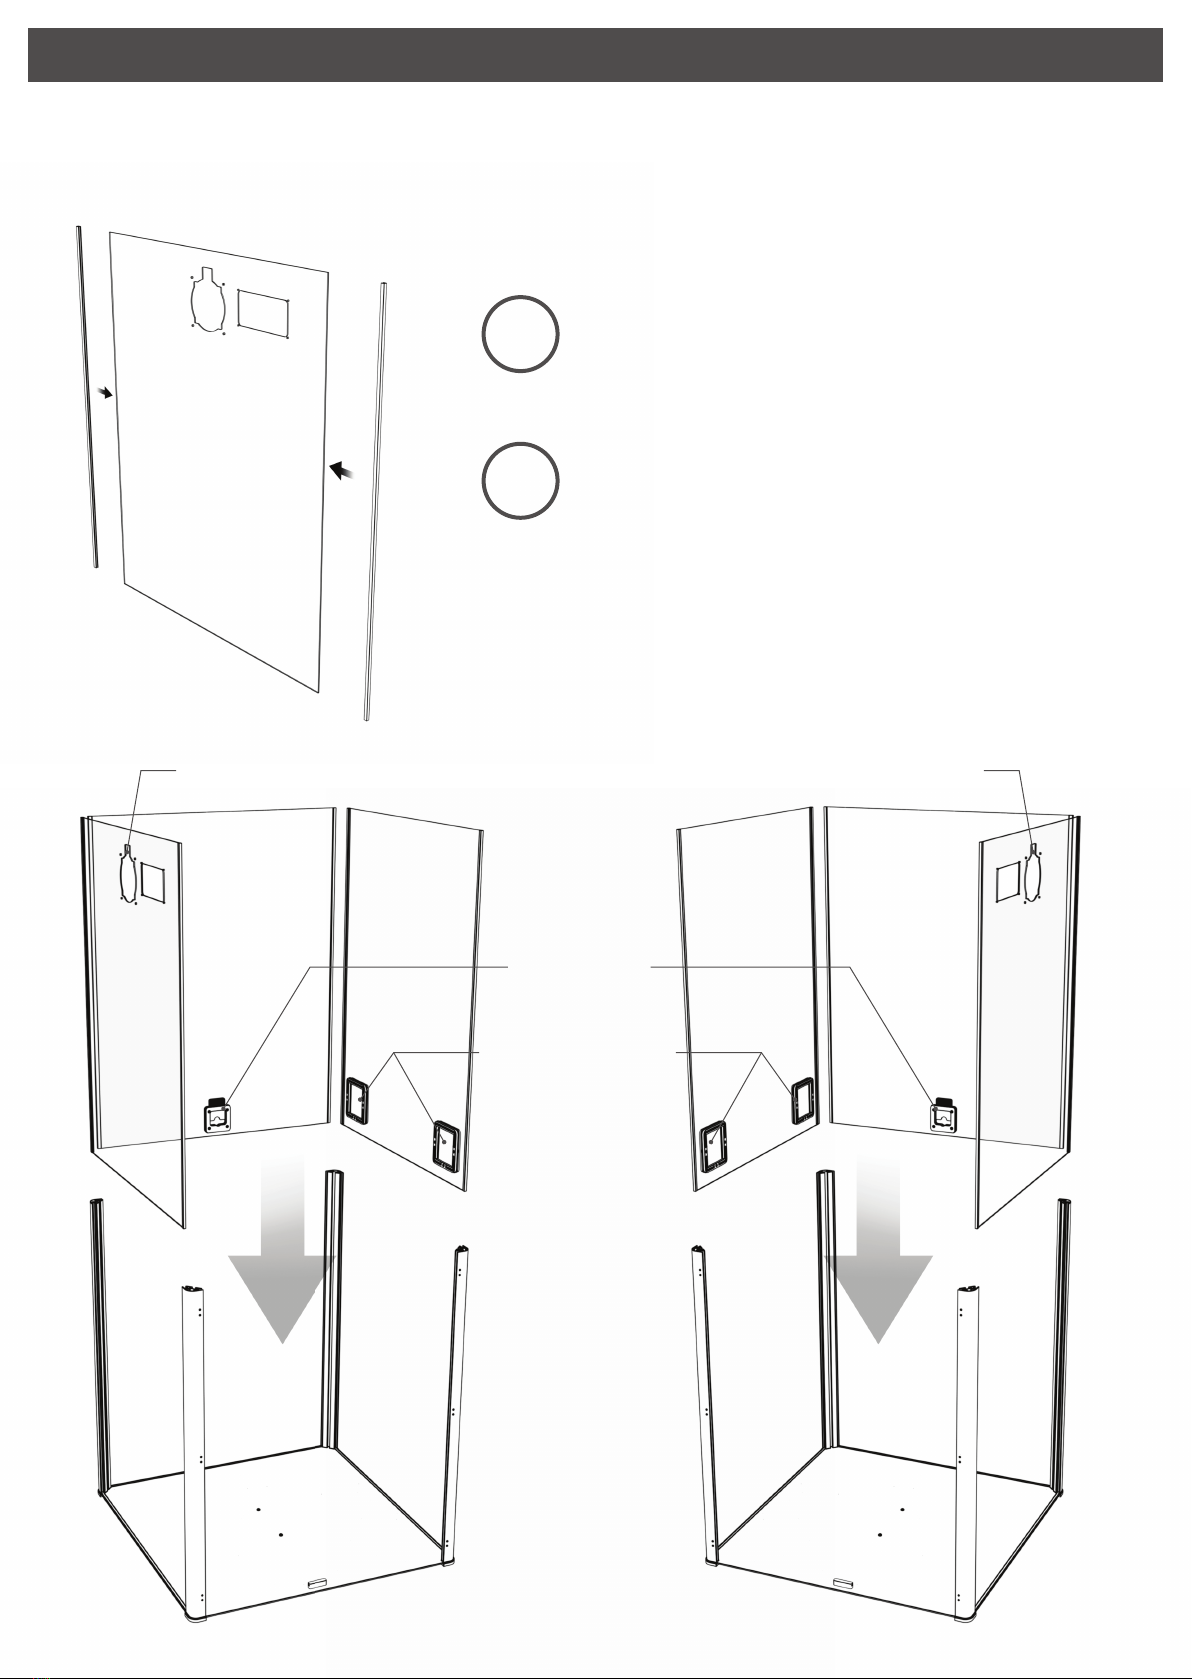
2x profiles with holes
2x profiles without holes
1x horizontal bar
Bag - Doors
12x M4x12 screws black countersunk
12x M4x8 screws black countersunk
12x M4 hexa nylstop nuts
4x M4x16 stainless steel cylinder screws
4x M4 square nuts
4x M5x12mm black countersunk screw
4x M5 square nut
Bag - Back panel
4x M3 hex nuts
4x M3x10 black cylindrical screw
Bag - Side panel 1
6x M3 hex nuts
6x M3x10 black cylindrical screw
Bag - Side panel 2
8x M5x16 self-drilling screw
4x M3x14 cylindrical screw
Bag - Top panel
8x M5x20mm screw black domed
4x M5x12 screw black domed
2x M5x10 screw black domed
1x base plate
1x cable clamp
Bag - Bottom panel
8x M5x20mm screws
2x screw M4x16 black oval
2x M4 square nuts
2x M5x10 screw black domed
2x M5 hex nuts
4x anti-skid adhesive pads
The elements supplied with the PRINTERCASE SERIES 900 - 800 - 600 Aluminum enclosure
2x accessory boxes 30x30x100
1x manual
1x power supply 24v angled
1x zip bag :
1x v2 card - 1x short temperature probe - 1x cable clamp + self-adhesive base - 1x 4 wires 19cm
1x alveoZERO = shell fan / filter / grid + 1x gasket 120mm - 1x card V0 double switch + 1x fan H8
1x filtre P3D
1x LED 230cm Model 600 / 270cm Model 800 / 320cm Model 900)
1x LED installation template
1x bag :
Accessories
1x bag :
1x Allen key 2,5mm
1x Allen key 3mm
1x pipe wrench 7mm
1x screwdriver
1x passageway cable
1x pair of grids
4x corner feet
2x central skids
1x magnet block (bottom) 4x cover caps square nuts M5
1x magnet block (top) 4x cover caps screws handles
2x wide magnets
2x handles
4x magnet screw covers
6x hinges Model 900 / Model 800 4x hinges Model 600
6x top panel block Model 900 / Model 800 3x top panel blocks Model 600
4x top cap
6x silicone gaskets Model 900 / Model 800 / Model 600
3x EPDM gaskets Model 900 / Model 800 / Model 600

04
Start by mounting the accessories on the bottom 4mm aluminum panel.
STEP 1. PREPARATION OF THE BOTTOM PANEL
Position the side with the 3
rails of the enclosure
upwards (the side facing
inwards).
1.
Insert the 2mm black
EPDM foam gaskets into
the rails.
Peel off the sticker on the
back of the gaskets and
place the gasket without
stretching it. Cut the excess
length if necessary.
2.
Install the center feet : 2
elements for 900 and 800
series, 1 element for the
600 series.
3.
M5 hexagonal nut
M5 screw, 10mm

05
Mount the magnetic locking system on the bottom plate. Insert one of the two magnets into the magnet holder.
Insert the M4 square nuts into the slots on the bracket, then secure the bracket to the plate with the two 16mm M4
cap screws.
STEP 2. BOTTOM MAGNETIC SYSTEM ASSEMBLY
Orient the magnet holder
so that the thinner wall
faces the doors.
1.
2x M4 screws, 16mm
Magnet
M4 Square nuts

06
The bottom panel is mounted using 8 M5 screws with a 20 mm domed head. They are screwed directly into the ends of the
aluminum profiles by taking the bottom plate and the corner feet .
STEP 3. MOUNTING THE BOTTOM PANEL
The profiles do not have an up/down direction.
However, it is necessary to position the threaded
profiles for the door hinges towards the front.
1.
Attach the corner feet to the panel and
the profile with the M5 screws with
20mm head. The head of the screw
must not protrude from the plastic part.
3. Place the 4 self adhesive
anti-slip pads on the feet.
4.
Prepare the 4 corner feet
2.
Be careful to screw in the first few threads by hand and then using the 3mm Allen wrench provided
with the kit. Make sure the screws fit the threads before tightening.
Hinge thread for door, rear, front
Arrière
Avant
M5 screw 20mm Pads

07
On the panel with the two square cut-outs, mount the grilles before installation in the aluminum structure. The assembly is
done with the 6 M3 cylindrical screws 10 mm and 6 M3 hexagonal nuts.
The air intake grilles are supplied pre-assembled. The micro perforated nylon grille is already positioned as well as the
hexagon nuts in the clamping ring.
STEP 4. MOUNTING THE AIR INLET GRILLES
Remove the protective film partially for the
installation of the accessories on the panel.
1.
Screw the elements of the friezes on both
sides of the panel.
2.
Nylon grid
M3 cylindrical screw 10mm
M3 hex
nut

08
The cable entry is mounted on the rear panel with 4 x 10mm M3 cylindrical screws and 4 x M3 hex nuts.
Put the nuts in their places, before tightening the screw.
Once the assembly on the panel is completed, slide the knife into the slot of the part on the screw side.
STEP 5. MOUNTING THE CABLE ENTRY
Partially remove the protective film from
the panel before assembly.
1.
Tighten the screws with
the 2.5 mm Allen key
supplied in the kit.
2.
Plate
Outer side faceplate
Cylindrical M3 screw 10mm
M3 HEX NUT

09
The silicon gaskets are mounted on the rear panel (cable entry) and the side panels (air inlet and filtration system grilles).
Remove the protective film from the sides of the panels. Install the silicone gasket in a U shape. The lengths of the gaskets
are cut to the right size, install the gaskets without stretching them.
STEP 6. GASKET ASSEMBLY AND PANEL ASSEMBLY
Put the silicone gaskets on the panels.
Remove the protective film.
1.
Slide the panels with the gaskets on
both sides into the profile rails.
2.
Left mounted filtration
Air inlets always on
the opposite side of
the filter
Rear cable
entry
Filtration right mounting

10
In this step, the bottom aluminum panel, profiles, PMMA panels are mounted, as well as the accessories on the panels, air
inlet grilles and cable passage.
STEP 7. ILLUSTRATION OF MOUNTED STRUCTURE BOX

11
The filtration system is mounted on the front of the unit on either side of the transparent panel.
STEP 8. ASSEMBLY OF THE FILTRATION SYSTEM
Insert the electronic board
into its slot following the
rails, components
downwards.
1. Once the electronic board
is in place, locate the
connectors.
2.
Fan connector
M5 self-drilling
screw 16mm
M5 self-drilling
screw 16mm
LED connector V2 Connector

Place the fan in its place, the label
facing panel transparent.
1.
Pull the fan wires through the slot
provided.
2.
Pass the electronic board through
the hole in the panel cut-out (from
the bottom to the top).
Avoid shocks between the electronic
board and the panel.
3.
Screw the 2 parts together with the 4
self-drilling screws M5 x16mm.
The panel is sandwiched between the
2 plastic parts.
4.
12
Panel mounting is done with 4 M5 self-drilling screws from the housing side of the filter location through the panel to the
fan. Screw directly into the plastic of the fan.
STEP 9. PANEL MOUNTING THE FILTER SYSTEM

13
Connect the cables and close the rear protection grid.
STEP 10. CLOSING THE FILTER SYSTEM
Connect the fan connector.
1. Pass the power cable of the V2 board
through the hole on the side of the
housing.
2.
Place the 120mm cylindrical joint in
the rail on the case above the fan.
Then close the grille by screwing in
the 4 self-drilling screws.
3.
19cm black
braided cable

14
The V2 board is supplied pre-assembled. Mount the V2 board in its slot on the panel and use the clamp ring to secure the
board to the panel with the 4 M3 14mm cylindrical screws and 4 M3 hex nuts.
STEP 11. ASSEMBLY OF THE V2 BOARD
Connect the power cable to the 4-pin
connector. There are two 3-pin
connectors and one 4-pin connector.
1.
V2 power
connector
V2 probe
connector
RS 232
M3 nuts
M3 14mm cylindrical

Connect the V2 probe to the middle 3-pin connector.
15
The V2 probe is connected to the middle 3-pin connector on the V2 board. After connecting the cables, use the
self-adhesive base and cable clamp for the probe on the back of the V2 board if necessary.
STEP 12. CONNECTING THE V2 PROBE
Connect the V2 probe to the
middle 3-pin connector.
2.
Connect the cable from the
electronic board of the filter box to
the V2 board on the 4-pin
connector.
1.

16
Mount the magnetic locking system on the support bar. Insert one of the two magnets into the magnet holder slot. Then fix
the magnet holder to the bar with the two M5 screws.
STEP 13. PREPARING THE TOP PANEL
Screw the bar on the top
panel.
2.
Mount the magnet holder
on the bar.
1.
Place two plate blockers on each
panel. Except for the 600 series,
only one per panel is required.
3.
M5 screw 10 mm
M5 domed 12mm
Panel clamp
Magnet

17
The panel is mounted by screwing the 8 M5 screws (20mm) into the profiles.
STEP 14. MOUNTING THE TOP PANEL
Adjust the panel clamps
1.
Screw the 8 M5 screws
20mm in the profiles
2.
Screw by hand on the first threads and then with the 3mm Allen key supplied with the kit.
Make sure that the screws fit the threads before tightening.
M5 screw
20mm

18
STEP 15. MOUNTING LED STRIP
The first step is to glue the LED strip on the 2mm aluminum panel (the top panel).
Be careful once glued, it is very difficult to remove and reposition the LED strip.
Position the light
installation template in the
center of the panel, align it
with the two pins to put in
the holes of the panel.
1.
Glue the LED strip
2.
Remove the installation
template
3.
Light installation template
The wire of the LED strip towards
the side of the filtration system.
Holes of the top panel

19
Assembly is almost complete!
STEP 16. ILLUSTRATION OF THE ASSEMBLED STRUCTURE 2
This manual suits for next models
2
Table of contents
Other ALVEO3D 3D Printer manuals