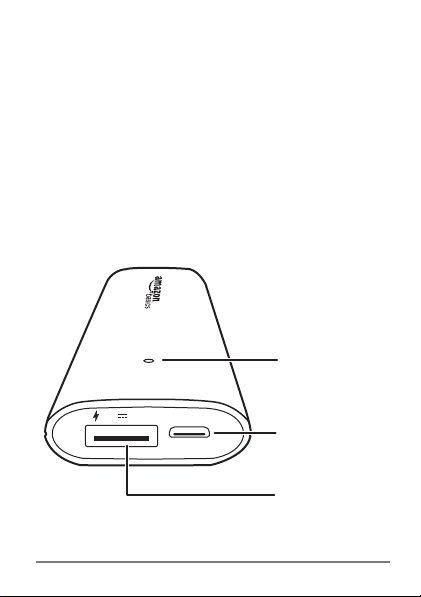
AmazonBasics B00LRK8I7O User manual

B00LRK8I7O

3
English
Instruction Manual
·
English
AmazonBasics “Lipstick”
Portable Power Bank - 3,000 mAh
Contents
•PowerBank
• USB charging cable
•Storagebag
• This PB3R instruction manual

4
Compatibility
• We do not recommend using your
power bank with tablets because the
charging speed will be slow.
• Your device’s power input should not
be greater than 5V/1A,
• Your power bank is designed to work
with devices with a 5V DC power input.
See your device’s documentation for
more information.
Product overview
INPUT
5V 1.0A
USB output
port
LED indicator
micro USB
input port

5
Power overload protection: Your power
bank has overload protection. To protect
your power bank and the connected device
in an overload situation, charging stops and
the LED indicator turns off.
An overload can occur if the device you are
charging needs a higher power input than
your power bank can supply or if your
power bank is outputting more than 5V/1A
of power.
Charging your power bank
1. Plug the small connector on the
included USB charging cable into the
micro USB INPUT port on your power
bank.
12
OR

6
2. Plug the large connector on the cable
into a power source, like an AC power
adapter (not included) or a USB port on
a computer. The red LED indicator blinks
while charging, then lights solid when
charging is complete.
Note: When the blue LED indicator is
blinking, your power bank’s charge is below
25%. You need to charge your power bank.
Charging your device
1. Plug the the large connector on the
included USB charging cable into the
5V 1.0A output port on your power
bank.
2. Plug the other end of the cable into the
micro USB port on your device.
1
2

7
Notes:
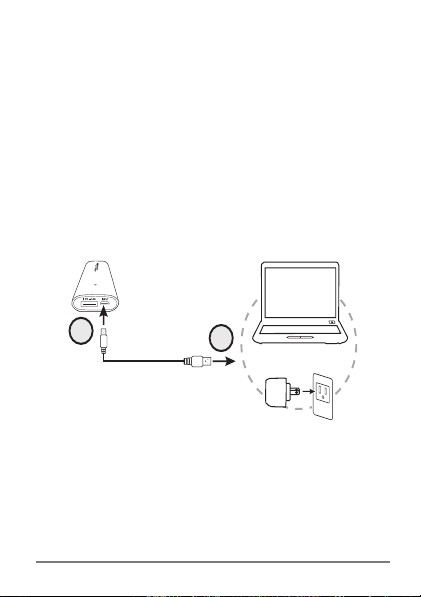
• We recommend that you use the
charging cable that came with your
device or the micro USB cable that
came with your power bank to charge
your device. Using other cables may
significantly reduce the charging speed
(or prevent you from charging).
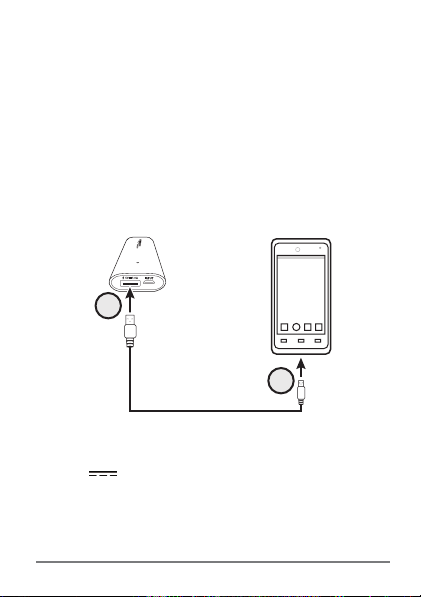
• If your device does not charge with a
micro USB port, use the USB cable that
came with your device or buy an
adapter.
• To charge an iPhone or iPad using a
lightning cable:
1.Connect the lightning cable to your
iPhone or iPad first, then plug the
other end of the cable into your
power bank. Charging starts.
2.When charging is complete, unplug
the lightning cable from the power
bank.
3.To charge another device using the
lightning cable, unplug the cable
from your power bank, then plug it
back into to your power bank. Plug
the lightning cable into your iPhone
or iPad within 15 seconds.

8
LED indicator
When the
indicator is: Your power bank:
Blinking red Is charging.
Red Is fully charged.
Blue Is charging your device.
Blinking blue Has a battery with a charge
level below 25%.
Off Needs to be charged.
OR
Has finished charging your
device.
Note: If you unplug your
power bank from a device, the
blue LED indicator stays on for
15 seconds.

9
Troubleshooting
My power bank doesn’t charge.
• Make sure that the micro USB cable is
connected to the INPUT port on your
power bank. See
Charging your power
bank
on page 5.
• If you are using an AC power outlet,
make sure that the outlet works.
• If you are using a computer USB port,
make sure that the computer is turned
on and the USB port works.
• Your power bank may be damaged.
Replace your power bank.
My power bank doesn’t charge a device
• Make sure that you have connected the
charging cable from your power bank's
5V 1.0A output port to the correct
port on your device. See
Charging your
device
on page 6.
• Make sure that your power bank is
charged. When your bank is charged,
the LED indicator lights red.
If the blue indicator is blinking, your
power bank's charge level is low and
you need to charge it.

10
If the blue LED indicator is off:
• Your power bank has no charge and
you need to charge it.
• A power overload has occurred. If
your power bank detects a power
overload, it stops charging.
Disconnect the cable, wait a few
minutes, then try charging again.
• Make sure that your device's power
input is not greater than 5V/1A.
• If you are trying to charge an iPhone or
iPad using a lightning cable:
1.Make sure that the lightning cable
isn’t plugged into your power bank.
2.Plug the lightning cable into your
iPhone or iPad first, then plug the
cable into your power bank.
Charging should start.

11
3.When you finish charging, unplug
the lightning cable from your power
bank. If you leave the cable
connected to your power bank and
try to recharge the iPhone or iPad
again, your power bank won’t
charge the device. Instead, unplug
the cable from your power bank,
then plug it back into your power
bank. Plug lightning cable into your
iPhone or iPad.

12
Specifications
Battery capacity 3000 mAh
Discharge from 4.2V to 3.0V with
0.2C
Cell type Lithium-polymer battery
Indicator light Two colors
Protection function Short circuit, over current,
overcharge, under voltage
protection
Input Max 5V/0.9A
Rated output 5V/1.0A
Working temperature 14° ~ 113°F (-10° ~ 45°C)
Dimensions
(L × W× D) 4.76 × 1.52 × 0.55 in.
(121 × 38.6 × 14 mm)
Weight Approximately 2.47 oz. (70 g)

13
Safety
Warnings:
• Do not dispose of your power bank in a
fire. The battery may explode.
• Do not short circuit the battery.
• Do not disassemble your power bank.
There are no user serviceable parts
inside.
• Keep your power bank dry. Do not use
it in a damp environment or immerse it
in water or other liquids.
• Keep your power bank away from
corrosive materials like cleaning
products.
• Keep your power bank away from heat
sources like heaters or stoves.
• Avoid extremely cold or hot
environments.
• If you have not used your power bank
for more than two months, recharge the
battery before using.
• Do not drop or hit your power bank
against hard objects. You may damage
your power bank.

14
Safety and Compliance
FCC Information
This equipment has been tested and found to comply
with the limits for a Class B digital device, pursuant to
Part 15 of the FCC Rules. These limits are designed to
provide reasonable protection against harmful
interference in a residential installation. This equipment
generates, uses and can radiate radio frequency energy
and, if not installed and used in accordance with the
instructions, may cause harmful interference to radio
communications. However, there is no guarantee that
interference will not occur in a particular installation.
If this equipment does cause harmful interference to
radio or television reception, which can be deter- mined
by turning the equipment off and on, the user is
encouraged to try to correct the interference by one or
more of the following measures:
• Reorient or relocate the receiving antenna.
• Increase the separation between the equipment and
receiver.
• Connect the equipment into an outlet on a circuit
different from that to which the receiver is
connected.
• Consult the dealer or an experienced radio/TV
technician for help.
Changes or modifications not expressly approved by the
party responsible for compliance may cause interference
and void the user’s authority to operate the equipment.
This device complies with Part 15 of the FCC Rules.
Operation is subject to the following two conditions: (1)
This device may not cause harmful interference, and (2)
this device must accept any interference received,
including interference that may cause undesired
operation.”

15
WEEE
Regulatory Information: Disposal of Waste Electrical and
Electronic Equipment (WEEE) The Waste Electrical and
Electronic Equipment (WEEE) Directive aims to minimize
the impact of electrical and electronic goods on the
environment, by increasing re-use and recycling and by
reducing the amount of WEEE going to landfill. The
symbol on this product or its packaging signifies that this
product must be disposed separately from ordinary
household wastes at its end of life. Be aware that this is
your responsibility to dispose of electronic equipment at
recycling centers in order to help conserve natural
resources.
Each country should have its collection centers for
electrical and electronic equipment recycling. For
information about your recycling drop off area, please
contact your related electrical and electronic equipment
waste management authority, your local city office, or
your household waste disposal service.

16
Franç ais
Manuel d’instructions
·
Français
AmazonBasics “Lipstick”
Chargeur portable AmazonBasics -
3 000 mAh
Table des matières
• Chargeur portable
• Câble de charge USB
• Sac de rangement
• Ce manuel d'instructions PB3R

17
Compatibilité
• Nous ne vous recommandons pas
d'utiliser votre chargeur portable avec
des tablettes, en effet la vitesse de
charge sera lente.
• La puissance d'entrée de votre
dispositif ne doit pas être supérieure à
5 V/1 A.
• Votre chargeur portable est conçu pour
fonctionner avec des dispositifs
présentant une puissance d'entrée de
5 V CC.
Reportez-vous à la documentation de
votre dispositif pour de plus amples
informations.

18
Présentation générale du produit
Protection contre les surcharges : Votre
chargeur portable est protégé contre les
surcharges. Afin de protéger votre chargeur
portable et le dispositif connecté en
présence d'une surcharge, la charge
s'interrompt et le voyant DEL s'éteint.
Une surcharge peut se produire si le
dispositif en cours de charge nécessite une
puissance d'entrée supérieure à celle que
votre chargeur peut fournir, ou si le débit du
chargeur portable est supérieur à 5V/1A.
INPUT
5V 1.0A
Port de
sortie USB
Voyant DEL
Port d'entrée
micro USB

19
Charge de votre chargeur portable
1. Branchez le petit connecteur du câble
de charge USB inclus dans le port
D'ENTRÉEUSB micro de votre chargeur
portable.
2. Branchez le gros connecteur du câble
dans une source d'alimentation, comme
un adaptateur CA (non inclus) ou un port
USB sur un ordinateur. Le voyant DEL
rouge clignote pendant la charge puis
reste fixe une fois celle-ci terminée.
Remarque : Lorsque le voyant DEL bleu
clignote, la charge de votre chargeur
portable est inférieure à 25 %. Vous devez
charger votre chargeur portable.
12
OU

20
Charge de votre dispositif
1. Branchez le gros connecteur du câble
de charge USB inclus dans le port de
sortie 5V 1 A sur votre chargeur
portable.
2. Branchez l'autre extrémité du câble
dans le port micro USB de votre
dispositif.
Remarques :
• Nous recommandons l'utilisation du
câble de charge qui accompagne votre
dispositif ou le câble micro USB qui
accompagne votre chargeur portable
afin de charger votre dispositif.
L'utilisation d'autres câbles peut
réduire nettement la vitesse de charge
(ou l'empêcher).
1
2
Table of contents
Languages:
Other AmazonBasics Accessories manuals

AmazonBasics
AmazonBasics B00LRK8HJ8 User manual

AmazonBasics
AmazonBasics B084419CT4 User manual

AmazonBasics
AmazonBasics B08DDVQ9RG User manual

AmazonBasics
AmazonBasics B0843862CB User manual

AmazonBasics
AmazonBasics B00LRK8JDC User manual

AmazonBasics
AmazonBasics AB 20 User manual

AmazonBasics
AmazonBasics B07SM9CSWT User manual