Ametek Land FLT5A User manual

Thermometer
Copyright © 2003 - 2016 Land Instruments International
User Guide
Issue 8
24 November 2016
Publication Nº 198.178
Language: English
FLT5A

Health and Safety Information
Read all of the instructions in this booklet - including all the WARNINGS and CAUTIONS
- before using this product. If there is any instruction which you do not understand, DO
NOT USE THE PRODUCT.
Safety Signs
WARNING
Indicates a potentially hazardous situation which, if not avoided, could result in death or
personal injury.
CAUTION
Indicates a potentially hazardous situation which, if not avoided, could result in minor or
moderate injury to the user or users, or result in damage to the product or to property.
NOTE
Indicates a potentially hazardous situation which, if not avoided, could result in damage or the loss of
data.
Signs and Symbols used on equipment and Documentation
Caution, risk of electric shock.
Caution, attention to possibility of risk of damage to the product, process or surroundings. Refer
to instruction manual.
Caution, hot surface.
Protective Conductor Terminal.
Observe precautions for handling electrostatic discharge sensitive devices.
Equipment Operation
Use of this instrument in a manner not specied by Land Instruments International may be hazardous.
Read and understand the user documentation supplied before installing and operating the equipment.
The safety of any system incorporating this equipment is the responsibility of the assembler.
Protective Clothing, Face and Eye Protection
It is possible that this equipment is to be installed on, or near to, machinery or equipment operating at
high temperatures and high pressures. Suitable protective clothing, along with face and eye protection
must be worn. Refer to the health and safety guidelines for the machinery/equipment before installing
this product. If in doubt, contact Land Instruments International.
Electrical Power Supply
Before working on the electrical connections, all of the electrical power lines to the equipment must
be isolated. All the electrical cables and signal cables must be connected exactly as indicated in these
operating instructions. If in doubt, contact Land Instruments International.
Storage
The instrument should be stored in its packaging, in a dry sheltered area.
Unpacking
Check all packages for external signs of damage. Check the contents against the packing note.
Lifting Instructions
Where items are too heavy to be lifted manually, use suitably rated lifting equipment. Refer to the
Technical Specication for weights. All lifting should be done as stated in local regulations.
IMPORTANT INFORMATION - PLEASE READ
Contact Us
UK - Droneld
Land Instruments International
Tel: +44 (0) 1246 417691
Email: [email protected]
Web: www.landinst.com
USA - Pittsburgh
AMETEK Land, Inc.
Tel: +1 412 826 4444
Web: www.ametek-land.com
China
AMETEK Land China Service
Tel: +86 21 5868 5111 ext 122
Email: [email protected]
Web: www.landinst.com
India
AMETEK Land India Service
Tel: +91 - 80 67823240
Email: [email protected]
Web: www.landinst.com
For further details on all AMETEK Land oces, distributors and representatives, please visit
our websites.
Return of Damaged Goods
IMPORTANT If any item has been damaged in transit, this should be reported to the carrier and to the
supplier immediately. Damage caused in transit is the responsibility of the carrier not the supplier.
DO NOT RETURN a damaged instrument to the sender as the carrier will not then consider a claim. Save
the packing with the damaged article for inspection by the carrier.
Return of Goods for Repair
If you need to return goods for repair please contact our Customer Service Department. They will be able
to advise you on the correct returns procedure.
Any item returned to Land Instruments International should be adequately packaged to prevent damage
during transit.
You must include a written report of the problem together with your own name and contact information,
address, telephone number, email address etc.
Design and Manufacturing Standards
The Quality Management System of Land Instruments International is approved to BS EN ISO 9001 for
the design, manufacture and on-site servicing of combustion, environmental monitoring and non-contact
temperature measuring instrumentation.
Approvals apply in the USA
Operation of radio transmitters, telephones or other electrical/electronic devices in close proximity
to the equipment while the enclosure doors of the instrument or its peripherals are open, may cause
interference and possible failure where the radiated emissions exceed the EMC directive.
The protection provided by this product may be invalidated if alterations or additions are made to the
structural, electrical, mechanical or pneumatic parts of this system. Such changes may also invalidate the
standard terms of warranty.
Copyright
This manual is provided as an aid to owners of Land Instruments International’s products and contains
information proprietary to Land Instruments International. This manual may not, in whole or part, be
copied, or reproduced without the expressed written consent of Land Instruments International Ltd.
Copyright © 2016 Land Instruments International.
MARCOM0311, Issue 7, 01 November 2016
Approvals apply in India

Thermometer User Guide
FLT5A

User Guide Thermometer
FLT5A
Contents
1 Introduction 1
1.1 About this guide 1
1.2 About the FLT5A thermometer 1
1.3 Unpacking the thermometer 2
1.4 Specications 3
2 Installing the Thermometer 5
2.1 Choosing a location for the thermometer 5
2.2 Power supplies and temperature displays 5
3 Using the Thermometer 7
3.1 Location of controls 7
3.2 Adjusting the 'Emissivity' value 7
3.3 Adjusting the averager 'Response Speed' 9
3.4 Note your settings 9
3.5 Electrical connections 11
4 Mountings and Accessories 12
5 Maintenance 13

Thermometer User Guide
FLT5A

Page 1
User Guide Thermometer
FLT5A
1 Introduction
1.1 About this guide
This guide gives the information necessary for you to operate a LAND FLT5A
Thermometer. Basic information regarding installation is contained within the
Installation Guide. More detailed information regarding servicing, repair and
calibration of the thermometer is contained in the Service Manual.
1.2 About the FLT5A thermometer
The LAND FLT5A thermometer is a highly accurate, non contact thermometer
designed for independent or STAND ALONE use.
The thermometer features include:
• Stand Alone operation.
• Adjustable response speed.
• 4 to 20mA loop powered, output linear over the temperature span
of the thermometer.
• Built in Emissivity controls.
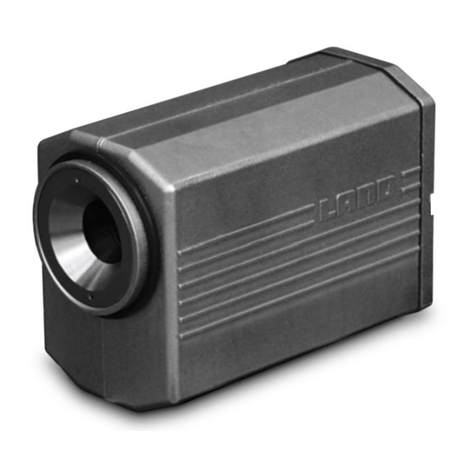
Fig. 1 Land FLT5A Thermometer S4970222

Page 2
Thermometer User Guide
FLT5A
The LAND FLT5A thermometer is designed to provide precise, non contact
temperaturemeasurementinoatlineapplications.
A comprehensive range of mountings and accessories is available,
see Section 4.0.
Air Purge Thermometer Jacket Back Cap
Fig. 2 Thermometer with Air Purge, Protection Jacket and Back Cap S4970223
1.3 Unpacking the thermometer
Along with this User Guide, the thermometer packaging will also contain the
following items:
• Envelope containing this User Guide.
• Binder, for your thermometer and power supply user documentation.
• FLT5Athermometer(ttedwithprotectioncaponthelens).
It is recommended that the lens protection cap is kept attached until the
thermometer is installed.

Page 3
User Guide Thermometer
FLT5A
FLT5A FLT51A
Temperature Range: 250 to 1100°C
500 to 2000°F
400 to 1300°C
Spectral response: 4.8to5.2μm
Field of view: 50:1at1mfocus(xed)
50:1at39.4infocus(xed)
Output: 4 to 20mA current loop
Response time
(0to95%): 1 to 10 seconds adjustable
Emissivity adjustment: 0.3 to 1.10 in 0.01 steps
Resolution: 0.2°C(slowresponsesetting)
0.4°F(slowresponsesetting)
Stability: 0.023% of span per 1°C change in ambient temperature
0.023% of span per 2°F change in ambient temperature
Accuracy(absolute): 0.5%K + 1°C
0.5%K + 2°F
Ambient limits: 0to60°Cspecied;-10to80°Coperating
32to140°Fspecied;14to176°Foperating
EMC:
EN50082-2(immunity)
EN50081-1(emission)
IEC1010(safety)
Sealing: to requirements of IP65
Vibration: 3g(10to300Hz)
Sealing: IP65
Power supply: 12 to 45V d.c.
1.4 Specifications

Page 4
Thermometer User Guide
FLT5A
Fig. 3 Target Size Table for FLT5A AD990201
Fig. 4 Thermometer installation dimensions AD990184
0 200 400 600 800 1000 1200
TargetDistance(mm)
24 23 22 21 20 30
TargetDiameter(mm)
1.0 0.9 0.9 0.8 0.8 1.2
TargetDiameter(in)
TargetDistance(in)
0 7.9 15.8 23.6 31.5 39.4 47.2
80.5mm/3.17in 158mm/6.22in
Mounting Pad: 2 holes, 1/4BSM,
7mm/0.3in deep on 25mm/0.98in centres
114mm/4.49in

Page 5
User Guide Thermometer
FLT5A
This section contains similar information to the thermometer
Installation Guide.
If the thermometer is to be used in conjunction with a protection jacket and
air purge, refer to the installation guides provided with those accessories.
If the thermometer is to be installed in a location where the ambient
temperatureiswithintherangesspeciedforthethermometer,andnoair
purging is required to keep the lens clean, the thermometer can be mounted
using the two tapped holes on the mounting pad. Either hole can be used for
direct tripod mounting.
2.1 Choosing a location for the thermometer
The overall dimensions of the thermometer installation are given in Fig. 4.
1) Choosealocationwherethethermometerwillnotbeexposedto
excessiveheat,fumesandspray.
Refertothe‘Specication’(Page3)forambienttemperaturelimitsetc.
2) RefertotheTargetSizeTable(Fig.3).Ensurethatthetargetcompletely
llstheeldofviewatthechosentargetdistance.
Check that nothing obstructs the sighting path between the thermometer
and the target.
3) Makesurethatthesightingpathisfreefromsmoke,oilorwaterspray.
4) Ensurethatthechosenlocationforthethermometerallowseasyaccess
for servicing.
2.2 Power supplies and temperature displays
The FLT5A Thermometer requires a power supply of 12 to 48V d.c.
2 Installing the Thermometer

Page 6
Thermometer User Guide
FLT5A
Screw-on cap
Fig. 5 Location of the screw-on cap AD990186
Emissivity SW1 SW2
0.10 1 0
0.80 8 0
0.85 8 5
0.92 9 2
1.00 0 0
1.09 0 9
Fig.6‘Emissivity’and‘ResponseSpeed’controls AD990202
Example settings
Emissivity
Example = 0.85
Response Speed
Fully anticlockwise = 1sec
Fully clockwise = 10sec
SW2
SW1
P1
e=0.85

Page 7
User Guide Thermometer
FLT5A
3 Using the Thermometer
It is recommended that the 'Emissivity' and 'Response Speed' controls are
set to match the requirements of the particular measurement location before
installation. This is particularly relevant if the thermometer is to be used in a
locationwhichisdifculttoaccessand/orusedinconjunctionwithajacket
and back cap.
3.1 Location of controls
The 'Emissivity' and 'Response Speed' control switches are located on the rear
face of the thermometer. The controls are protected by a screw-on cap
(SeeFig.5).
NOTE
To keep the thermometer electronics sealed against ingress
of dust and moisture, always replace the screw-on cap after
adjusting the settings.
3.2 Adjusting the 'Emissivity' value
For accurate temperature measurement, the 'Emissivity' setting must be set
to correspond with the target being measured.
The emissivity can be set in the range 0.10 to 1.09 in steps of 0.01.
The FLT5A is supplied with the emissivity factory-set to 1.00.
The 'Emissivity' value is set using switches SW1 and SW2. See Fig. 6.
When switch SW1 is set from 1 to 9, this denotes the rst gure after the
decimal point of the emissivity value.
e.g. for an emissivity value of '0.85', set SW1 to '8' and SW2 to '5'.
When switch SW1 is set to 0, this denotes a '1' before, and a '0' after, the
decimal point of the emissivity value.
e.g. for an emissivity value of '1.00', set SW1 to '0' and SW2 to '0'.

Page 8
Thermometer User Guide
FLT5A

Page 9
User Guide Thermometer
FLT5A
3.3 Adjusting the averager 'Response Speed'
The Averager time function is adjusted by the potentiometer P1.
(SeeFig.6,Page6).
The Averager 'Response Speed' can be set to any value between 1 and 10
seconds(for0to95%ofnalreading).
1) Toincreasethe'ResponseSpeed'(i.e.makefaster),turnthe
potentiometer P1 anticlockwise. When P1 is turned fully anticlockwise, the
'Response Speed' is 1 second.
2) Todecreasethe'ResponseSpeed'(i.e.makeslower),turnthe
potentiometer P1 clockwise. When P1 is turned fully clockwise, the 'Response
Speed' is 10 seconds.
3.4 Note your settings
Write down the settings for 'Emissivity' and 'Response Speed' in the spaces
provided below.
Use this table as a quick reference guide.
Each time you adjust the settings, make a note in the table.
Serial Number Date Emissivity Response Speed

Page 10
Thermometer User Guide
FLT5A
Fig. 7 Location of the electrical connector AD990187
Fig. 8 Connecting the plug to the socket S4970229
Electrical connector
Lugs Keyway Marker
Marker
Locking Sleeve

Page 11
User Guide Thermometer
FLT5A
3.5 Electrical connections
The electrical connections for the thermometer power supply and temperature
output are made via the 6-way socket on the rear of the thermometer.
See Fig. 7.
The cable connections are as follows:
Electrical connection to the thermometer must be made by either:
• 6-wayplug(LANDPartNº206.551)
• 6-wayplughousedinBackCap(LANDPartNº091.562)
• Pre-wiredcable,4mlong(LANDPartNº029.673)
Toconnectthecable;
1) RefertoFig.8.Aligntheredmarkernearthelugsofthepre-wiredplug
with the red marker above the keyway in the socket on the thermometer.
2) Pushtheplugintothesocket.
Todisconnectthecable;
1) Gripthelockingsleevesectionoftheplug.
2) Pulltheplugoutwardstoreleasethelockingmechanismanddisconnect
the cable.
Thermometer
Thermometer
Pinj No. Function Cable
Colour
End Cap
Pin No.
1
2
3
4
5
6
-
-
V+, 4 to 20 mA
-
-
V-, 4 to 20 mA
-
-
Red
-
-
Black
-
-
5
-
-
6

Page 12
Thermometer User Guide
FLT5A
4 Mountings and Accessories
The FLT5A thermometer is compatible with all Land System 4 Mountings and
Accessories.
Forthemajorityofoatlineapplications,thefollowingpackageofaccessories
is recommended:
Air Purge: Part Nº 091.561
Jacket: Part Nº 091.560
Back Cap: Part Nº 091.562
For more information on Mountings and Accessories, refer to the
"Thermometer Mountings and Accessories Installation Guide".
Fig. 9 Recommended mounting accessories for FLT5A S4970223
Air Purge Thermometer Jacket Back Cap

Page 13
User Guide Thermometer
FLT5A
5 Maintenance
Thermometer maintenance consists mainly of ensuring that the lens is clean.
Ifthelensbecomesdirty,cleanitwithlenscleaninguidandasoftcloth.
Ifitisthelensisdifculttokeepclean,itmaybenecessarytousethe
thermometerinconjunctionwithasuitableairpurge(LANDPartNº091.561).
Contact LAND Infrared for more information.
If the thermometer is used in conjunction with a cooling jacket, ensure
thattheowrateforthecoolingwateris1litreperminute/0.035cu.ftper
minute.
If the thermometer is used in conjunction with an air purge, check that the
owrateforthepurgeairis1litrepersecond/2cu.ftperminute.
WARNING
Never‘over-cool’thethermometerasthismayresultincondensation
either on or inside the thermometer.

Page 14
Thermometer User Guide
FLT5A
Table of contents
Other Ametek Land Thermometer manuals

Ametek Land
Ametek Land IQ Series User manual

Ametek Land
Ametek Land CDA User manual

Ametek Land
Ametek Land RT8B User manual

Ametek Land
Ametek Land UNO U1 600/1600C-L User manual

Ametek Land
Ametek Land UNO Series User manual

Ametek Land
Ametek Land ADT User manual

Ametek Land
Ametek Land LANCOM 4 User manual