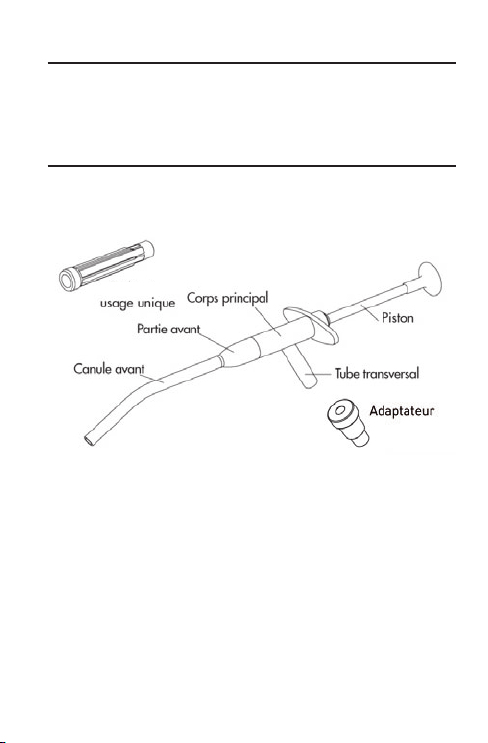
8
E
E
VII. HYGIENE ET ENTRETIEN
La re-stérilisation des dispositifs médicaux réutilisables doit être réalisée par
un personnel correctement formé et protégé, en respectant la réglementation
en vigueur.
Le protocole de re-stérilisation doit être adapté au risque infectieux.
Pour chaque produit utilisé : se référer aux instructions du fabricant.
En particulier : respecter les concentrations, les durées d’exposition, le
renouvellement des solutions et la durée de vie des produits. Ne jamais
mélanger les produits. Respecter les prescriptions pour l’élimination des
produits utilisés.
Utiliser uniquement des produits destinés à l’entretien du matériel
médicochirurgical.
Proscrire les antiseptiques qui sont eux destinés à une utilisation sur la
peau et les muqueuses.
Utiliser uniquement des produits compatibles avec les aciers inoxydables.
Porter une tenue de protection adaptée. Pour éviter tout risque d’infection
et de blessures, il est impératif de porter des gants de protection.
PRÉ-DÉSINFECTION
Cette pré-désinfection doit être réalisée immédiatement après l’intervention.
Par trempage :
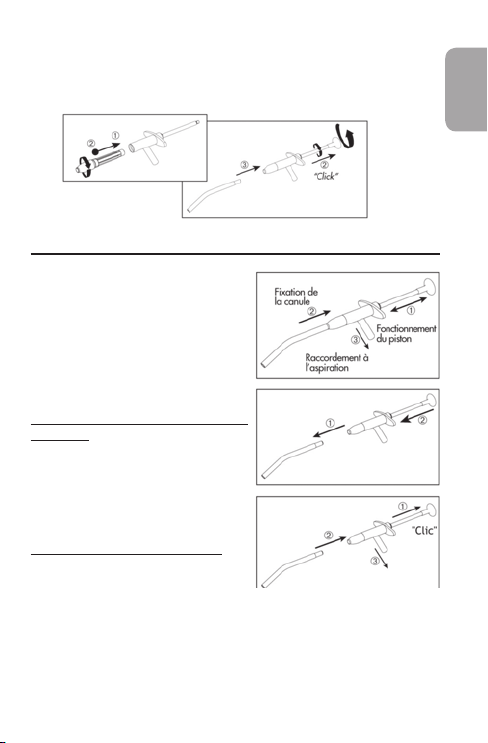
• Démonter entièrement le dispositif.
• N’utiliser que des solutions détergentes-désinfectantes de pH neutre ou
faiblement alcalines. Ne pas utiliser de substances susceptibles de xer
les protéines (alcool, aldéhydes). Immerger complètement le dispositif au
minimum 15 minutes.
• Rincer et sécher soigneusement chaque élément
Ou : laveur désinfecteur, immédiatement après l’intervention.
• Démonter entièrement le dispositif. Immobiliser chaque élément.
• Le cycle de nettoyage et désinfection est de 10 minutes à 93°C (203°F). Suivre
la notice d’utilisation du fabricant.
• N’utiliser que les produits de nettoyage très doux, dont le pH est compris
entre 2.5 et 9.
• Respecter impérativement le cycle de séchage.
Assécher les éventuels résidus d’eau avec de l’air sous pression de qualité
médicale : Porter des lunettes et un masque.
E
E
E
E
r
NETTOYAGE
• Démonter le dispositif.
• N’utiliser que des solutions détergentes-désinfectantes de pH neutre ou
faiblement alcalines. Ne pas utiliser de substances susceptibles de xer
les protéines (alcool, aldéhydes). Immerger complètement le dispositif en
respectant les durées de trempage.
• Ce dispositif démonté peut être immergé 60 minutes dans de la soude 1M ou
2M. Ne pas utiliser de récipient en aluminium.
L’utilisation d’hypochlorite de sodium (eau de javel) est à proscrire: risque
important de corrosion.
Utiliser une cuve à ultrasons à basse fréquence (25 à 50KHz) en chauffant la
solution au maximum à 45° ou brosser avec une brosse douce et écouvillonner
méticuleusement chaque élément (l’usage d’écouvillon à usage unique est
recommandé).
Le frottement des pièces entre elles ou avec la cuve peut entraîner des
défauts d’aspect.
S’assurer, pour l’emploi d’une cuve à ultrasons, que la solution de
détergent-désinfectant est compatible avec ce procédé.
Rincer les pièces à l’eau adoucie, puis rincer les pièces à l’eau déminéralisée
dans une cuve à ultrasons à basse fréquence (25 à 50KHz) 10 minutes à 60°.
Sécher soigneusement chaque éléments, avec des champs stériles doux et
non pelucheux, complété éventuellement par de l’air sous pression de qualité
médicale.
Vérier que le nettoyage a permit d’éliminer toute souillure visible, sinon
recommencer l’opération de nettoyage.
STÉRILISATION
Le dispositif est à stériliser avant la première et après chaque utilisation.
Le dispositif et ses accessoires sont stérilisables à 135°C (275°F) à 2.13 bar
uniquement en autoclave à vapeur d’eau saturé pendant 20 minutes minimum
(temps de maintien à la stérilisation).
Le ltre à usage unique est livré stérile.
Nous conseillons vivement l’utilisation d’autoclaves de classe B.
Tout autre mode de stérilisation est à proscrire.
Lire la notice d’utilisation du fabricant d’autoclave.
Respecter l’espace entre les sachets et ne pas surcharger l’autoclave.
D