Anton Paar Lovis 2000 M/ME Manual

Tel: +43 316 257-0 Created on 17 December 2012 C72IB004EN-B
www.anton-paar.com Created by HJ Page 1 of 7
Lovis 2000 M/ME – SOP
Standard Operating Procedure
1 About the SOP
Read all safety instructions in the Lovis 2000 M/ME Instruction Manual (Original Instruction)!
Find additional and more detailed information in the Lovis Instruction and Reference Manual and in the
Device Software Manual.
2 Conditioning the Capillaries
Condition every capillary before using it for the first time.
TIP: Select a suitable cleaning liquid. It must completely dissolve your sample, evaporate easily and
without residues. It must not react chemically with the capillary or any of the wetted parts.
Consult the Lovis 2000 M/ME Instruction Manual for more information.
3. Blow the capillary dry with the built-in air pump:
This is a step-by-step guide how to... • fill a standard capillary with liquid and a steel ball
outside the capillary block,
• perform a single-point measurement (at one angle
and one temperature) and
• clean the capillary.
1. Rinse the capillary (2) inside with cleaning
liquid, brush it with a supplied brush (15)
and rinse with some more cleaning liquid.
2. Rinse the brush and wipe it with a lint-free
cloth or paper tissue.
2 .... Capillary
15 .... Brush
• Fix the Filling Adapter Luer Female (1)
on the top end of the capillary (2).
1 .... Filling Adapter Luer Female
2 .... Capillary
• Plug the Adapter Luer cone (16) of the
silicone air hose into the adapter’s inlet
and start the pump with the button .
• The drying time depends on the
cleaning liquid, on the temperature and
on the ambient air humidity. Determine
the suitable drying time empirically.
Stop the pump with the button .
16 .... Adapter Luer cone of air hose
2
15
21
2
1
16

Tel: +43 316 257-0 Created on 17 December 2012 C72IB004EN-B
www.anton-paar.com Created by HJ Page 2 of 7
Lovis 2000 M/ME – SOP
Standard Operating Procedure
3 Installing (Adjusted) Lovis Measuring Systems
(Manager and Administrator only)
1. Tap "Menu > Setup > Measuring System Settings > Lovis Module > Capillary Administration".
2. Tap <Add>. There are two possibilities:
•Select"Import Capillary Configuration" to import factory adjustment data from the
USB flash drive. You can also import user-created data of an existing capillary/ball
combination, exported from another Lovis beforehand. Tap <OK>.
- The available "Drive" is displayed. Select a capillary/ball combination or a list of
combinations in the field "Target". Tap <Next>.
- If there is a list, select one of the combinations.
- You can assign a new name to the combination.
•Select"Create New Capillary" if no capillary/ball combination data is available. Tap <OK>.
- Choose ball type, capillary diameter and enter the serial number. Name the capillary/ball
combination. Activate the checkbox to use this combination unadjusted to measure only
runtimes or adjust the combination (see chapter 6, p. 5).
4 Filling the Capillaries
1. Select a suitable capillary for the liquid’s viscosity:
Capillary measuring core rangesa(dynamic viscosity) / from... to...
a. Allows to measure the viscosity at all angles from 15° to 80°.
1.59 1 mPa.s 20 mPa.s
1.8 13 mPa.s 300 mPa.s
2.5 70 mPa.s 1700 mPa.s
2. Fix the Filling Adapter Luer Female (1) on the
top end of the capillary (2).
1 .... Filling Adapter Luer Female
2 .... Capillary
3. Set the funnel (3) on the open end of the
capillary (2). Drop one steel ball (4) in with the
plastic tweezers (5).
TIP: If using a factory adjustment ball, tip it directly
from its container into the funnel.
3 .... Funnel
4 .... Steel ball
5 .... Tweezers
4. Put the Filling and Cleaning Adapter Luer
Male (6) on the open end of the capillary (2).
6 .... Filling and Cleaning Adapter Luer Male
21
3
2
5
4
62

Tel: +43 316 257-0 Created on 17 December 2012 C72IB004EN-B
www.anton-paar.com Created by HJ Page 3 of 7
Lovis 2000 M/ME – SOP
Standard Operating Procedure
12. Now the capillary (2) is filled. It must be free of bubbles.
5. Plug a syringe (7) into the Filling Adapter Luer
Female (1) and draw sample into the capillary
from a vessel.
6. Turn the capillary upside down.
7. Check for and remove bubbles (if any).
7 .... Syringe
8. Remove the Filling and Cleaning Adapter Luer
Male (6).
9. Close the capillary (2) with a plug (8) that suits
the capillary diameter.
10. Turn the capillary.
11. Remove the syringe and close the Filling
Adapter Luer Female (1) with a Luer plug (9).
1 .... Filling Adapter Luer Female
2 .... Capillary
4 .... Steel ball
8 .... Plug
9 .... Luer plug
1
6
7
360°
6
7
2
8
1
2
9
2 918 4

Tel: +43 316 257-0 Created on 17 December 2012 C72IB004EN-B
www.anton-paar.com Created by HJ Page 4 of 7
Lovis 2000 M/ME – SOP
Standard Operating Procedure
5 Performing a Level Adjustment
TIP: PerformaLevelAdjustmentwheninstallingaLovis,beforeadjusting a capillary and wheneverthe
instrument has been moved (even if only a little bit).
1. Select a capillary from the Lovis measuring systems list. The capillary need NOT be adjusted!
2. Perform a Level Adjustment:
• Tap "Menu > Checks/Adjustments > Other Adjustments > Lovis Module > Level Adjustment".
• Fill the capillary with liquid (see chapter 4, p. 2).
• Follow the instructions on the screen. An arrow prompts you to tap a key.
- <Improve> or <Apply> the result. You can improve the Level Adjustment more than once.
- If after improving several times Lovis does not allow you to <Apply>, check the filling of the
capillary for bubbles and check that the Lovis stands in a stable position.
Refill the capillary and tap <Improve>.
- Lovis suggests <Apply> if the Level Adjustment correction is < ±0.5°.
• The Level Adjustment is valid and stored after tapping <Apply>.
13. Screw the Screw Cap Back Side Closed (10)
into the back of the capillary block.
10 .... Screw Cap Back Side Closed
14. Insert the filled capillary into the capillary block
from the front. The twist protection (11) should
point upwards. Fit it into the corresponding
recess by slightly rotating the capillary.
11 .... Twist protection
15. Mount the Screw Cap Front Side Closed (12,
with metal ring 13) on the capillary block.
12 .... Screw Cap Front Side Closed
13 .... Metal ring of
Screw Cap Front Side Closed
The Lovis is now ready for measurement.
10
11
12
13
10
NO
HOLE !

Tel: +43 316 257-0 Created on 17 December 2012 C72IB004EN-B
www.anton-paar.com Created by HJ Page 5 of 7
Lovis 2000 M/ME – SOP
Standard Operating Procedure
6 Adjusting Lovis Measuring Systems (Manager and Administrator only)
TIP: Ifyouhaveordered a factory adjustment,import theadjustmentfromtheUSB flashdrivedelivered
with the capillaries. See chapter 3, p. 2
1. Perform a Level Adjustment. See "Performing a Level Adjustment", p. 4.
2. Tap "Menu > Checks/Adjustments > Other Adjustments > Lovis Module". Select "Standard
Adjustment" (range: 20° to 70° angle) or "Single Point Adjustment" (at one user-defined angle).
3. Follow the instructions on the display. Select the capillary (from the list of stored measuring
systems, see chapter 3, p. 2). Enter the ball batch no. and the ball density (see label of ball
vessel) and the adjustment temperature.
4. Enter a reference medium (viscosity standard liquid) and its dynamic viscosity and density at the
adjustment temperature. By default Lovis uses the values for reference medium "water". Fill the
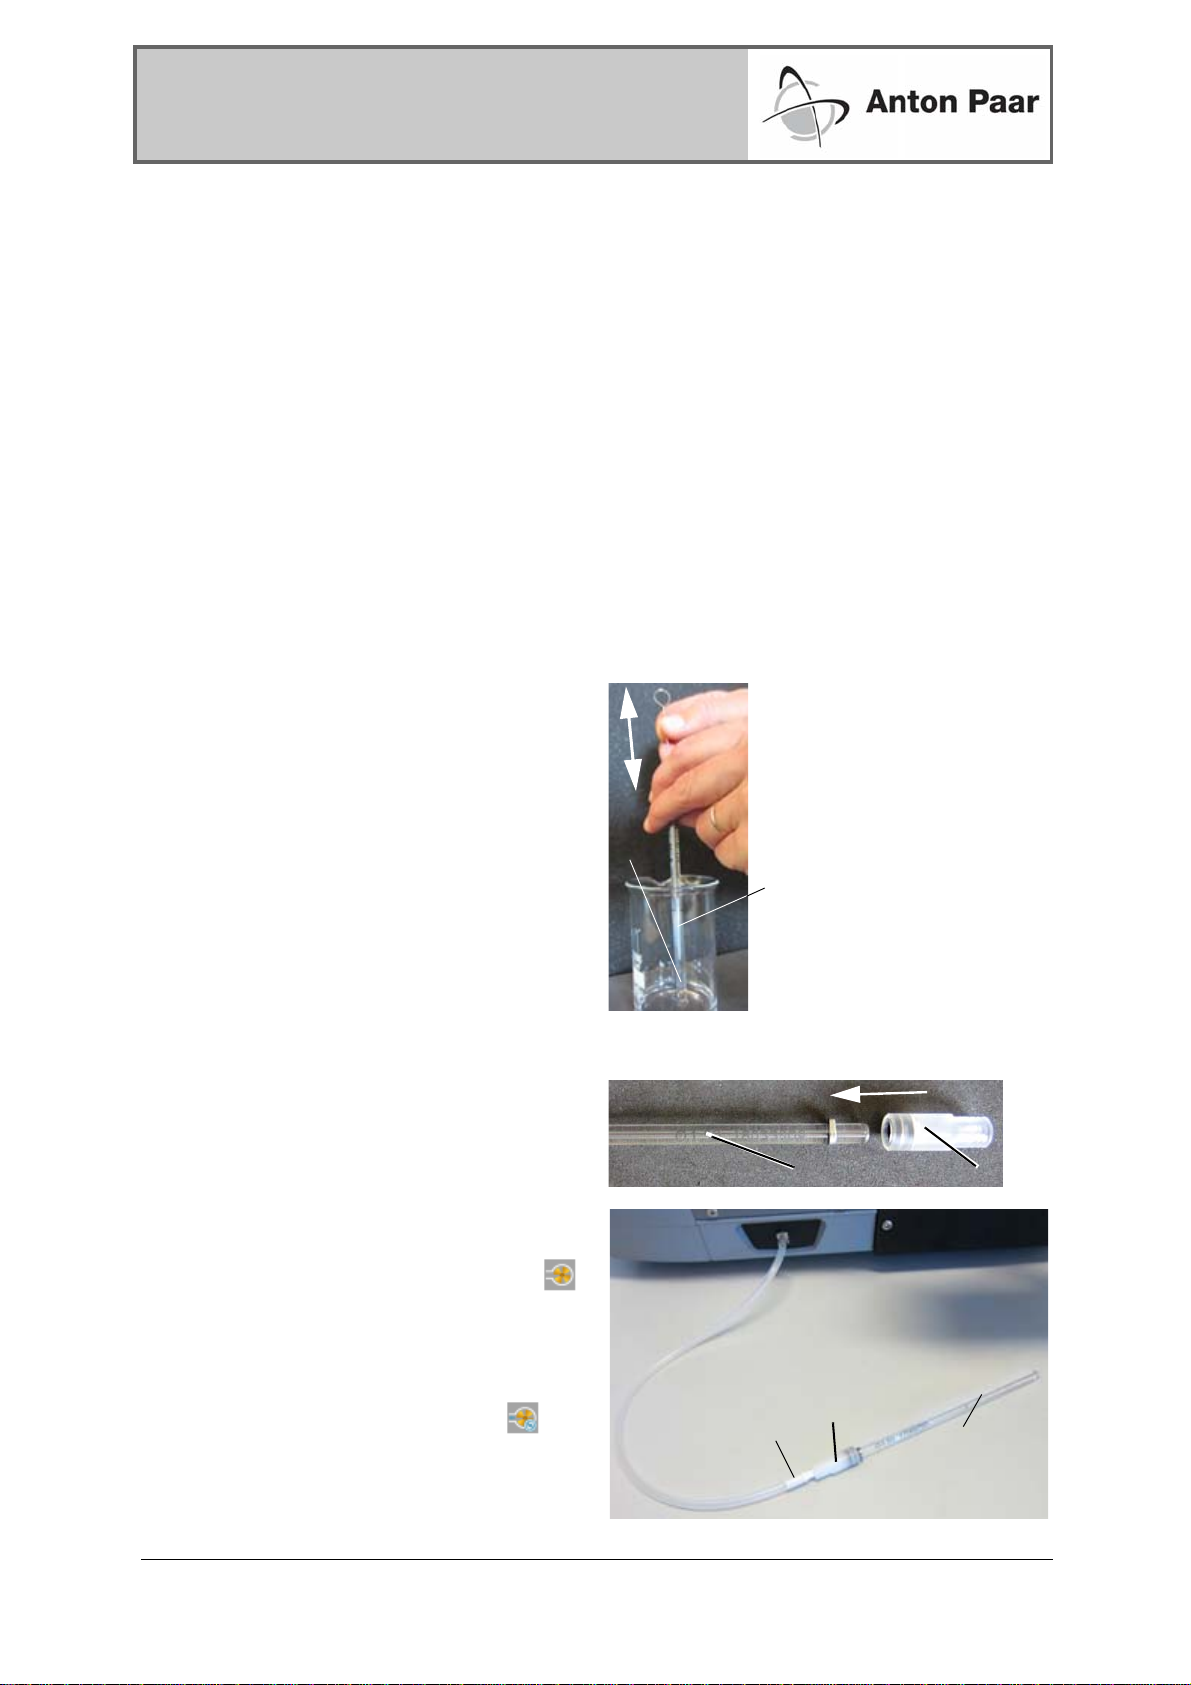
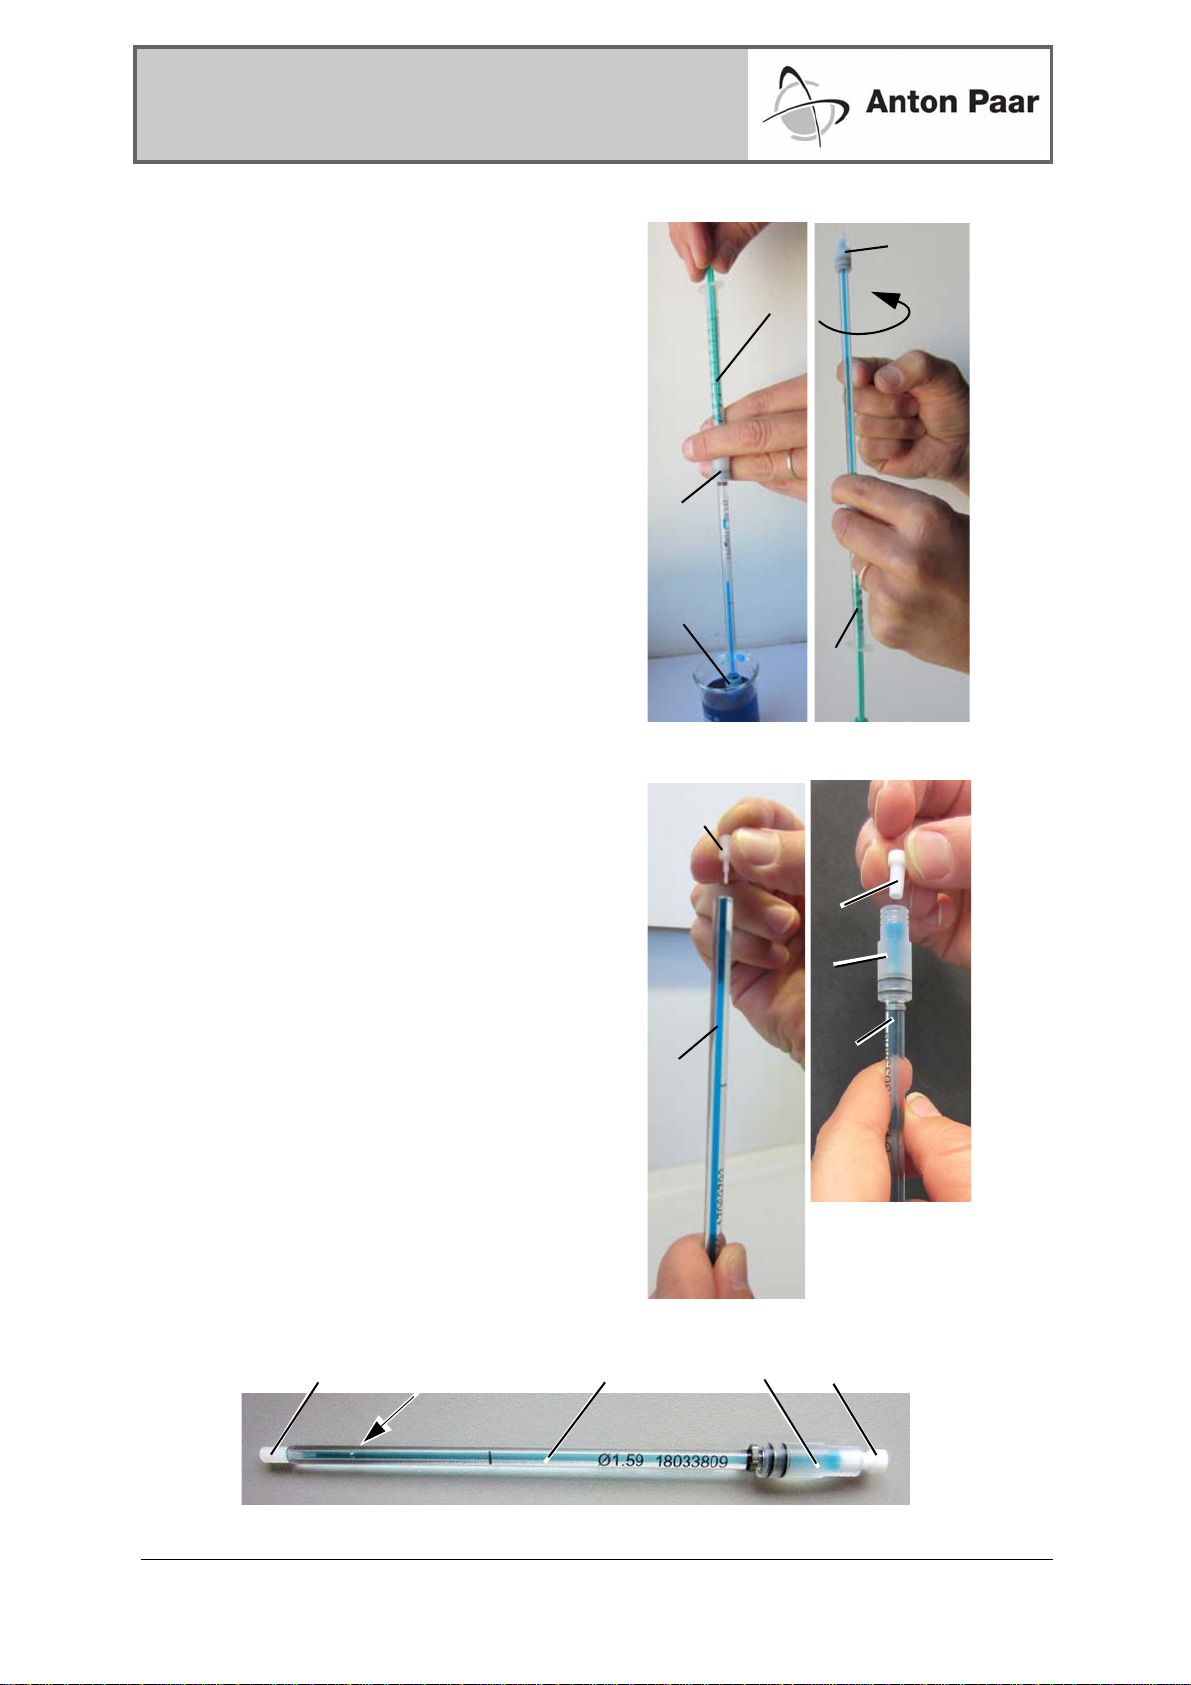
capillary with your standard liquid (see chapter 4, p. 2) and start the adjustment.
When finished, Lovis displays the ball runtimes at the adjusted angle(s) and the maximal
variation coefficient that occurred during the adjustment.
5. Tap <Verify> to make sure the adjustment was correct.
6. Confirm the allowed deviation between adjustment and verification (default 0.5 %).
7. Fill the capillary once again with your standard liquid. Do NOT change the ball. Follow the
instructions on the display.
When the verification is finished the runtime deviations for each adjusted angle are displayed.
TIP: After a verification the runtime deviations to the values of the preceding original adjustment
are displayed. Typically, these values are higher than the variation coefficient of the original
adjustment.
• If the maximal deviation exceeds the allowed deviation, Lovis prompts you to tap <Redo>.
• Fill the capillary again and repeat the verification.
• If still exceeding the allowed deviation after the second <Redo>, clean and brush the
capillary (see chapter 9, p. 7), refill it and start a new adjustment.
8. To print or export an adjustment report, tap <Print>.
To save and apply the adjustment, tap <Apply>.
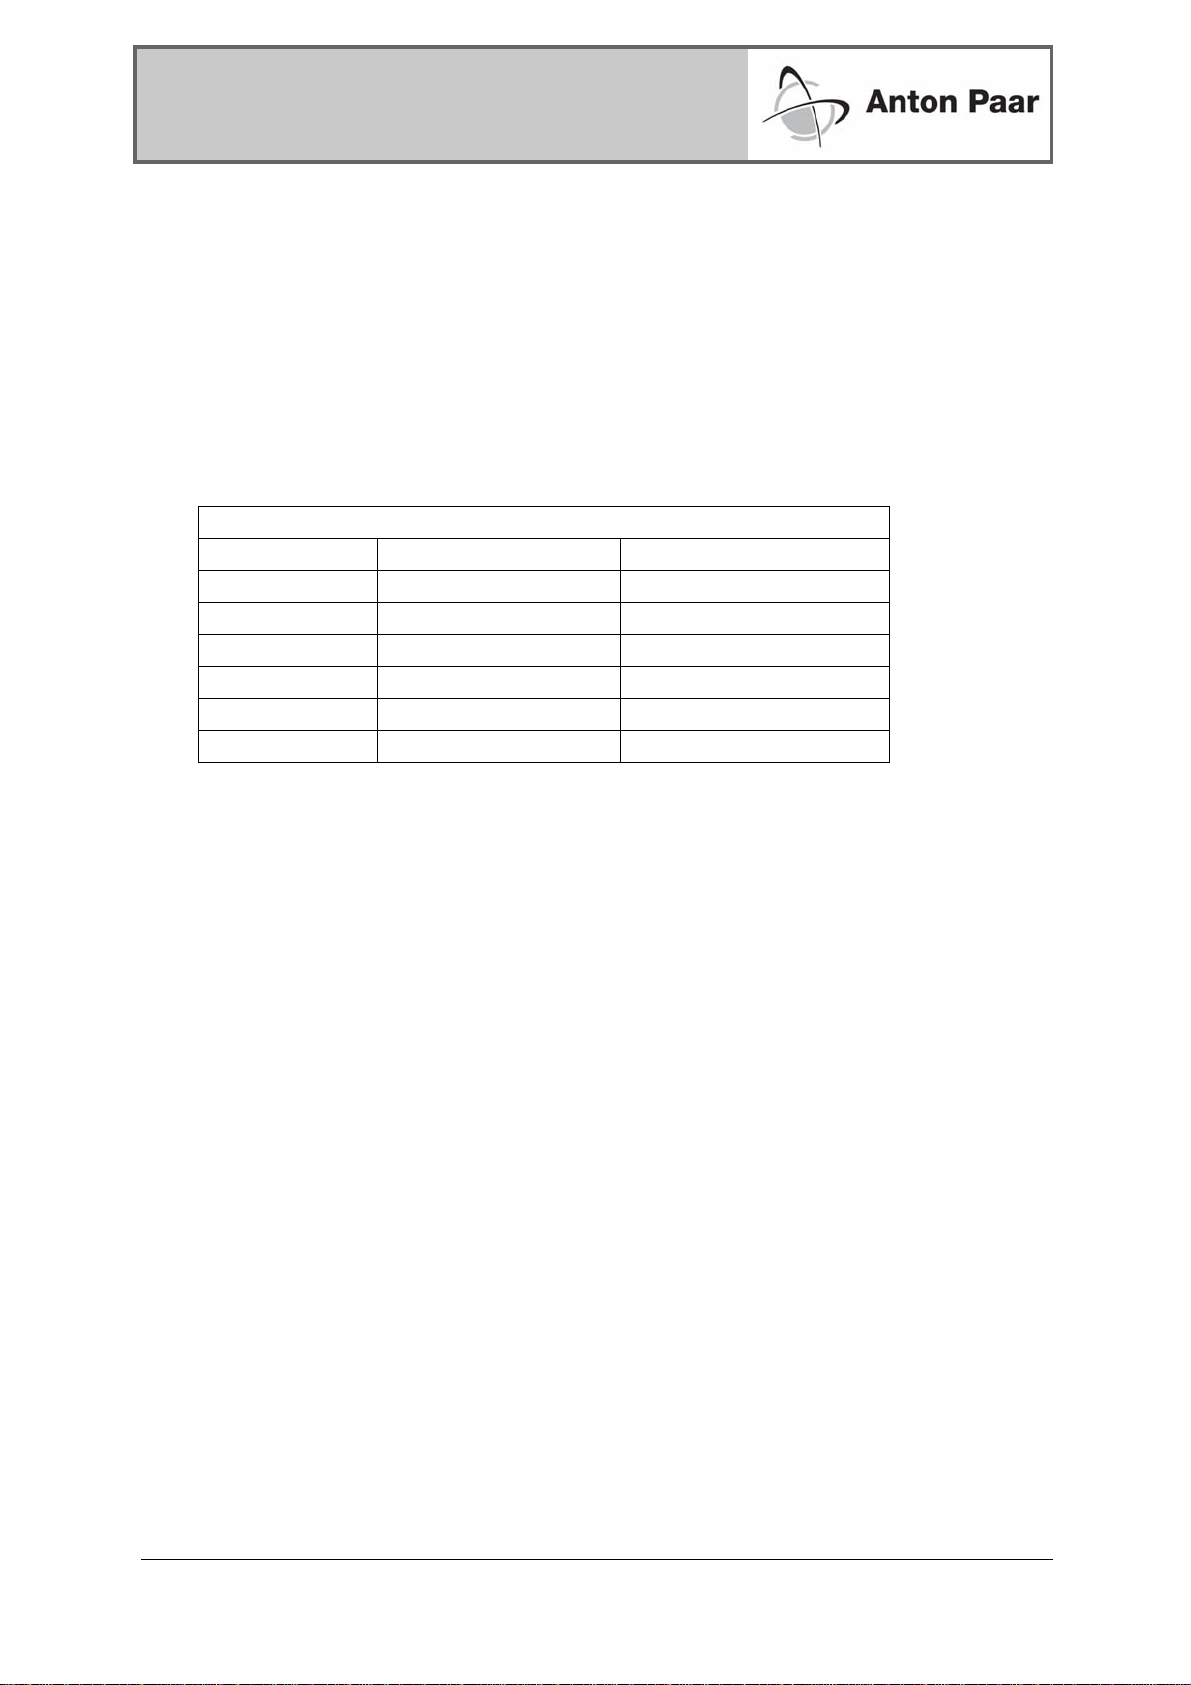
Recommended standard liquids:
Capillary Temp. range Standard liquid
1.59 mm 20 °C to 40 °C water bi-distilled
1.59 mm 20 °C to 80 °C S3 oil
1.59 mm 40 °C to 100 °C N7.5 oil
1.8 mm 20 °C to 100 °C N26 oil
2.5 mm 20 °C to 60 °C N100 oil
2.5 mm 40 °C to 100 °C N415 oil

Tel: +43 316 257-0 Created on 17 December 2012 C72IB004EN-B
www.anton-paar.com Created by HJ Page 6 of 7
Lovis 2000 M/ME – SOP
Standard Operating Procedure
7 Creating and Editing Measuring Methods (Manager and Administrator only)
1. Tap "Menu > Methods > Method Management". Select a method from the list. Tap <Copy>.
Enter a new name for this method. Edit the new method as described below.
2. Tap "Menu > Methods > Method Settings". Select a method from the list.
3. Select "Lovis Module". Set the following parameters:
8 Measure
1. Fill your capillary with sample (see chapter 4, p. 2).
2. Tap <Method> and select a measuring method from the list.
3. Tap <Quick Settings>.
• Enter a "Sample Name".
• Select measurement mode "S (Standard)" – single-point test at one temperature, one angle.
• If not using a density meter, enter the sample density: "Lovis Density for Start Temperature".
4. Tap <Start>. Select your capillary (capillary/ball combination) from the list (see chapter 3, p. 2).
In case only one capillary is stored, Lovis automatically uses this one.
5. Lovis starts measuring. A measurement is successfully completed if the progress bar turns green
and the message above reads "Finished". The "Lovis Condition" is "valid".
Menu Item Lovis Module Parameters Default Value
Temperature
Settings "Temperature"
Measuring Temperature 20 °C
"Temperature Equilibration"
This is the time Lovis waits for the sample to
reach the measuring temperature after
starting measurement and after the capillary
block has reached it.
0 s
Measuring Settings "Measurement Cycles"
1 meas. cycle = 1 forward + 1 backward run
No. of cycles for calculating the variation coeff.
2
"Use Manual Angle" check box
Use a user-defined angle or let Lovis
automatically choose the measuring angle
according to the Advanced Settings.
Deactivated
"Use Variation Coefficient" check box
If using the variation coefficient, Lovis
compares the set value to the runtime
variation coefficient calculated from the set no.
of measurement cycles. If the calculated var.
coeff. exceeds the set value, Lovis discards
the first cycle and performs another cycle. The
max. no. of cycles within which the set value
should be achieved is set in the Advanced
Settings .
Activated;
Var. Coeff.: 0.10 %
"Measuring distance"
Option "Automatic" causes Lovis to switch to
"Short" if the runtime exceeds the Auto-
distance threshold in the Advanced Settings.
Automatic

Tel: +43 316 257-0 Created on 17 December 2012 C72IB004EN-B
www.anton-paar.com Created by HJ Page 7 of 7
Lovis 2000 M/ME – SOP
Standard Operating Procedure
9 Cleaning
TIP: Select a suitable cleaning liquid. It must completely dissolve the sample, evaporate easily and
without residues. It must not react chemically with the capillary or any of the wetted parts.
If necessary, repeat all steps with a second cleaning liquid.
Consult the Lovis 2000 M/ME Instruction Manual for more information.
1. Unscrew the Screw Cap Front Side Closed from the Lovis capillary block.
2. Pull out the capillary by the Filling Adapter Luer Female.
3. Hold the capillary with the tip upwards and remove the plug from the tip.
4. To keep the ball in the capillary, fix the Filling and Cleaning Adapter Luer Male to the capillary tip.
5. Turn the capillary around and hold it over a waste vessel.
6. Remove the Luer plug from the Filling Adapter Luer Female.
7. Plug a syringe filled with air into the Luer opening of the Filling Adapter Luer Female and press
down the plunger to remove the sample.
8. Plug a syringe filled with cleaning liquid into the Filling Adapter Luer Female and rinse the
capillary. Move the plunger up and down to improve the cleaning effect. Rinse until no traces of
sample are left.
9. Wipe the capillary and the adapters on the outside.
10. Clean the plug and Luer plug, if required also the funnel, with some cleaning liquid and wipe
them dry.
11. Blow the capillary (2) dry with the built-in air
pump:
• Fix the Filling Adapter Luer Female (1)
on top of the capillary.
• Plug the Adapter Luer cone (16) of the
silicone air hose into the adapter’s inlet
and start the pump with the button .
• The drying time depends on the cleaning
liquid, on the temperature and on the
ambient air humidity. Determine the
suitable drying time empirically.
Stop the pump with the button .
TIP: If this cleaning method does not yield satisfactory results, brush the capillary with the supplied
brush.
Brushing capillaries
1. Proceed as described above to empty the capillary. Do not mount the Filling and Cleaning
Adapter Luer Male. Remove the Filling Adapter Luer Female.
TIP: Toreusethe ball, carefullyempty the sampleplusball intoaclean vessel.Cleantheball withsome
cleaning liquid. Handle the clean ball only with the supplied plastic tweezers!
2. Rinse and brush the inside of the capillary with some cleaning liquid. Rinse again.
3. Clean the adapters, the plug and the Luer plug.
4. Dry the capillary, the adapters and plugs.
2
1
16
Other manuals for Lovis 2000 M/ME
1
Table of contents
Other Anton Paar Measuring Instrument manuals

Anton Paar
Anton Paar DMA 35N User manual

Anton Paar
Anton Paar DMA 35 Manual

Anton Paar
Anton Paar ViscoQC 300 Series Original instructions

Anton Paar
Anton Paar SmartRef Original instructions

Anton Paar
Anton Paar DMA 35 Manual

Anton Paar
Anton Paar SVM 2001 Original instructions

Anton Paar
Anton Paar EasyDens Original instructions

Anton Paar
Anton Paar MCR Evolution Series User manual

Anton Paar
Anton Paar Quantachrome ULTRAPYC UPY-32 User manual

Anton Paar
Anton Paar PA 5 User manual