Aritech ATS4000 User manual

F. Rennenberg 29-11-'01
Manual ATS4000 MM (UK)
A4 110-01
2 A 29-11-'01 10520
14 999-4234
White paper: 70gr/m² progresso; overprint black. If P.O.D.: use 80gr/m².
Wit papier: 70gr/m² progresso; opdruk zwart. Wanneer P.O.D.: gebruik 80gr/m².
Advisor MASTER ®
Manager's guide
ATS4000
Version 1.0
1) Format: 34 pages A4 Bookshape (stapled).
2) Text may differ from original and is for reference only.
Formaat: 34 pagina's A4 Boekvorm (geniet).
Tekst kan verschillen met origineel en is alleen voor referenties.
Intelligent Security & Fire Ltd.

Advisor MASTER
®
ATS4000
Manager’s guide
Version 1.0
Intelligent Security & Fire Ltd.

A
ritech is an interlogiX Company
© interlogix B.V. 2000. All rights reserved. No part of this publication may be reproduced, transmitted, stored in a retrieval
system, or transmitted in any form, or by any means – electronic, photocopying, recording, or otherwise – without the prior
written permission of interlogiX B.V.. interlogiX B.V. reserve the right to change information without notice.
Intelligent Security & Fire Ltd.

ATS4000 Manager’s Guide 1
C
ONTENTS
Welcome ........................................................................................................................................................... 3
The Advisor MASTER keypad......................................................................................................................... 4
The keypad .............................................................................................................................................. 4
The LCD display ...................................................................................................................................... 5
The LED’s ................................................................................................................................................ 5
User identification............................................................................................................................................ 6
Duress ............................................................................................................................................................... 8
Door opening option........................................................................................................................................ 9
Disarming your system ................................................................................................................................. 12
Active zones (When arming)14
Types of alarms.............................................................................................................................................. 15
Local alarm ............................................................................................................................................ 15
Alarm...................................................................................................................................................... 15
System alarm ......................................................................................................................................... 15
What to do when there is an alarm............................................................................................................... 16
Resetting a local alarm .......................................................................................................................... 16
Resetting a zone in alarm ...................................................................................................................... 17
Further information about alarms .......................................................................................................... 18
Listing past alarm events.............................................................................................................................. 19
The Advisor MASTER menu ......................................................................................................................... 20
1. Panel status ............................................................................................................................................ 22
2. Active Zones ........................................................................................................................................... 23
3. Zones in alarm ........................................................................................................................................ 24
4. Inhibited zones ....................................................................................................................................... 25
5. History ..................................................................................................................................................... 25
6. Test report............................................................................................................................................... 27
7. Service menu .......................................................................................................................................... 29
8. Film counters.......................................................................................................................................... 31
9. List Zone names ..................................................................................................................................... 32
10. Inhibit zone ............................................................................................................................................. 33
11. Uninhibit zone......................................................................................................................................... 34
12. Test zone ................................................................................................................................................. 35
13. Start auto DISARM test .......................................................................................................................... 36
14. Program users ........................................................................................................................................ 37
15. Time and date ......................................................................................................................................... 44
16. Inhibit/uninhibit RAS/DGP .................................................................................................................... 46
17. Enable / disable service technician...................................................................................................... 47
18. Reset cameras ........................................................................................................................................ 48
20. Door and Floor groups .......................................................................................................................... 48
21. Holidays................................................................................................................................................... 51
22. Open doors ............................................................................................................................................. 52
Intelligent Security & Fire Ltd.

2ATS4000 Manager’s Guide
23. Unlock, lock, disable and enable doors............................................................................................... 52
24. Print history ............................................................................................................................................ 54
Programming records.................................................................................................................................... 55
User record – Menu option 14 ...................................................................................................................... 56
Door group record – Menu option 20........................................................................................................... 57
Floor group record – Menu option 20 .......................................................................................................... 58
Holiday record – Menu option 20 ................................................................................................................. 59
Alarm group record Details to be supplied by the installer...................................................................... 60
Timezone record Details to be supplied by the installer .......................................................................... 61
Glossary.......................................................................................................................................................... 62
Index................................................................................................................................................................ 64
Intelligent Security & Fire Ltd.
ATS4000 Manager’s Guide 3
W
ELCOME
This manual explains how to use the Advisor MASTER system if you are responsible for
managing the system. There is also a shorter user guide available that explains every day
usage.
The Advisor MASTER panel combines sophisticated design with versatility, which makes
it the leader in its field.
How your system has been programmed?
Your system has been programmed to meet your requirements. However, not all of the
features described in this guide may apply to your system. The system may also have
additional features and these are detailed separately in the user guides for that
equipment.
Depending on how the system has been programmed, some of the system features might
not be authorised to all users.
This guide details all the procedure variations, including the different responses from the
Advisor MASTER system. However, it should be noted that the procedures and Advisor
MASTER responses will be consistent throughout one system. For example, if a list is
presented in a particular way in one function, it will be presented in the same way in all
other functions.
The display text
The terminology used to describe the various parts of your premises or security system
has been programmed specifically for your organisation.
Testing the system
It is important that you regularly test your system to ensure that all installed equipment is
operating properly.
Intelligent Security & Fire Ltd.
4ATS4000 Manager’s Guide
T
HE
A
DVISOR
MASTER
KEYPAD
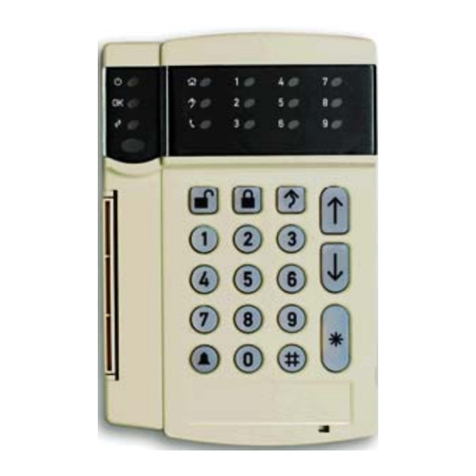
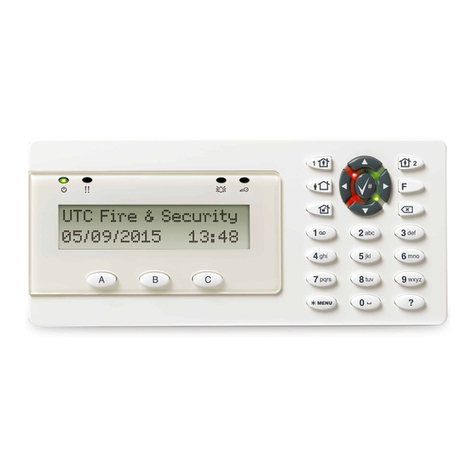
Figure 1: The keypad
The keypad
➀
0 - 9 Used to enter alphanumeric information.
➁
ON Used after entering your PIN code to tell the system that you want to arm your
area(s).
(some arming stations may have a # as ON key)
➂
OFF Used after entering your PIN to tell the system that you want to disarm your
area(s).
(some arming stations may have a * as OFF key)
➃
ENTER •Used when information is to be processed (similar to the Enter key on a
computer).
•Scroll forwards in the menu.
(some arming stations may have a # as ENTER key)
➄
MENU* •Display the menu login prompt.
•Backspace to correct an error.
•Scroll backwards in the menu.
(some arming stations may only have the * without the word menu)
➁
NEXT •Display the next items in a menu list.
•Update the information displayed.
(available on some arming stations only)
➆
[CLEAR] Exit the current function or operation and return to alarm control prompt.
(available on some arming stations only)
➇
LCD display Used to display messages.
➈
Area LED Used to display the status of the areas.
Intelligent Security & Fire Ltd.
ATS4000 Manager’s Guide 5
The LCD display
Messages are displayed on the liquid crystal display (LCD) on the keypad. They guide
you through the functions of the Advisor MASTER SYSTEM, such as identifying
problems, the procedures necessary to rectify problems, programming functions and
other menu options. The display might also show information you have entered on the
keypad.
The first line of the display shows system information and scrolls if there are more
characters than can be displayed, depending on the arming station type. The second line
of the display shows instructions, and characters you enter on the keypad.
In some instances there can be insufficient space to display all the text being presented
(e.g. a list of areas in your building):
•If a complete list is displayed on line 1, there is a full stop at the end of the list.
•If the list is incomplete, there is a ">" at the end of the line and the full stop does not
appear.
By pressing [NEXT] you can then display the rest of the list and update the
information at the same time.
•If only part of a name or location is shown, it can be moved left by entering the
applicable number preceding the text, and then pressing [ENTER].
Your system might display a custom message instead of the one shown above if it has
been programmed to do so.
e.g.:
The LED’s
The red LED Advisor MASTER on the Advisor MASTER keypad, together with the
information shown on the display, allow you to determine the system status at a glance.
Not all LED’s are available on all arming stations.
Area LED’s:
The area LED’s, one for each of the possible security areas, indicate the status of the
particular area.
ON The area is unoccupied and armed.
OFF The area is occupied and the security system has been set to
allow normal access.
BLINKING An alarm has occurred in the area while the area was disarmed
(LED flashes slow) or armed (LED flashes fast)
There Are No Alarms In This Area
Code:
Welcome to the ATS
Code:
Intelligent Security & Fire Ltd.
6ATS4000 Manager’s Guide
System alarm LED’s: (available on some arming stations only)
The system alarm LED’s indicate a breach of security. One of the system alarm LED’s
flashes when an alarm has occurred (the area’s armed LED also flashes to indicate the
location of the alarm).
DISARMED alarm Flashes when an alarm has occurred in an occupied area and
the area was disarmed.
24-HOUR alarm Flashes when an alarm has occurred in an area where a zone
has been programmed for 24-hour alarm.
ARMED alarm Flashes when an alarm has occurred in an armed area.
TAMPER alarm Flashes when an alarm has occurred due to tamper.
System faults: (available on some arming stations only)
System faults are displayed on the arming station keypads if the arming station has an
LCD fitted and/or "System faults" LED’s.
Comms Fail When there is a failure in the communications between THE
Advisor MASTER control panel and a central station.
RAS Fail When a remote arming station is off-line.
DGP Fail When a data gathering panel is off-line.
Battery Fail When the auxiliary battery power is found to be low.
Trouble Indicates a trouble in the system (RAS fail, low battery, etc).
U
SER IDENTIFICATION
All users of the Advisor MASTER system need PIN codes and/or a cards. The PIN code
has between four and nine digits and is unique for each user. It is a combination of
numbers between 0 and 9.
The PIN code is programmed to let a user do specific tasks, such as arm or disarm the
system. The following three features are used to group functions together and
consequently determine which functions a user can access.
The Advisor MASTER system combines options for alarm and access control. Alarm
control provides options to monitor zones and determine if an alarm should occur when
an intruder is detected (depending if the area the zone is assigned to is armed or
disarmed). Access control provides options to monitor and control access to (parts) of the
premises.
Alarm groups:
Alarm groups contain options available to control the alarm system and perform functions.
There are many alarm groups and each one is assigned specific areas and a specific set
of functions. Your user number is assigned to an alarm group and therefore performs only
the functions of that alarm group.
Also, timezones are allocated to each alarm group. This means that the functions of an
alarm group can be further controlled by the time.
Intelligent Security & Fire Ltd.
ATS4000 Manager’s Guide 7
Door groups:
Door groups contain options available to gain access to the premises by controlling
doors.
There are at least 10 and up to 128 door groups in your system for controlling access to
doors. Each door group is allocated specific door numbers, and each door number is
allotted a timezone during which you can access the door.
Your user number is assigned to a door group and will therefore access only the doors of
that door group during the specified timezone(s).
Floor groups: (relevant to systems with lift controllers)
Floor groups contain options available to gain access to floors by controlling lifts.
There are at least 10 and up to 64 floor groups in your system. Each door group is
allocated specific floor numbers, and each floor number is allocated a timezone during
which the user can select a floor.
Each user number is assigned to a floor group and will therefore access only the floors of
that floor group during the specified timezone(s).
The Advisor MASTER can therefore be programmed so that a PIN code and/or card can
be used to perform any function or combination of functions during any time period.
For example:
•An alarm group for Managers can allow access to all Advisor MASTER user
operations at all times.
•An alarm group for a cleaner can only allow their card to disarm an area for 1 hour
between 17:00 and 23:00.
•A door group for a night shift worker may allow their PIN code to be used to open a
door between 23:00 and 07:00 only.
Using a PIN code:
When you enter your PIN code on the Advisor MASTER keypad, each key pressed is
indicated by * on the display.
If you enter the wrong PIN code, or a code/card that is not valid at the particular arming
station, the keypad will beep quickly seven times. Correct a wrong code by pressing
[CLEAR] and enter the correct code.
If you access a menu and do not use any keys for two minutes, you will automatically exit
from the menu. It is good practice to exit the menu using 0 [ENTER] or [CLEAR] rather
than the time out facility because if someone else uses the menu before it times out, the
functions they use will be logged against your PIN code.
Users can only access the menu options that their PIN code had been authorised to
access. When they try to access an option that they are not authorised to access, they
get the message, You are not authorised to enter.
Also, although users might be able to access a menu option, depending on how their PIN
code has been programmed, they might not be authorised to access all the information
available on it.
See also: Program Users - Menu Option 14.
Intelligent Security & Fire Ltd.
8ATS4000 Manager’s Guide
D
URESS
The duress function activates a silent signal to alert security personnel. For example, if
you are asked, under threat, to breach your system security (e.g. forced to disarm the
system), this function lets you do so while at the same time activating the system duress
facility. However, your Advisor MASTER system must be programmed to use it.
You use a duress digit in conjunction with your PIN code. The duress digit is the last digit
of your PIN, plus one (1).
e.g.: PIN = 1234 - duress digit = 5
If the last digit of your PIN is 9, then the duress digit is 0.
To activate duress
1. Enteryour PIN code without the last digit (e.g. 123)
2. Enter the duress digit, for example 5in the case shown above.
3. Press: [OFF]
or [ON]
or [ENTER].
To reset duress
To reset the duress facility (i.e. to turn off the signal), enter a valid PIN code.
✍
If duress was activated under conditions that are no longer valid (false alarm), and
it has been reset, you must contact your central station company to ensure that no
further action is taken by them.
Using your PIN code with the duress digit still activates the functions associated
with the PIN.
Intelligent Security & Fire Ltd.
ATS4000 Manager’s Guide 9
D
OOR OPENING OPTION
An Advisor MASTER keypad can be used to open a door by entering a door code.
Your door code is related to your PIN code. It varies, depending on whether your PIN
code has been programmed to allow you to arm/disarm your system, as well as open
doors.
To open a door
1. The bottom line of the display must show:
2. Enter your door code (see Note 3 below).
3. Press: [ENTER] to open the door only,
or
[OFF] to disarm the security and open the door if your full PIN
code is entered (see Notes 2 and 3 below),
or
[ON] to arm the security and open the door if your full PIN code is
entered (see Notes 2 and 3 below).
If the door can only be opened for a preset time, the display might show.
e.g.
If the door is closed before the end of the maximum open time, the word “Shunted
zone" is removed from the display and the keypad sounds the warning buzzer for
three seconds to indicate that the door is no longer shunted.
If the door is not closed at the end of the shunt time, the display shows "Shunting
Ends" on the top line of the display.
The keypad sounds the warning buzzer for a preset time to let you to close the door
or re-enter your PIN code to extend the suppression time.
✍
1. If the keypad sounds seven quick beeps when you enter your door code, an
invalid code has been entered, or the code is not valid at this arming station.
2. A door code only opens doors that are programmed to be opened by that code.
i.e. The Door Group assigned to the user might not allow access to all doors.
3. In most systems with access control, an "Alarm Code Prefix" is used. The Alarm
Code Prefix is the number of digits not to enter at the beginning of your full PIN
code to make the door code and is programmed by the installer.
e.g. Alarm Code Prefix = 2 digits. Full PIN code = 123456. Door PIN code is
therefore 3456.
For further information see also: Menu option 20, Door Groups.Arming your system
Code:
Shunted zone
Code:
Intelligent Security & Fire Ltd.
10 ATS4000 Manager’s Guide
When to arm
You arm your premises, or areas in it, when they are unoccupied. Then if an unwanted
event occurs, such as someone forcing a door open, this sets off the alarm.
The time limit when arming
Once you have armed the system, you must leave the area within a preset time as
otherwise you will set off the alarm. The manager of the alarm system will need to inform
everyone about this time limit.
Make sure you know which route to take when leaving the premises.
When you cannot arm/disarm
You might not be able to arm/disarm specific areas in the premises because:
•Your keypad has been programmed to arm/disarm specific areas in the premises
only. Make sure you know which keypad to use if there is more than one present in
the premises.
•Your PIN code has been programmed to arm/disarm specific areas only of the
premises. Make sure you know which areas you can arm/disarm.
•You cannot arm/disarm an area if it has a zone device not properly closed, such as
the magnetic contacts on a door or window. So, before arming, make sure that all
doors and windows are properly closed. If a zone is open when you arm, the keypad
will beep quickly seven times and you will get the message “Active On ….”.
To arm the system
1. Before beginning, the display must show:
2. Enter your PIN code.
3. Press [ON].
4. The result of step 3 depends on how the system has been programmed:
•Whether the system has been programmed to display the areas assigned to
your PIN.
•Whether the areas to be armed are normal (see Active Zones on page 14 for
further information).
Areas not displayed:
If your system has not been programmed to display the areas assigned to your PIN
code, any of those areas that were disarmed are now automatically armed (provided
all zones were normal).
The display returns to that shown in step 1.
The area LED(s) illuminate when the arming procedure has been successful.
There Are No Alarms In This Area
Code:
Intelligent Security & Fire Ltd.

ATS4000 Manager’s Guide 11
Areas displayed:
If the areas assigned to your PIN are displayed, any of those areas that are
disarmed will be listed.
e.g.
5. You have four options:
Option Action Result
Arm all areas Press 0and
[ENTER]
Arms all areas at once. Returns you
to the original display.
Arm individual
areas
Enter area number
and press
[ENTER].
When finished
arming, press
[ENTER] again.
Arms the selected area. If there are
more disarmed areas, they will be
displayed.
Cancel Press [CLEAR] Exit and return to the original display.
Areas already armed, stay armed.
Display more areas Press [NEXT] Displays the next disarmed area in
the list. You can then select an area
to be armed, or continue to press
[NEXT].
6. The area LED(s) illuminate when the arming procedure has been successful.
0-All 1, Office 2, Boardroom 3, Workshop
Enter Area:
Intelligent Security & Fire Ltd.

12 ATS4000 Manager’s Guide
D
ISARMING YOUR SYSTEM
When to disarm
If the area you want to enter is armed, you must first disarm the alarm system before you
can enter, otherwise you will set off the alarm. You will know which zone is armed
because it’s LED on the keypad will be lit red.
The time limit when disarming
On entering the area, the system will allow you a preset time to disarm before an alarm
occurs
Disarming when there is an alarm
If there is an alarm condition when you are disarming the system, the alarm is reset. You
must then find out what caused the alarm and fix it. Use the function “Listing past alarm
events” to get a list of all the alarms that recently have happened (see page 19).
When you cannot disarm
You might not be authorised to disarm specific areas in the premises. See the earlier
section “When you cannot arm/disarm” on page 9 for more information.
To disarm the system
1. Before commencing, if there is no alarm in the area, the display must show:
2. Enter your PIN code.
3. Press [OFF].
4. The result of step 3 depends on:
•Whether the system has been programmed to display a list of the areas
assigned to your PIN.
Areas not displayed:
If your system has not been programmed to display a list of the areas assigned to
your PIN, all armed areas are now automatically disarmed (provided all zones were
normal). The display returns to that shown in step 1.
Areas displayed:
If a list of the areas assigned to your PIN are displayed, all armed areas are now
listed.
e.g.
There Are No Alarms In This Area
Code:
0-All 1, Office 2, Boardroom 3, Workshop
Enter Area:
Intelligent Security & Fire Ltd.

ATS4000 Manager’s Guide 13
From this display you have several options:
Option Action Result
Disarm all areas Press Oand
[ENTER]
Disarms all areas at once. Returns
you to the original display.
Disarm individual
areas
Enter area number
and press
[ENTER].
When finished
disarming, press
[ENTER] again.
Disarms the selected area. If there
are more armed areas, they will be
displayed.
Exit Press [CLEAR]
and [ENTER]
Exit and return to the original display.
Areas already disarmed, stay
disarmed.
Display more areas Press [NEXT] Displays the next armed area in the
list. You can then select an area to
be armed, or continue to press
[NEXT].
5. The area LED(s) extinguish when the disarming procedure has been successful.
Intelligent Security & Fire Ltd.

14 ATS4000 Manager’s Guide
A
CTIVE ZONES
(W
HEN ARMING
)
You cannot arm (or disarm, if your system is programmed that way) an area unless all the
zones in that area are normal, as an active zone would usually set off an alarm. For
example, all the doors and windows must be closed.
If a zone is active while you try to arm or disarm an area, the Advisor MASTER keypad
sounds seven quick beeps and displays the active zones.
Active zones are listed either:
One at a time
e.g
Or
As a list of numbers
e.g
From either display:
Action Result
Press [NEXT] Update the list of active zones and display the next zones in the
list (if any).
Enter area number
and press
[ENTER].
Display the zone name in full.
Press [CLEAR] Exit the function and return to the display shown when you were
attempting to arm the system.
After you have determined which zones are active, you must check these and correct the
problem (e.g. close the door) then exit this display, and try again to arm If you are unable
to close the zone, refer to Menu option 10, Inhibit Zone.
See also: Arming Your System
Disarming Your System
Inhibit Zone - Menu Option 10
Active On 6. Front Doo
r
NEXT or ENTER
Active On 6, 7, 9.
Zone No:
Intelligent Security & Fire Ltd.

ATS4000 Manager’s Guide 15
T
YPES OF ALARMS
There are three types of alarms used in the Advisor MASTER system.
1. Local alarm
2. Alarm
3. System alarm
Local alarm
•It occurs when an area is occupied (that is, disarmed). For example, zones with
24-hour security have been activated: a firedoor has been opened.
•The circumstances that caused the local alarm need to be checked and rectified by
someone on site. Consequently, the alarm does not need to be reported to a central
station.
See "Resetting a local alarm" for the procedure to identify, acknowledge and reset a local
alarm.
Alarm
•The area is armed and one of its zones has been activated. For example, a door
lock has been forced open causing a siren to sound.
•The area is disarmed and a 24 Hour zone was activated. For example: Hold-up
button is activated, tamper switch is open.
The exact type of alarm (siren, flashing light, etc.) depends on how the system has
been programmed.
The area LED on the panel identifies the location of the alarm.
See "Resetting a zone in alarm" for the procedure to reset an alarm.
System alarm
•The state of a security system when an Advisor MASTER device (Advisor MASTER
panel, RAS or DGP) is tampered, stops communicating, or detects a fault condition
such as mains fail, low battery, fuse fail etc.
e.g. - Alarm equipment interfered with or covers removed (DGP tamper)
-Communications cabling interfered with - cut or shorted (DGP Fail,
RAS Fail)
-Connections to siren speaker(s) interfered with - cut or shorted.
(Siren Fail)
-Telephone line interfered with - cut, shorted or damaged. (Report
Fail)
-Power supply interruption and/or overload and battery problems.
(Mains Fail, Fuse Fail, Low Battery)
Intelligent Security & Fire Ltd.

16 ATS4000 Manager’s Guide
•The exact type of alarm (siren, flashing light, etc.) depends on how the system has
been programmed.
Your system has been programmed to respond to a system alarm in one of two ways:
1. Latching System Alarms
A PIN code, which is authorised to reset system alarms, must be entered to
reset a system alarm.
The procedure to identify and reset latching system alarms is the same as the
procedure described for "Alarms".
2. Non-Latching System Alarms
The system alarm resets automatically as soon as the condition causing the
alarm has been rectified.
The procedure to identify the system alarm details is the same as the procedure
described to Identify “Alarms”.
W
HAT TO DO WHEN THERE IS AN ALARM
When there is an alarm, the LED of the area in alarm flashes red on the keypad. The
message “There are no alarms in this area” is no longer displayed. If it is a local alarm,
this is shown.
An area can have several zones associated with it. When there is an alarm, it is important
that you know exactly which zone is causing the problem so that you can quickly deal
with it.
Resetting a local alarm
•The keypad emits a discontinuous tone until the local alarm is acknowledged (if
programmed).
•The LED of the area in alarm flashes red on the keypad, depending on how it has
been programmed.
•The display shows the following:
To reset a local alarm
1. Press [ENTER] twice.
2. The zones causing the alarm are listed either:
One at a time
eg
or
As a list of numbers
eg
You now know which zones are causing the problem.
,Local Alarm
Code:
Local Alarm On A4. Rear Fire Doo
r
NEXT or ENTER
Local Alarm On A4, A5, A9, NEXT
Zone No:
Intelligent Security & Fire Ltd.

ATS4000 Manager’s Guide 17
3. From either display:
Option Action Result
Acknowledge the
local alarm
Press 0and
[ENTER]
Acknowledge the local alarm (see
below). Depending on programming a
user code is required to reset.
Display the zone
name in full
Press [NEXT] Display the complete zone name.
Update the list of
zones
Enter the zone
number and press
[ENTER]
Update the list of zones and display the
next zones in the list (if any).
4. The display shows:
Fix the problem (e.g. close the door).
✍
Re-alarming: If your system has been programmed to remind you about alarms, it
will automatically re-alarm after a preset time unless the cause has been fixed, no
matter how many times you acknowledge the alarm.
When a re-alarm does occur, the letter preceding the zone number will not be
shown.
Resetting a zone in alarm
•The LED of the area in alarm flashes red on the keypad.
•The sirens are active (if programmed),
•When an alarm occurs, the display There Are No Alarms In This Area disappears
from the top line. Instead you see:
✍
Zones in Tamper Alarm are displayed with a Tin front of the zone number.
There Are No Alarms In This Area
Code:
Code:
Intelligent Security & Fire Ltd.
Other manuals for ATS4000
1
Table of contents
Other Aritech Keypad manuals

Aritech
Aritech ATS1135 Assembly instructions

Aritech
Aritech ATS1155 User manual

Aritech
Aritech ATS1110 User manual

Aritech
Aritech ACL599 Owner's manual

Aritech
Aritech ACL875FL-KP Assembly instructions

Aritech
Aritech ATS1136 Assembly instructions

Aritech
Aritech CS-175 Series User manual

Aritech
Aritech CS450 User manual

Aritech
Aritech ATS111-N Series Assembly instructions

Aritech
Aritech CS-175-275-575 Series User manual