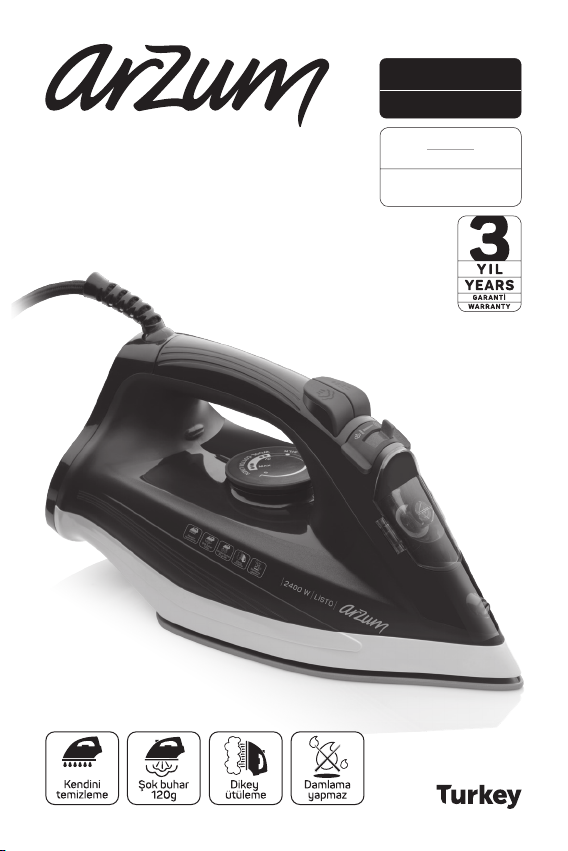
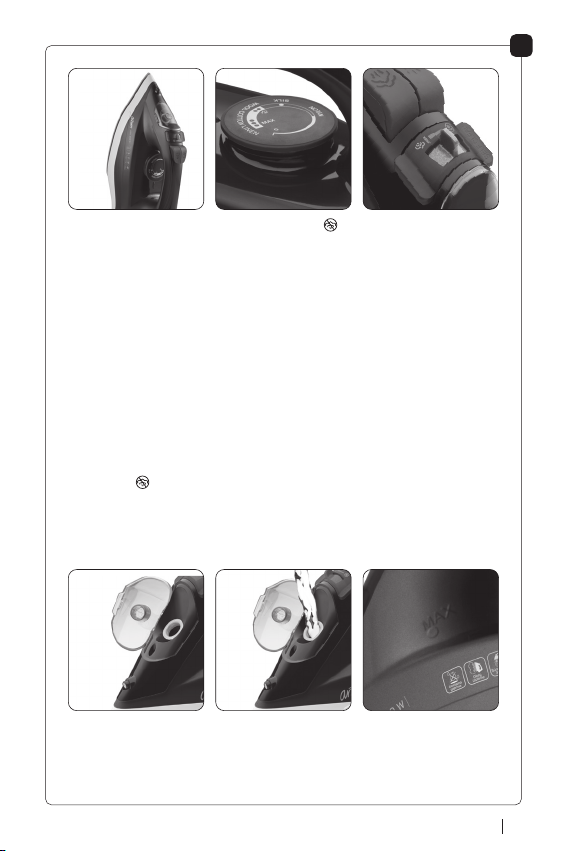
Arzum LiSTO User manual

KULLANMA KILAVUZU
INSTRUCTION MANUAL
2400 W
LİSTO
AR 6021 BUHARLI ÜTÜ
AR 6021 STEAM IRON

02 ARZUM
LİSTO
AR 6021 BUHARLI ÜTÜ
1- Buhar ayar düğmesi
2- Şok buhar düğmesi
3- Su sprey düğmesi
4- Gösterge lambası
5- 360° dönebilen kablo
6- Termostat ayar düğmesi
7- Su tankı
8- Seramik taban
9- Su püskürtme deliği
10- Su doldurma kapağı
11- Kendi kendini temizleme
düğmesi
7
12
8
10

03
ARZUM
Arzum marka ütüyü tercih ettiğinizden dolayı teşekkür ederiz. Bu ürünün
de diğer Arzum ürünleri gibi hayatınızı kolaylaştırmasını diliyoruz.
Cihazınızdan iyi verim almak için kullanım kılavuzunu dikkatlice okuyunuz
ve daha sonra gerekli olabileceğinden saklayınız.
ÖNEMLİ UYARILAR
• Arzum Listo Buharlı Ütü’nüzün üzerinde yazılı voltajın, bulunduğunuz
yerin voltajına uygun olup olmadığına dikkat ediniz. Herhangi bir
uyuşmazlık durumunda meydana gelebilecek arızalardan firmamız
sorumlu tutulamaz ve bu nedenle oluşabilecek bir arıza, garanti kapsamı
dışında işlem görür.
• Cihazınız sadece evlerde kullanım içindir. Ticari ya da sanayi amaçlı
kullanılmamalıdır. Aksi takdirde, garanti kapsamı dışında işlem görecektir.
• Cihazınızı dış mekanlarda ve banyo gibi nemli ortamlarda kullanmayınız.
•Bu cihaz, güvenli bir şekilde
kullanılmasıyla ilgili kendilerine
gözetim veya talimat verilmişse
ve içermiş olduğu tehlikeler
kendileri tarafından anlaşılmışsa
8 yaş ve üzeri çocuklar ve
fiziksel, duyusal veya zihinsel
yetenek eksikliği bulunan veya
tecrübe ve bilgi eksikliği olan
kişiler tarafından kullanılabilir.
Çocuklar cihaz ile oynamamalıdır.
Temizleme ve kullanıcı bakımı
gözetimsiz çocuklar tarafından
yapılmamalıdır.
TR

04 ARZUM
•Ütünün fişi prize takılıyken ütü,
gözetimsiz bırakılmamalıdır.
•Ütü çalışırken veya soğumaya
bırakıldığında ütüyü ve
kordonunu, 8 yaşından küçük
çocukların ulaşamayacakları bir
yerde bırakınız.
• Cihazınıza zarar vermemek için yetersiz akım sağlayan uzatma kabloları
kullanmayınız.
• Cihazınızın fişini prize takmadan önce veya ütüleme işleminiz bittiğinde
fişi prizden
çıkarmadan önce termostat ayar düğmesini mutlaka minimum konuma
getiriniz.
• Cihazınızın kablo ve fişine zarar verecek hareketlerden kaçınınız.
Kablosundan tutarak taşımayınız, prizden çekmek için fişi tutunuz, asla
kablosundan çekmeyiniz.
• Ütünüzün kablosunun çocukların rahatlıkla ulaşabileceği kenarlardan
sarkmamasına özen gösteriniz.
• Ütünüzü su veya başka bir sıvıya KESINLIKLE daldırmayınız.
• Cihazınızın sıcak yüzeylerine dokunmayınız. Sadece saplardan veya
ilgili düğmelerden tutunuz. Özellikle ütünüz dik konumdayken yanma
riskine karşı, ütünüzün sıcak tabanına dokunmayınız ve tabanından çıkan
buhara karşı dikkatli olunuz.
• Ütüleme işleminden sonra ütünüzü çocukların erişemeyeceği bir yerde
soğumaya bırakınız.
• Ütünüzü her zaman dik konumda muhafaza
ediniz. Eğer ütünüzü, tabanı zemine gelecek
şekilde saklarsanız çok az miktarda nem
bile ütünüzün taban plakasının paslanıp
lekelenmesine sebep olur.
• Kablonun sıcak yüzeylere temas etmemesine
dikkat ediniz. Ütünüz sıcakken kabloyu, tabanı
etrafına sarmayınız. Ütünüzü dik konumda
bırakarak soğumasını bekleyiniz.

05
ARZUM
•Ütü, sabit bir yüzey üzerinde
kullanılmalı ve bırakılmalıdır.
•Ütü, kendi altlığına yerleştirilirken
altlığın yerleştirildiği yüzeyin sabit
olduğundan emin olunmalıdır.
•Su haznesine su doldurulmadan
önce fişi prizden mutlaka çekiniz
•Su doldurma yeri, kullanım
esnasında açılmamalıdır.
•Ütünün düşürülmesi, üzerinde
gözle görülür hasar işaretlerinin
olması veya sızıntı yapması
durumunda kullanmayınız.
Kendiniz tamir etmeyiniz. Derhal Arzum Yetkili Servisine başvurunuz.
Cihazınızda, sadece orijinal yedek parça kullanmaya özen gösteriniz.
• Ütünüzün fişini;
- Su doldurmadan önce ya da suyu boşaltmadan önce,
- Temizlik ve bakımını yapmadan önce,
- Her kullanımdan sonra işiniz bittiğinde MUTLAKA prizden çıkarınız.
• Cihazınızı tavsiye edildiği şekilde ve amacına uygun kullanınız.
Dikkat: Ütü yüzeyleri kullanım
sırasında sıcak olacaktır.
TR

06 ARZUM
ÜTÜ SICAKLIK AYARI
• Arzum Listo Buharlı Ütü’nüz ile ütüye başlamadan önce ütüleyeceğiniz
kumaşın etiketinde ütü talimatı olup olmadığını kontrol ediniz. Eğer varsa
bu talimatlara uyunuz. Eğer etikette ütü talimatı yok ise ancak kumaşın
cinsini biliyorsanız, bu durumda aşağıdaki tablo size yardımcı olacaktır.
NOT:
1- Eğer yüksek ısı gerektiren kumaşlardan ütülemeye başladıysanız ve
en az ısı gerektiren kumaşları ütülemek istiyorsanız, ısı ayar düğmesini
“• • • ” konumundan “• ” konumuna getiriniz ve soğuması için 5 dakika
bekleyiniz.
UYARI: Ütünüzde, aşırı ısınmaya karşı ütünüzü koruyan emniyet
termiği bulunmaktadır. Yine de güvenliğiniz için, ütüleme işlemini
bitirdiğinizde veya ara vermek istediğinizde ütünüzün fişini prizden
mutlaka çekiniz.
KURU ÜTÜLEME
• Ütünüzü dikey olarak düz bir zemin üzerine yerleştiriniz, termostat ayar
düğmesini min konuma getirdikten sonra ütünüzün fişini prize takınız.
NOT: ÜTÜLENEMEZ
MAX MAX BUHAR
ETİKET
Sentetik
kumaşlar;
Örn; akrilik,
viskos, naylon
(polyamid),
polyester
Keten
Pamuklu
İpek
Yün
MIN KURU
ÜTÜLEME
“0”
KUMAŞ TÜRÜ SICAKLIK AYAR
DÜĞMESİ BUHAR

07
ARZUM
• Kuru ütüleme için; buhar ayar düğmesini “ ” konumuna getiriniz.
Bu konumda olduğu sürece, su tankında su olsa dahi buhar çıkışı
engellenecektir.
• Termostat ayar düğmesini ütülemek istediğiniz eşyanın kumaşına göre
ayarlayınız.
• Termostat ikaz lambası söndüğünde gerekli ısı seviyesine ulaşıldığından
ütüleme işlemine başlayabilirsiniz.
NOT: Ütüleme sırasında, ütülenen kumaşa uygun taban sıcaklığının
korunması için hazır ışığı yanıp sönebilir.
SU DOLDURMA
(Buharlı ütüleme ve spreyleme için)
• Ütünüze su doldurmadan önce fişini prizden çekiniz ve buhar ayar
düğmesini “ ” kuru konumuna getiriniz.
• Ütünüzün su doldurma ağzı dik duracak şekilde tutarak, su doldurma
kapağını açınız ve su tankını doldurunuz. Doldurduğunuz suyun, su
tankının üzerinde gözüken MAX seviyeden fazla olmamasına dikkat
ediniz. Doldurma işleminde sonra su doldurma kapağını iterek kapatınız.
• Çok sert su (17º PH dan fazla) olmadıkça musluk suyu kullanabilirsiniz.
Aksi takdirde, arıtılmış su kullanınız.
TR

08 ARZUM
SPREYLEME
• Her ısı derecesinde sprey
düğmesine birkaç kez basmanız
ütüleyeceğiniz kumaşı nemli hale
getirecektir.
BUHARLI ÜTÜLEME
• Ütünüz ile buharlı ütüleme; termostat düğmesi
ve tabloda belirtildiği gibi yüksek sıcaklık derecesinde mümkündür.
• Su tankında yeterli
miktarda su olduğundan
emin olunuz.
• Ütünüzü dik konuma
getirerek, termostat ayar
düğmesi min konumda iken
fişini prize takınız.
• Termostat ayar
düğmesini ve buhar ayar düğmesini, buhar için gerekli pozisyona getiriniz.
• Termostat ikaz lambası söndüğünde ütüleme işlemine başlayabilirsiniz.
ŞOK BUHAR
• Istenildiğinde daha fazla buhar
sağlamak için, daha zor ütülenen
veya çok kırışık kumaşlarınızı buharlı
ya da kuru ütüleme esnasında şok
buhar ile kolayca ütüleyebilirsiniz.
• Ütünüzü şok buhar uygulayacağınız
bölgenin (kumaşın) üzerinde tutarken, şok
buhar düğmesine 3-5 saniye basıp bırakınız
ve ütülemeye devam ediniz. Şok buhar düğmesine çok sık aralıklarla
basılmamalıdır.
DİKEY ÜTÜLEME
• Ütünüzün termostat ayar düğmesini ve
buhar ayar düğmesini max konumuna getiriniz.
Ütünüzü, dikey pozisyonda ütüleyeceğiniz elbise
veya perdenin karşısında tutunuz ve şok buhar
düğmesine basınız.
UYARI: ELBİSELERİNİZİ KESİNLİKLE ÜZERİNİZDE
YA DA BİR BAŞKASININ ÜZERİNDE ÜTÜLEMEYE ÇALIŞMAYINIZ.

09
ARZUM
KULLANIM SONRASI
• Buhar ayar düğmesini “ ” kuru pozisyonuna
getiriniz.
• Ütünüzün fişini prizden
çıkarınız ve iyice soğuyana
kadar dik konum da
bekletiniz.
• Ütünüzü ters çeviriniz
ve sallayarak su tankının
içindeki suyu dökünüz.
• Ütünüzü muhafaza ederken su tankı içinde su
olmamasına dikkat ediniz, tabanı üzerinde (yatay
konumda) değil dik konumda tutunuz.
BAKIM VE TEMİZLİK
• Ütünüzün fişini prizden çıkarınız ve iyice soğuyana kadar bekleyiniz.
• Ütü tabanı üzerinde ve buhar deliklerinde bazı kumaş artıkları olabilir.
Bu yapışkan artıklar sirke-su karışımlı bir solüsyon içine batırılmış ıslak bir
bez ile temizlenerek çıkartılabilir. Daha sonra ütünüzün tabanını kuru bir
bez ile kurulayınız.
• Ütü tabanını temizlerken aşındırıcı malzemeler kullanmayınız. Sert metal
nesnelerle temas ettirmeyiniz.
• Ütünüzün dış yüzeyini nemli bir bez ile sildikten sonra kurulayınız.
Ütünüzün dış yüzeyine zarar verecek malzemelerle temizlemeyiniz.
• Ütünüzü kesinlikle suya veya herhangi bir sıvıya daldırmayınız.
• Su tankı içine sirke ya da kireç çözücü kimyasal maddeler
koymayınız.
• Kendi kendine temizleme işlemi en az ayda bir kez uygulanmalıdır.
• Zaman zaman su tankının içine su doldurup çalkalayarak su tankını da
temizleyiniz. Daha sonra suyu dışarıya boşaltınız.
TR

10 ARZUM
KENDİ KENDİNİ TEMİZLEME
UYARI: Kendi Kendini Temizlemeyi ayda bir kez veya kullanıma bağlı
olarak daha fazla uygularsanız, ütünüz en iyi ütüleme sonuçlarını verir
ve daha uzun süre dayanır.
. Su haznesini yarısına kadar su ile doldurunuz.
. Ütüyü arkasındaki gövde altı konumunda yerleştiriniz.
. Termostat ayar düğmesini “MAX” konumuna getiriniz.
. Ütüyü fişe takınız.
. Önce gösterge ışığı sönene kadar ütünün ısınmasını bekleyiniz.
. Ütünün fişini prizden çekiniz.
. Ütüyü yatay bir şekilde lavabonun üzerinde tutunuz.
. Buhar ayar düğmesini maksimum konuma ayarlayınız. Şimdi tabandaki
deliklerden kaynar su ve buhar çıkacaktır.
. Bu sırada ütüyü ileri ve geri hareket ettirin; su haznesi neredeyse
boşalana kadar buhar ve suyun çıkmasına izin vermeye devam ediniz.
. Buhar ayar düğmesini “ ” konumuna getiriniz.
. Ütüyü fişe takınız.
. Termostat ayar düğmesini “MAX” konumuna getiriniz, ütünün tekrar
ısınmasını sağlayınız. Su tankının içindeki suyun geri kalanı şimdi
buharlaşacak ve ütünün tabanından çıkacaktır.
. Bu kuru buharlaşma işlemi sırasında, eski bir bez parçası kullanılması
tavsiye edilir.

11
ARZUM
Kullanım ömrü 10 yıl
TEKNİK ÖZELLİKLER
220-240 V ~ 50-60 Hz
2000 -2400 W
AEEE Yönetmeliğine Uygundur.
AEEE
Bu cihaz AEEE direktiflerine uygun olarak geri dönüşümü olan
parçalardan oluştuğu için çöpe atılmaması gerekmektedir. Lütfen, bu
cihazın geri dönüşümünü sağlamak için en yakın toplama merkezine
başvurunuz.
TAŞIMAVE NAKLİYE SIRASINDA
DİKKAT EDİLECEK HUSUSLAR
• Taşıma ve nakliye sırasında cihazınız, aksamlarına zarar gelmemesi için
orijinal kutusunda tutulmalıdır.
• Taşıma sırasında ürünü normal konumunda tutunuz.
• Cihazınızı nakliye esnasında düşürmeyiniz ve darbelere karşı
koruyunuz.
• Ürünün müşteriye tesliminden sonra taşıma sırasında oluşan arızalar ve
hasarlar garanti kapsamına girmez.
İmalatçı:
Arzum Elektrikli Ev Aletleri San. ve Tic. A.Ş.
Otakçılar Caddesi No: 78 Kat: 1 B Blok No: B1b
Eyüp 34050 İstanbul Türkiye
Made in Turkey - Menşei Türkiye’dir
0850 222 1 800
www.arzum.com
TR

12 ARZUM
LİSTO
AR 6021 STEAM IRON
1- Steam regulating Knob
2- Burst steam button
3- Spraying button
4- Indicator bulb
5- 360° degree swivel cord
6- Temperature regulating knob
7- Water tank
8- Ceramic Coating Soleplate
9- Spraying mouth
10- Cover of water filler
11- Self-clean button
7
12
8
10

13
ARZUM
We thank you for having selected the Arzum brand iron. This product as
well is one of other Arzum products offered to you to make life easier
for you.
In order to obtain utmost output from your appliance, please read
carefully this user’s manual and save it for further use.
IMPORTANT SAFEGUARDS
• Make sure that the voltage indicated on the Arzum Listo Steam Iron
corresponds with the mains voltage in your home. Our company shall
not be held liable for any failures owing to any discrepancy and such
failures shall not be covered by the guarantee.
• Your device is for household use only. Do not use outdoors for
commercial or industrial purposes. Otherwise, inconvenient uses shall
not be covered by the guarantee.
• Do not use your iron outdoors or in bathrooms.
•This appliance can be used by
children aged from 8 years and
above and persons with reduced
physical, sensory or mental
capabilities or lack of experience
and knowledge if they have
been given supervision of
instruction
concerning use of the appliance
in a safe way and understand the
hazards. involved. Children shall
not play the appliance. Cleaning
and user maintenance shall not
be made by children without
supervision.
EN

14 ARZUM
• The iron must not be left
unattended while it is connected
to the supply mains.
•Keep the iron and its cord out
of reach of children less than 8
years of age when it is energized
cooling down.
• To prevent harming your appliance do not use extension cords that
supply insufficient current.
• Your iron should always be turned to minimum before plugging or
unplugging from outlet.
• Avoid actions that may harm or damage the cord or plug of your
appliance.
• Do not carry your appliance by holding from the cord. To unplug, hold
the plug and do not pull by the cord.
• Do not allow the power cord to hang down over edges where it can be
reached by children.
• NEVER immerse the iron in water or other liquids.
• Do not touch hot surfaces. Always use the handle and warn others of
the possible dangers of burns from steam, hot water or the soleplate,
especially when ironing vertically.
• Store your iron while cooling down out of reach of children.
• Ensure that the iron stands upright. The
soleplate may become damaged, corroded, or
stained even due to a small quantity of moisture
if the iron is stored with the soleplate facing
downwards.
• Do not allow the mains cord to touch hot
surfaces. Do not wind the mains cord around the
soleplate when the iron is hot. Allow the iron to
cool completely then store in upright position on
its heel.

15
ARZUM
•The iron must be used and
rested on a stable surface.
•When placing the iron on its
stand, ensure that the surface on
which the stand is placed stable.
•The plug must be removed from
the socket outlet before the
water reservoir is filled with water.
•The filling apperture must not be
opened during use. Instructions
for safe
refilling of the water tank shell be
given.
•The iron is not to be used if it has
been dropped, isf there are visible
signs of damage or if its leaking.
Take it to an Arzum Authorized Service for examination and repair. Care
that for using the only original spare parts.
• Unplug your iron from the mains supply:
- Before filling with water or emptying it,
- Before cleaning and maintenance,
- Immediately after use.
• Use your appliance for its intended purposes as recommended.
Caution: The surfaces are
liable to get hot during use.
EN

16 ARZUM
SETTING THE TEMPERATURE
• Before starting ironing with your Arzum Listo Steam Iron always check
first to see whether a label with ironing instructions is attached to the
article to be ironed. Follow these instructions, if any. If ironing instructions
are missing but you do know the kind of fabric, then the table given
below will be helpful for you.
NOTE:
1- If you have started ironing those fabrics that require higher
temperatures and if you wish to iron such fabrics requiring the lowest
temperature, then set the temperature switch from the position “ ” to the
position “ ”, and wait for 5 minutes to allow cooling down.
CAUTION: There is a thermal safety fuse to protect the steam iron from
over-heating. However; for your safety always disconnected your iron
from the electrical outlet after finishing the iron or before taking a rest.
DRY IRONING
• Place your iron on a flat surface and on its heel. Turn the temperature
switch to the position lowest temperature, i.e. “min”.
NOTE: NOT SUITABLE FOR IRONING
MAX MAX STEAM
LABEL
Synthetic
fabrics,
For example:
Acryl,c, viscous,
nylon,
(polyamide),
polyester
Linen
Cotton
Silk
Wool
MIN DRY IRONING
“0”
TYPE OF
TEXTILE TEMPERATURE
SWITCH STEAM

17
ARZUM
• Set the variable steam button to the position of no steam, i.e. “ ”. This
will prevent the steam flow; even there is water in the water tank.
• Adjust the temperature switch according to the kind of fabrics you
want to iron.
• You can start ironing after the temperature display light disappears,
indicating that the selected temperature is being maintained.
NOTE: Pilot light may again turn on to maintain the selected
temperature of soleplate during ironing, which is suitable for the article
being ironed.
FILLING WITH WATER
(For steam ironing and spraying)
• Remove the mains plug from the wall socket before filling your iron, set
the variable steam button the position of dry, i.e. “ ”.
• Open the water filling inletcover, with the iron held on an angle, pour
water slowly into the filling hole. Do not fill higher than indication “MAX”
of the water tank. After filling the tank then close the water filling inlet
cover.
• You can use tap water, unless it is very hard (hardness higher than
17º PH). Otherwise, it is advisable to use distilled water. However, the distilled
water must be subjected to an actual distillation process before filling.
EN

18 ARZUM
SPRAYING
• At any temperature by pressing on
the spray button a couple of times,
the laundry to be ironed can be
damped down.
STEAM IRONING
• Steam ironing with your iron is only possible in
the higher temperatures as indicated in the temperature switch and in
the table.
• Ensure that there is
enough water in the water
tank.
• Stand the iron on its
heel and plug into the
mains supply while the
thermostat adjustment
button is min position and
switch on.
• Set the temperature switch to the correct position for steam flows.
• As soon as the temperature display light disappears you can start
ironing.
SHOT OF STEAM
• When and if required, in order to
supply more steam you can iron
quite easily your hard iron able and
too wrinkly cloths through shot of
steam during both steam and dry ironing.
• Lift the iron slightly above the surface of the
fabric; depress the shot of steam button for 3
to 5 seconds, and then release. Steam flow will
begin after releasing the button.
Burst steam button should not be pressed too frequently.

19
ARZUM
VERTICAL STEAM
• Set the temperature control dial to the
position max, and the variable steam button
to the position max. Stand against the cloths
and curtains that you would iron in the vertical
position. Depress the shot of steam button.
WARNING: NEVER ATTEMPT TO IRON ANY
CLOTHS WHEN WORN BY YOU OR OTHERS.
AFTER USE
• Set the variable steam button to the position “ ”.
• Remove the mains plug from the wall
socket and wait for the soleplate to cool down
completely.
• Hold the iron downward,
and pour out the water
contained in the tank by
shaking it.
• Take care that there is no water in the water
tank before storing your iron and that the iron
stands upright, but not in the horizontal position
on its soleplate.
CLEANING AND CARE
• Ensure that your iron is disconnected from the power supply and allow
the iron to cool down thoroughly.
• There may be some fabric deposits and other residues on the
soleplate. Those sticky residues can be removed with a damp thick cloth
soaked in a vinegar/water solution. Then wipe off the soleplate with a dry
cloth.
• Do not use abrasive and scratching objects on the soleplate when
cleaning. Avoid hard contact with metal objects.
• Wipe up the outer surface of your iron with a damp cloth, and wipe
dry with a dry one. Do not use abrasives or harsh cleaners as they may
damage the surface of the iron.
• Never immerse the iron in water or any other liquids.
• Do not put vinegar or chemical calcification removers into the water
tank.
EN

20 ARZUM
• The self-cleaning process should be carried out at least once a month.
• From time to time clean the inside of the water tank also, by filling with
water and shaking. Then pour the water out.
SELF CLEANING
IMPORTANT : Your iron will give the best ironing results and last
longest if you apply the Self Cleaning once a month, or more
depending upon the usage.
Fill the water tank up to half with water.
. Position the iron on its rear heel.
Select the temperature control dial to ‘MAX’.
. Plug the iron.
. Allow the iron to heat up until the indicator light first goes out.
. Unplug the iron from the electrical outlet.
. Keep the iron horizontally over the sink.
. Set the variable steam knob at maximum position. Boiling water and
steam will now emit from the holes in the soleplate.
. Move the iron forwards and backwards white this happens; go on letting
steam and water escape until the water tank is virtually empty.
. Turn the variable steam knob to ‘ ’ position.
. Plug in the iron
. Set the temperature dial to the ‘MAX’ position, let the iron heat up again,
the remainder of the water inside the steam chamber will now vaporize
and leave the iron through the soleplate.
. During this process of dry steaming it is advised to use it over and old
piece of cloth.
This manual suits for next models
1
Table of contents
Languages:
Other Arzum Iron manuals

Arzum
Arzum AR 682 User manual

Arzum
Arzum STEAMPRO 2002 User manual

Arzum
Arzum AR 6004 User manual

Arzum
Arzum PETA User manual

Arzum
Arzum IRONFORCE AR 686 User manual

Arzum
Arzum Rio 2000 User manual

Arzum
Arzum CLARO AR 688 User manual

Arzum
Arzum TRIPPER AR 690 User manual

Arzum
Arzum COMFY MOVE AR6023 User manual

Arzum
Arzum SHINY PRO 2001 User manual

Arzum
Arzum HEALTH TECH 20B User manual

Arzum
Arzum STEAMLINE User manual

Arzum
Arzum STEAMART POWER User manual

Arzum
Arzum CLARO User manual

Arzum
Arzum STEAMPRO PLUS AR6000 User manual

Arzum
Arzum HEALTH TECH AR6018 User manual

Arzum
Arzum STEAMPRO 2001 User manual

Arzum
Arzum AR 6001 User manual

Arzum
Arzum TESSIA User manual